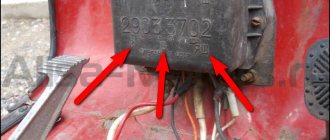
Motor scooter engine bearing numbers "Ant"
- Right main bearing - 6-42305KIM (66-42304AM USSR, KRAFT NJ305 presumably China)
- Left main bearing (internal) - 304
- Left main bearing (outer) - 205
- Gearbox input shaft - 202, 203
- Secondary shaft of gearbox 202, 204
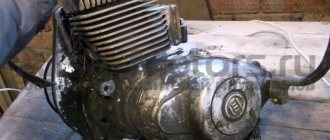
Almost just before leaving for permanent residence on another collective farm, an old acquaintance, whom I had not seen for 15 years, turned to me and asked me to overhaul the engine of his Ant. To be honest, I didn’t have much of a desire to get involved with this Soviet chatterbox, to say the least... But after thinking about it and playing out the situation in my head that I would have to sit in a new place for some time without my favorite job, I agreed and immediately began the repairs.
I will not go into the essence of the disassembly in particular within the framework of this article - I will only outline the main points and, based on my experience, I will try to describe the most common malfunctions and errors during repairs.
The engine had the following symptoms before being repaired:
- Bad start
- Oil leak
- Weak traction
- Increased noise during operation
- The winding lever did not return to its place
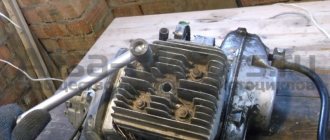
Preliminary diagnosis:
- Depressurization of the crank chamber, as well as wear of the seals
- Poor quality assembly
- The piston died
- Bearing wear
- Kickstarter return spring broke
Everything else, including the gearbox and clutch, did not cause any complaints during operation. However, first things first.
Before a major overhaul, I don’t wash the engines - I just drain the oil, pull it off the frame and get to work.
Fuel system
The power system consists of a fuel tank, carburetor and air filter
Fuel supply by gravity, supply control by mechanical fuel tap
The latest scooters were equipped with a more advanced K-65G carburetor. In general, the carburetor is very good, if only because it has two systems that make starting easier in cold weather: a manual enricher on the steering wheel and a float suppressor. All these systems together ensure reliable engine starting in any frost
To increase low-end thrust, a reed valve was added to the engine design. The valve is installed in the cylinder and blocks the reverse emission of fuel from the crank chamber
The cylinder is purged with three channels. Three-channel purge ensures better cylinder filling
The cylinder head has a displacer. The displacer itself is useless, but in combination with a three-channel purge and a reed valve it significantly adds traction at the bottom
Removing the clutch
Unscrew the nuts and remove the pressure plate from the basket.
Unbend the lock washer, insert a tin rod or stick under the tooth of the motor transmission sprocket and unscrew the nut on the crankshaft journal (right-hand thread).
Unbend the lock washer, fix the inner clutch drum with a puller, which is a clutch disc with a welded piece of tire, and unscrew the nut (left-hand thread).
We take out the discs and drum.
Remove the basket from the shaft along with the chain and sprocket.
Vehicle Upgrades
⚫ repair of the rear arch of a VAZ 2109. repair of the wing arch with your own hands. ♦diy cam♦
If your old bicycle, scooter or motorcycle breaks down, you should not sell the equipment for scrap. There is also no need to rush into buying a new motor. It can be replaced with a power unit from a light motor cultivator. There is only one restriction: such a car cannot be driven on public roads. But the Ant scooter with a walk-behind tractor engine can be used in the country for trips to a field or river. 5-6 hp engine quite enough to accelerate the moped to a speed of 50-60 km/h. Before installing the engine on a bicycle, it is necessary to install reinforced wheels on this vehicle that can withstand a weight of up to 100 kg.
In order to assemble a scooter with a walk-behind tractor engine, you will need the following tools and materials:
- welding machine;
- grinder with metal discs;
- electric drill;
- wrench;
- screwdriver;
- pliers;
- level;
- hammer;
- dye.
In order to install the power unit on the Ant, you will need to create a frame for it.
This is done in the following sequence:
- Drawings are drawn up, precise calculations of the frame configuration and attachment points are made. It is recommended to check the calculations on soft aluminum strips.
- The mounting bracket is welded. It is treated with anti-corrosion agents and holes are drilled for the bolts.
- The engine is carefully placed on the bracket and secured with bolts. The installation accuracy is checked and the position is adjusted.
- The motor is connected to the vehicle's chassis using a belt or chain. Gear shift cables and control levers are secured.
- Checking the functionality of the vehicle. The created homemade product needs to be run in so that all the parts get used to each other. You need to spend 6-8 hours on this with the engine running at medium speed.
If you have experience in handling household tools and knowledge in electrical engineering, you can assemble an electric excavator with your own hands. This will require channels, hinges, cables and a working electric motor. The bucket is made of sheet steel, which can be purchased inexpensively at scrap metal collection points.
What's the result?
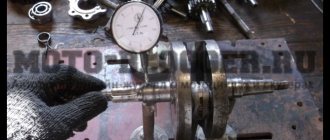
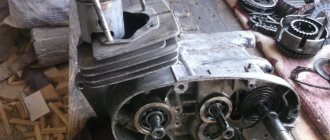
The crankshaft has been taken away - to say that it is worn out is to say nothing... The gearbox bearings, like the main bearings, have gone to the same place - to the crankshaft: in the trash. The gearbox, with the exception of one fork, did not cause any complaints. By the way, the clutch too.
Now the question is: what to do with all this junk? Buy a “plasticine” crankshaft from no one’s making and mold it into the engine??? I was initially against this idea. In general, we found a used engine for a ruble and removed the crankshaft from it. Of course I had to tinker with him. Since the thread was clogged, I sharpened it and straightened it with a sharpening tool.
After correcting the threads, I checked the crankshaft for runout. There was no need to worry - the beating of the trunnions did not exceed one hundredth of a millimeter with a tolerance of three hundredths. By and large, it would have been necessary to replace the bushing of the upper head of the connecting rod, but time was running out and the bushing was not very worn. In all other respects, the crankshaft did not disappoint and this purchase can safely be called a success.
We decided to buy everything else: CPG, cylinder head, gaskets, seals, bearings, motor chain, etc. in the store. Although, by and large, the cylinder could have been bored out and that would be enough. But the owner did not want to wait, but in vain.
[sc:ads1]
It's no secret that the engineers of the Tula plant have created equipment with which the average owner has to feel like a mechanic. To this day, having found another problem, Ant’s owner has to pick up a tool, remembering the would-be engineers. One of the main problems is the engine of the Ant scooter, which is repaired in most cases of breakdowns.
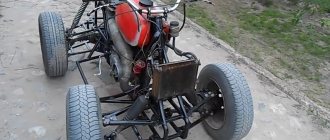
ATV from "Ant": suspension
Repairing the dynastarter of an ant scooter with your own hands
You can use the suspension of a scooter as a front or rear axle. The choice is made by the master himself, but the first option is preferable. The rear suspension can be done in two ways:
- Take the rear axle from an old car, and then shorten it to fit the dimensions of the ATV. The disadvantage of this design is its significant weight.
- Cardan-gear type design. A gearbox is mounted on the rear axle, to which the drive is supplied.
An ATV requires an independent suspension that will have high ground clearance. Its levers are fixed to the frame using bolts through silent blocks. The front suspension strut must be inclined, otherwise the ATV may roll over.
Dynastarter
However, it is not only the engine that can make a motorcyclist clearly see all the components of his motorcycle. The most common problem is a problem with the dynastarter . The engineers of the Tula plant installed it in Muravya, instead of a conventional alternating current generator.
Why is it so important? If you notice a red light on the instrument panel while the moped is running, it means you are running out of charge. This happens because the generator is not producing alternating current. To begin with, in such a situation, it is necessary to check the integrity of the wires connected to the dynastarter and the relay regulator. If everything is in order, then the problem lies directly in the dynastarter. There may be three main causes of problems:
- difficulty in rotor operation (dirt getting into the collector or dust accumulation);
- freezing or wear of brushes;
- violation of the integrity of electrical equipment.
Since in most cases the operation of the dynastarter is difficult due to contamination of the collector, it is worth carrying out a simple disassembly according to the instructions described in the moped operating book. The main rules when working are neatness and cleanliness. After disassembly, be sure to thoroughly rinse all parts in gasoline and lubricate the rubbing parts, and under no circumstances throw away the parts.
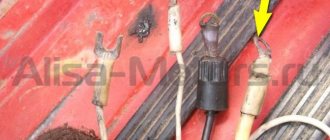
Electrics
The most problematic part of the Ant has always been considered its electrics, in particular the voltage regulator relay and dyno starter (generator and starter rolled into one). Due to their design features, the dyno starter and relay regulator require constant attention and qualified maintenance. If the dyno starter is not serviced on time, then it begins to undercharge the battery literally in the first season
On older models, the relay-regulator was of a mechanical type
On the latter, more advanced - electronic type
Contact ignition. The contacts are located in the cooling casing
The ignition coil and capacitor are located on the frame. In terms of repair and maintenance it is very convenient
Engine assembly
Unlike a dynastarter, repairing an Ant scooter engine with your own hands is difficult to do according to the operating book. Therefore, it is worth seeking the advice of experienced motorcycle owners. Most often, the engine has to be disassembled when there are problems with the clutch mechanisms, the operation of the gearbox, as well as wear on the crankshaft, bearings or oil seals. The most important rule is not to be afraid to disassemble the engine yourself. Using these instructions, disassembling and assembling the engine of the Ant scooter will not be difficult.
So, the procedure for disassembling the engine:
- To begin, prepare your workspace. If you want to achieve proper and trouble-free operation, keep all parts clean and tidy. Remember and complete the disassembly order.[sc:ads3]
- First of all, remove the engine from the frame. To do this, you will need to remove the supporting hood covering the engine. Simply put, you need to unscrew the deflector, the volute and the wires: high-voltage, positive and ground. You can unscrew it in any order.
- Place the moped at any speed, unscrew the nut securing the dynastarter to the crankshaft and, holding the brake, press it out.
- With the scooter running at speed, unscrew the nut located on the drive sprocket.
- Remove the generator stator by unscrewing the 4 screws and remove the casing with the wires coming from it.
Then we move on to removing the clutch cable and kickstarter lever. Now the task is to remove the muffler. To do this you will need a special key. In some cases, the muffler is attached to the cylinder with two ordinary bolts. Drain the oil from the gearbox by unscrewing the drain bolt. Then unscrew the three points securing the engine. Now you need to unscrew the cylinder secured by 4 nuts located on the head. Remove the head and place the cylinder vertically, upward open part. The piston can be left in the crankshaft unless replacement is required. Otherwise, you need to pull out the retaining rings and then knock out the pin. Now remove the bushing on the secondary shaft, where the drive sprocket was previously. Unscrew the “flower” with the right crankshaft oil seal attached. Then disconnect the kickstarter cover, secured with a thrust bolt and 5 -th screws. Next, the clutch is removed. The central adjusting screw can be left untouched, but the 3 pins with hooks located around it must be unscrewed. Pull out all the clutch discs located inside and remove the clutch lever attached to one bolt. The lever must be removed along with the spring. Use a chisel to break off the lock washers of the crankshaft and clutch basket and remove the rods and balls. After this, the entire structure is removed. Now the engine can be separated into halves, you just need to unscrew all the connecting screws. When all the parts are disconnected, you can address the problem area where problems have arisen.
You can see how to assemble an Ant scooter engine in more detail in the visual video at the end of the article. The essence of assembly is in the reverse order, but it is important to tighten the parts with a certain force and synchronize the parts with the marks. Under no circumstances should you assemble an engine without detailed instructions written by the manufacturer.
With frequent breakdowns, owners think about what engine can be installed on the Ant scooter. Instead of a native motor, you can use Chinese analog motors . Since the Ant has many copies in Asian countries, replacing the engine can be a great option to save money in case of irreversible damage. True, you will have to make the fastenings yourself and, in some cases, remake the bridge for the left-hand arrangement of the chain. This is not very difficult, considering that the Tula plant provided for the possibility of rearranging the bridge.
[sc:ads5]
Improving the carrying capacity, or making a dump truck out of Ant
The Ant scooter is a powerful device, but most owners are not averse to increasing the model’s load-carrying capacity.
In addition, you can remake the body and make it folding (like a dump truck). However, there are some nuances and the main thing is not to overdo it. As you know, the load capacity is about 250 kg; in practice, large loads can also be accommodated. But it should be remembered that with such a load the speed will be much slower (up to 35 km/h).
You can increase the load capacity by increasing the sides. However, the scooter frame will need to be strengthened.
Welding can be considered the most optimal option, but you can do it without it (the additional frame is made from wood).
In this situation, the body is moved forward or left in its place, but it is prohibited to move it back.
It is possible to consider the option of installing separate booths on such scooters, which will require separate costs.
The following mechanisms are most often used for a dump truck:
- cable winches;
- hydraulics with automatic drive;
- methods using door hinges, etc. (so-called “manual”).
As for hydraulics, you will also need to use a pump. The total costs with this approach may exceed the cost of the scooter itself.
Let's consider options for implementing the idea:
1. Using automation.
The body is attached to an additional frame, which is connected to the main frame using hinges. Lifting can be carried out using a diamond jack, which operates with a simple electric drive. The electric drive itself can easily be made using the window lifters of a simple car. This is the essence of automation, when the body tips over with the press of one button.
The only disadvantage of such a conversion is the final cost of the work. The price depends on the spare parts used.
2. Manual method.
The body, as in the automatic method, is mounted on an additional frame. The frame is also attached to the main one.
The convenience of this method is that, if necessary, it is possible to simply remove the body (for example, when you need to transport long pipes, etc.). Such long objects can be attached directly to the frame.
Subtleties of production
In practice, it is recommended to additionally install chains that will protect the loops from being pulled out. Ordinary door handles from household appliances or car mechanisms can serve as closures.
When constructing a removable body, you will also need to attach the tank, license plate, and turn signals directly to the frame (not to be confused with the body). It is necessary to ensure that the center of gravity is near the axes of the loops (about 30 cm in relation to the rear edge). This is the only way the body can be tipped over manually without any problems.
So, the Ant scooter today is not only a means of transportation, but also a powerful mini-dump truck at home. Despite the fact that the vehicle has not been sold on the auto market for a long time, it is still worth purchasing it second-hand. Thus, from a simple moped, thanks to little effort, we acquire a powerful dump truck and a sophisticated vehicle.
Photo report: Replacing the rear chain of an Alpha moped
Torque chain transmission is always a problem. But low cost, ease of maintenance, coupled with low weight, and for a motorcycle - weight is a very significant parameter - outweigh all the disadvantages and the chain drive of the rear wheel, just like many years ago, is dominant in the motorcycle industry. And we are unlikely to get away from this in the coming decades.
As already said: the chain is always a problem. The infection is spreading and nothing can be done about it. And if only it drags on, it begins to eat the teeth of the stars and if it is not replaced with a new one in time, then it will literally eat the stars in one season.
Analysis of previous repair errors
We remove the flange on which the stator is mounted and carefully inspect the connector plane for interference by “drop-dead handles”.
No matter how many times I repair Ants, I come across the fact that all sorts of “drop-dead little hands” seal the oil channel through which oil flows to the crankshaft main bearing and oil seal. I'm already tired, honestly - how much can you? Why cover it up???
It doesn’t matter to me, but how do you think the bearing and oil seal should work without lubrication? Admire what happens to the main bearing when it runs dry.
We unscrew the bolts and half the crankcase.
general information
Repair of gearbox VAZ 2107 5 mortar video. manual transmission repair vaz 2107 5 mortar
The Soviet cargo scooter has a reliable metal trike, made in the form of a platform with a tailgate. Ant's trike is quite roomy. The platform's carrying capacity is 250 kilograms, which allows the Ant scooter to be actively used for household needs. Thus, a cargo scooter allows you to transport:
- fertilizers;
- seedlings;
- hives;
- Construction Materials.
Motor vehicles are distinguished by maneuverability and unpretentiousness. In the garage, the Ant scooter takes up about the same space as a bulky motorized vehicle with a sidecar. Ant's turning radius is about 3.5 meters.
Characteristics of the Ant scooter
In winter, a cargo moped operates using a mixture of M6/3-10G/1 engine oil and A-76 gasoline, and in summer it requires the M8B grade.
If we compare the Ant scooter with a sidecar motorcycle, then in terms of operational fuel consumption the advantages will be on the side of the former. A cargo moped “eats” 8 liters/100 kilometers. It is also much lighter than a motorcycle with a sidecar - its weight is 240 kilograms.
Adjusting the free play of the cable
On the left side of the engine, remove the cover, unscrew the locknut on the adjusting bolt and, depending on what problems you had with your clutch, adjust the free play of the clutch lever.
- If the clutch was moving, tighten the adjusting bolt
- If the clutch is slipping, unscrew it
We tighten and unscrew the adjusting bolt exactly until the free play at the end of the clutch lever is 5-10mm. After adjusting the bolt, fix it with a screwdriver and tighten the locknut
Specifications
The Soviet moped, which has recently enjoyed great popularity, has the following technical characteristics:
- Length - 2680 millimeters.
- Width - 1250 millimeters.
- Height - 1075 millimeters.
- Dry weight - 240 kilograms.
- Load capacity - 250 kilograms.
- Speed - 25-35 kilometers per hour.
- Engine type is 2-stroke, power is 11 l/s.
- Transmission - 4-speed gearbox.
- The brakes have a diameter of 15.0 centimeters. Drum-type, each wheel has a mechanical drive.
Many fans of Soviet motorcycles are sincerely convinced that the technical characteristics of the Ant are practically in no way inferior to the characteristics of Western models.
Trailer
You can make a trike for the modern Ant yourself. In addition to this model, a homemade trike is also suitable for a sidecar motorcycle.
A standard trike is a connection:
- stroller frames (side trailer);
- a bracket curved from a steel pipe (L-shaped);
- clamps (2 pcs.);
- tubular struts.
When making a trike, it is important to ensure that the body shell does not touch the bracket. In order to give the frame more rigidity, it is necessary to weld a gusset made of steel
A homemade trike requires a welded trailer frame. The trike must also have an easily opening and freely removable tailgate. The sides and bottom of the body are covered with boards (tongue and planed).
The trike must be equipped with up-to-date lighting devices: turn signals, side lights and brake lights.
Tractor from a walk-behind tractor
Few people will like the process of walking around the field for many hours behind the machine. It is much easier to mow the grass, plow or hill up the soil while sitting on a comfortable chair attached to a trailed cart. There are many branded adapters, trailers and carts available at retail outlets. But they have a considerable cost, which many cannot afford. You can make a mini-tractor from a Neva walk-behind tractor almost free of charge, using the tools and materials that you have at hand.
The following devices and materials are needed:
- differential from a passenger car;
- wheels from a small car;
- sprockets and chains from a motorcycle;
- hexagonal solid steel profile;
- steel corners 50 mm;
- tin for making wings.
The first difficulty that arises when making a homemade tractor with your own hands is a high center of gravity. It is impossible to lower it for purely technical reasons. The only way to increase the stability of a tractor is to expand its wheelbase. For this, a hexagonal profile is used, which is attached to the hubs with cotter pins. When the track expands to 120 cm, the walk-behind tractor will gain normal stability. Installing a differential will allow the unit to corner easily.
The mini-tractor is assembled in the following sequence:
- Welding the frame of the trailer part. Attaching the drawbar to the flange, making holes in it for the bolts (the connection must be made collapsible in order to be able to transport the walk-behind tractor in the trunk or trailer).
- Manufacturing of chassis. Wheels are installed on the trolley. To make all-wheel drive on both axles, sprockets are welded onto the axle shaft, and a tensioning mechanism and chains are installed.
- Assembly of body and seat. If necessary, a canopy is installed over the driver. The controls are being configured and adjusted.
- Electrification of the created machine. A tractor generator or battery is used as an energy source. For ease of driving, it is advisable to install 2 headlights - front and rear (for reversing).
User manual
This manual provides the following information:
- Safety requirements when working with the device.
- The structure of a walk-behind tractor in diagrams and drawings.
- Step-by-step assembly of the Ant walk-behind tractor.
- First start-up, running-in of the unit.
- Common breakdowns, as well as their causes and solutions.
- Walk-behind tractor maintenance.
The instructions contain the necessary diagrams and photos of all components of the unit, as well as a detailed description that allows you to correctly assemble the walk-behind tractor from a set of parts (the walk-behind tractor comes from the store in a semi-assembled state, the owner will have to assemble the unit himself).
First start
The first start-up followed by running-in is a crucial moment for the owner of the unit. It is during this period that all moving parts of the engine are ground in, ensuring a long service life in the future. Initially, you should warm up the unit at idle, then, gradually increasing the speed, go through the first and second speeds. Run-in lasts about 25 hours, during which all work should be carried out in a gentle mode at no more than ¾ power.
Basic malfunctions and ways to eliminate them
The brand is represented by a line of gasoline walk-behind tractors, which are characterized by the following malfunctions.
The design of the Ant walk-behind tractor
The engine does not start:
- fuel filter clogged - replace;
- Fuel supply hoses are faulty - replace;
- problems with the carburetor - dirty - sort out and clean, worn out - replace;
- the magneto is out of order, or its blades are jammed - replace it, adjust the position;
- the spark plug is smoked - clean and rinse in gasoline;
- fuel runs out - top up;
- spark plug burnt out - replace;
- The tip of the spark plug gets wet - pump and dry, replace the spark plug.
The cutters stopped rotating:
- stones or clods of earth clog the rotors - cleaning;
- the clutch cable is loose - adjustment or replacement will help;
- the bolts are loose - tighten the fasteners.
Gearbox noise:
- oil is running low - add more;
- Fasteners are loose - tighten them.
The wheels stopped turning:
- belts stretched - replacement;
- fasteners become loose - tighten them;
- Clutch cable loose - replace.
Maintenance
There are several stages of maintenance:
- Daily care.
- Monthly examination.
- Preservation for the winter.
Before starting work:
- check the oil level in the crankcase;
- fuel in the tank;
- tighten the fasteners.
Upon completion of field work:
- we clean and wash the walk-behind tractor;
- wipe and dry;
- Lubricate the rubbing parts with oil and grease.
Every 25 hours of operation it is necessary to replace the used oil with new one.
Discounts from the help desk
When you mention ACC you can get discounts on parts and services
Automotive Help Desk: auto news, spare parts in Krasnoyarsk for foreign and domestic cars, disassembled cars, car repairs, addresses and phone numbers of companies, bulletin boards, spare parts catalogues, service and repair manuals.
All information presented on the site is for informational purposes only and under no circumstances constitutes a public offer.
Source
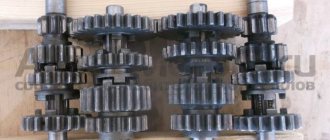
How to disassemble the gearbox
The Ant gearbox is disassembled according to a certain scheme. This process is necessary if for some reason Ant’s gearbox stops functioning. Some people do it wrong: when the gearbox breaks, they simply throw it away. But with the right approach to this matter, the device can be repaired, after which the Ant scooter will function the same as before. In addition, it is difficult to buy spare parts for the Ant scooter, so you shouldn’t waste them.
Motor scooter gearbox Ant
- If the Ant gearbox has been disassembled for some time, then first it would be a good idea to clean it of dust and dirt.
- Unscrew all the bolts that secure the gearbox. Take a hair dryer. Use it to warm up the Ant gearbox from all sides, then tap the housing with a wooden mallet. Until it splits into two halves.
- Now you can find out what caused the breakdown. The gearbox could fail for two main reasons: the input shaft bearing was broken or the gear teeth were worn out. Both parts will have to be replaced.
- Gears and bearings need to be removed so they can be replaced with new parts.
- Remove the retaining shield.
- Remove the retaining ring and remove the axle shaft from the cup.
- Before you start putting all the parts back together, you need to check their integrity. When the Ant gearbox is assembled, it can be sent to its designated location.
The Ant scooter can become a useful type of equipment today. If you have your own farm or garden at your dacha, you won’t find anything better than such a scooter.
Vehicle Upgrades
If your old bicycle, scooter or motorcycle breaks down, you should not sell the equipment for scrap. There is also no need to rush into buying a new motor. It can be replaced with a power unit from a light motor cultivator. There is only one restriction: such a car cannot be driven on public roads. But the Ant scooter with a walk-behind tractor engine can be used in the country for trips to a field or river. 5-6 hp engine quite enough to accelerate the moped to a speed of 50-60 km/h. Before installing the engine on a bicycle, it is necessary to install reinforced wheels on this vehicle that can withstand a weight of up to 100 kg.
In order to assemble a scooter with a walk-behind tractor engine, you will need the following tools and materials:
- welding machine;
- grinder with metal discs;
- electric drill;
- wrench;
- screwdriver;
- pliers;
- level;
- hammer;
- dye.
In order to install the power unit on the Ant, you will need to create a frame for it.
This is done in the following sequence:
- Drawings are drawn up, precise calculations of the frame configuration and attachment points are made. It is recommended to check the calculations on soft aluminum strips.
- The mounting bracket is welded. It is treated with anti-corrosion agents and holes are drilled for the bolts.
- The engine is carefully placed on the bracket and secured with bolts. The installation accuracy is checked and the position is adjusted.
- The motor is connected to the vehicle's chassis using a belt or chain. Gear shift cables and control levers are secured.
- Checking the functionality of the vehicle. The created homemade product needs to be run in so that all the parts get used to each other. You need to spend 6-8 hours on this with the engine running at medium speed.
If you have experience in handling household tools and knowledge in electrical engineering, you can assemble an electric excavator with your own hands. This will require channels, hinges, cables and a working electric motor. The bucket is made of sheet steel, which can be purchased inexpensively at scrap metal collection points.