- Untimely valve adjustment on Ural motorcycles
- Sequence of actions on how to adjust valves on a Ural motorcycle
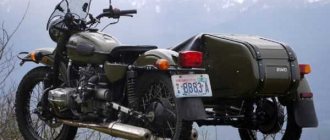
Ural motorcycles are domestic vehicles. They are very popular because motorcyclists with any driving experience can afford them. The Ural motorcycle began to be produced back in Soviet times. Many people still use old models for driving today.
In general, Ural motorcycles are reliable. They rarely fail. In order for the engine to last for a long time, it is necessary to carry out preventive maintenance on time, which consists of checking and correcting problems in individual systems of motorcycle equipment.
Required Tools
Before you start adjusting the valves, you should prepare the necessary tools.
First of all, you will need a set of keys. In practice, you will only need one, but it is better to have everything on hand. The motorcycle valves are directly adjusted using feeler gauges. Depending on the motor model, different probes may be needed. On the M 72 Ural, a thickness of 0.1 mm will be required; for newer engines, for example, IMZ, it is better to use 0.05 mm. In fact, these are very conditional indicators. There is a small tolerance during adjustment, but under operating conditions of the power unit this does not affect its performance.
You will need to stock up on a small container to catch the oil; it can sometimes spill. Also, a rag will not be superfluous; it can be used to clean the engine from dirt. Let's see how to properly perform this repair.
We recommend reading:
| How to remove the variator? Instructions with comments |
| Adjusting motorcycle valves Expert recommendations |
[sc:ads6]
Have you read it? Write a comment
On a Ural motorcycle, valve adjustment is not often required. In this regard, the engines are very reliable. But still, sometimes it is simply necessary to do this work. Correct adjustment of the valves on the Ural motorcycle allows you to avoid premature wear of the power unit.
- How to adjust the valves of a VAZ-2115 injector 8 valves
Content
How to adjust without a valve gauge on a Ural motorcycle
Adjusting the valves of the Ural and Dnepr motorcycles.
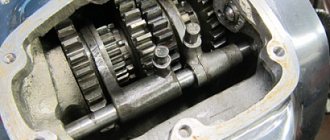
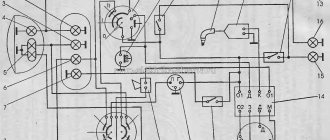
In the gas distribution mechanism, the thermal clearance in the valve drive is regulated. In order for the valve to fit tightly on the seat, it is necessary that there is a gap between the valve and the drive parts when the camshaft cam is not acting on the pusher. If there is no such gap, the valve will rest against the actuator, will not sit on the seat and will not provide a tight seal. If, on the contrary, the gap between the valve and the drive parts is too large, this will lead to the opening of the valves being delayed. In both cases, this is a sign of unstable engine operation, intermittent operation (and if you add to this a poorly set ignition, incorrectly selected spark plugs, unadjusted carburetors, then the motorcycle will most likely refuse to start and run at all).
The clearance is adjusted on a cold engine. At the same time, it is useful to know that for lower-valve engines (motorcycles: M-72, K-750, Dnepr-12, MV-750) the clearance decreases when the engine warms up, and for overhead-valve engines (Ural and Dnepr motorcycles of modern models). Therefore, when adjusting, for lower-valve engines, a larger gap is assigned, and for overhead-valve engines, a smaller one.
An external sign of increasing clearances in the valve drive is a loud metallic knock in the cylinder heads on a warm engine. Signs of a lack of clearance are a drop in power from the Ural and Dnepr motorcycle engine and popping noises in the carburetor.
And so let's move on to the adjustments themselves:
1) Adjusting valves on motorcycles M-72, K-750, MV-750, Dnepr-12 The clearance must be adjusted as follows:
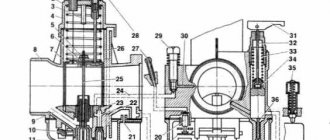
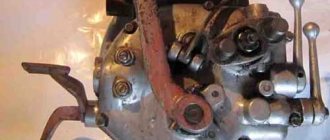
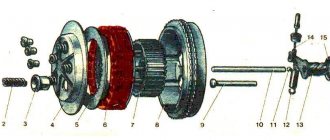
· Unscrew screw 9 Fig. 1 and remove cover 10 together with sealing gasket 8.
· Turn the crankshaft of the Ural or Dnepr motorcycle engine until the intake valve closes
· Loosen locknut 5 of the exhaust valve rod pusher adjusting bolt.
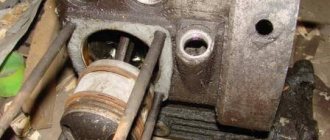
· By screwing or unscrewing the adjusting bolt 11 of the pusher 7, set the gap between the pusher 7 and the valve stem to 0.1 mm (the gap should be checked with a feeler gauge)
· Having established the gap, lock the lock nut 5, holding the adjusting bolt 11 with a wrench. Finally check the gap.
To adjust the intake valve clearance, continue cranking the crankshaft until the exhaust valve begins to rise and adjust the clearance as described above.
· Close the valve box with cover 10 with gasket 8 and securely fasten fastening screw 9 using a screwdriver.
When checking and adjusting the clearance, it is necessary to place a tray under the cylinder head, remove the cylinder head cover and drain the accumulated oil. Set the piston to i.d.t. compression stroke, turning the crankshaft so that the “B” mark on the flywheel aligns with the mark on the engine crankcase; You need to observe this through the inspection window in the engine crankcase with the rubber plug removed. In this position, both valves, intake and exhaust, will be completely closed, and their rocker arms should swing freely on their axles. Then you need to use a feeler gauge to check the gap between both rocker arms and the valves.
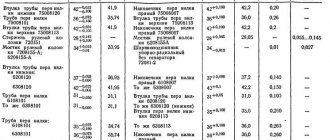
If the gap is incorrect, it is necessary to loosen the lock nut 1 (Fig. 2) and, by rotating the adjusting bolt 2 in one direction or the other, set the required gap. After this, tighten the locknut. The clearance is adjusted when the engine is cold; in this case, the gap should be equal to 0.1 mm ± 0.01 mm at the outlet, and 0.07 mm ± 0.01 mm at the inlet. If there is no or very small clearance, the valve will not fit tightly to its seat when closing; if the gap is large, the start of valve opening will be delayed.
The gap size should be checked if necessary. When adjusting the clearance in another cylinder, it is necessary to rotate the crankshaft one revolution (360 º), and then check and adjust the valves as indicated above.
3) Adjusting valves on modern Ural motorcycles (M-67, IMZ-8.103, etc.)
Next, two methods of adjusting the valves of a Ural motorcycle will be described.
The first thing I would like to note is that the gap between the valve stem and the adjusting screw on a cold Ural motorcycle engine should be 0.05 mm. The adjusting screws must not have clogged edges and must be locked.
· To adjust the clearances, remove the cylinder head cover and drain the accumulated oil. Then use the trigger lever to turn the crankshaft. As the intake valve begins to close, the exhaust valve clearance is adjusted, and as the exhaust valve begins to open, the intake valve clearance is adjusted.
Sequencing
- First, it is better to remove all excess that may interfere with free access to the cylinder head.
- The spark plug is unscrewed.
- The cylinder head cover is removed. There will most likely be oil in it - place something under the motorcycle and carefully drain the contents.
- When cranking the crankshaft, it is necessary to set the so-called “dead center of the compression stroke”. This means that the valve must be closed and not affected by the camshaft. If you have difficulty with this process, refer to the factory markings on the flywheel and crankcase. It is necessary to get exactly the top point, marked on the flywheel with the letter “B”.
- It is necessary to insert the dipstick into the space between the valve and the pusher.
To do this, use a tool with a thickness of no more than 0.07 mm. The entire procedure should be carried out only on a cold engine, since even slight heating can throw off all indicators. In order to understand the clearance on the valves of a Ural motorcycle, focus on the feeling and the average value of 0.05-0.07 mm. Your dipstick shouldn't fall through, but it shouldn't require much force to push between the valve and rocker arm. Otherwise, adjustment is needed.
To adjust, you will need to tighten or loosen the bolt located on the rocker arm.
Before doing this, loosen the control nut. ATTENTION! These bolts are quite fragile and can easily break if too much force is used, so use a comfortable tool and do not overdo it. Once the adjustment is complete, reinsert the dipstick.
If it fits tightly, secure the bolt with a locknut. To check the correctness of the actions performed, after reassembly, start the engine and evaluate the changes in its operation. Excessive clattering and clicking should go away, and the engine should produce more dynamics and speed when driving. As you can see, valve adjustment is a fairly simple process that all owners of domestic motorcycles have to become familiar with. Those who actively use a motorcycle can make adjustments once every month or two. If you are focused on mileage, in the absence of problems or extraneous sounds, you still need to check the gaps.
Why adjustment is needed
- With a small gap, especially if the pusher fits closely, low compression is observed. Even on a hot engine there is a gap. In this case, the engine operates unstably at any temperature; on a hot engine, characteristic knocking noises will be heard, and popping noises may occur in the carburetor;
- If there is a large gap on the valves, they do not open completely. At the same time, the combustion chamber is poorly ventilated and is also not sufficiently filled with the fuel-air mixture. This leads to unstable operation of the motor.
If there are strong deviations in the clearances, the engine operates very unstable, to the point of being unable to start. Adjustments are made to avoid these problems.
When is adjustment still needed?
Sometimes the valve seats begin to fit loosely against this cap.
Then the valves need to be ground in. After this you need to set the correct interval. Knowing how to grind valves, you can also avoid many problems with the engine. For this work it is better to use lapping devices. Previous entry Modern tuning Voskhod 3m Next entry Motorcycle Ural - all modifications
Do-it-yourself valve adjustment in the Urals
Detailed description of setting and adjusting valves on Ural and Dnepr motorcycles
Adjusting the valves on a Ural or Dnepr motorcycle is carried out infrequently, but this procedure is mandatory and allows you to keep the engine in full working condition. Despite the fact that the presented Soviet heavy motorcycles have different engines, their principle and adjustment scheme are the same.
What is thermal valve clearance?
Thermal valve clearance is the distance from the upper end of the valve stem to the pressure part of the rocker arm. This gap is necessary so that when the engine reaches high operating temperatures, with subsequent expansion of the metal, the optimal valve opening function is maintained. Of course, when cold, the engine may run unevenly or not at full power, fortunately, air-cooled engines quickly reach operating temperature and the valves begin to work as expected. Different units have different clearances, this is due to the materials from which they are made. For example, in the Dnepr K-750 motorcycle there is a gap of 0.1 mm, while more modern models of Soviet heavy motorcycles received a gap of only 0.05 mm. This means that the older K-750 was made of metal subject to a high degree of thermal expansion, while modern models are made of a more stable metal. To control gaps, special probes are used. They are made of steel plates of various thicknesses. Each probe indicates its thickness, and the degree of deviation with the indicated value is so small that under the operating conditions of these engines the error can be neglected.
Why is valve adjustment done on Ural motorcycles?
The valves have mobility in both directions, along their axis, which means the gap can increase or decrease. First, let's consider what happens if the gap decreases, right up to the contact with the pusher. First of all, power is reduced due to loss of compression. The engine heated up, the metal expanded, and the valve began to not close completely, making less contact with the seat, due to constant contact with the pusher. This can be determined by several signs - the engine has become harder to start, there is a noticeable loss of power when warming up, you can also hear the knocking of valves when hot and notice popping noises in the carburetor. Here you can find out details about setting up carburetors on a Ural motorcycle. On the other hand, if the gap becomes larger than required, then the valves will not open completely, the combustion chamber will become less filled with the fuel-air mixture and will be less cleared of exhaust gases. In both cases, the engine will perform noticeably worse, and in the most advanced cases, the engine will simply be impossible to start. By the way, the ignition in the Urals must also be adjusted.
Preparatory work
So, the engine is cooled down, and the car itself is placed on a flat surface and immobilized. You can start working:
- Remove the carburetor air filter cover and remove the filter;
- We unscrew the filter mounting bolts and remove it, having first disconnected the pipes going to it;
- We remove the cable for manual control of the air damper (choke) and disconnect the throttle linkage;
- Unscrew the bolts securing the valve cover and dismantle it;
- Check the chain tension (it must be normal, otherwise you will have to adjust the tension first);
- Remove the distributor cap.
Now you need to set the TDC of the piston in the 4th cylinder and the marks on the knees will help with this. camshaft drive shaft and cover. shaft, as well as on the camshaft gear and its cover.
To do this, you can use a key of appropriate size, which you need to rotate the knees. shaft for the drive pulley bolt. Or use one of the drive wheels. To do this, you need to hang it with a jack, engage 4th gear and slowly turn the raised wheel. In this case, the transmission will ensure rotation of the crankshaft. But with the second method, you will need an assistant, since it will be difficult to check the coincidence of the marks.
Valves for Ural motorcycle
Ural motorcycles are domestic vehicles. They are very popular because motorcyclists with any driving experience can afford them. The Ural motorcycle began to be produced back in Soviet times. Many people still use old models for driving today.
In general, Ural motorcycles are reliable. They rarely fail. In order for the engine to last for a long time, it is necessary to carry out preventive maintenance on time, which consists of checking and correcting problems in individual systems of motorcycle equipment.
How to grind valves with a drill?
pedestrian Thu, 19/07/2007 - 06:25
Viking, people, why are you using a screwdriver, your valves are crooked, and you are grinding them on the seat along the way.
Most of the heads that you have to work with are worn out, there is a large chamfer of the valve seat, there is play in the guides, valves with burnouts, or the working chamfer of the disc is worn out. 1 I interrupt the guide, there is a blog where you can buy factory blanks for your uncle turner. 2 I countersink (sharosh) the valve seats, 45, 15, 75 degrees, fortunately I have friends in a car service center, although I should buy myself a set of cutters so as not to beg
It is important that the working chamfer of the seat (45) is not wide, about 1 mm. 3 I'll give it away if the valves are used
for grinding the working chamfer, it happens that new lapans also have to be grinded because they are crooked. 4 After the above procedures, I rub it in with my hands, carefully for no more than 10 minutes with diamond paste, I don’t recommend rubbing for a long time at all, you will shorten the life of your head (moto head). All work takes 1 day, costs $5 and the head is like new. I also advise you to polish the channels, the outer and inner surfaces of the valve plate, which will add performance to your engine, and it’s much more pleasant to assemble such units.
Ps It is more convenient to polish the channels with a screwdriver.
opposit.ru
Messages [1 to 20 of 47]
1↑ Topic from tt 03/26/2012 19:16:56
- tt
- Newbie
- Inactive
- Name: Timur
- From: Kazakhstan
- Registered: 20-03-2012
- Messages: 29
- Motorcycle: IMZ 8.103.10
Topic: how to grind valves?
Please advise how to properly grind the valves? And how is this done in general? Thanks in advance
2↑ Reply from Ghost Rider 03/26/2012 19:51:16
- Ghost Rider
- Ghost rider
- Inactive
- Name: Roman 34RUS
- From: Volgograd region. Krasny Yar.
- Registered: 15-01-2012
- Messages: 3 608
- Reputation: 107
- Motorcycle: M-72, Stels Skif 50 2T, VAZ 21113.
Re: how to grind valves?
By hand or using a drill. GOI paste. Grinds in until the color is uniform, without scratches or marks. Until you get a “belt” on the valve. Rinse everything afterwards. Check for leaks - after installing the valve, pour kerosene into the head for half a day. If it doesn’t flow, you can install it; if it flows, rub further.
+1
3↑ Reply from tt 03/26/2012 20:14:49
- tt
- Newbie
- Inactive
- Name: Timur
- From: Kazakhstan
- Registered: 20-03-2012
- Messages: 29
- Motorcycle: IMZ 8.103.10
Re: how to grind valves?
4↑ Reply from Ghost Rider 03/26/2012 20:16:04
- Ghost Rider
- Ghost rider
- Inactive
- Name: Roman 34RUS
- From: Volgograd region. Krasny Yar.
- Registered: 15-01-2012
- Messages: 3 608
- Reputation: 107
- Motorcycle: M-72, Stels Skif 50 2T, VAZ 21113.
Re: how to grind valves?
Now it’s even more precise: Start rubbing like this - smear the seat, insert the valve and clamp it into a drill or, better yet, into a screwdriver with reverse and with a force of about 500 three grams. The contact strip can be seen on the old valve, if it is preserved. You need to grind it in so that the paste does not get into the guide (into the valve bushing, in short), which causes a gap and play to form there. You rub it in, remove it, wash it off - look/check for leaks. You can grind it in with a flexible hose, but it’s more difficult because you need a spring. In short, that's it! You can also rub it in by hand, but that’s using an ancient and time-consuming method. Good luck!
Adjusting the valve
The procedure for adjusting clearances on a Ural motorcycle requires care and attention, since it is necessary to accurately set a specific value.
The process itself can be divided into several sequential actions:
First you need to remove the cylinder head cover. Sometimes there may be some oil present that needs to be drained. At this stage, you should turn the crankshaft until one of the pistons is at the top (dead) point. This can be determined by special marks located on the flywheel and engine crankcase. When the piston is in the desired position, these marks should coincide. This process can be monitored through a special hole, often closed with a special plug. Measure the gap with a special feeler gauge measuring 0.05 mm. In case of discrepancy, you should proceed with the adjustment, which is made by a bolt located on the rocker arm
It is very important to loosen the locknut before unscrewing it. Once the desired gap size is set, tighten the locknut back. We check this parameter again and then install the previously unscrewed cover in place.
Adjustment on M-72 and Dnepr K-750 engines
This work is quite simple, but we will still describe it in detail. Before starting work, the motorcycle should be tilted to the side and a container should be placed under the engine to collect the oil. The settings are made in the following order:
- Using a wrench, unscrew the nut securing the valve cover;
- Drain the engine oil from the cavity;
- We install the piston in the cylinder at the top dead center of the compression stroke. To check the marks, it is worth removing the rubber plug from the engine crankcase. The engine is cranked using a kickstarter;
- Next, the use of the adjustment probe begins. It is used to measure the gap between the rocker arm and the valve. This indicator should be equal to 0.1 mm;
- If the gap is different, then it is worth making an adjustment. To do this, loosen the locknut and tighten the adjusting nut. After this, the locknut is tightened;
- Next, the engine is cranked by the kickstarter one more time, after which the correct settings are checked. If everything is normal, then we assemble the cylinder and move on to another.
This is how the valves on the Ural motorcycle are adjusted; the BSZ on the Izh Jupiter 5 has a slightly different configuration. Therefore, it is worth studying it in more detail.
Valves for Ural motorcycle
March 24
LiveJournal
Ural motorcycles are domestic vehicles. They are very popular because motorcyclists with any driving experience can afford them. The Ural motorcycle began to be produced back in Soviet times. Many people still use old models for driving today.
In general, Ural motorcycles are reliable. They rarely fail. In order for the engine to last for a long time, it is necessary to carry out preventive maintenance on time, which consists of checking and correcting problems in individual systems of motorcycle equipment.
What can result from untimely valve adjustment on Ural motorcycles?
Owners of Ural motorcycles very often encounter problems with valves. They need to be configured in a timely manner. Not every modern motorcyclist knows how to adjust the valves on a Ural motorcycle. To do this you need to have certain knowledge and skills.
You can make adjustments yourself. Initially, you need to familiarize yourself with how to do this. Instructions for working with Ural valves are not complicated. Every motorcyclist can figure them out.
Important: It should be remembered that in order for the Ural engine to last for many years, it is necessary to adjust the valves every two thousand kilometers. This frequency was not chosen by chance.
It has been experimentally proven that it is after overcoming two thousand kilometers that the valves of Ural motorcycles begin to fail. The gap between the valve base and the pusher or rocker arm (depending on the engine type) becomes larger
This frequency was not chosen by chance. It has been experimentally proven that it is after overcoming two thousand kilometers that the valves of Ural motorcycles begin to fail. The gap between the valve base and the pusher or rocker arm (depending on the engine type) becomes larger.
As a result, every owner of Ural motorcycle equipment needs to adjust the valves. This will allow you to enjoy using your vehicle for various purposes for many years. With adjusted valves, the engine will always operate properly.
Valve guides motorcycle Ural
Adjusting valves on a Ural motorcycle
In order to adjust the valves on Ural motorcycle equipment, it is necessary to divide the process into several stages.
How to adjust valves on a Ural motorcycle
They are:
- unscrewing the screw and removing the cover along with the gasket,
- turning the crankshaft until the intake valve closes,
- loosening the counterbolt, which is located on the exhaust valve stem pusher,
- regulating the gap between the valve base and the pusher or rocker arm. The gap should be 0.1 millimeters.
- setting the gap. It consists of screwing the locknut into a certain place.
To adjust the intake valve, you must first turn the crankshaft until the exhaust valve is completely closed. Only then can the gap between the base of the intake valve and the pushrod or rocker arm be adjusted.
The sequence of actions for adjusting the intake valve on a Ural motorcycle is practically the same as that used to adjust the exhaust valve.
Important: When adjusting one valve, you must not forget to adjust the other. Otherwise it will lead to engine malfunction
Many motorcyclists do not consider setting the valves on a Ural motorcycle too complicated. It can be done at home without any extra costs, which will lead to savings on the services of various motorcycle services.
MY MOTORCYCLE - All about bikers, motorcycles, and new products!!!
Honda is going to reclaim the laurels of the creators of the fastest lawn mower in the world and accelerate its Mean Mower garden tractor (HF2622) to a speed of 240 km/h. Read more
The American manufacturer of legendary motorcycles, Harley-Davidson, is looking for new ways to improve its financial situation. And soon he will release a new product called Pan America. The prototype has already been revealed to the world on the Internet. Read more
Tsogorich, from 24 to 26 sickles we traditionally gather for the celebration of the Independence Day of Ukraine in the glorious village of Kobizhcha, Chernihiv region! Read more
Program of the Baltanka motofestival (July 26-29, 2021):