Almost just before leaving for permanent residence on another collective farm, an old acquaintance, whom I had not seen for 15 years, turned to me and asked me to overhaul the engine of his Ant. To be honest, I didn’t have much of a desire to get involved with this Soviet chatterbox, to say the least... But after thinking about it and playing out the situation in my head that I would have to sit in a new place for some time without my favorite job, I agreed and immediately began the repairs.
I will not go into the essence of the disassembly in particular within the framework of this article - I will only outline the main points and, based on my experience, I will try to describe the most common malfunctions and errors during repairs.
The engine had the following symptoms before being repaired:
- Bad start
- Oil leak
- Weak traction
- Increased noise during operation
- The winding lever did not return to its place
Preliminary diagnosis:
- Depressurization of the crank chamber, as well as wear of the seals
- Poor quality assembly
- The piston died
- Bearing wear
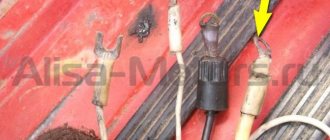
- Kickstarter return spring broke
Everything else, including the gearbox and clutch, did not cause any complaints during operation. However, first things first.
The motor chain turned out to be stretched, but not critically.
Analysis of previous repair errors
We remove the flange on which the stator is mounted and carefully inspect the connector plane for interference by “drop-dead handles”.
No matter how many times I repair Ants, I come across the fact that all sorts of “drop-dead little hands” seal the oil channel through which oil flows to the crankshaft main bearing and oil seal. I'm already tired, honestly - how much can you? Why cover it up???
The gearbox, with the exception of one fork, did not cause any complaints. By the way, the clutch too.
Now the question is: what to do with all this junk? Buy a “plasticine” crankshaft from no one’s making and mold it into the engine??? I was initially against this idea. In general, we found a used engine for a ruble and removed the crankshaft from it. Of course I had to tinker with him. Since the thread was clogged, I sharpened it and straightened it with a sharpening tool.
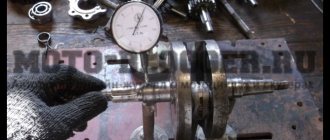
After correcting the threads, I checked the crankshaft for runout. There was no need to worry - the beating of the trunnions did not exceed one hundredth of a millimeter with a tolerance of three hundredths. By and large, it would have been necessary to replace the bushing of the upper head of the connecting rod, but time was running out and the bushing was not very worn. In all other respects, the crankshaft did not disappoint and this purchase can safely be called a success.
We decided to buy everything else: CPG, cylinder head, gaskets, seals, bearings, motor chain, etc. in the store. Although, by and large, the cylinder could have been bored out and that would be enough. But the owner did not want to wait, but in vain.
(
2
ratings, average:
4.50
out of 5)
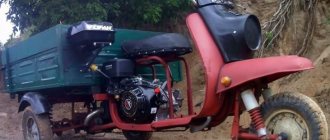
Ant is a three-wheeled cargo moped that was produced by the Tula plant. The Ant gained popularity due to its versatility of use and cost. A working motorcycle was a way out of the situation of not being able to purchase a car during Soviet times. A load capacity of 250 kg, with a weight of 240 kg, made this transport indispensable in agriculture.
The scooter is distinguished by high maneuverability and maneuverability, as well as small dimensions. In the garage it will take up as much space as a heavy motorcycle with a sidecar.
The Soviet scooter "Ant", which is still popular, has the following technical characteristics:
- Length – 2.68 m.
- Width – 1.25 m.
- Height – 1.07 m.
- Dry weight – 240 kg.
- Load capacity – 250 kg.
- Speed – about 30 km/h.
- Gasoline engine, two-stroke, 11 hp.
- 4-speed gearbox + reverse.
- Drum brakes with mechanical drive on each wheel.
Among fans of this brand, there is an opinion that the scooter is not inferior in performance properties to its Western counterparts.
Among the advantages of a moped it is worth noting:
- Small turning radius – 3.5 m.
- The lightness of the Ant scooter; motorcycles significantly predominate in weight.
- Low cost - only used devices are available on the market.
There are also disadvantages:
- There are a lot of used equipment on the market.
- The engine has high fuel consumption - from 8 liters. per 100 km. But more often this figure is closer to 10 - 11 liters. per 100 km. due to increased wear.
- Frequent breakdowns due to low reliability, especially of the engine.
Ant owners have the most questions about the engine. After all, I want to moderate my appetite for fuel consumption.
The Ant was equipped with a motor that was different from others produced by the industry of the Soviet Union. Innovations in its design fueled interest in technology among then ordinary people. And now they are warming up restorers and collectors. The differences are as follows:
- Availability of electric starter.
- Forced cooling.
The main difference is the presence of an electric starter. This made it possible to start a moped in the same way as a car.
The cooling system fan moves air through the engine casing, removing heat from it. It is worth noting that such a scheme works tolerably.
The motor design is simple. But even this does not protect it from breakdowns, which are often associated with age. You shouldn’t just disassemble the engine, but if the following symptoms appear, you should take up the tools:
- Startup problems.
- Oil leak.
- Lack of traction.
- Increased background noise.
- The winding lever does not return to its place.
Possible breakdowns:
- Worn seals.
- Poor quality assembly after previous repair.
- CPG failure.
- Worn bearings.
- The return spring in the kickstarter has broken.
Note! Before overhauling the power plant, it is not necessary to wash it. Just drain the oil and remove it from the frame.
Cylinder block
After unscrewing several bolts, you need to remove the cylinder head. Pay attention to the worn cylinder head gasket. Opposite the outlet window, you should probe the so-called excavation. If a characteristic wave or step is felt, then such a cylinder needs to be changed or bored.
Burnout occurs where the piston rings contact the cylinder. Where they work, the metal wears out, so a transition is formed at the border of the two zones, which reflects the degree of wear.
The piston should be examined for wear. Some “Kulibins” manage to refine it with sandpaper.
Clutch
- Removing the clutch cover and kickstarter shaft. Pay attention to the return spring - it often breaks and the kickstarter does not return to its place. Also at this point you can check the timing chain tension.
- Clutch disassembly. To do this, you will need to unscrew the nuts and remove the pressure plate from the basket.
- The lock washer must be bent and a stick must be inserted under the tooth of the main gear sprocket. Please note that the threads on the crankshaft journal nut are right-handed. The nut needs to be unscrewed.
- There will be another lock washer that needs to be straightened. We take a puller and fix the clutch drum. The clutch nut has a left-hand thread.
- The disc and drum are removed, as well as the clutch basket is removed from the shaft along with the chain and drive sprocket.
Dinostarter
Remove the following elements:
- Cooling casing.
- Ignition chopper cam, but provided that the power plant was not converted to a magneto. In this case, it is necessary to fix the dyno starter rotor. This can be done using the cooling fan or by fixing the crankshaft with improvised means.
- The rotor is dismantled using a puller - standard or homemade.
As a result, the rotor was removed.
Removing and checking the piston (CPG)
Remove the cylinder head (cylinder head).
The cylinder head gasket held up well, as evidenced by the absence of oil leaks.
In the upper part of the cylinder opposite the exhaust window, we feel the groove with our finger. If it feels a clearly perceptible so-called “wave”, “step”, that is, a drop, then such a cylinder is no longer subject to further use. It needs to be either bored to repair size or bought a new one.
The wear can be easily felt in the place where the piston rings do not reach the end of the cylinder. In the place where the piston rings do not work, the nominal factory size is maintained, but in the place where they work, the metal wears out. That is why a transition is formed at the boundary of these two sections, which is larger the greater the wear of the cylinder.
In my case, as expected, the wear was clearly palpable and the cylinder mirror was covered in nicks and scratches.
A bunch of hay that blocked the flow of cooling air, in my opinion, did not increase the efficiency of the cooling system... How can you even drive like this???
The piston turned out to be burst and, moreover, according to the good old collective farm tradition, it was treated with sandpaper. As indicated by numerous risks on its surface.
After removing the clutch cover and removing the kickstarter shaft, the reason for the freezing of the winding lever was found - the return spring had burst in half.
The motor chain turned out to be stretched, but not critically.
Spare parts price
Despite the fact that the production of the device stopped long ago, you can still find new spare parts for it that are produced by the industry. Some parts are imported, some come assembled. Supplied in sets:
- Clutch discs.
- Gaskets for power plant and gearbox.
- Nuts.
- Pipes.
- Levers.
The necessary parts can be found on the Internet using store catalogs. Prices for spare parts for the Ant scooter are fair. Here are some examples:
- Clutch disc – 400 rub.
- Kickstarter shaft – 1100 rub.
- Front shock absorber – 1600 rub.
- Gearbox seals – 100 RUR.
- Piston – 2500 rub.
- Gearbox – 14,000 rub.
- Wheel hub – 2000 rub.
Judging by the prices, the device is more than cheap to repair. This is an important operational property for people in rural areas.
In terms of tuning the Soviet Ant vehicle, the owners can’t think of anything. After all, these are often tech-savvy people who like to spend time in the garage. Several directions can be distinguished:
- Weight loss.
To do this, you will need to remove “extra” equipment. This includes body kit in the form of wings, hood and fairings, as well as all electrical equipment. To transport goods around the village in the summer, all this is unlikely to be needed. - Increased output from the power plant
. To do this, cut off the dynostarter shaft. The operation will add power and dynamism. The recoil during starting is leveled by trimming the crankshaft. - Installation of other wheels.
Front 4.5 - 9, and rear 7 - 10. Cross-country ability and speed will increase. - Improvement of the piston group .
You can buy a piston with three rings and make an additional window in the cylinder to supply the fuel mixture. - Magneto and increasing the efficiency of the cooling system
are additional tuning.
The main task when tuning is to increase reliability and less tinkering with details due to breakdowns.
In terms of engine tuning, some owners took radical measures and installed a Lifan engine (Lifan 188f), which has a volume of 400 cubic meters, on the Ant scooter. cm. And its power is 13 hp. A distinctive feature of this assembly is the variator and centrifugal clutch.
A centrifugal clutch is not the best option for trucks, since when driving on rough terrain on a loaded scooter at low speeds, it may slip. And this incapacitates him.
What modifications of the “Ant” scooter are there in the video:
It's no secret that the engineers of the Tula plant have created equipment with which the average owner has to feel like a mechanic. To this day, having found another problem, Ant’s owner has to pick up a tool, remembering the would-be engineers. One of the main problems is the engine of the Ant scooter, which is repaired in most cases of breakdowns.
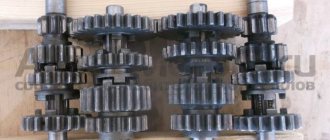
How to disassemble the gearbox
The Ant gearbox is disassembled according to a certain scheme. This process is necessary if for some reason Ant’s gearbox stops functioning. Some people do it wrong: when the gearbox breaks, they simply throw it away. But with the right approach to this matter, the device can be repaired, after which the Ant scooter will function the same as before. In addition, it is difficult to buy spare parts for the Ant scooter, so you shouldn’t waste them.
- If the Ant gearbox has been disassembled for some time, then first it would be a good idea to clean it of dust and dirt.
- Unscrew all the bolts that secure the gearbox. Take a hair dryer. Use it to warm up the Ant gearbox from all sides, then tap the housing with a wooden mallet. Until it splits into two halves.
- Now you can find out what caused the breakdown. The gearbox could fail for two main reasons: the input shaft bearing was broken or the gear teeth were worn out. Both parts will have to be replaced.
- Gears and bearings need to be removed so they can be replaced with new parts.
- Remove the retaining shield.
- Remove the retaining ring and remove the axle shaft from the cup.
- Before you start putting all the parts back together, you need to check their integrity. When the Ant gearbox is assembled, it can be sent to its designated location.
The Ant scooter can become a useful type of equipment today. If you have your own farm or garden at your dacha, you won’t find anything better than such a scooter.
Dynastarter
However, it is not only the engine that can make a motorcyclist clearly see all the components of his motorcycle. The most common problem is a problem with the dynastarter.
. The engineers of the Tula plant installed it in Muravya, instead of a conventional alternating current generator.
Why is it so important? If you notice a red light on the instrument panel while the moped is running, it means you are running out of charge. This happens because the generator is not producing alternating current. To begin with, in such a situation, it is necessary to check the integrity of the wires connected to the dynastarter and the relay regulator. If everything is in order, then the problem lies directly in the dynastarter. There may be three main causes of problems:
- difficulty in rotor operation (dirt getting into the collector or dust accumulation);
- freezing or wear of brushes;
- violation of the integrity of electrical equipment.
Since in most cases the operation of the dynastarter is difficult due to contamination of the collector, it is worth carrying out a simple disassembly according to the instructions described in the moped operating book. The main rules when working are neatness and cleanliness. After disassembly, be sure to thoroughly rinse all parts in gasoline and lubricate the rubbing parts, and under no circumstances throw away the parts.
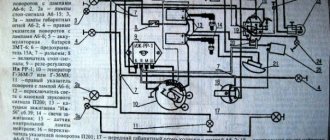
Electrical circuit of the motor scooter Ant 2M
The electrical wiring of the Ant 2 and 2M scooter (prototype – Tulitsa 2) is located at the bottom of the scooter. The cargo-passenger version is slightly different in appearance and electrical equipment. A more detailed power supply diagram of Ant 2M allows you to repair and tune the electrical equipment of the scooter.
Download the electrical diagram of the Ant 2M scooter:
- Direction indicators
- headlight
- Indicator light (red) for dynastarter operation in generator mode
- Indicator lamp (green) for neutral activation
- Indicator lamp (orange) for direction indicator operation
- Indicator lamp (blue) for turning on the high beam headlights and the speedometer scale illumination lamp
- Sound signal
- Light breaker relay
- Side light switch
- Ignition switch and handbrake brake switch
- Switch for high/low beam and direction indicators
- Relay regulator
- Dynastarter
- Day/night switch with emergency engine shutdown
- Breaker
- Circuit breakers
- Capacitor
- Ignition coil
- Spark plug
- Neutral warning lamp switch
- Rechargeable batteries ZMTR-10
- Foot Brake Light Switch
- Rear light with brake light
The dynostarter as a device is as far from complete perfection as our VAZ plant is from the premium segment. But if at least once a season you carry out competent maintenance of the collector unit, switching equipment, and battery, then with all its inherent shortcomings, the dyno starter can last a very, very long time, up to 30,000 km, or even more.
Engine assembly
Unlike a dynastarter, repairing an Ant scooter engine with your own hands is difficult to do according to the operating book. Therefore, it is worth seeking the advice of experienced motorcycle owners. Most often, the engine has to be disassembled when there are problems with the clutch mechanisms, the operation of the gearbox, as well as wear on the crankshaft, bearings or oil seals. The most important rule is not to be afraid to disassemble the engine yourself. Using these instructions, disassembling and assembling the engine of the Ant scooter will not be difficult.
So, the procedure for disassembling the engine:
You can see how to assemble an Ant scooter engine in more detail in the visual video at the end of the article. The essence of assembly is in the reverse order, but it is important to tighten the parts with a certain force and synchronize the parts with the marks. Under no circumstances should you assemble an engine without detailed instructions written by the manufacturer.
With frequent breakdowns, owners think about what engine can be installed on the Ant scooter. Instead of the original motor, you can use Chinese analog motors
. Since the Ant has many copies in Asian countries, replacing the engine can be a great option to save money in case of irreversible damage. True, you will have to make the fastenings yourself and, in some cases, remake the bridge for the left-hand arrangement of the chain. This is not very difficult, considering that the Tula plant provided for the possibility of rearranging the bridge.
During the Soviet years, this bloodsucker Ant was bought only for its body. Since nothing like this was produced in the USSR in those years. And people needed to either go to the garden or feed the farm, so they took him.
The body in the Ant is really good; you can easily load 10 bags of mixed feed, 500 kilograms of coal or half a cubic meter of firewood and it will safely trample all this junk home. On the two-seater version, the body was significantly smaller and moved far back, causing the overloaded scooter to tip over backwards on bumps. But on the two-seater version it was possible to ride together
The tailgate opens like a regular truck
In stock, the body does not have extensions. On collective farms this feature was ignored and the sides were sewn to some unrealistic size.
Device Description
The Ant is much lighter than ordinary motorcycles, so everyone dreamed of owning one. The approximate weight was only 240 kg, which is small considering that it could transport loads several times heavier than itself. Actually, it is because of this that he received the name Ant.
Another advantage of the scooter was and is that you can buy it for a small amount of money. So, you can buy an Ant scooter for only 30,000-50,000 rubles.
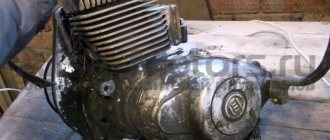
Engine
The Ant engine is single-cylinder. At the same time, it is quite voracious, so it’s hard to call a scooter an economical vehicle. After all, even a new Ant engine consumes about 8 liters of 80-grade gasoline per hundred, and what can we say about used equipment? After all, if the piston or gearbox is slightly worn out, then the costs increase to 10 liters per hundred. In this case, you can replace damaged spare parts, but it is not easy to buy them, since they are rarely found on sale.
You can buy an already assembled Ant engine, but such luxury is a little expensive.
Suspension
In general, the Ant scooter is a very durable piece of equipment. The front wishbone suspension is especially well executed. It can last for decades. Many scooter users even claim that it is made better than modern versions of telescopic forks.
Nowadays, most fans of the Ant scooter install rear shock absorbers from a scooter instead of front shock absorbers, because the former are currently in short supply.
The rear suspension is independent. The gearbox drives the rear wheel. This is facilitated by a roller chain running through it. At the same time, the gearbox itself is made quite well. It is located in the very center of the rear axle, making it easy to remove if necessary.
Easy to repair
Thanks to its light weight, the owner of this equipment can easily turn over the Ant scooter, which will allow him to easily carry out repair work. To change a tube, tire or even gearbox, it is absolutely not necessary to remove the wheel.
The scooter is large in size, making the equipment excellent for work in rural areas.
The scooter can reach a maximum speed of 50-60 km/h.
Engine
The Ant engine is somewhat different from Soviet engines of that time. The most significant difference is in the starting system: here it can be done using an electric starter (this was very cool in the 50s) or using a manual kickstarter. There was no trace of an electric starter on any Soviet motorcycle of those years.
The engine is started with the starter just like a regular car: insert the key into the ignition, turn the key all the way to the right and the engine starts.
The second difference is the forced cooling of the engine
The fan drives air through the casings, cooling the cylinder and cylinder head. The cooling system works tolerably
Mechanical clutch with cable drive from a lever on the steering wheel
The gearbox is manual, the shift lever is located on the left directly under the driver’s foot. The switching algorithm is as follows: first, second, third and fourth gears are switched up. Neutral gear is at the very beginning and to engage it you need to push the gear lever down. Controversial decision, but that's how it's done here
Twin-shaft gearbox with constant gear meshing
The engine is as simple as a broom
Electrics
The most problematic part of the Ant has always been considered its electrics, in particular the voltage regulator relay and dyno starter (generator and starter rolled into one). Due to their design features, the dyno starter and relay regulator require constant attention and qualified maintenance. If the dyno starter is not serviced on time, then it begins to undercharge the battery literally in the first season
On older models, the relay-regulator was of a mechanical type
On the latter, more advanced - electronic type
Contact ignition. The contacts are located in the cooling casing
The ignition coil and capacitor are located on the frame. In terms of repair and maintenance it is very convenient
Removing the dyno starter
We remove the cooling casing and then, if the engine is not converted to a magneto, remove the ignition breaker cam. Hold the dyno starter rotor by the fan and unscrew the nut. If you cannot hold the rotor in this way, fix the crankshaft with something and unscrew the nut.
We pull off the rotor with a puller. The rotor can be pulled off either with a standard puller or with a homemade one. Depending on the situation, I use both standard and homemade ones.
We remove the stator.
Fuel system
The power system consists of a fuel tank, carburetor and air filter
Fuel supply by gravity, supply control by mechanical fuel tap
The latest scooters were equipped with a more advanced K-65G carburetor. In general, the carburetor is very good, if only because it has two systems that make starting easier in cold weather: a manual enricher on the steering wheel and a float suppressor. All these systems together ensure reliable engine starting in any frost
To increase low-end thrust, a reed valve was added to the engine design. The valve is installed in the cylinder and blocks the reverse emission of fuel from the crank chamber
The cylinder is purged with three channels. Three-channel purge ensures better cylinder filling
The cylinder head has a displacer. The displacer itself is useless, but in combination with a three-channel purge and a reed valve it significantly adds traction at the bottom
Frame
Creating a case is one of the difficult stages.
Suitable materials for this are fiberglass or fiberglass. Sheet metal can also be used, but an artificial body kit will weigh less. First, a “blank” of the body is cut out of pieces of foam plastic, for which you will need to develop a preliminary drawing. Fiberglass is applied to the prepared form. There will be several layers, so metal fasteners are installed between them for subsequent fixation of the new body kit to the frame. To ensure that each layer is properly bonded to each other, they are additionally coated with epoxy resin. The body needs to be thoroughly dried, and then primed and painted.
After installing all components and connecting the systems, you need to check the functionality and run the vehicle, gradually increasing the load.
The Ant scooter today, unfortunately, has already been discontinued from production and sales by the manufacturer. However, it is still possible to purchase a used model.
Such scooters have already won a lot of fans due to their characteristics. More carrying capacity compared to motorcycles, affordable cost, ease of use - all this makes the model a priority among other motorcycles.
Brakes
Ant also has brakes, and you can even try to stop the scooter with them, but only three kilometers before the obstacle. Both brakes are mechanically driven drum brakes: front manual with cable drive, rear foot with rod drive
Just a couple of months ago, an old client asked to overhaul the engine of his Ant for the season. He is not greedy for money - he promised to buy everything needed for repairs. We agreed, the client brought it for repairs. The piston, crankshaft, motor chain and almost all bearings were worn out.
The customer insisted on purchasing a new crankshaft. They are now in abundance in any store - I don’t want to take them, but their quality is still good... I resisted for a long time and in the end the client found a used engine from which I pulled the crankshaft. Of course, it was slightly worn out, but the bearing of the lower head of the connecting rod was intact and intact, and we didn’t need anything more.
Build errors
In most cases, the right main bearing of the crankshaft fails due to an assembly error almost in the first season after repair. The engine that we are now repairing is no exception. The bearing has practically crumbled and in any case needs to be replaced with a new one.
The mistake is that when installing the flange on which the dynostarter stator is attached, the oil channel through which lubricant flows to the main bearing and oil seal is sealed.
To ensure that the main bearing lasts at least several seasons, cut the gasket under the flange a little along the contour of the oil channel and when you put the flange in place, do not smear anything with sealant there.
And one more thing: to avoid self-unscrewing of the bolts securing the dynostarter stator flange to the crankcase, and they come loose very often, apply a little thread locker to the threads. If possible, use a medium-strength fixative - “blue”.
Removing the clutch
Unscrew the nuts and remove the pressure plate from the basket.
Unbend the lock washer, insert a tin rod or stick under the tooth of the motor transmission sprocket and unscrew the nut on the crankshaft journal (right-hand thread).
Unbend the lock washer, fix the inner clutch drum with a puller, which is a clutch disc with a welded piece of tire, and unscrew the nut (left-hand thread).
We take out the discs and drum.
Remove the basket from the shaft along with the chain and sprocket.