Home → Maintenance → Do-it-yourself carburetor adjustment on an ATV.
Very often, tuning and adjusting an ATV carburetor for beginners seems like an insurmountable task, but in fact, this is far from the case. Using our instructions, you can easily adjust the carburetor with your own hands.
Due to incorrect carburetor settings, problems arise such as: failures during acceleration, jerking while driving, uncertain engine start, poor acceleration dynamics, overheating, loss of power, increased fuel consumption, and carbon deposits in the combustion chamber.
So, what exactly are we going to configure?
- Idle adjustment
- Adjusting the mixture quality (special screw on the carburetor).
- Adjusting the quality of the mixture (by shifting the needle position)
Attention! The adjustment is carried out with a warm engine and a clean carburetor.
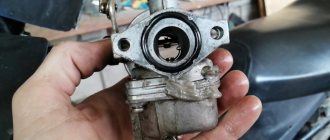
First, let's make sure there is no condensation in the carburetor. First you need to drain the gasoline from the float chamber, to do this you need to close the fuel valve and partially unscrew screw No. 1, after the gasoline has drained from the float chamber, tighten screw No. 1.
Let's look at photographs of candles with various soot and defects.
A 100% indicator of a correctly adjusted combustible mixture is carbon deposits on the spark plug.
- Spark plug when the engine is running without faults.
- Engine with increased fuel consumption.
- Poor air-fuel mixture.
- Excessive amount of additives containing metal.
- Engine after a long period of inactivity.
- Idle cylinder spark plug
- Complete destruction of the central electrode with its ceramic skirt.
- Worn out or stuck oil scraper piston rings.
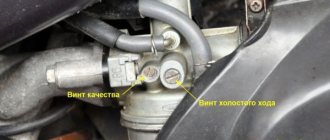
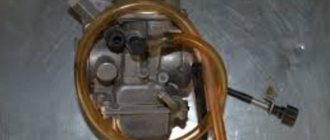
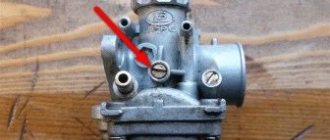
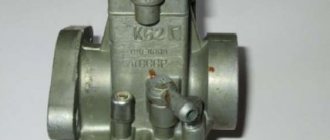
Let's consider the location of the screws for adjusting the mixture quality and idle speed of carburetors of different models.
No. 1 Screw-plug of the float chamber; No. 2 Mixture quality screw;
No. 3 Idle speed adjustment screw.
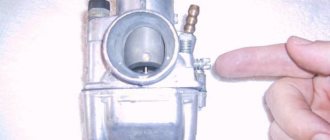
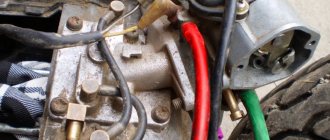
1 — idle quality adjustment screw; 2 — fuel inlet fitting; 3 - fitting through which you can drink fuel from the float chamber; 4 — screw-plug of the float chamber.
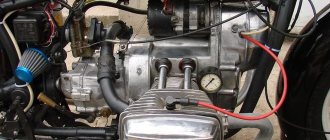
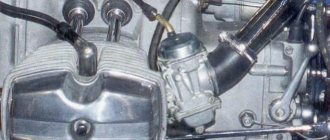
1 - ventilation tube; 2 — idle speed adjustment screw; 3 — screw for adjusting the composition of the fuel-air mixture.
Adjusting the speed and quality of the mixture of the ATV carburetor.
1. Start and warm up the engine until it reaches operating temperature.
2. By adjusting the idle speed screw, set the speed to normal. Tighten the fuel mixture screw completely until it stops, the engine should stall. If this does not happen, check the air tightness of the air supply system from the air filter.
3. Unscrew the fuel mixture screw 1 turn. (By turning the screw clockwise, we enrich the mixture; by unscrewing it counterclockwise, we lean it).
4. Start the engine and, by adjusting the idle speed screw, set the speed slightly higher than normal
5. Slowly unscrew the fuel mixture screw until the engine reaches maximum speed (we unscrew the screw no more than 2 turns, but depending on engine wear and other malfunctions, the range may fluctuate).
6. By re-adjusting the idle speed screw, set the speed to normal.
7. By pressing the gas trigger several times, check whether the idle speed is stable.
Adjusting the quality of the mixture using a needle.
You've probably heard more than once about adjusting the quality of the mixture on a carburetor by manipulating the needle. I note that these are extreme measures; for initial adjustment, use the mixture quality screw, and only if you do not get the desired result, unscrew the fastener and remove the needle. What is she? This is the main element that regulates the amount of gasoline supplied to the combustion chamber. Connected directly to the gas handle via a cable. When you turn the knob, the needle rises higher, opening the fuel channel, thereby supplying more mixture, which increases power, which is translated into speed.
You will see 5 grooves on the needle at the attachment point. Initially, a locking ring secures it in the central position, this is the best option. But sometimes it is not possible to achieve the required quality of the mixture. Then we will need the remaining grooves, 2 on top and 2 on the bottom, this means that we can adjust the dose gradually.
By lifting the locking ring up and locking it in this position, you lower the needle, and it, in turn, blocks the channel more than usual. There is less gasoline supplied than air, and the mixture becomes leaner. By lowering the ring down, we raise the needle, and everything happens exactly the opposite.
Remember that an excessively lean or rich mixture can lead to serious problems - from overheating to loss of power, carbon deposits in the combustion chamber and all the ensuing consequences. Monitor the condition of the spark plug electrodes; this is the main indicator that will help you determine the quality of the mixture.
If you have any questions about adjusting and tuning the carburetor, you can ask them below in the “Comments” column.
Source
How to set up a carburetor on a 125cc pit bike
To adjust the carburetor on a 125 pit bike, you first need to check the color of the spark plug. Ideally, the color of the candle should be dirty orange. The second option is more suitable for an experienced pit bike owner. When you start to let off the gas and you hear shooting, this will mean that the mixture is not of the proper quality. And if, when you sharply press the gas pedal, the engine seems to be choking and there is no correct pickup, this also means that the mixture is of poor quality.
The idle speed is adjusted using two screws: a quality adjustment screw and a quantity adjustment screw. If the quality screw is on the diffuser side, then it regulates the fuel supply, and if on the air filter side, it regulates the air supply accordingly. Initially, we set the minimum stable speed using the quantity screw, i.e. your pit bike should almost stall, then we slowly begin to rotate the quality screw. We should hear maximum revs. After the number of maximum revolutions has been found, we begin to turn the quantity screw, setting the optimal speed for the engine.
s
Balbes TV: started a pit. warmed up I unscrewed the quantity screw until the motorcycle started to stall. then turn the quality screw to maximum speed. then again, use the quantity screw to set the comfortable idle speed. All. Why did you set up some kind of cart for 3 hours? As a result, absolutely nothing is clear.))))) He runs here and there. back and forth. and why the hell will you understand)))))
Vlados: Please tell me, I recently bought a used snow leopard, it doesn’t start well and doesn’t hold idle, it drives very well, what’s the problem? Maybe the carb is rich?
Nekit Akhtarov: I'm driving too fast
Maxim Alekseev: when I start the engine, the speed goes off scale, as if at full throttle, the throttle moves but does not react to it. the needle is all in place. Tell me what’s wrong? I just took the needle out of the carb and wanted to move the ring on it by one division and after that it started.
Andrey larovento: Does it have a pz 22?
Eduard Bychkov: thanks patpiska
even though I have kayo, I’m thirstier than namikuni
Sasha Uvarov: I have trouble starting
Ilya Gribanov: Thank you very much
Valery Vasilievich: Hello, oil is leaking from the CGB, the reason
TippOK A: Please tell me about the position of the choke switch (opening the damper). Do you have it all the way down? In summer?
Yuri Noskov: Guys, tell me how to set up the Mikuni 22 carburetor, I have a Wels CRF 125 pit bike, such dances with a tambourine
sun_x: Will misadjustment damage the motorcycle?
Neo Nik: For some reason I used to think that a rotation is 360 degrees.
Anyutka Plaksina: On my kayo 140 the intake gap is 0.5 and the exhaust gap is 0.6
Andrey Dragon: thanks, it helped)))
Bessonnica: damn lilies of the valley, progression for you
Alexander Volkov: Do you mean 0.08 at graduation?
Vingo: told me okay
Alexander Durso: Tell me why, when you sharply open the throttle, it choke and doesn’t pick up speed?
Alex Clark: how to remove dips
How to adjust the carburetor on a pit bike
In order to adjust the carburetor on a pit bike. It is necessary to first determine the quality of the mixture. The quality of the mixture must meet the standard. The correct quality of the mixture must be achieved by raising (lowering) the needle. As a rule, the needle must be lowered if the mixture has a dark (black) color, and if the mixture has a very light color, then lower the needle accordingly. If it was not possible to adjust using the needle, then you need to return the ring on the needle to the position in which it was previously.
Another option would be to change the jet. The jet looks like a thick nut with a hole inside and a recess on the surface of the head for a flat-head screwdriver. In order to change or change the size of the jet, you need to remove the carburetor from the pit bike. But first you need to drain all the gasoline and open the float chamber. Depending on the color of the mixture, we select the nozzle; for a light mixture we increase the size, for a dark mixture we decrease it.
If it happens that all your efforts are in vain and the adjustment, alas, did not help, washing and blowing the channels in the carburetor can help (this can happen if sand or dirt has disappeared into the carburetor. For those owners who have little experience or do not have time to adjust the carburetor on your pit bike, we advise, of course, to contact specialists
How to adjust the carburetor on a pit bike
In order to adjust the carburetor on a pit bike. It is necessary to remove the carburetor and filter, completely disassemble it, wash it with gasoline, and blow it with a compressor. Also rinse the filter thoroughly and dry it and apply special oil. After the manipulations are completed, we put everything in place. We test the pit bike on a flat, deserted area. The engine will need to be turned off so that the throttle position is at full. And then we unscrew the spark plug and carry out the above manipulations. We figured out how to adjust the carburetor on a pit bike. But I would like to describe in more detail about changing the jet. In order to determine whether we generally need to change the jet or not. It is necessary to unscrew the gas handle a quarter turn. This is necessary to check that the carburetor is set correctly. And then we check by sharply turning the throttle. If your pit bike does not stall, then you did everything right.
Having determined the need to change the jet, we select the correct size. Everything is simple here, for a mixture that has a dark color (rich mixture) we select a larger nozzle size. For a pale mixture (poor), select a smaller jet size.
As a result of everything, I want to highlight the three stages of setting up the carburetor on a pit bike.
Source
Video on this topic
Troubleshooting fuel supply to the Irbis TTR125 carburetor
“Seat for a needle” - ahahahaha, I’m talking some kind of nonsense)))
Failure when opening the throttle and how to fix it. Setting the carburetor for winter mode.
VK https://vk.com/jmd_service Personal page https://vk.com/stuntdanil service website https://jmd-service.ru/ The work we perform.
Carburetor repair. For IRBIS TTR 125, 250
Carburetor repair when fuel leaks from the sump hoses.
Setting up the carburetor on a pit bike/moped | Brief and simple | Without ceremony #1
Our group in VK: https://vk.com/endurroadept Affiliate AIR: https://join.air.io/endurroadept ALL MUSIC IN VK GROUP!
Installing the Mikuni VM 22 carburetor on Irbis ttr 125 (adjustment and tuning) (Babzor.ru)
In this video I will tell you in detail and show you how to replace a standard poor Irbis ttr 125 carburetor with a Mikuni vm22.
Cleaning and basic adjustment of the Irbis TTR 125 carburetor
Maintenance of the irbis ttr 125 carburetor. Basic setup. Consideration in detail. Also suitable as.
Carburetor irbis ttr125. Disassembly, cleaning, adjustment.
Carburetor irbis ttr125. Disassembly, cleaning, adjustment. We disassembled the carburetor, which was overfilling, cleaned it and adjusted it.
Setting up the Irbis TTR 125 carburetor
In this video, I will tell you how to properly set up a carburetor. All the subtleties of tuning, and the right approach.
branches: Moscow | St. Petersburg | Ekaterinburg | Nizhny Novgorod | Samara | Ufa | Chelyabinsk | Tyumen | Novosibirsk | Vladivostok | Khabarovsk
Source
How to set up an ATV carburetor yourself
In most cases, setting up and adjusting the carburetor on your own for beginners seems like some kind of prohibitive task, but in fact, everything is not so difficult. So, from this article you will understand that the carburetor can be adjusted independently and without unnecessary problems, and without contacting specialized services
But it should immediately be noted that incorrect carburetor settings can lead to the following problems:
- Overclocking failures;
- Sharp shocks during operation;
- Weak engine start;
- Poor acceleration dynamics;
- Rapid overheating;
- Sudden loss of power;
- Excessive fuel consumption;
- The appearance of carbon deposits in the combustion chamber area
In order to avoid these and many other problems, you should configure:
- Idle move;
- Quality of the mixture;
Remember: carburetor adjustment must be done with a clean carburetor and a warm engine!
The first thing you should make sure is that there is no condensation in the carburetor. It is necessary to drain all gasoline in the float chamber. To do this, you need to unscrew the screw and drain the gasoline. Then the screw must be tightened.
Now we need to properly disassemble the locations of the screws responsible for idle speed and for adjusting the quality of the mixture. So, how should you properly regulate the mixture quality and carburetor speed in an ATV?
It's very simple, just do the following:
- Start the ATV and let the engine warm up properly so that it reaches its normal operating temperature;
- Constantly adjusting the idle speed screw, set the speed to normal, and then tighten the screws responsible for the fuel mixture all the way. The engine should stall. If the engine does not stall, then it is necessary to check the tightness of the air supply system that comes from the air filter;
- Now you need to unscrew the screw responsible for the fuel mixture. Exactly one turn. Remember that by turning the fuel mixture screw in different directions, you either enrich the mixture or lean it. Usually enrichment proceeds clockwise.
- Now you should start the engine and, carefully adjusting the idle speed screws, set the speed to a slightly higher speed.
- Now you need to start slowly unscrewing the screw responsible for the fuel mixture. It should be unscrewed carefully until the engine reaches the maximum speed point. This usually requires unscrewing the screw a maximum of two turns.
- Next, you need to re-adjust the idle speed screw, simultaneously setting the speed to normal.
- And the last thing to do is press the gas a few more times and check the stability of the idle speed.
How to adjust the quality of the mixture using a needle?
Most likely, you have already heard many times about adjusting the quality of the mixture used in the carburetor using a needle. It should be noted that manipulation with a needle is already an extreme measure. It is used if you were unable to achieve the desired result using the previous method. In order to start tuning with a needle, you need to unscrew the mount and remove the needle. What kind of needle is this? This is one of the main elements that can regulate the amount of gasoline supplied to the combustion chamber.
Additionally, there are five grooves on the game. From the very beginning, the locking ring locks the needle in a central position. This is the best option.
Remember that a very rich or very lean mixture can cause really serious problems with your ATV.
Source
Irbis 110 ATV carburetor adjustment
Home → Maintenance → Do-it-yourself carburetor adjustment on an ATV.
Very often, tuning and adjusting an ATV carburetor for beginners seems like an insurmountable task, but in fact, this is far from the case. Using our instructions, you can easily adjust the carburetor with your own hands.
Due to incorrect carburetor settings, problems arise such as: failures during acceleration, jerking while driving, uncertain engine start, poor acceleration dynamics, overheating, loss of power, increased fuel consumption, and carbon deposits in the combustion chamber.
So, what exactly are we going to configure?
- Idle adjustment
- Adjusting the mixture quality (special screw on the carburetor).
- Adjusting the quality of the mixture (by shifting the needle position)
Attention! The adjustment is carried out with a warm engine and a clean carburetor.
First, let's make sure there is no condensation in the carburetor. First you need to drain the gasoline from the float chamber, to do this you need to close the fuel valve and partially unscrew screw No. 1, after the gasoline has drained from the float chamber, tighten screw No. 1.
Let's look at photographs of candles with various soot and defects.
A 100% indicator of a correctly adjusted combustible mixture is carbon deposits on the spark plug.
- Spark plug when the engine is running without faults.
- Engine with increased fuel consumption.
- Poor air-fuel mixture.
- Excessive amount of additives containing metal.
- Engine after a long period of inactivity.
- Idle cylinder spark plug
- Complete destruction of the central electrode with its ceramic skirt.
- Worn out or stuck oil scraper piston rings.
Let's consider the location of the screws for adjusting the mixture quality and idle speed of carburetors of different models.
No. 1 Screw-plug of the float chamber; No. 2 Mixture quality screw;
No. 3 Idle speed adjustment screw.
1 — idle quality adjustment screw; 2 — fuel inlet fitting; 3 - fitting through which you can drink fuel from the float chamber; 4 — screw-plug of the float chamber.
1 - ventilation tube; 2 — idle speed adjustment screw; 3 — screw for adjusting the composition of the fuel-air mixture.
Adjusting the speed and quality of the mixture of the ATV carburetor.
1. Start and warm up the engine until it reaches operating temperature.
2. By adjusting the idle speed screw, set the speed to normal. Tighten the fuel mixture screw completely until it stops, the engine should stall. If this does not happen, check the air tightness of the air supply system from the air filter.
3. Unscrew the fuel mixture screw 1 turn. (By turning the screw clockwise, we enrich the mixture; by unscrewing it counterclockwise, we lean it).
4. Start the engine and, by adjusting the idle speed screw, set the speed slightly higher than normal
5. Slowly unscrew the fuel mixture screw until the engine reaches maximum speed (we unscrew the screw no more than 2 turns, but depending on engine wear and other malfunctions, the range may fluctuate).
6. By re-adjusting the idle speed screw, set the speed to normal.
7. By pressing the gas trigger several times, check whether the idle speed is stable.
Adjusting the quality of the mixture using a needle.
You've probably heard more than once about adjusting the quality of the mixture on a carburetor by manipulating the needle. I note that these are extreme measures; for initial adjustment, use the mixture quality screw, and only if you do not get the desired result, unscrew the fastener and remove the needle. What is she? This is the main element that regulates the amount of gasoline supplied to the combustion chamber. Connected directly to the gas handle via a cable. When you turn the knob, the needle rises higher, opening the fuel channel, thereby supplying more mixture, which increases power, which is translated into speed.
You will see 5 grooves on the needle at the attachment point. Initially, a locking ring secures it in the central position, this is the best option. But sometimes it is not possible to achieve the required quality of the mixture. Then we will need the remaining grooves, 2 on top and 2 on the bottom, this means that we can adjust the dose gradually.
By lifting the locking ring up and locking it in this position, you lower the needle, and it, in turn, blocks the channel more than usual. There is less gasoline supplied than air, and the mixture becomes leaner. By lowering the ring down, we raise the needle, and everything happens exactly the opposite.
Remember that an excessively lean or rich mixture can lead to serious problems - from overheating to loss of power, carbon deposits in the combustion chamber and all the ensuing consequences. Monitor the condition of the spark plug electrodes; this is the main indicator that will help you determine the quality of the mixture.
If you have any questions about adjusting and tuning the carburetor, you can ask them below in the “Comments” column.
Source
Why do you need to tune the fuel system?
The operation and service life of the engine directly depends on the quality of the fuel mixture. The carburetor is responsible for preparing the mixture, but after long-term use of the equipment, the settings get lost. It leads to:
- Problems with starting the power unit. For example, if the carburetor of a 125 cc ATV has not been adjusted, the unit may stop starting or begin to stall.
- Poor response to the throttle trigger and a drop in power. Due to incorrect system settings, the engine speed decreases and, accordingly, its power decreases.
- Failures during acceleration. The traction may disappear for one or several seconds. But the most unpleasant thing is that such failures occur consistently, which significantly interferes with the speed gain.
- Reduced dynamics. The quad becomes “sluggish” and reluctantly picks up speed. In addition, when accelerating, jerks appear.
- Excessive carbon formation. An incorrectly prepared mixture leads to a large amount of carbon deposits appearing in the combustion chamber, which causes the engine to overheat. Naturally, this reduces the life of the engine and leads to its breakdown.
Many riders who decide to buy an inexpensive ATV simply do not spare the equipment and ignore this procedure. But even if you plan to change your device in 1.5-2 years, adjustment is needed. The reason for this is increased fuel consumption. A quadric with an untuned carburetor “eats” 30-40% more gasoline, and this is a significant expense.
How to avoid problems?
So how do you adjust the carburetor on a Chinese ATV? To do this you need:
- Adjust idle speed. The procedure is performed using a special screw, which is responsible for the quality of the composition and the number of revolutions.
- Optimize the quality of the fuel composition.
- Adjust the gasoline level.
However, it is important to remember that all adjustments are made only with a “clean” carburetor. This means that the rider needs to remove all dirt from the assembly and flush the system to remove condensation and sediment from it.
Note: Immediately before adjustment, the engine should be warmed up to operating temperature.
How to adjust the carburetor on an ATV?
To adjust the idle speed of the carburetor, you first need to clear the float chamber of fuel. To do this, start the all-terrain vehicle, close the fuel valve and wait until the vehicle stalls (5-10 minutes). To speed up the process, you can ride a little on a quad. Of course, you can drain the gasoline, but in any case you will have to warm up the device, so the first method of “removing” gasoline is more effective.
After this you need:
- Open the tap.
- Start the device.
- Screw in the bolt (No. 2), which is responsible for the quality of the mixture, until it stops. Remember that to enrich the composition you should turn to the right, and to deplete it to the left. If the quad stalls at this stage, it means there are problems (the pipes have become depressurized).
- Turn screw #2 once (to the left).
- Increase idle speed using bolt #3. Start the quad and check the speed. They will be slightly higher than standard indicators.
- Unscrew bolt No. 2 (turn it 2-2.5 times). After this, the engine should reach maximum speed.
- Start adjusting the system using screw No. 3. Focus on sound. The engine should run smoothly, without any strain.
- Step on the gas. This will make sure that the speed does not drop.
To avoid mistakes, read the instructions before adjusting the carburetor on a 125 cc ATV. Remember that the location of the bolts differs in different devices, so read the documentation in advance.
YORUMLAR • 70
The most intelligible video, thank you.
soooooooooooooooooooooooooooooooooooooooooooooooooooooooooooooooooooooooooooooooooooooooooooooooooooooooooooooooooooooooooooooooooooooooooooooooooooooooooooooooooooooooooooooooooooooooooooooooooooooooooooooooooooooooooooooooooooooooooo much this videos are very good vids.
You have turn signals and rear brake lights. But it turns out you installed them for your own safety. or you are driving onto a public road.
@Russland Lange, in any case, I have a driver’s license, so I didn’t worry about it) I filmed the video 6 years ago, I sold the motorcycle back in 2014 or 2015 ???? There is nothing complicated there, I also Googled these videos on YouTube. You can handle it, I'm sure????
@Raev Alexander, you can’t do that, Brother, Pete is a sports inverter. there is a video on how to install turn signals and brake lights. If you don’t have it, do it, I’ll wait, because I’m the one who’s sick of you with electrics, and you explain it very clearly.
@Raev Alexander, well, you can’t do that, brother
I installed it because I was driving on public roads????
What should you do if at TTR 125, at speed 4 with the throttle fully open, it starts to jerk and twitch?
I turned it off after the words about gasoline.
Since 2012 Irbis, I only use 95. The valves are ideal, the mileage is about 20, 30k
What carburetor model is it?
Well done then and before I
guys also started making videos about TTR 125 Irbis, subscribe
Well done, even though I know it, it was still interesting
started the pit. warmed up I unscrewed the quantity screw until the motorcycle started to stall. then turn the quality screw to maximum speed. then again, use the quantity screw to set the comfortable idle speed. All. Why did you set up some kind of cart for 3 hours? As a result, absolutely nothing is clear.))))) He runs here and there. back and forth. and why the hell will you understand)))))
Please tell me, I recently bought a used snow leopard, it doesn’t start well and doesn’t hold idle, it drives very well, what’s the problem? Maybe the carb is rich?
Peepee I ride on a twisted amount
Tomorrow I'll go spinning
When I start the engine, the speed goes off scale, as if at full throttle, the throttle moves but does not react to it. the needle is all in place. Tell me what’s wrong? I just took the needle out of the carb and wanted to move the ring on it by one division and after that it started.
Check the cable notches, it may be too tight.
Maybe when I inserted the needle with the flap it jammed there, or it wasn’t inserted properly
Does it have a pz 22?
thank you patpiska
even though I have kayo, I’m thirstier than namikuni
I have trouble starting
Hello, oil leaked from csb cause
Please tell me about the position of the choke switch (opening the damper). Do you have it all the way down? In summer?
It should always be in the middle position
Guys, tell me how to set up the Mikuni 22 carburetor, I have a Wels CRF 125 pit bike, such dances with a tambourine
Will misalignment damage the motorcycle?
For some reason I used to think that a rotation was 360 degrees.
On my kayo 140 the intake gap is 0.5 and the exhaust gap is 0.6
should be 0.05 at the inlet and 0.07(0.08) at the outlet
damn lilies of the valley, progression for you
I’ve been assembling engines for 15 years, repairing everything except body parts. Motorcycles are my hobby, not serious, so are all sorts of ratchets. I bought a 125 TTR for my son, rebuilt the engine, and didn’t like the carburetor. I bought the 22nd Mikuni. and then it began. It’s not clear at all whether it’s overfilled or underfilled, I’m twisting and turning. As a result, I made passages for the hall sensor and simulated advance. I removed the original filter; the diffuser inside it is much smaller than the diffuser in the carburetor. As a result, there is no failure at all, it turns out to the fullest. Your video is an amateurish approach. There is no need to mislead people. And the number of views indicates that the problem is simply epidemic. I could also make a video of how I, an old man, couldn’t fix the carburetor of a moped for 2 days, I even went to the Internet. But still, reason and logical thinking bear fruit. So to speak, you can’t drink your talent away.
Yuri, it looks like you’re the only one who didn’t understand anything in this video; you can tell by the likes whether people understood what I told them or not.
Why mislead already incomprehensible people. Since they came here to look for an answer, they will find nonsense after which nothing will go anywhere at all. The words are some kind of progression. Progression? Which? Arithmetic or geometric? What if the oil leaks?
Source
How to adjust the quality of the prepared mixture?
To evaluate the quality of the fuel composition, do a test drive. After this, unscrew the spark plug and assess its condition. If she:
- Brown (near the insulator). This means everything is fine. But if such a shade is only on one side, the composition is too poor.
- Black (on insulator). Soot signals that the system is delivering too much fuel. However, if the entire spark plug is black, it means the composition is too rich, which increases gas mileage.
- White (insulator). This means there is not enough fuel and air. And if the mixture is too lean, the entire candle will be white.
- Red. This means there is a high concentration of metals in the composition.
Also pay attention to the following “symptoms”: damaged tip (electrode malfunction), oil deposits (damage to rings and caps), chips and inclusions (a sign of motor destruction).
To adjust the mixture, you need to twist the needle cap and pull it. To get the needle, pull out the cable. After this, move the ring in the required direction (lower - more air, but less fuel and vice versa). Then start the engine and make sure it doesn't stall.
Setting the gasoline level
The last step in adjusting a 125cc ATV carburetor is to adjust the gas level. To do this you need:
- Find the drain hose.
- Lift the bottom of the tube.
- Unscrew the screw and remove the mixture.
- Open the float chamber.
- Find the tab that covers the needle.
- Bend it slightly downward to increase the fuel flow rate.
Note: Be careful when making adjustments as the system components are very fragile. Ideally, carburetor adjustment should be carried out by a specialist.
Why do you need carburetor adjustment at all?
For stable operation of the ATV, it is necessary that the engine receives the optimal amount of fuel mixture corresponding to its speed range. Otherwise, the following problems may occur:
- Difficulties with the factory, the engine constantly stalls.
- Weak power characteristics, sluggish response to the throttle trigger.
- Poor dynamics when accelerating from the bottom, accompanied by spontaneous jerks when moving.
- Dips observed mainly during overclocking.
- High fuel consumption.
- Excessive formation of carbon deposits on the walls of the combustion chamber and, as a result, overheating of the engine.
What needs to be done in this case:
- Adjust the idle speed using the mixture quality screw and the number of revolutions.
- Adjust the quality of the mixture using a needle.
- Adjust the fuel level.
Important! Make adjustments only when the carburetor is cleaned inside and out, and when the engine is warmed up to operating temperature.
Why do you need to tune the fuel system?
The operation and service life of the engine directly depends on the quality of the fuel mixture. The carburetor is responsible for preparing the mixture, but after long-term use of the equipment, the settings get lost. It leads to:
- Problems with starting the power unit. For example, if the carburetor of a 125 cc ATV has not been adjusted, the unit may stop starting or begin to stall.
- Poor response to the throttle trigger and a drop in power. Due to incorrect system settings, the engine speed decreases and, accordingly, its power decreases.
- Failures during acceleration. The traction may disappear for one or several seconds. But the most unpleasant thing is that such failures occur consistently, which significantly interferes with the speed gain.
- Reduced dynamics. The quad becomes “sluggish” and reluctantly picks up speed. In addition, when accelerating, jerks appear.
- Excessive carbon formation. An incorrectly prepared mixture leads to a large amount of carbon deposits appearing in the combustion chamber, which causes the engine to overheat. Naturally, this reduces the life of the engine and leads to its breakdown.
How to adjust carburetor idle speed on an ATV
- To get rid of condensation that regularly appears in the carburetor, drain the fuel from the float chamber - close the fuel valve and unscrew screw No. 1 until it stops. Wait for the gasoline to drain completely and tighten screw No. 1 back.
- Start the vehicle and let it warm up for a few minutes.
- Tighten the mixture quality bolt No. 2 until it stops. The engine will stall at this stage. If this does not happen, the tightness of the air supply system pipes is most likely broken. Check it out. Then turn bolt #2 one turn. The mixture becomes richer in a clockwise direction, while it becomes leaner in a counterclockwise direction.
- Increase idle speed using screw No. 3 and start the ATV. The number of revolutions should be slightly higher than usual (in some models the idle speed adjustment bolt is located on the right side of the four-wheeler).
- Unscrew the fuel mixture quality screw No. 2 so that the power unit reaches maximum speed - approximately 2-2.5 turns.
- Start leveling the idle speed using bolt No. 3 until you hear a smooth, smooth sound of the engine running.
- Press the throttle trigger several times to check the stability of the idle speed.
Note. The location of the bolts may vary on each carburetor model, so check the instructions that came with your carburetor.
Lost idle speed (XX) of an engine with a Solex carburetor
The car engine may idle completely.
Malfunction - the engine only runs on choke. Or be unstable (the speed “floats” up and down, the engine shakes – “troits”, stalls after a short period of operation, stalls after pressing the gas pedal, etc.). Let's look at the reasons for the disappearance of idle speed on car engines with Solex carburetors 2108, 21081, 21083, 21073. Along the way, we'll look at methods for eliminating this malfunction.
Lost idle speed of an engine with a Solex carburetor, reasons
The reasons are related only to the Solex carburetor 2108, 21081, 21083, 21073 and the engine power system connected to it.
There are actually only two main malfunctions leading to the disappearance of idle speed associated with the carburetor:
— the carburetor prepares a fuel mixture that is too lean due to a malfunction or incorrect adjustment, after which the engine simply cannot operate on it;
- the carburetor prepares a fuel mixture that is too rich, it does not ignite well and floods the spark plugs.
Now in more detail about when this happens:
— Idle speed control is broken
For example, after repairing a carburetor, the position of the screws for adjusting the “quantity” and “quality” of the fuel mixture is incorrectly set. Set the initial position of the screws - screw them in until they stop, and then turn them out one and a half to two turns. Then adjust the idle speed of the Solex carburetor. See photo above.
— The carburetor solenoid valve (EMV) is faulty
Perhaps it itself is faulty, or the system of which it is a part is not working. Or it is simply installed incorrectly. Check its operation and installation. A sign of correct operation and installation is the engine stopping after removing the wire tip from its output.
Fuel jet in the solenoid valve (EMV) of the Solex carburetor
— The air and/or fuel jets of the idle system are clogged
The CXX fuel jet is located in the tip of the solenoid valve (see photo above). To access the air jet you will have to remove the carburetor cover. They should be cleaned and blown out with compressed air.
Air jets CXX carburetor Solex
— “Suction” of foreign air into the carburetor
The fuel mixture becomes lean - the engine idles unstably and even stalls. The image shows the place where foreign air is likely to be “sucked” into the carburetor. Most often, the culprits are leaky or loose gaskets under the carburetor, an O-ring on the EMC, and a leaky hose to the vacuum brake booster.
Places where foreign air is likely to leak into the carburetor
— Clogged engine air filter
Severe contamination does not allow sufficient air to pass through the carburetor idle system.
The car engine air filter element may be clogged.
— The shut-off needle valve does not hold in the carburetor float chamber
As a result, at idle, excess fuel is sucked in through the nozzles of the HDS diffusers, excessively enriching the fuel mixture, the so-called. "overflow". Check the valve and adjust the fuel level in the float chamber. You should also pay attention to the serviceability of the fuel pump, as it can create excess pressure on the needle valve (“pump”) and it will begin to leak fuel.
Checking the Solex carburetor float chamber needle valve
— Draining fuel from the carburetor into the tank (“return”) does not work
“Symptoms of a malfunction of the VAZ 2109 drain line check valve”
Drain line - “return” of the fuel system of the carburetor engine of VAZ 2108, 2109, 21099 cars
— Fuel level in the float chamber is too low
A low fuel level is always the cause of a lean fuel mixture, and in idle mode a slightly enriched mixture is needed. The engine will not want to run when it is lean. See Signs of Low Carburetor Float Chamber Fuel Level.
The normal fuel level for a Solex carburetor is 25-26 mm from the edge of the float chamber to the gasoline “mirror”; if it is more, there will be no idle
Notes and additions
— Before searching for faults leading to unstable engine idling associated with the Solex carburetor, you must make sure that the engine is warmed up to operating temperature (if there is no idle at all, then we warm it up with “suction”), all the necessary hoses, tubes and wires are connected to it, the air the damper stands strictly vertical, the “suction” is recessed all the way. In some cases, it is possible to pre-set the CXX.
— In addition to the Solex carburetor, the reasons for the disappearance of engine idle may be malfunctions of the ignition system, the power system and the engine itself. It is almost always recommended to start looking for problems with the ignition and fuel supply system (check the spark and jet from the fuel pump).
Twokarburators VK - More information on the topic in our VKontakte group, on Facebook Twokarburators FB and on Odnoklassniki - Twokarburators OK
More articles on engine idling with a Solex carburetor
— Solex carburetor idle system, device, principle of operation
— The idle speed of an engine with a Solex carburetor cannot be adjusted
— A hot carburetor engine does not start, reasons
— Diagram of the idle system and transition systems of the carburetor 21073 Solex
— The Solex carburetor idle system does not work
— Idle speed is not adjusted (reasons not related to the carburetor)
HOW TO ADJUST THE CARBURETOR ON AN ATV
First of all, we free the float chamber from residual gasoline. We turn off the fuel supply and start the engine, wait a few minutes until the engine stops completely. To speed up the process, you can also ride an ATV.
Next you need:
- Open the fuel supply valve.
- Let's start the engine.
- We tighten the bolt, which is responsible for the quality of the mixture, until it stops. Important: for a “rich” mixture you need to turn it counterclockwise, for a “poor” mixture clockwise. If the engine starts and immediately stalls, then there is a possibility of depressurization of the pipes.
- Turn the screw responsible for the mixture counterclockwise one turn.
- We increase the speed using the “quantity” screw. We start the engine and look at the speed. They should be slightly larger than usual.
- Unscrew the mixture screw (turn 2-2.5 times). Next, the engine reaches maximum speed.
- Using the “quantity” screw, we adjust the operation of the power system. Engine operation should be free of choke.
- By pressing the accelerator handle, make sure that the speed does not decrease.
- Before adjusting the carburetor on an ATV, you need to study the instructions, since the location of the adjustment bolts may differ on different models.
Irbis 110 ATV carburetor adjustment
1. DONE WITH A WARM ENGINE.
2. Idle SCREW - RIGHT.
3. MIXTURE QUALITY SCREW - BOTTOM.
_____________________________________________________________________
With the engine well warmed up, tighten the VK (quality screw) until it stops. Let's start the engine. Use the throttle to hold the MINIMUM SUSTAINABLE RPM, not allowing it to stall, TURN the VXX screw (idle speed screw) until the engine itself maintains the MINIMUM SUSTAINABLE RPM - without the help of the throttle. Then slowly
unscrew the VK. The engine will begin to increase speed. By gradually unscrewing the VK we will achieve MAXIMUM RPM (if the RPM is too high, turn the VV a little until it is acceptable). Having achieved the maximum speed of the VC, we check that further UNLOCKING the screw does not increase the speed, try to TWIST it until the speed begins to decrease, leave it in this position and then, unscrewing the VC, set an acceptable idle speed. The operation can be repeated a couple of times. If this method does not work, it means the carburetor is clogged, there is an air leak or it is defective.”
__________________________________________________________________________
A mixture is called normal if gasoline and air are combined in it with a weight ratio of 1:15. Engine power when operating on such a mixture is 4-5% lower than the maximum, and fuel consumption is approximately the same amount higher than the minimum possible. The engine develops the greatest power when running on a rich mixture, in which this ratio ranges from 1:12.5 to 1:13. In those cases when it is necessary to achieve the greatest efficiency, the amount of air per 1 kg of gasoline increases to 16-16.5 kg (lean mixture). With a further increase in the air content in the mixture, it becomes increasingly leaner and soon becomes ineffective. If, on the contrary, the air content in the mixture is reduced, then at a ratio from 1:12.5 to 1:6.5 (rich mixture), the engine “pulls poorly” due to a large loss of power and operates extremely uneconomically.
Carburetor adjustment is carried out only on a hot engine; therefore, before starting the adjustment, it is necessary to warm up the engine. The mixture quality screw is turned in completely, and then backed out half a turn - a turn. By rotating the idle speed adjusting screw, achieve a minimum stable rotation of the crankshaft, and then gradually unscrew the mixture quality screw (lean mixture) until interruptions in engine operation occur. Then slowly turn the idle speed screw (enriching the mixture) until the engine starts running stably. Tighten the mixture quality screw again, reducing the rotation speed, finding a new position of the idle screw. As in the first case, these operations are repeated until a minimum, but completely stable crankshaft speed is obtained.
The correct adjustment of the amount of mixture is checked by sharply opening and closing the throttle. If the engine stalls when the throttle is sharply opened, you should turn the quality screw 1/4-1/2 turn (the mixture will become richer), and if it stops when the throttle is suddenly closed, turn it out the same amount (the mixture will become leaner).
It helped me and I started eating less)
Source
Adjusting the ATV carburetor mixture quality on the go
1. Start the ATV and take it for a test ride. Wait until the engine has completely cooled down.
2. Check the condition of the spark plug. To do this, unscrew the cap and inspect the spark plug.
What to pay attention to:
- A light brown coating around the entire circumference of the insulator is a sign of optimal carburetor operation.
- Brown color on one side of the insulator means the engine has a lean mixture.
- A thick black deposit on the spark plug insulator is an indication that the carburetor is supplying too much fuel mixture while the ATV is moving.
- A completely black plug, insulator and electrode are too rich a mixture, which results in excessively high fuel consumption and a decrease in power, as well as gas pollution in the chamber.
- White insulator - lack of air and gasoline supply. Leads to overheating and increased gasoline consumption.
- A completely white spark plug is a too lean mixture.
- Brick color - a large amount of additives with a high metal content in the composition.
- The absence of carbon deposits and the simultaneous melting of the electrode means a very lean mixture at high speeds.
- A spark plug with a broken tip is a breakdown of the central electrode with a ceramic skirt.
- A spark plug with oil deposits inside the electrode is a sign of used rings and valve stem seals.
- Shiny inclusions and shavings indicate engine destruction due to driving at high speeds.
- Oxidation - problems with piston rings.
3. Unscrew the needle cap at the top of the carburetor. Pull the needle. This is the main element that regulates the supply of fuel to the combustion chamber, since the needle is connected to the gas trigger. When the trigger is pressed, the needle rises, slightly opening the hole for supplying the fuel mixture. This directly affects the increase in power and speed of the ATV.
4. Remove the cable, then press the needle to pull it out. The needle has 5 grooves and a locking ring. By default it is set to medium. The lower the locking ring is located, the higher the needle is raised, which means a lot of gasoline and little air is supplied. Accordingly, the higher the ring, the less gasoline and more air.
5. Move the retaining ring in the desired direction to optimize carburetor performance. Insert the needle into place.
6. Start the engine and pull the throttle trigger. If adjusted correctly, the engine should not stall from sudden pressure.
And remember, you should resort to adjusting the needle only as a last resort, when adjusting the quality and quantity screw does not bring any results.
The best carburetor for Irbis TTR 125
Irbis TTR 125, unfortunately, has not earned the best reputation, but all because it has a little more jambs than any other pit bike. In general, this is the same pit as all the others: it breaks in the same way, and it also has its own weak points.
With proper running-in and regular maintenance, the engine lasts quite a long time. And remember that this is the very first and cheapest mass-produced pit bike that appeared in Russia!
Naturally, any technique can be improved, modified and simply made to suit you.
As written above, the engine is quite good for its price, but like the YX 140, it is pretty strangled by the carburetor.
And if on the same kai, on the 140 engine, there was at least a good copy of the MIKUNI VM 22, and it starts and drives on it, but not at all at full strength, then that set of bolts with crooked holes in the body, which the creators of the snow leopard call a carburetor, defies any logic or explanation.
The native “carburetor” of the snow leopard cannot be adjusted in principle! It would have a greater effect if you manually poured gasoline into the engine than using a native carburetor.
So, it cannot be adjusted; therefore, you will not be able to adjust the working mixture normally, and this leads to two things. First, the mixture will be lean, which means an increased temperature of fuel combustion, an engine wedge, burnt-out valves, and often a burnt-out exhaust at the bend.
The second case is when the mixture is rich. Starting will be complicated, because the spark plug will constantly be flooded, and while driving, the engine will not work at full power, but will simply choke, and your snow leopard will not drive normally.
Naturally, there can be no talk of any stable work; there will always be some problems.
But the solution to this problem is extremely simple - installing a MIKUNI VM 22 carburetor.
By the way, despite the fact that the carburetor is not very expensive, quite often they sell new used carburetors that are removed from the Kae 140, for which it is frankly too small.
What will this carburetor give you?
And it will give you the opportunity to correctly configure the working mixture. Your engine will last much longer, since there will be no chance of overheating and jerking when the mixture is rich.
Naturally, after installing the mikuni, the snow leopard will ride much more vigorously, and you will feel it immediately. Of course, when driving, the dips that occur at high speeds will disappear, because hurray - you will have a normal mixture!
You can start the engine by hand in any weather and, probably, under any conditions. In this case, the engine will not stall, then gain or lose speed, but will run smoothly and smoothly.
Everything written above is based not on theory, but on practice, and on several snow leopards. At first you suffer, trying to adjust your original carburetor. Then, after the 10th attempt, I simply bought a mikuni and voila! Perfect engine operation is ready! Without unnecessary problems and hassles)
As for the results of the sea trials, as a form of mockery, each gear was cranked up to the cutoff and he picked it up as long as the throttle was turned. No jerks, failures or inappropriate actions on the part of the pit.
Bottom line: If you have an snow leopard TTR 125, then we recommend that you install Mikuni VM 22 on it. By doing this you will not only make your life easier and protect yourself from constant repairs, but also get stable engine operation and extend its service life.
Source
Adjusting the fuel level in the float chamber of ATVs
The performance of a four-wheeler depends on the correct level of gasoline in the carburetor. An excessive amount will flood the candles, spill on the ground and lead to unnecessary expenses. If too little fuel is supplied, the engine simply will not start.
How to optimally adjust the fuel supply
- 4-stroke ATVs have carburetors with an opaque drain hose tube hanging down. Therefore, first of all, replace it with transparent one.
- Lift the free end of the hose up.
- Unscrew the drain screw next to the tube to get rid of excess fuel. Based on the amount of liquid entering the tube, determine the level of gasoline in the carburetor. The norm is the line (1-1.5 mm below is allowed) between the housing and the float chamber.
- To adjust the fuel supply level, open the float chamber and find the tab that covers the shut-off needle.
- By bending the tongue down, you will increase the intensity of fuel delivery. By bending it up, on the contrary, lower it. Perform all manipulations with caution, as the structure is quite fragile.
OPTIMUM FUEL LEVEL IN THE CARBURETOR. CARBURETOR ADJUSTMENT.
The correct fuel level in the carburetor float chamber is the key to the normal operation of an ATV or mini bike.
The quality of operation of a minibike or ATV largely depends on the correct level of fuel in the carburetor. If there is too much of it, then it will flood the candles and spill on the ground when overflowing, and if there is too little, problems with starting cannot be avoided. Therefore, it is recommended to pay special attention to carburetor settings. At the very bottom there is a drainage hose. First of all, you need to take its transparent tube and, having disconnected one of its ends, lift it up to the carburetor chamber. Some ATV models (usually 4-stroke ATVs) use an opaque tube, in which case it is recommended to remove it and replace it with a transparent one while making adjustments.
Then you should unscrew the fuel drain screw, which is located next to the drain hose. Fuel from the carburetor will begin to flow into the drain hose.
When the fuel enters the transparent tube, we can judge its level in the carburetor. The optimal level is considered to be the level that reaches the connection line between the carburetor bodies and the float chamber. A level of a millimeter or one and a half below this line is also considered acceptable, depending on the engine model. The most suitable option can be determined experimentally.
If during testing you find that your level is very different from the specified parameters, it needs to be adjusted. To do this, you need to open the float chamber and find the float, which closes the locking needle using a metal tongue. To increase the fuel level in the carburetor chamber, do you need to bend the tongue? resting down on the locking needle, and to lower it, bend it up. In this case, you need to act with extreme caution, since the tongue is not particularly durable.
You can also take this opportunity to disconnect the shut-off needle and rinse it thoroughly. The same applies to the fuel passage (jet), especially if your carburetor is leaking through the fuel drain hose. Such a leak may be due to contamination of the tube or a clot of oil getting under the needle. In such cases, the needle does not completely shut off the fuel supply, which leads to the chamber overflowing and fuel leaking out through the drain hose.
Do not despair if your attempts to adjust the fuel level are in vain. Rarely does anyone succeed the first time. You'll have to experiment, try different options until the level is what you need. Of course, you will have to be patient, but keeping your ATV running smoothly is worth it.
If the engine feels like it's about to stall, you should increase the fuel level, and if it feels sluggish and sounds like it's choking, you should lower the fuel level.
Source