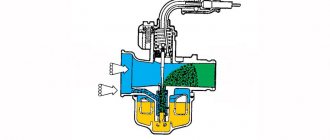
The carburetor is one of the most important systems on a motorcycle. The performance characteristics of the vehicle itself, as well as the durability of its operation, depend on its correct operation. Therefore, when choosing this element of the system, drivers pay attention to the device and the principles of its configuration.
If your motorcycle has a K-68 carburetor, it is not difficult to perform the adjustment procedure yourself. In this case, the engine will start quickly and the speed will become stable. At the same time, a mixture of gasoline and air in the correct proportion will begin to flow into the engine.
general characteristics
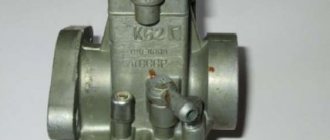
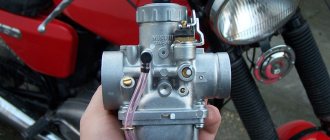
The K-68 Pekar carburetor is in great demand among owners of domestically produced motorcycles. The presented equipment is produced by the plant in St. Petersburg, Fuel Systems LLC. Production was focused on domestic machine-building enterprises. The main consumers of their products were VAZ, PAZ, Gazelle, Volga, etc.
The “Baker” series of carburetors includes devices for cars and motorcycles. This is new generation equipment. The differences lie in the design and functional characteristics of the presented carburetors. They are also known among car enthusiasts for their efficiency. Therefore, the demand for the presented devices has not decreased for many years.
Correct adjustment of the K-68 carburetor allows you to reduce gasoline consumption by up to 20%. At the same time, the performance of the motor is significantly improved. The carburetor of the presented series, according to reviews from experts and consumers, has good performance. An acceptable price makes the presented products competitive. Therefore, K-68 carburetors are in great demand today.
Types of settings
When choosing a carburetor for Ural, Dnepr, IZH and other brands of domestic motorcycle manufacturers, most users prefer the K-68 model. Moreover, buyers are trying to purchase original equipment manufactured by the above-mentioned plant.
The correct operation of the engine in various modes depends on the operation of the carburetor. Therefore, when preparing the fuel mixture, it is necessary to maintain a certain proportion of air and gasoline. When there are violations in this system, failures occur in other systems and mechanisms. Therefore, the driver must control the ratio of fuel and air mixture.
In order for the process to occur correctly, it is necessary to ensure the correct adjustment of various devices. These primarily include the main dosage system. The starting device and the mechanism for maintaining a certain fuel level also require attention during maintenance. The driver, in addition, adjusts the idle speed.
What carburetor is used on the IZ Jupiter 5 model
IZH Jupiter 5 is the latest and most modified model in the series. The first “fives” were transitional: facing from model 4 and a K-62D carburetor. Then, an updated version was put into production - IZH Jupiter 5-01, the motorcycle received an interchangeable lining with IZH Planet 5 and carburetors K-65D, K-68D and Jikov-2928CE. The latter was taken from the Czechoslovakian motorcycle Java-638, which had similar engine parameters to the Jupiter.
Later, Izhmash presented a modified version of the Jupiter engine with water cooling. The so-called “dropsy” had the same engine power as a conventional engine, but the engine’s noise level and fuel consumption decreased. A new K-68D carburetor was also installed on it. Its feature was the new cylindrical shape and material of the throttle valve (like Jikov), which reduced its wear. Idle speed has become more stable.
Fuel level
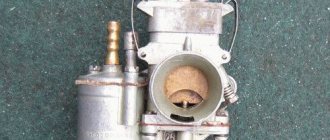
Tuning the K-68 carburetor can begin by checking the fuel level in the float section. To perform this procedure, you need to prepare the necessary tools. With its help you need to dismantle the carburetor. Next, remove the lid that covers the float chamber.
The carburetor must be turned over. The floats will now be on top. The motorcycle owner must measure the distance from the top edge of the floats to the edge of the body. Ideally it will be 26 mm. A deviation of 0.5 mm in both directions is allowed. If the indicator does not correspond to the standard, it is necessary to adjust the position of the floats. To do this, you need to bend the tongue a little.
The floats must also be parallel. If this is not the case, they are bent with a bracket.
Need an intake manifold
A separate problem is the manufacture of the intake manifold. Since casting the part at home is not possible, you will have to use thick-walled stainless steel pipes
It is important to meet the following conditions:
- The internal diameter of the pipe must correspond to the diameter of the inlet holes on the cylinders.
- The diameter, flow area and bending of both branches of the collector must be the same.
- The connecting platforms should be made of thick, at least 5 mm, and even sheet. It would be good if all operations could be performed on a milling machine. In the absence of one, you will have to arm yourself with a good plumbing tool, be patient and do everything yourself.
- Internal welds, if any, are carefully ground. Irregularities and protrusions on the inner surface of the intake tract are unacceptable.
Inspection of candles
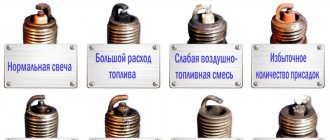
Adjusting the K-68 carburetor also involves assessing the appearance of the spark plugs. To do this, you need to drive at least 30 km along the highway. In this case, the speed should be medium or high. After this, you can start studying candles. If carbon deposits form on them, this indicates an insufficient amount of air in the fuel. It's a rich mixture.
It happens that the insulator is completely white. This indicates a lean fuel mixture. Normal candle color ranges from red-orange to sandy. If this is the case, then the single-chamber carburetor does not need to be adjusted.
Based on the obtained observation results, the driver makes a decision on further actions. Sometimes you only need to make an adjustment, but sometimes you may also need to clean the carburetor. In this case, the device is completely dismantled, disassembled and washed.
SOVIET OPPOSITION MOTORCYCLES on Odnoklassniki | Topic author: Evgeniy
Which carburetors are better to put in the Ural K-68 or K-301?
Vladimir (Achava) Of course K 301. Old ones that have been proven over the years - RELIABLE. And at 68, I can’t say good things about them. I had these in the Urals, a “baker”, it works terribly above average speeds, it eats a lot. All in all a bad option. But if you put K 301, then buy them from a grandfather you know.
YURIY (Carmiya) I’ve had 301 for three years now and I’m not complaining.
Andrey (Iseline) I was of the same opinion
Vadim (Natana) Yes, K 301 is good for everyone until the float cracks and sinks. Here there will be a slightly different opinion. I also thought they were eternal. Ah, no. With K-63, 65 it is much easier in this regard. There were articles about the K-68 in Moto, it’s not worth publishing without modifications.
YURIY (Carmiya) yes, this also happens, but in this case I always carry a couple with me. About 68, what improvements?
With (Assunta) on a quad they cost 68 on a trike 301 to 301 consumption is less by 68 a little more, in principle I’m happy with both of them, they need to be adjusted normally and everything will be great
))) Vovka 54 RUS (((I had a motor in the Urals without any modifications, it worked perfectly, I admit only the K-68, nothing else. The K-65 crap comes a little closer, it starts to eat and you sit there wondering what to do with them, k- 301 is also bullshit, the flap consisting of two halves is also annoying
YURY (Carmiya) I’ll have to try to put 68 on the second Urals, but that will be in the summer.
Dmitry (Pernelle) I noticed only the plus of the K-68 is more economical than the K-65T. Minus the failures. The K-65T is good for speed. K-301 was installed on 6-volt Urals M-62, M-63, M-66. The K-38 was also praised for its economy on the Irbit M-61.
))) Vovka 54 RUS (((I didn’t have any failures in the Urals
YURY (Carmiya) thanks for the advice, we’ll try it. I was given it in the Urals 4 years ago,
))) Vovka 54 RUS (((I’ve been in the Urals since I was 7 years old
Andrey (Iseline) In general, opinions differ, but for now I’ll stick to K-301 K-65, I’m not even considering new ones
Andrey (Iseline) K-68 needs to be improved, right?
With (Assunta) put any if the new ones will still eat up as much as it needs. I have a K65.. only the damper wears out, you take the repair kit and change the whole zoor for a couple of K68s you can run into scorched ones.
Anton (Leonora) more than one Urals will not work on these corbs without failures
))) Vovka 54 RUS (((You don’t need to tell me, I had them and there were no failures.
Anton (Leonora) more than one 4-stroke internal combustion engine will not work without failures with variable resistance carburetors in the diffuser. This is a fact. It has been verified a long time ago
))) Vovka 54 RUS (((Who checked? when checked? I won’t bullshit I didn’t have any failures in the Urals
Everyone has Anton (Leonora). That’s why such corbs are no longer installed on any internal combustion engine except for some 2-stroke engines
How to connect Nissan consult iii with autocom
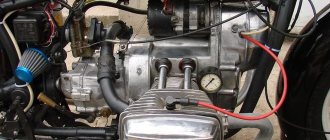
The Ural is the most recognizable motorcycle with a boxer engine and a side-mounted trailer, which is known not only in the countries of the former USSR, but throughout the world. Today, these motorcycles are produced mainly for the foreign market with electronic fuel injection. But they used to have carburetors. This article will describe in detail the adjustment and tuning of various carburetors on a Ural motorcycle.
Stop valve
Checking the K-68 carburetor requires paying attention to the shut-off valve. It is also called needle. If the valve is leaking, the level of gasoline in the mixture may increase. This creates a rich mixture.
The needle valve of the K-68 carburetor may have a rubber cone or ring in its design. To check the condition of this element, you need to remove the cover at the bottom. It is attached to the body with two bolts. When removing fasteners, care must be taken to ensure that they do not damage the gasket.
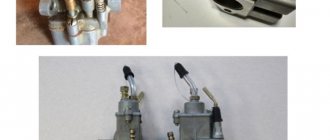
Next, the float is removed. To do this, you need to carefully squeeze its rod out of the grooves. The needle may fall out. Therefore, it is necessary to monitor it so as not to accidentally lose such an important element. If the rubber ring or cone is worn out, it is necessary to replace it. The needle should also move smoothly along the saddle.
Adjusting the fuel level in the Ural
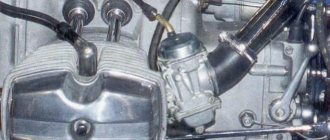
Adjusting the carburetor of the Ural motorcycle, with certain skills, can be done without removing the block itself. Due to the nature of the installation, some difficulties may arise with dismantling. The carburetor in this motorcycle is located on the cylinder heads at an angle to both the horizontal and vertical planes.
To make the adjustment, you will need a float from the same device. The motorcycle must be secured to a stand. Next, the gas tap opens. You need to wait some time. The carburetors will fill with fuel. Then the gas tap is closed. The hose is disconnected from the carburetor.
The bottom cap filled with gasoline must be removed. A spare float is lowered into it. The lid must be leaned against the body so that their planes become, as it were, a continuation of each other. The fuel level should be under the rim of the lower corner of the cap. If this is not observed, you need to bend the tongue.
Idle speed adjustment
Adjustment of the carburetor of the Ural, Dnepr and other vehicles is first performed at idle. To do this, the engine needs to be warmed up. Next, at idle, you need to set a stable speed. To do this, you need to rotate the horizontal screw, which is turned with a screwdriver.
Next, adjust the quality screw. This will also require a screwdriver of the appropriate size. You need to find a vertical screw. When setting it up, it is necessary to catch the moment when the number of revolutions increases to the maximum level. This action is repeated until stable engine idle operation is established.
You can check the correct setting by closing and opening the throttle. If you give the gas sharply, the engine will stall if the settings are incorrect. This means that the screw needs to be tightened (to enrich the mixture). When the throttle is closed abruptly, the engine stalls due to the fuel mixture being too rich. The screw needs to be turned out a little.
CARBURETTORS K68U, K68T
Instructions for installation and operation of carburetors K68U, K68T
This is interesting: Step-by-step instructions for installing fender liner
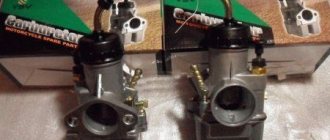
The engine is equipped with 2 carburetors. A carburetor is installed on the left cylinder, in which the throttle lift screw 11 is located on the side of the fuel fitting 12 (left-hand version), on the right - a carburetor, in which screw 11 is located on the side of the starting device.
1. Installing the carburetor on the engine. The carburetor is installed on the engine in the following sequence:
- Unscrew cover 2, remove it together with the throttle assembly 3, disconnect the cable blank 17.
- Pass the throttle cable through the guide tube 18, spring 4 and stopper 5. Using stopper 5, compress spring 4 and insert the cable boss into the groove of coupling 6.
- Install the throttle 3 so that the groove made on its side surface slides along the pin 7 pressed into the body 1. Lowering the throttle into the well, direct the needle 8 into the hole of the sprayer 10.
- Screw on the lid.
- Use the throttle handle to raise and lower throttle 3. Make sure that it fully opens and closes the diffuser.
- Use screw 11 to raise throttle 3 so that the distance between its lower edge and the diffuser generatrix is 1-2 mm.
- Install the assembled carburetor onto the engine through a standard gasket and secure with nuts, tightening them evenly to avoid deformation of the flange.
- Adjust the position of the cable sheath stop 25 so that the cable sheath has an axial play of 2-3 mm. Close stop 25 with cap 26.
- Screw screw 15 completely with a little force, and then unscrew it 1 turn.
- Attach the fuel hose to fitting 12.
2. Prepare the carburetor for starting the engine. After opening the fuel tap, make sure there is no fuel leaking from the carburetor. - Open starter 16.
- To facilitate starting a cold engine at temperatures below +5°C, fill the float chamber by pressing the quencher 13 and holding it until fuel appears from the drain hole 14.
- Turn the engine crankshaft by pressing the kick starter 1-2 times, turning on the ignition.
- After starting and warming up the engine, close the starting device 16.
3. Adjusting the carburetor on a warm engine.Before starting adjustments, it is necessary to check the technical condition of the engine.
- Disable one of the cylinders by removing the spark plug tip and shorting it to ground.
- Use the throttle lift screw 11 to reduce the speed of the operating cylinder to the minimum stable speed.
- Use the mixture quality screw 15 to adjust the speed to maximum.
- Repeat this operation 2-3 times, gradually reducing engine speed. Slowly lifting off the throttle, make sure that the engine constantly, without “failures,” increases speed. If a “failure” is observed, it is necessary to enrich the mixture by turning screw 15 1/4-1/3 of a turn.
- Adjust the second carburetor in the same way.
- Turn on both cylinders. Unscrew the throttle lift screws 11 of each of the carburetors to the same angle, reduce the engine speed to the minimum stable speed.
- Determine by ear the drop in engine speed when the cylinders are switched off for a short period of time.
- Use screws 11 to adjust the rise of the throttles so that the engine speed when the right and left cylinders operate alternately is the same.
- Turn on both cylinders and use the throttle to sharply increase and then sharply reduce engine speed.
In this case, the engine should switch to low speed mode and not stall. If the engine stalls, you need to slightly increase the engine speed by turning screws 11 of both carburetors to the same angle. 4. Adjustment of the synchronization of cylinder operation. - Ensure free rotation of the rear wheel of the motorcycle.
- Engage the highest gear.
- Having turned off one of the cylinders, increase the engine speed so that the speedometer shows 40-50 km/h.
- Fix the position of the throttle and, without changing it, determine the speedometer reading when the second cylinder is running.
- Adjust the position of the stops of the cable sheath 25 of both carburetors so that the speedometer readings when each cylinder operates alternately are the same.
5. Adjust the quality of the mixture at operating modes of the engine, depending on climatic conditions and the technical condition of the engine, by moving the metering needle 8 relative to the lock 9.The nominal position of the lock is the middle groove of the needle. When the needle lock moves upward, the mixture becomes leaner; when it moves downward (towards the conical part of the needle), it becomes richer. The needle displacement is achieved by moving the lock 9 to a nearby groove (coarse adjustment) and moving the adjusting washer 19 (fine adjustment).
6. Special instructions for use.
Operation is not allowed if fuel is leaking.
The carburetor must be operated with a sealed air filter installed by the manufacturer. Changing the filter design, as well as installing filters from other vehicles, is not allowed. The fuel entering the carburetor must be free of mechanical impurities. Carburetor parts should only be flushed with fuel. Solvent washing is not permitted. After washing, blow with compressed air or dry.
Cleaning calibrated holes 20, 21, as well as jet holes 22, 23, 24 with metal objects (wire, needles, etc.) is not allowed.
Main dosing system
Adjusting the K-68 carburetor also requires adjusting the metering needle and its position. You need to ride a motorcycle for some distance. On a straight section of the highway, you need to evaluate how the vehicle responds to the throttle. If it is weak, the needle is raised up one division. If after the trip the candles are sooted, they are lowered.
This setting will ensure stable engine operation at medium speeds. They are most often used by drivers. To adjust the carburetor at maximum speed, you need to select the correct jet cross-section. It only works when the throttle is turned all the way.
Having considered the principles of setting up and servicing the K-68 carburetor, every owner of a domestic motorcycle will be able to carry out the settings independently. Fuel consumption, as well as the operation of the main vehicle systems, depend on the correct execution of this process.
How to install and operate carburetors K68U, K68T
Carburetors with the “T” index are installed on engines with a volume of 750 cm3, and with the “U” index - 650 cm3.
The engine is equipped with 2 carburetors. A carburetor is installed on the left cylinder, in which the throttle lift screw 11 is located on the side of the fuel fitting 12 (left-hand version), on the right - a carburetor, in which screw 11 is located on the side of the starting device.
1. Installing the carburetor on the engine.
The carburetor is installed on the engine in the following sequence:
Unscrew the cover 2, remove it together with the throttle assembly 3, disconnect the cable blank 17. Pass the throttle cable through the guide tube 18, spring 4 and stopper 5. Using stopper 5, compress spring 4 and insert the cable boss into the groove of coupling 6. Install throttle 3 so that the groove made on its side surface slides along pin 7, pressed into body 1. Lowering the throttle into the well, direct needle 8 into the hole of sprayer 10. Screw on the lid. Use the throttle handle to raise and lower throttle 3. Make sure that it fully opens and closes the diffuser. Use screw 11 to raise throttle 3 so that the distance between its lower edge and the diffuser generatrix is 1-2 mm. Install the assembled carburetor onto the engine through a standard gasket and secure with nuts, tightening them evenly to avoid deformation of the flange. Adjust the position of the cable sheath stop 25 so that the cable sheath has an axial play of 2-3 mm. Close stop 25 with cap 26. Screw screw 15 in completely with a little force, and then unscrew it 1 turn. Connect the fuel hose to fitting 12.
2. Preparing the carburetor for starting the engine.
After opening the fuel tap, make sure there is no fuel leaking from the carburetor.
Open the starting device 16. To facilitate starting a cold engine at temperatures below +5°C, fill the float chamber by pressing the quencher 13 and holding it until fuel appears from the drain hole 14. Turn the engine crankshaft by pressing the kick starter 1-2 times by turning on the ignition. After starting and warming up the engine, close the starting device 16.
3. Adjusting the carburetor on a warm engine.
Before starting adjustments, it is necessary to check the technical condition of the engine.
Disable one of the cylinders by removing the spark plug tip and shorting it to ground. Use the throttle lift screw 11 to reduce the speed of the operating cylinder to the minimum stable speed. Use the mixture quality screw 15 to adjust the speed to maximum. Repeat this operation 2-3 times, gradually reducing engine speed. Slowly lifting off the throttle, make sure that the engine constantly, without “failures,” increases speed. If a “failure” is observed, it is necessary to enrich the mixture by turning screw 15 1/4-1/3 of a turn. Adjust the second carburetor in the same way. Turn on both cylinders. Unscrew the throttle lift screws 11 of each of the carburetors to the same angle, reduce the engine speed to the minimum stable speed. Determine by ear the drop in engine speed when the cylinders are switched off for a short period of time. Use screws 11 to adjust the rise of the throttles so that the engine speed when the right and left cylinders operate alternately is the same. Turn on both cylinders and use the throttle to sharply increase and then sharply reduce engine speed. In this case, the engine should switch to low speed mode and not stall. If the engine stalls, you need to slightly increase the engine speed by turning screws 11 of both carburetors to the same angle.
4. Adjustment of the synchronization of cylinder operation.
5. Adjust the quality of the mixture at operating modes of the engine, depending on climatic conditions and the technical condition of the engine, by moving the metering needle 8 relative to the lock 9.
The nominal position of the lock is the middle groove of the needle. When the needle lock moves upward, the mixture becomes leaner; when it moves downward (towards the conical part of the needle), it becomes richer. The needle displacement is achieved by moving the lock 9 to a nearby groove (coarse adjustment) and moving the adjusting washer 19 (fine adjustment).
6. Special instructions for use.
Operation is not allowed if fuel is leaking.
The carburetor must be operated with a sealed air filter installed by the manufacturer. Changing the filter design, as well as installing filters from other vehicles, is not allowed. The fuel entering the carburetor must be free of mechanical impurities. Carburetor parts should only be flushed with fuel. Solvent washing is not permitted. After washing, blow with compressed air or dry.
Cleaning calibrated holes 20, 21, as well as jet holes 22, 23, 24 with metal objects (wire, needles, etc.) is not allowed.