Sometimes it happens that the carburetor starts to malfunction on a faithful iron horse and it becomes necessary to clean it and adjust it correctly. Symptoms of this problem most often include: difficulty starting the engine after long periods of standstill (1 day or more), power failures when switching from idle to load, and unstable engine operation at high speeds. And, as a rule, there is not always time or opportunity to roll the moped to a workshop where it could be repaired. Therefore, you have to take on this painstaking work yourself.
Alfa moped carburetor overhaul
Before starting any work with the carburetor, you should know that any speck that gets into or is not washed out of the bowels of the unit can cause it to malfunction. Therefore, the workplace must be thoroughly cleaned. An important point is that all dismantling work is carried out only with the engine cooled down.
There should be no problems when dismantling the carburetor. You need to disconnect all the pipes from the unit (before disconnecting the fuel pipe, you need to turn off the fuel supply valve) and the throttle cable. Next, the assembly should be thoroughly washed from the outside using a brush and gasoline. As a “cleaning” agent, you can use gasoline, diesel fuel, kerosene, VD 40 or aviation alcohol of your choice.
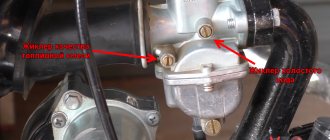
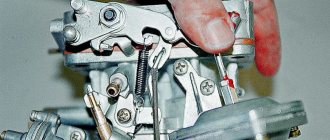
Once all dirt has been removed from the carburetor body, you can begin disassembling it. It should immediately be clarified the purpose of the three (usually brass) flat-head screws located on the carburetor body (all three are on the left side).
- Located in the area of the air supply pipe and serves to adjust the quality of the mixture when the engine is idling
- Located near the throttle valve and is responsible for adjusting the idle speed
- Serves to dump sludge from the float chamber and is located at the very bottom of it
For people who do not have experience disassembling carburetors, it is recommended that they lay out the parts in a line in the order in which they were removed. This will greatly facilitate the process of assembling the unit and eliminate the appearance of “extra parts”.
When disassembling, the following is removed from the carburetor:
- float together with axle;
- locking needle;
- fuel jet (integrated with the idle emulsion tube);
- main fuel jet;
- emulsion tube of the main dosing system;
- float chamber cover gasket.
When disassembling the unit is completed, all internal parts should also be thoroughly washed. After this, the integrity of the parts is inspected, and if a defect is detected, the part is replaced. If the carburetor parts do not have defects and are not clogged with debris, then carburetor tattoos are not suitable for this engine.
What is the need?
In order to prevent parts from wearing out too quickly, it is important to select the correct mixture at idle, at full throttle and in modes when the throttle is not fully open. What should make the owner think about adjusting the carburetor of the Alpha moped in these modes? Violation of the ratio of air and gasoline. Ideally, it should correspond to 1:15, where there is only 1 part of gasoline. Signs of a violation may include:
- Difficulty starting the engine.
- Any instability in idle speed can be heard as irregular engine operation.
- When you turn the throttle all the way, the engine does not rev up and accelerates slowly.
- Popping sounds in the carburetor or exhaust pipe.
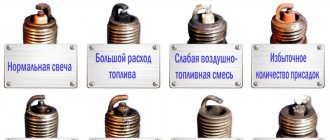
- Candle color is white or black.
How to adjust the carburetor on an alpha moped
Beginning motorcycle enthusiasts often encounter the problem of incorrect carburetor calibration. This happens after replacing a unit or after long-term use. The usual setup can be done with your own hands in literally 10 - 15 minutes. While upgrading an incorrectly selected unit and increasing its performance (this often happens when buying a new carburetor happens at random), the matter is not simple and requires certain knowledge and skill.
And so, setting up a correctly selected or original carburetor occurs in several steps:
- The air filter is cleaned from dust and, if necessary, the spark plug is replaced, and you also need to check the integrity of all tubes and the reliability of their fastenings.
- The engine warms up to operating temperature and the quality of the combustible mixture is adjusted. In this case, screw the mixture quality screw to the maximum and unscrew it back about 1 turn. Next, you need to turn the idle speed screw until the engine begins to stably maintain speed at a normal level.
- Next you need to force the mixture to lean. To do this, the quality adjustment screw is unscrewed until the engine begins to operate intermittently. It is then screwed back in again until the motor runs normally and the motor is tuned.
- Checking the setting is done by sharply rotating the throttle. If the motor runs without interruption, then everything is done well. If, when you sharply press the gas, the engine begins to choke or stall, you will need to enrich the mixture a little more by rotating the corresponding screw.
Adjusting the quality of the fuel mixture
In the case of an incorrectly selected carburetor, everything is a little more complicated. With the above symptoms, it becomes clear that the carburetor does not provide the necessary performance and the engine runs on a lean mixture. Such engine operation, especially at high speeds, is fraught with a drop in power, spark plug failure, frequent engine overheating and valve burnout. So for the carburetor to work properly, it will need to be modified.
If you still have questions about setting up the carburetor on the alpha, I recommend watching this video:
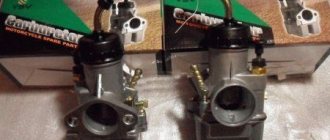
Carburetor Mikuni VM 22
Buy Mikuni VM 22 carburetor
The best available thing that can be supplied for excellent performance on a 125 engine is... Yes - yes, we will talk about the Mikuni VM 22 carburetor!
Well, there’s nothing complicated about it at all: it’s like a brick. You can only break something out of stupidity or from a “great” mind.
It attaches in a classic way
, without any adapters or other nonsense, just firmly to the pipe with two M6 bolts.
There are no bells and whistles with the damper either.
. A conventional round throttle valve: a design that has not left the assembly line for almost 80 years. In general, the theory of simplicity and reliability of bricks works again)
But despite its simplicity, you should not think that this carburetor is bad! Vice versa! This is the best carburetor that you can and should install on your 125 cc pit bike!
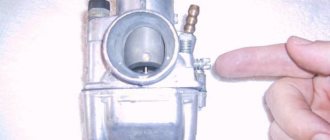
And what is noteworthy is that there is not a rather primitive air damper operating in three positions, but a full-fledged suction
, which has two positions.
First position
– the flag is lowered down, while the fuel channel is CLOSED!
Second position
– the flag is raised. It is in this position that the fuel channel is OPEN!
In the raised position of the flag, we open an additional fuel channel, thereby creating a rich mixture.
This is very helpful when starting the engine in the cold season: you just have to lift the flag, and literally within 2-3 times the engine begins to purr. In the warm season, when starting, for example, in the morning, you need to raise the flag, pull the kick 2 times: the engine, as a rule, grabs and immediately stalls, after which we lower the flag and calmly start it. It turns out to be a kind of swap mode. But in sub-zero temperatures, the engine starts with the flag raised and will continue to do so until it warms up completely, after which it either begins to run unevenly or stalls completely. In general, it choke from excess fuel and too little air.
But in this suction system one stable unpleasant feature has been noticed. Very often, after, for example, driving through mud, the suction valve begins to jam when opening or closing. You shouldn’t be afraid of this: the flag itself gets stuck in the place of the restrictive plate, where it is in direct contact with it.
To avoid jamming, simply keep this unit clean and tidy, or even better, sometimes lubricate it with a small amount of grease, such as lithol.
But despite all the advantages and good work, there is one design idiocy here, namely the location of the adjusting screw.
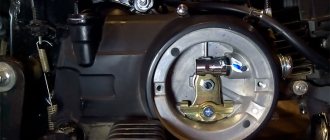
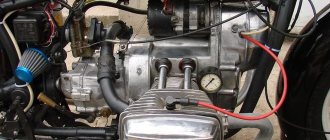
The Japanese installed this carburetor on the lower vertical bars, and it was possible to get to the screw. Here is an example of such a motor.
As we see here, there is quite a large space between the crankcase and the carburetor, and adjustment, although not so convenient, is quite accessible.
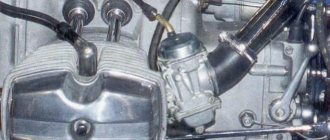
Now let’s look at how it’s all located on the pit bike...
Maybe we don’t understand something, but what kind of tool can we get into the centimeter distance between the hot cylinder and the adjusting screw??? How to regulate it? By the power of thought?
In general, without getting burns on your hands and there’s nothing else you can do to get there except with a head from a set of keys, fortunately you don’t have to do this very often.
By the way, the adjusting screw is responsible for more or less fuel supply to the mixture. Accordingly, if we tighten the screw, we lean the mixture; if we unscrew it, we enrich it.
As mentioned above, you only need to install this carburetor on 125 engines, although from the factory it is priced at 140, but this is more than a crazy idea: it is stupidly small for a 140 engine, but on 125 it works just fine).
Result:
in terms of characteristics, simplicity and price, this is the best carburetor that can be installed on 125-110 engines.
Yes, there is a point where adjustments are inconvenient, but you have to come to terms with this fact. But this is a truly eternal carburetor, which is very difficult to render inoperative. Buy Mikuni VM 22 carburetor
Increasing carburetor performance on an alpha moped
Increasing carburetor performance is a whole complex of measures and everything happens approximately as follows:
- For better air supply, the factory air filter is replaced with a more efficient one. Next, you will need to bore the flow area of the diffuser using its boring tool.
- The main fuel jet is being replaced. For carburetors of this type, jets from a Solex car carburetor are ideally suited, and they are selected with a large bore. Note. Under no circumstances is it permissible to independently bore the nozzle holes to a larger diameter. Increasing productivity should only be done by replacing the part.
- Adjusting the position of the dosing needle. To improve performance, you can replace the metering needle with a more efficient one, allowing you to more accurately adjust the fuel supply at different speeds. But as a rule, replacing the needle on such carburetors is not very cost-effective. Therefore, it is enough to set it in a different position.
- Under ideal conditions, the idle jet must also be replaced with a more efficient one. But due to the fact that it is not always possible to find it. You can achieve the desired effect by adjusting the mixture quality screw.
- Increasing the diffuser passage opening. To better fill the cylinder at high speeds, you can slightly increase the cross-section of the unit. However, this procedure should be performed very carefully - if the hole is enlarged too much, the mixture formation rate in the low speed range may decrease.
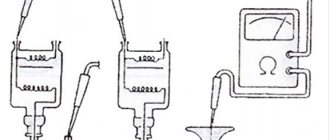
How does a carburetor work?
On one side the air comes in, that’s where the air filter is attached, and on the other side the cylinder comes in, and that’s where the mixture comes out. At the bottom there is a float chamber, a jet and a tube. When the piston moves down, it sucks air from the air filter. The speed of this air is quite high, which causes a vacuum: the atmospheric pressure increases, and because of this, gasoline begins to flow from the float chamber through the nozzle and the emulsion tube. The fuel mixes with the air and actually breaks down into dust. Moving on, it calmly flies into the cylinder. With such work, it may not be necessary to adjust the carburetor of the Alpha moped (110 or 72).
If the gasoline level changes, it will flow out through the drain pipe. This happens due to the overflow of the float chamber: floats, shut-off needle with a rubber tip and hole. When gasoline rises, the float blocks the flow of gasoline. There is a shaft at the top where the spool with a needle runs, and a cable to the throttle handle stretches to it. The needle enters the emulsion tube and nozzle. With gas, the space increases and the amount of mixture changes. This is controlled by the mixture quality screw. The idle jet with the screw facing outwards is intended for dosing the mixture. This is the second screw.
Types of carburetors
Despite the fact that this part is small, it contains a lot of spare parts, some of which are very small. So, depending on the model, carburetors differ in some elements. In particular, this is the characteristics of the throttle valve and its control elements.
The cost between them ranges from 1000-1740 rubles . That is, as you can see, the spread is only a couple of hundred rubles, which is not a significant difference. But it is not recommended to install a 150 cc carburetor on an Alpha with an engine capacity of 70 cc. Because the size may vary.
What does the price depend on?
First of all, the price is influenced by such characteristics as the year of manufacture . The newer the Alpha model, the more expensive the spare parts will be. Mopeds from older years will be less expensive.
The second reason that affects the final cost of an Alpha carburetor is the manufacturer . It’s clear that no one wants to deal with a seller whose product has a bad reputation.
The third reason is cubic capacity . Everyone knows that Alpha has several different models, which differ in engine size. Today the following are known: 50, 70 cubic centimeters, 110, 125.