EҍŒ —>
Why does the carburetor on an Alpha moped leak? — Main post
Main post
Latest and breaking news
Skip to content Main post > Technologies > Why does the carburetor on an Alpha moped leak?
September 20, 2021 September 20, 2021 Petr Yuriev
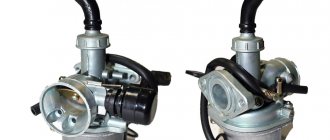
Possible reasons why the carburetor on an Alpha moped is leaking. Diagnostics of faults, carburetor repair.
If the carburetor on an Alpha moped is leaking, you must first make sure that it is not oil or other technical fluid. If fuel leaks, the vehicle cannot be operated. We urgently need to find the cause of the malfunction. You must act carefully so that the fuel does not ignite. The work is carried out strictly in accordance with safety regulations. You can buy a new Alpha moped in our Dvako Moto motorcycle showroom. We sell inexpensive motorcycle equipment from well-known manufacturers. New and used models have a 1 year warranty.
How to connect a headlight to a snow blower?
Installing a homemade lighting device on a household snow blower should be done using a special switch, which will be responsible for turning the headlight on and off. The device itself should be installed as high as possible; the handle of a commercial snow blower is suitable for this.
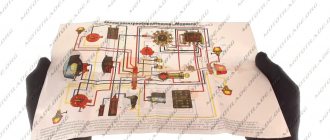
To connect it you will need a circuit diagram. In the wiring plan below, the daytime running lights are a homemade headlight.
To connect the manufactured lighting device, the owner of the snow blower will need about 1.5 m of electrical wiring, which must have the same cross-section.
The connection itself must be performed in the following sequence:
- First, you will need to thoroughly clean the ends of the electrical wiring used;
- Then one end of the wire must be connected to the lamps installed in the homemade headlight;
- After this, the second end of the wire must be connected to the voltage control relay used. The wires that remain will need to be thoroughly cleaned and pulled one by one to the switch, and then to the standard generator of the snow blower;
- The operator must then check the operation of the headlamp. If it works properly, and the brightness and intensity of the device completely satisfies the owner of the snowplow, then the wiring will need to be disconnected, pulled into protective silicone tubes, and reconnected to the circuit elements;
- In the last step, the manufacturer will need to stretch the wires, carefully placing them in the grooves. When laying wires, you need to make sure that the silicone tubes do not touch the heating components of the snow blower.
Before you start operating the unit, you must re-check the operation of the homemade device. Its brightness should not decrease when the engine starts, and the lamps themselves should not flicker due to vibration of the snow blower’s internal combustion engine.
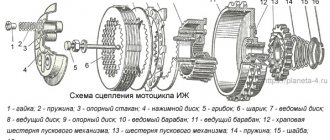
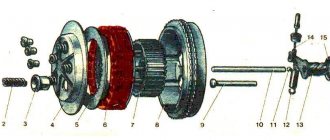
Design and principle of operation
The clutch on the Ant is multi-plate and is in an oil bath. The unit is designed to connect and disconnect the leading and driven units of equipment. The lead group includes a drum with slots on the rim, as well as 5 reinforced plastic discs. And the driven group is a driven drum, which is located on the splines of the input shaft, plus 4 steel driven steel disks, one pressure and support.
Due to the presence of the clutch, torque from the engine may not be transmitted, for example, when changing gears. By gradually engaging the clutch, the torque from the internal combustion engine is transmitted to the gearbox, and with the help of the main gear (rear chain), the force is sent to the rear wheels. This ensures acceleration on the scooter.
Torque is transmitted by the clutch at the moment when the drive and driven discs are connected. There are special protrusions on the outer side of the circle of the drive disks. They fit into the grooves of the clutch assembly drive drum, which is connected by a chain to the sprocket on the left crankshaft journal. In total, the Ant has 7 driving disks. Plastic is used to make them. Between the 7 driving elements there are 8 driven disks. Only they are already steel.
With their internal projections, the driven disks have a constant connection with the driven drum. That, in turn, is fixedly connected to the input shaft on the gearbox.
Both types of disks (driver and driven) can move along the grooves, moving in the axial direction. But when they are in their working position, they are sure to press tightly and forcefully against each other. They are helped in this by 5 cylindrical springs. The latter are fixed on the fingers of the driven drum already discussed.
The clutch engages smoothly due to the slipping of the discs at the moment when the compressive force weakens.
What can we say about the device? The clutch of the Soviet-style Ant scooter consists of several elements. Namely:
- spacer sleeve;
- chains;
- clutch drive drum;
- long rod;
- ball;
- short rod;
- clutch driven drum;
- clutch discs;
- left crankcase cover;
- paper gasket;
- lock washer;
- springs;
- spring pin;
- asterisks.
Having a rough understanding of the device, the principle of operation and what kind of circuit is provided here, it will be much easier to understand the repair and adjustment of the clutch assembly on a Soviet scooter.
How to avoid installation complications?
So, if you have a medium or heavy weight snow blower, then you probably have an electric starter that is powered by a battery. The battery is fed from an electric generator. The system is indeed not simple, but in practice it is the starting material so that you can carry out this simple electrical installation operation with your own hands, having only initial knowledge of how to install a headlight on a snow blower.
In the vast majority of cases, a running generator will provide enough power to easily install additional electrical equipment and ensure that all electrical appliances on the snow blower can operate without interruption. Today's practice is standard: the snow blower manufacturer provides for the theoretical possibility of creating additional load on the generator. In other words, often. This machine can be loaded up to a third more than originally intended, and it should hold up.
Cleaning the lock needle
This reason is one of the most common why the carburetor on an Alpha moped leaks. You can try to clean the locking needle without disassembling the unit. The fuel valve is closed and the drain bolt is unscrewed. Gasoline is drained from the tank by opening the tap again. At this moment, you need to lightly tap the float chamber. If the blockage is severe, you will have to disassemble the carburetor:
- The moped is installed so that the front wheel points upward.
- The cover at the bottom of the chamber is removed.
- The overflow hose is removed and the screws are unscrewed.
- The rod is taken out.
- The locking needle is removed from its seat.
- The fuel channel is flushed with gasoline.
causes of malfunction, how to check the coil and configure the unit
To start the power unit, high-quality ignition of the combustible mixture is necessary, for which a high-voltage charge is used. It is this charge that allows the magneto to be produced. You can learn more about the operating principle of this device and in what cases magneto repair is necessary from this article.
Content
[ To uncover]
[Hide]
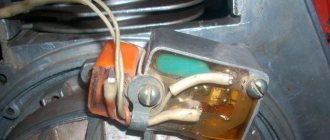
Magneto operating principle
Before checking the coil and adjusting it, let's understand the principle of operation of the unit. When the magnet rotates, a current is excited in the primary winding, which is closed using the contacts of the interrupter device. At the moment when the current strength in the primary section reaches its maximum value, the contacts open on the interrupting mechanism. Accordingly, this leads to a break in the primary current.
As a result, the magnetic field created by the primary current also disappears. Due to a change in the magnetic field, a high-voltage voltage is generated in the secondary section of the circuit. This voltage can break through the entire gap between the spark plug electrodes. When the magneto rotor continues to rotate, it produces a new spark.
Rare magneto for cars 1920-1930.
Diagnostics of the technical condition of the unit
As for diagnostics, it is carried out as follows:
- First you need to connect the high voltage cable to the voltage terminal.
- The second end of the cable should be kept at a distance of about 0.5-0.7 cm from the device body.
- In this position of the wire, it is necessary to sharply turn the rotor in the direction of rotation. If the magneto is adjusted, then as a result of turning the rotor, a spark should jump between the wire contact and the housing. If it is absent or too weak, barely noticeable, most likely the device needs to be checked for malfunctions and, if necessary, adjusted.
Typical malfunctions and methods for their elimination
Now let's look at the main magneto malfunctions:
- Failures in sparking. There may be several reasons, as well as ways to solve them. This is oxidation or burning of contacts, violation of gap adjustment, wear of the interrupter device lever cushion, or a broken capacitor element. Failed elements must be replaced, and non-adjustable gaps must be adjusted. If the problem is in the contacts, they need to be changed or cleaned.
- No spark. The reason may be a break in the transformer wiring, a short to ground, or a breakdown of the insulating layer on the high-voltage cable. If the problem is in the transformer, then the unit is changed, if there is a short circuit, then it should be eliminated, and if the reason is an insulation breakdown, then the cable simply needs to be changed.
- If the spark is too weak, then most likely the reason is a broken capacitor, which will also need to be replaced.
Instructions for disassembling and assembling magneto
To repair the magneto, it must be dismantled and disassembled; to do this, follow these steps:
- First, the device is removed from the power unit.
- The assembly must be thoroughly cleaned of dust, as well as traces of motor fluid, if any. The magneto will be dirty, so it needs to be cleaned. Do not allow dirt to get on the internal elements when disassembling the device.
- The next stage will be analysis. Using a socket wrench, you need to unscrew the nut that secures the ignition timing device. Dismantle this element, and then remove the key from the groove.
- Then move the latch slightly to the side, after which you can remove the cover of the interrupter assembly. To remove it, you need to unscrew four more bolts that secure it.
- Once the cover is removed, the rotor can be removed from the housing itself.
- The final step will be to unscrew the pins that secure the transformer assembly. Having done this, the transformer can be removed from the housing. Thus, you have access to the constituent elements of the magneto. Now the mechanism is being repaired with the replacement of all failed components. For further assembly and installation of the magneto, all the steps described above will need to be repeated in reverse order.
Adjustment features
Magneto adjustment is carried out if the unit cannot perform the functions assigned to it, while all elements of the mechanism are intact. The magneto is adjusted by measuring the gap between the contacts of the interrupter assembly, while the engine crankshaft should be turned by the flywheel. The shaft rotates until the contact divergence is greatest. Let's adjust the gap by loosening the bolt that secures the contact post and turning the post of holes, which is installed in the eccentric slot.
When the gap is adjusted, it is necessary to test the mechanism - this will determine the correctness of the process. If everything is done correctly, then sparking failures can be avoided.
Newsline
WHO made a statement about a new strain of coronavirus
20:29 26 Nov 2021
WHO made a statement about a new strain of coronavirus
20:20 26 Nov 2021
NATO threatened Russia in case of invasion of Ukraine
19:53 26 Nov 2021
Who will help Ukraine persuade Putin to compromise: Zelensky’s statement
19:45 26 Nov 2021
The State Forestry Agency and business discussed how much forest it is safe and economically profitable to cut down
19:36 26 Nov 2021
Belgium confirms first case of new COVID strain
19:26 26 Nov 2021
Ukraine started qualifying for the 2023 Basketball World Cup with a defeat
19:18 26 Nov 2021
Zelensky made an important statement about the exchange of prisoners
19:08 26 Nov 2021
Zelensky made an important statement about the exchange of prisoners
18:33 26 Nov 2021
Zelensky made an important statement about the exchange of prisoners
18:23 26 Nov 2021
“Security threw a car” – Zelensky’s motorcade injured a journalist
17:56 26 Nov 2021
In Ukraine, oil prices will rise by 7-8% in the near future - expert
17:48 26 Nov 2021
Two Polish security forces were injured in clashes with migrants
17:39 26 Nov 2021
First League: Gornyak-Sport defeated Olympic and rose to the top 5
17:30 26 Nov 2021
Ermak will hold negotiations with Russia: Zelensky announced the conversation
17:20 26 Nov 2021
Ermak will hold negotiations with Russia: Zelensky announced the conversation
16:44 26 Nov 2021
Possibility of escalation from Russia: Zelensky named three signals
16:35 26 Nov 2021
Will Russia attack and what did Zelensky say: “Freedom of speech for Savik Shuster”
16:09 26 Nov 2021
Sergey Tokarev on investing in IT: curiosity always leads forward
15:59 26 Nov 2021
Tools
- Generator puller (you can make it yourself)
- Variator puller (you can make it yourself)
- Kickstart sprocket puller (157QMJ engine only)
- Heads for 8, 10, 12, 17 mm
- Phillips and flathead screwdriver
- Small hammer
- Wish
Most Chinese four-stroke scooter engines can be divided into two main types
- First type: 139QMB-series engine. This engine is very popular in the CIS countries and is installed on most Chinese four-stroke scooters
- Second type: 157QMJ-series engine. This engine has a larger volume than the first and, due to its higher price, is not so popular
Essentially, these two engines are a copy of the ancient Honda GY6 and differ from each other in displacement, kickstarter design, oil pump drive and electric starter drive. In all other respects, these engines are identical.
Typical 139QMB, in fact JL1P139QMB-2
And this is what a typical 157QMJ looks like, in fact LK162QMK
Signs of problems with the fuel level in the carburetor
Before starting to repair any component of a car or other vehicle, it is important to make sure that the problem is caused by a particular component. In the case when the carburetor is flooded, checking the malfunction of this particular unit is very simple - just analyze the behavior of the car and pay attention to some aspects of its functioning. In particular, if there is a problem with fuel supply, the following will be observed:
- difficulty starting the engine, especially with a well-warmed-up engine;
- unstable or high idle speed;
- problems with setting “idles”;
- streams or real puffs of black smoke from the exhaust pipe;
- dips with medium and strong pressure on the gas pedal;
- black velvety soot on the spark plugs.
Note that such symptoms are also observed when fuel is overflowed from the carburetor of a chainsaw, a motorcycle, a moped, a car, and even on a walk-behind tractor. However, in units with a small and, as a rule, parallel fuel system, such as a multicultivator, moped or scooter, another sign is also observed - the presence of gasoline in the air filter. If such a symptom occurs, then we can guarantee that the carburetor is overflowing and requires taking some measures.
Reasons why a carburetor may leak
Gasoline often drains through the shut-off valve, which is located at the bottom of the carburetor. If you notice a leak in time, you should immediately close the tap located immediately under the gas tank of your motorcycle immediately after arriving at your destination. This problem can especially often arise on a Chinese moped, since Chinese carburetors are not of high quality. Other causes of carburetor leaks look like this:
- The carburetor is simply clogged and should be cleaned;
- Loose connection between carburetor and manifold. Usually it's a matter of the spacer between these elements;
- The floats in the carburetor need to be adjusted;
- Gasoline leaks through the heat-insulating gasket;
- Fuel may leak through the carburetor cap;
- The carburetor is leaking through the fitting.
Each case must be analyzed in detail, but first the carburetor must be removed.