When manufacturing different parts of a scooter, the manufacturer does not know where and in what climatic conditions you will use them, and as you know, the same engine can operate differently under different conditions (ambient temperature, humidity, etc.). The Suzuki Address 110 carburetor is no exception.
Just to solve this problem, designers provide adjusting elements in such an important part of the power system as the carburetor. Adjusting the carburetor on a Suzuki Address scooter, as with most other brands of scooters, comes down to selecting the optimal air-fuel ratio.
Before you start adjusting the scooter carburetor, make sure that there is no excess air leakage in the power system (there are no cracks in the pipes, all clamps are securely fastened). Also, all parts of the power system must be clean: wash and blow air through the carburetor and jets, and replace or clean the air filter. Of course, the scooter's starting enrichment must be in good working order, and the spark plug must be replaced or cleaned. Carburetor adjustments should only be made when the scooter engine is fully warmed up! Adjust the carburetor immediately after riding the scooter. Follow safety precautions to avoid getting burned on engine parts.
Setting up the carburetor in a Suzuki Sepia scooter
The Japanese scooter Suzuki Sepia is considered a fairly popular model in Russia and other countries, in particular due to its attractive appearance and simple design of the engine and other parts. But problems with this scooter are quite common and are caused by malfunctions of such components as the CPG, carburetor and variator. It is important to carefully monitor their condition to prevent damage. As for the carburetor, the Mikuni carburetor is used here; the Suzuki Sepia is ideal for this carburetor model, which is also used on other equipment. In particular, you can see a similar model on the no less famous Suzuki Adress scooter. The carburetor is characterized by its simple design, good quality and the ability to quickly adjust. But judging by the frequent problems of owners, it will be extremely difficult to adjust the carburetor for optimal operation of the scooter; the entire procedure will have to be carried out exactly according to the specified rules. If you are the owner of a Suzuki Sepia, get ready to clean the carburetor frequently, because its location is so inconvenient that the carburetor becomes clogged with dust very often. Below is a carburetor setting option.
How to choose a carburetor for a Suzuki scooter
The Japanese scooter Suzuki Sepia is considered a very popular model in the Russian Federation and other countries, especially due to its attractive appearance and conventional design of the motor and other parts. But the problems with this scooter are quite constant and are caused by breakdowns of such components as the CPG, carburetor and variator. By the way, if you are interested in the carburetor of a Suzuki scooter, go to the website moped.in.ua.
The main thing is to carefully monitor their condition to prevent problems. As for the carburetor, the Mikuni carburetor is used here; the Suzuki Sepia is perfect for a similar carburetor model, which is also used on other equipment. In particular, you can see a similar model on the no less famous Suzuki Adress scooter. The carburetor is distinguished by its design simplicity, the best quality and the ability to quickly adjust. But judging by the common problems of owners, it will be very difficult to adjust the carburetor for good operation of the scooter; the entire procedure must be carried out exactly according to the specified rules. If you are the owner of a Suzuki Sepia, prepare to frequently clean the carburetor, because its placement is so uncomfortable that the carburetor most often becomes clogged with dust. Below is a carburetor setting option.
Adjusting the Suzuki Sepia carburetor
Before the procedure itself, you must not forget that when changing parts such as a cylinder, filters, muffler, the old carburetor settings will be invalid and you will need to make adjustments again. It is also very, very important to adjust the jets when the engine is already warm. The process is performed as follows:
Adjustment of needle and venturi tube size at 1/3 gas; Adjusting idle speed and mixture quality. Needle adjustment
The characteristic feature of this carburetor is the absence of a jet for the quality of the mixture; its adjustment here occurs by raising or lowering the locking ring on the needle. If you notice that the mixture is too lean, you will have to install the ring higher by 1 or 2 grooves, so the rich mixture will be when installing the same ring on the 4th or 5th level. The center position on groove 3 indicates the standard throttle needle setting. With proper settings, the scooter will have good traction, speed and consume fuel according to the specified properties.
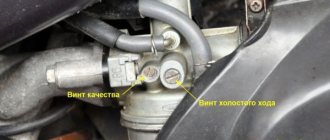
Setting the air screw
Also in the carburetor there is a jet responsible for the amount of air, located under the cover. The jet is located in the air duct, so when you tighten the screw, the throttle rises and the air flow increases. At the same time, the engine speed increases.
Configuration is carried out as follows:
fully screw in the screw and unscrew it 4-5 turns; the engine should start to stall; gradually screw in the screw until the speed increases to the highest; Upon reaching the highest speed, you can unscrew the screw by ? turnover; adjust the idle speed screw for good speed. Unmarried move: setup specifics
Adjusting the Suzuki Sepia carburetor is not possible without using idle speed. It changes the number of revolutions, where when the screw is tightened, the speed indicator becomes higher and the wheel rotates on its own without the throttle. When you unscrew the idle speed screw, the scooter will start only when you add more revolutions with the throttle handle. It would be a good idea to adjust this jet as a last resort, in other words, first adjust the quality of the mixture, the needle in the throttle valve, if necessary, the air screw, and then adjust the unmarried stroke.
This procedure is different from those used by other experts, but the Suzuki Sepia carburetor is very extravagant, and because of this it requires a personal approach when tuning. Probably any owner of a Japanese model has encountered a similar difficulty, so the main thing is to learn how to adjust all the jets and promptly clean the Mikuni carburetor.
Adjusting the Suzuki Sepia carburetor
Before the procedure, you should remember that when changing parts such as a cylinder, filters, muffler, the old carburetor settings will be invalid and you will have to make adjustments again. It is also extremely important to adjust the jets when the engine is already warm. The process is carried out as follows:
- Adjustment of needle and venturi tube size at 1/3 gas;
- Adjusting idle speed and mixture quality.
Needle adjustment
The peculiarity of this carburetor is the absence of a jet for the quality of the mixture; its adjustment here occurs by raising or lowering the locking ring on the needle. If you notice that the mixture is too lean, you will have to install the ring higher by 1 or 2 grooves; accordingly, the mixture will be rich when installing the same ring on the 4th or 5th step. The center position on the 3rd groove indicates the standard throttle needle setting. If configured correctly, the scooter will have good traction, speed and consume fuel according to the specified characteristics.
Setting the air screw
The carburetor also has a jet responsible for the amount of air located under the cover. The jet is located in the air channel, so when you tighten the screw, the throttle rises and the air flow increases. At the same time, the engine speed increases.
Configuration is carried out as follows:
- completely tighten the screw and unscrew it 4-5 turns;
- the engine should start to stall;
- gradually tighten the screw until the speed increases to maximum;
- upon reaching maximum speed, you can unscrew the screw ¼ turn;
- adjust the idle speed screw for optimal speed.
Carburetor structure
It is worth noting that the location of the carburetor is also different in different scooter models. Therefore, before you start adjusting it, you need to thoroughly study all the components and assemblies of your vehicle, their characteristics and location. The structure, in contrast to the location, of the carburetor is approximately the same.
The carburetor includes the following components:
- Venturi tube;
- valve with needle;
- float chamber;
- idle system;
- starting enrichment;
- spool;
- accelerator pump.
Venturi tube
So, the first element of the carburetor, called the Venturi tube, plays the most important role in its operation. This part is characterized by a diameter that varies throughout the entire length of the tube. This is due to the fact that it narrows towards the center, after which expansion follows again. It is the narrowest point of the tube that is intended for the air flow to pass through it.
The characteristic narrowing of the tube contributes to the formation of low air pressure, which is aligned to the point of expansion of the tube. If another smaller tube with gasoline is placed inside this tube, then the gasoline, on its way to the low-pressure zone, will begin to leave the small tube, spraying and evaporating, interacting with the air flow inside the large tube.
Flap with needle
The valve with the needle is installed directly in the center of the Venturi tube described above. It is necessary in order to regulate the amount of mixture that enters the combustion chamber. This adjustment is carried out by pressing the gas. However, the damper cannot operate without a needle. It is this that determines the volume of fuel entering the engine. So, when the pilot presses on the gas, the damper begins to move, thereby raising the needle, due to which the required amount of gasoline is supplied. In a word, the harder you press on the accelerator pedal, the more the damper opens, and, accordingly, the more fuel enters the combustion chamber.
Float chamber
To prevent the engine from stalling, it must be constantly supplied with fuel, a certain amount of which must be in the tube. For this purpose, a float chamber was invented, the operation of which is carried out on the principle of a toilet tank. Those. There is a float inside the chamber that moves to its lower part immediately after the gasoline level in the tube drops. Thus, the displacement of the float ensures the opening of a special valve through which fuel enters. After filling, the float rises, thereby closing the valve. This ensures a continuous and correct supply of fuel.
Idle system
The idle system in the carburetor is responsible for idling. However, its work is carried out not only at idle, but also at low speeds. In the case of idle speed, fuel is supplied through another channel of the carburetor, which is located behind the limiter. The idle system consists of:
Screw system
It is responsible for the volume of air that passes through the entire system, thereby regulating the quality of the mixture entering the combustion chamber. By tightening and unscrewing this screw, the pilot can adjust the amount of air. Accordingly, the less air volume enters the system, the tighter the screw is tightened, and vice versa. It turns out that when there is a lot of air, the fuel is leaner, when there is little, it is richer, since it contains more gasoline than air.
Special channel
The fuel mixture leaves the carburetor through it. This channel is closed by a special valve at the moment when the carburetor throttle valve opens
The valve is an important part because it prevents the system from negatively affecting the operation of the scooter's power unit at high speeds
Idle speed: settings features
Adjusting the Suzuki Sepia carburetor is impossible without using the idle speed. It regulates the number of revolutions, where when the screw is tightened, the speed indicator increases and the wheel spins independently without the throttle. When you unscrew the idle screw, the scooter will start only when you add more revolutions with the throttle. It is advisable to adjust this jet last, that is, first adjust the quality of the mixture, the needle in the throttle valve, and, if necessary, the air screw, and then adjust the idle speed.
This procedure may differ from those used by other specialists, but the Suzuki Sepia carburetor is very unpredictable and therefore requires an individual approach when tuning. Probably every owner of a Japanese model has encountered this problem, so it is important to learn how to adjust all the jets and clean the Mikuni carburetor in a timely manner.
Adjusting the carburetor Suzuki Lets 2
Adjusting the carburetor on a 2T scooter
Cleaning the carburetor Suzuki Lets 2
The most detailed carburetor setting is H.H. .Scooter.2.A carb adjustment. X
Suzuki Let's 2: Little Engine Tyr-Tyr-Tyr)
How to adjust a scooter's carburetor
How to adjust the carburetor on a scooter. Theory (My Tact 24 Part 7)
WITH YOUR OWN HANDS: CLEANING THE CARBURETOR Suzuki Lets 2
Carburetor SUZUKI LET'S-1, LET'S-2, LET'S-2 NEW
Brief description of connecting the SUZUKI LETS 2 carburetor power system
The scooter smokes and rides poorly on a cold engine: the EC is to blame
In order for a scooter engine to operate efficiently and steadily, it needs the correct fuel mixture, which is prepared in the carburetor. Depending on the condition of the engine, cylinder volume, quality of gasoline and other factors individual for each scooter, additional carburetor adjustment may be required.
The principle of operation of a carburetor on a scooter
The design of a scooter carburetor is quite complex, but most of them have standard elements. The main task of any carburetor is to create a high-quality fuel mixture. Also, most scooters are equipped with a float chamber on the carburetor, so if you do not know how to adjust the carburetor on a 2t or 4t scooter, first study its structure.
The principle of operation of the carburetor is as follows: after pressing the throttle, the valve on the carburetor is activated, it is called a Venturi tube, the needle rises in the valve and the formation of a fuel mixture begins by mixing gasoline and air. An open throttle increases the supply of mixture to the engine, which is why the scooter starts to move.
A faulty carburetor will prevent the engine from starting, so it must be kept in as good condition as possible. Before adjusting the carburetor on a 50cc scooter, identify the main signs of failure. The main consequences may be:
- Inability to start the scooter;
- The engine runs intermittently and often stalls;
- Power is significantly reduced.
Most often, these situations occur when the carburetor is incorrectly adjusted, causing the mixture to become either lean or rich. Checking the characteristics of your mixture is quite simple; just inspect the spark plug for its condition; if the spark plug is flooded and has carbon deposits or other changes, most likely you have an enriched mixture. A spark plug that is too white indicates that there is too much air in the fuel mixture. Keep in mind that if you don’t know how to adjust the carburetor on a scooter, 2t or 4t, the type of engine will not matter; adjustments should be made according to standard recommendations.
Tuning the carburetor of a two-stroke engine
One of the main components in the fuel mixture supply mechanism in a vehicle such as a scooter is the carburetor. Before moving directly to the description of the adjustment process, let's talk about why it is needed at all.
Carburetor - a device that ensures the formation and supply of a fuel mixture (consisting of air, gasoline and oil) directly to the engine
What exactly is the purpose of a carburetor? In a nutshell, this is a device that ensures the formation and supply of a fuel mixture (consisting of air, gasoline and oil) directly to the engine. That is, the quality of this mixture and, accordingly, the power that the power unit produces depends on it.
Scooters typically use carburetors of a type called “float” carburetors. The main element is a Venturi tube, which houses a damper that regulates the amount of air supplied to the mixture, as well as a needle that supplies gasoline. By unscrewing the throttle, we thereby open the throttle and raise the needle, increasing the amount of air-fuel mixture entering the engine.
Naturally, the movements of the valve and the needle must be clearly synchronized to ensure its (mixture) homogeneity. The float chamber is designed to ensure the constant presence of gasoline in the tube. The principle of its operation is based on the fact that when the fuel level drops, the float lowers and opens a channel for supplying gasoline to the tube. When it is full, the float rises and closes the valve, thereby stopping the flow of fuel.
If the scooter's engine power drops, it is impossible to start the engine or the engine stalls - these are signs of a carburetor failure
Signs that the carburetor is faulty may include:
- Engine power drop
- Inability to start the engine
- The engine stalls.
Another way to assess the quality of the carburetor (more precisely, the correctness of its operation) is as follows - unscrew the spark plug and look at its color. If it is white, it means the fuel mixture is lean, that is, there is too much air in it, and if the spark plugs have a black tint, it means the carburetor is “pouring” too much fuel. With any of these options, one thing is clear - it needs adjustment.
It should be noted that, globally, this process does not depend on the engine stroke, therefore the answer to the question of how to correctly adjust the carburetor on a Chinese 4t scooter and how to correctly adjust the carburetor on a 2t scooter will be the same. Let's now move on to describing the sequence of actions.
Idle speed adjustment
Does your scooter not work properly when idle and often stalls? Most likely your idle speed screw is not adjusted sufficiently. Before the procedure, be sure to warm up the engine, then find the idle screw, which is present on absolutely all scooters. You will have to warm up the scooter for 10-15 minutes, this will allow you to achieve optimal engine performance.
After this, you need to turn the idle speed screw, where clockwise rotation increases the speed, and unscrewing it decreases it.
Adjusting the fuel level
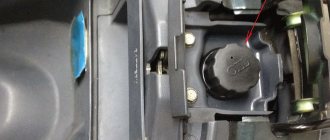
The float chamber allows you to have a constant flow of fuel in the carburetor, which is always replenished, but it is important to remember that you cannot have an excess of gasoline in the float chamber. Gasoline is drained using a special hose coming from the chamber; you will have to check the amount of fuel with the engine running. Raise the hose above the carburetor as shown in the picture below and check the fuel level. It should not differ much from the mark indicated in the picture. There is a holder antenna located on the needle inside the float chamber; it can be used to regulate the amount of fuel inside the float chamber.
Please also take into account the fact that before adjusting the carburetor, you should only have high-quality gasoline with a normal octane number. Otherwise, you will have to completely drain the bad gasoline not only from the gas tank, but also from the float chamber; it must have a special drain screw.
Why do you need to regulate?
During the adjustment process, the scooter carburetor needle is adjusted, the position of which affects the proportions of the air-fuel mixture, as well as a number of other adjustments.
Adjusting the scooter carburetor needle is done during the adjustment process
Each tuning operation has a different effect on engine operation and fuel preparation:
- adjusting the idle speed ensures stable operation of a running engine when the transmission is turned off;
- changing the quality of the air-gasoline mixture using a special screw allows you to deplete or enrich it;
- adjusting the position of the carburetor needle affects the change in the quality of the fuel mixture;
- Ensuring a stable level of gasoline inside the float chamber avoids flooding of spark plugs.
A power unit with an adjusted carburetor operates stably in any conditions, is economical, throttle response, develops rated power and maintains speed, and does not cause problems for its owner.
Setting the mixture quality
The quality of the mixture plays a key role in the operation of the entire scooter, because incorrectly configured parameters will lead to the scooter choking, consuming a lot of fuel and increasing wear on the piston group. That is why the combustible mixture must be in the optimal quantity; a lean mixture indicates a loss of power and frequent overheating of the engine, a rich mixture is characterized by high fuel consumption and the presence of heavy carbon deposits in the combustion chamber.
There are two ways to adjust the quality of the mixture - with an adjusting screw or the needle level in the damper. In some cases, the carburetor design assumes the absence of an adjusting screw, so adjustment is carried out only with a needle. The standard procedure for adjusting the screw is to rotate counterclockwise and clockwise; in the first case, the mixture becomes lean; tightening the screw indicates that the mixture is richer. In the case of a needle, you can enrich the mixture by raising it up; the lean mixture is set on a lowered needle.
Important: adjusting the quality of the mixture should also be carried out with the engine warmed up for 10-15 minutes.
The instructions for most scooters say that there is a standard setting for the mixture quality, where the screw should be unscrewed only 1.5-2 turns. Therefore, if it is impossible to accurately adjust the mixture, stick to this indicator.
The needle is adjusted by raising or lowering it; it has markings and a special locking ring that sets the current height. Accordingly, if you find a lean mixture, you will have to raise the ring level by 1 notch. Having achieved optimal performance, your scooter will operate smoothly and correctly, it will consume fuel in normal quantities, and the power will correspond to the characteristics.
Maintenance Procedure
Scooter motors are manufactured in different volumes. The most common are 50 and 150 cubic meters. The gas distribution system has both 2t and 4t options. The differences between the models are minimal, so maintenance of 2 and 4 stroke 50cc mopeds is carried out according to the same principle.
- Carburetor adjustment at idle speed. The scooter starts and its operation without load is analyzed. The assessment is carried out based on the evenness of the strokes and the stability of the engine speed.
- The position of the screws for the quantity and quality of the mixture is adjusted.
Due to the relative lightness of the structure, adjustment is made with two control bolts. If stable operation cannot be achieved, it is necessary to remove the unit and carry out deep cleaning and adjustment.
Important: before servicing the carburetor on a 4t and 2t scooter, you should make sure that the piston group and ignition system are in good condition. Otherwise, the adjustment will have no effect.
Because of the way it works, the carburetor is attached directly to the intake manifold. The fuel line and air duct are connected to it. All removable hoses are removed from the body and the part is exposed.
The starting enrichment is switched off. The fastening bolts are unscrewed with a spanner wrench, and the entire assembly is pulled out.
Installation is in the reverse order.
Carburetor cleaning
An excellent cleaning method is to blow out the internal channels with compressed air from a compressor. For this, a special gun with a pointed tip is used.
During operation, plaque forms on the surfaces of the carburetor. This is due to the quality of gasoline. Most of the dirt stops in the fuel filter, but some gets into the intake tract.
To remove deposits, you can use either a solvent or a special liquid for cleaning carburetors. It is also suitable for scooters. The advantage of using it is that the cleaning agent is under pressure and is able to penetrate into the most inaccessible channels.
The scooter carburetor has rubber gaskets. To avoid exposing them to cleaning mixtures, it is recommended to insulate these parts in advance.
When cleaning the intake mechanism of a scooter, it is not recommended to use fluffy rags. Their threads can get stuck in the carburetor components, which will lead to additional difficulties.
Idle speed adjustment
An indicator of proper operation of the carburetor on a scooter is a stable idle. The absence of “floating” speeds and confident operation indicate a prepared mixture inside the combustion chamber.
For this purpose, there is a screw on the device that is responsible for dosing fuel when the scooter is operating without load.
Some carburetors do not have adjustment bolts. In this case, you need to adjust the idle mode using a needle and floats in the fuel chamber.
The scooter is started and allowed to run for a few minutes. This is necessary for better evaporation of gasoline inside the intake manifold and its mixing with air.
After warming up, turn the idle screw until the engine becomes stable. The criteria for correct adjustment are:
- the scooter maintains stable speed indicators;
- there is no engine tremors or failures in operation;
- the carburetor confidently switches to power gain mode (when over-throttled) and back.
Sometimes the scooter refuses to respond to idle adjustment. This behavior indicates additional problems in the intake system.
Mix quality
The two main components in the operation of any internal combustion engine are air and fuel. The force from their combustion pushes the pistons and forces the vehicle to move.
But simply mixing these substances is not enough. You can achieve maximum energy output only by maintaining the correct proportion of components. In a carburetor, this procedure is called adjusting the quality of the mixture and the entire operation of the 50cc scooter depends on it.
There are three types of air-fuel mass:
Maintaining the correct mixture ratio in the carburetor is vital for reliable engine operation.
Mixture control diagram
First, you need to start the scooter and warm it up. After setting the temperature, you should proceed according to the following algorithm:
- The mixture quality screw is tightened until it stops.
- Loosen the adjusting bolt one and a half turns counterclockwise.
- Start the scooter, tighten the screw a third.
- If the speed increases, turn it a quarter.
- We adjust until the speed stops falling.
This scheme allows you to configure all types of motorcycles.
How to adjust the carburetor on a Suzuki Adress 110 scooter
When manufacturing different parts of a scooter, the manufacturer does not know where and in what climatic conditions you will use them, and as you know, the same engine can operate differently under different conditions (ambient temperature, humidity, etc.). The Suzuki Address 110 carburetor is no exception.
Just to solve this problem, designers provide adjusting elements in such an important part of the power system as the carburetor. Adjusting the carburetor on a Suzuki Address scooter, as with most other brands of scooters, comes down to selecting the optimal air-fuel ratio.
Before you start adjusting the scooter carburetor, make sure that there is no excess air leakage in the power system (there are no cracks in the pipes, all clamps are securely fastened). Also, all parts of the power system must be clean: wash and blow air through the carburetor and jets, and replace or clean the air filter. Of course, the scooter's starting enrichment must be in good working order, and the spark plug must be replaced or cleaned. Carburetor adjustments should only be made when the scooter engine is fully warmed up! Adjust the carburetor immediately after riding the scooter. Follow safety precautions to avoid getting burned on engine parts.
Increasing carburetor performance on an alpha moped
Increasing carburetor performance is a whole complex of measures and everything happens approximately as follows:
For better air supply, the factory air filter is replaced with a more efficient one. Next, you will need to bore the flow area of the diffuser using its boring tool. The main fuel jet is being replaced. For carburetors of this type, jets from a Solex car carburetor are ideally suited, and they are selected with a large bore. Note. Under no circumstances is it permissible to independently bore the nozzle holes to a larger diameter. Increasing productivity should only be done by replacing the part. Adjusting the position of the dosing needle. To improve performance, you can replace the metering needle with a more efficient one, allowing you to more accurately adjust the fuel supply at different speeds. But as a rule, replacing the needle on such carburetors is not very cost-effective. Therefore, it is enough to set it in a different position. Under ideal conditions, the idle jet must also be replaced with a more efficient one. But due to the fact that it is not always possible to find it. You can achieve the desired effect by adjusting the mixture quality screw. Increasing the diffuser passage opening. For better filling of the cylinder at high speeds, you can slightly increase the cross-section of the unit
However, this procedure should be performed very carefully - if the hole is enlarged too much, the mixture formation rate in the low speed range may decrease.
It is worth mentioning right away that the factory carburetor settings assume maximum fuel efficiency. That is why, with standard settings, the consumption of a 110 cc engine does not exceed 2.5 liters per hundred. But such settings do not allow the engine to operate at full power (when driving at high speeds, the engine does not operate stably).
To treat some of the problems inherent in this type of technology, you can do the following:
To neutralize the “plug” effect on the tops, you can install a high-performance fuel jet. Together with an increase in the cross-section of the diffuser and a more efficient air filter, this will give a good effect.
Next, to dampen the dip in transition modes, you need to adjust the position of the metering needle relative to the throttle. You can raise the needle a little to get more fuel.
The final calibration is performed by working with the quality screw. Initially, you should unscrew it about 1.5 turns and start the engine. After warming up the engine, using the speed control screw, you need to adjust the rotation speed at 900 - 920 rpm. Then, by unscrewing the quality control, you need to get the maximum possible engine speed, after this speed adjustment screw you again need to bring the engine to 900 - 920 rpm.
Next, a test drive is made for approximately 5 - 7 km. And if necessary, adjustments are made.
The fuel supply system is necessary for engine operation. Even if there are craftsmen who can ride without a battery, then without a carburetor the scooter will not even start. However, a more modern analogue is becoming increasingly common - an injector. It is common in Europe and Japan, but in our country the owner of an iron horse, as a rule, has to deal with a traditional device
It is important to correctly configure the carburetor on the scooter, otherwise excessive fuel consumption and breakdowns will not be avoided.
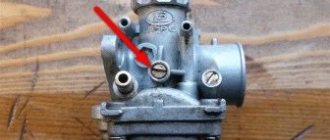
Setting up the carburetor on the Suzuki Address 110 scooter
A small cog on the Suzuki Address carburetor is responsible for the supply of gasoline at idle. It is unscrewed about one and a half turns. The screw blocks the air channel, i.e. the more it is twisted, the more gasoline is supplied; The more it is unscrewed, the less gasoline and more air. Through the gasoline supply hole at idle, fuel is always supplied - even during main engine operation, i.e. they can slightly regulate the supply of gasoline at operating speeds. The large screw adjusts the level of lowering of the carburetor choke. There is a needle in the valve; it should be in the middle position. The large screw regulates the air supply at idle. It is adjusted for a small screw, i.e. after the little one.
The main gasoline supply (for driving) is adjusted by selecting jets and raising/lowering the main damper needle. Carburetor jets: large 77.5, small 15 - on the new version, with alloy wheels.
So, actually adjusting the scooter carburetor :
- place the scooter on the center stand
- We provide free access to the carburetor adjusting screws
- idle screw (small), unscrew 1.5 turns from the screwed state
- Use a large screw to adjust the throttle lift level (idle speed) so that the engine does not stall
- by unscrewing or tightening the idle screw to achieve a maximum increase in engine speed
- tighten the screw a little so that the engine speed becomes just a little lower
- If the speed does not change when you turn the screw, then you need to flush the carburetor
- Use the large screw to set acceptable idle speed so that the scooter does not vibrate or stall
A correctly configured Suzuki scooter carburetor is checked by sharply opening and releasing the throttle - the engine should pick up speed evenly and not stall.
Thank you for your attention, now you know how to adjust the carburetor of the Suzuki Address 110 scooter .
Purpose and principle of operation of the carburetor
The carburetor is an important component of an internal combustion engine, responsible for preparing the air-fuel mixture and supplying it to the working cylinder in the required ratio. A scooter engine with an unadjusted carburetor cannot function properly. The stability of speed, the power developed by the engine, gasoline consumption, response to turning the throttle, as well as ease of starting in the cold season depend on the correct settings of the engine power supply.
This unit is responsible for preparing the air-gasoline mixture, the concentration of the components of which affects the nature of the operation of the power plant. The standard ratio is 1:15. Leaning the mixture to a ratio of 1:13 ensures stable engine operation at idle. Sometimes it also becomes necessary to enrich the mixture by maintaining a ratio of 1:17.
Knowing the structure of the carburetor and knowing how to adjust it, you can ensure stable operation of the engine on two-stroke and four-stroke scooters.
Thanks to a properly configured carburetor, easy and quick starting of the vehicle engine is ensured, as well as stable operation of the engine, regardless of the ambient temperature. Any carburetor is equipped with jets with calibrated holes, a float chamber, a needle that regulates the cross-section of the fuel channel, as well as special adjusting screws.
The adjustment process involves specially rotating the screw in a clockwise direction or in the opposite direction, which causes, respectively, the enrichment or depletion of the working mixture. Adjustment measures are carried out on a warmed-up engine. In this case, the carburetor unit must first be thoroughly washed and cleared of blockages.
Do-it-yourself cleaning of the Mikuni carburetor of a Suzuki Djebel 200 motorcycle.
The other day I went to clean the Mikuni carburetor of a Suzuki Djebel 200 motorcycle and decided to make a short article about it, although everything is so simple there, compared to blocks of 4 Keihin carbs, that it’s not even interesting. But if it is useful to someone, I will be glad.
The process is so simple that even a child can do it. The Mikuni carburetor from the Keikhin carburetor, which are installed on Sibishki, is structurally no different - they are both membrane ones. For cleaning we need any carburetor cleaning liquid and a pair of screwdrivers. I got into the carburetor because my float chamber gasket had dried out and the carb began to leak. In order not to wait for a carburetor repair kit, I decided to stupidly put the float chamber cover on the sealant, although I usually don’t do this - pieces of sealant can get inside the carburetor and clog the jets. Accordingly, I also needed gasket sealant.