Carburetor adjustment is an important skill for a motorcyclist to tune a motorcycle engine for optimal fuel consumption. Achieve maximum power while maintaining the excellent condition of the power unit for many years of operation.
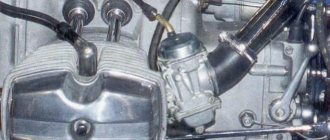
The two-cylinder boxer engine has a carburetor for each cylinder, which increases the difficulty of tuning, especially the synchronization of the cylinders. When setting up each device, you must strictly follow the sequence of actions described in the instructions; this is the only way to achieve the best result.
First you need to understand the principle of the device for preparing the fuel mixture. Find out what each part consists of, what each part is needed for, and what role it plays. With the help of which the device parameters are changed. What will happen if you turn the adjustment screws.
Preparing for adjustment
Adjusting the K-37A carburetor of the Ural motorcycle has three stages of adjustment: 1. idle; 2. at medium speeds; 3. uniform operation of both carburetors.
Before starting the setup, it is advisable to remove the carburetors and disassemble them to check for serviceability. To do this, check the fuel level, if necessary, change it and bring it to normal. Clean all jets and fuel and air passages. Check the control drive of each device. When installing, pay attention to the tightness of all connections.
Before starting, pay attention to the condition of the piston and measure the compression ratio in the cylinder. The cylinder-cylinder head connection is assembled without air leaks. If you need to replace the gasket.
Pay attention to the ignition. Inspect the spark plugs and spark quality. In case of malfunction, install new spark plugs.
Carburetor adjustment should be carried out on a warm engine, and the carburetors should first be adjusted individually.
Inappropriate installation option
What carburetors are suitable and what is better to install? We will have to disappoint those who plan to use available models from Oka or Zhiguli during the conversion. All car modifications are out of play in this case. There are several reasons:
- The vacuum in the intake tract of a motorcycle differs from the parameters typical for car engines. Because of this, correct adjustment of the carburetor on a motorcycle becomes almost impossible.
- The selection is carried out not simply by working volume, but by the number of aspirations per unit of time. Aspiration can be roughly calculated by multiplying the engine displacement by the maximum speed.
- Car models pose a danger if the motorcycle falls because fuel can splash out and ignite.
Automobile carburetors are not suitable for conversion!
So the idea of using parts from Oka or other automotive equipment will have to be abandoned.
Idle speed adjustment
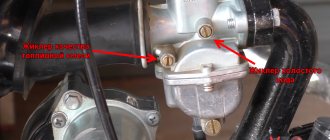
The idle speed is adjusted in the following order: 1. Close the throttle completely. 2. Unlock the stop screw 19 (see figure) and screw it into a position so that the engine runs at slightly higher speeds. 3. Set the ignition timing shifter to late ignition. 4. Turn mixture quality screw 18 all the way in. 5. Turn screw 19 out 1-1.5 turns, the engine speed will decrease. 6. Listening to the operation, gradually turn out the mixture quality screw until the engine evenly develops a higher number of revolutions. 7. By unscrewing the thrust screw, reduce the speed to the minimum stable speed. 8. Lock both screws.
It is recommended to adjust the carburetors of the Ural motorcycle to a slightly enriched mixture. With such a mixture, starting becomes easier and low speeds (idle) become stable.
Adjustment at medium speed
Setting up the K-37A device of the Ural motorcycle at medium speeds is done as follows.
If, when the throttle valve is opened sharply, “sneezing” is observed in the carburetors and the engine stalls, then the mixture must be enriched by shortening the adjusting needle 12 by one or two holes.
If the “sneezing” stops and the engine revs well, then the adjustment has been made correctly. It is recommended to ride a few kilometers after this and make sure that the motorcycle pulls well.
Messages [19]
1↑ Topic from Student 08/14/2013 15:05:15
- Student
- Assistant
- Inactive
- Name: Ivan
- From: Engels
- Registered: 04/11/2013
- Posts: 267
- Reputation: 3
- Motorcycle: Dnepr MT 10, Dnepr MT 11
Topic: How to synchronize carbs (the easiest way)
I was surfing the Internet and found this article, tried it myself, everything works, it’s super simple. I think the easiest way is for beginners and those who don’t have a speedometer
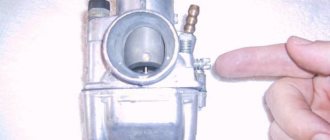
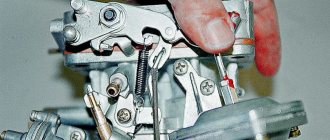
After you have adjusted the idle speed, turn off the engine. Next you will need a second person, an assistant. Remove the air filter pipe from the carburetors (K-65). Using your left index finger, touch the throttle valve of the left carburetor. At the same time, touch the throttle valve of the right carburetor with the index finger of your right hand. At this point, the second person should pull the throttle very slowly. You will feel which throttle valve (left or right carburetor) will rise first. Achieve simultaneous lifting of the throttle valves by rotating the fittings on the carburetor covers. That's all the adjustment is. This method can be used on any carburetors.
Source
Timing adjustment
Adjusting the uniformity of operation of both carburetors is quite difficult, especially since the synchronism is maintained for a relatively short time. However, it must be achieved and constantly maintained. Non-synchronous operation will lead to rapid wear of the connecting rod bearings and, when driving, will cause overheating of one of the cylinders and increased carbon formation.
The adjustment procedure is as follows: 1. Place the motorcycle on a stand so that the rear wheel can rotate freely. 2. Start the engine and engage fourth gear. 3. Remove the high voltage wire from the spark plug of one of the cylinders. 4. Bring the engine speed to a number corresponding to a speed of 30 km/h on the speedometer, and listen carefully to the operation of the cylinder. 5. Turn off the cylinder from operation by removing the high voltage wire from it, and at the same time put the wire on the spark plug of the not working cylinder. 6. Listen carefully to the operation of the second cylinder. 7. Comparing the operation of the cylinders by ear or according to the speedometer readings, you need to achieve synchronous operation of the devices by raising or lowering the throttle valve using the cable stop 26 (see figure).
Since such adjustment takes a relatively long time, you must be very careful not to overheat the engine, especially a new one, in which, if overheated, the pistons in the cylinder can easily jam.
Preparing to adjust carburetors
Before you start adjusting carburetors, make sure that the valve clearances are set correctly and that the ignition is not disrupted and is working correctly.
It is recommended to read the information on setting up valves in the Urals. And in this article you can find out how to set up the Ural ignition.
The carburetors should not be worn out or different, otherwise nothing will work out for you, and tuning will be impossible. The carburetors themselves must be clean both outside and inside without plaque, traces of rust and other deposits, each jet must be blown with compressed air, the shut-off needle is in working order, and the floats are sealed . Check the condition of the rubber pipes; cracks are unacceptable. Is the air filter clean?
It is important to know: one of the big problems is the leaky installation of carburetors and the connection of rubber pipes with the air filter. If there is an air leak somewhere, this can lead to engine overheating and dust getting into the cylinders.
The first stage of adjusting carburetors on a Ural motorcycle
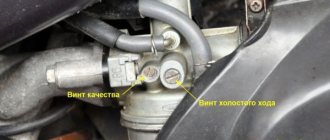
- Using the “quantity” screw (pictured No. 1), we lower the speed to the minimum stable.
- Using the “quality” screw (pictured No. 2), we increase the speed until it stops growing.
Repeat points 1,2 – 2-3 times. We do the same on the other cylinder. We achieve the same operation of the cylinders individually by ear, ideally by the tachometer.
3. Connect both spark plug wires and synchronously turn the mixture quantity screws with both hands until the minimum idle speed is obtained. The engine should run smoothly and without jerking. The first part of the adjustment affects the stability of the launch of the Ural motorcycle, the correct operation of the carburetors at the initial opening of the throttle valves.
It is worth noting that: if you have an outdated model of carburetors, such as the K-65, the “quantity” screw No. 1 is located on top, on the carburetor cover.
Messages [19]
1↑ Topic from Student 08/14/2013 15:05:15
- Student
- Assistant
- Inactive
- Name: Ivan
- From: Engels
- Registered: 04/11/2013
- Posts: 267
- Reputation: 3
- Motorcycle: Dnepr MT 10, Dnepr MT 11
Topic: How to synchronize carbs (the easiest way)
I was surfing the Internet and found this article, tried it myself, everything works, it’s super simple. I think the easiest way is for beginners and those who don’t have a speedometer
After you have adjusted the idle speed, turn off the engine. Next you will need a second person, an assistant. Remove the air filter pipe from the carburetors (K-65). Using your left index finger, touch the throttle valve of the left carburetor. At the same time, touch the throttle valve of the right carburetor with the index finger of your right hand. At this point, the second person should pull the throttle very slowly. You will feel which throttle valve (left or right carburetor) will rise first. Achieve simultaneous lifting of the throttle valves by rotating the fittings on the carburetor covers. That's all the adjustment is. This method can be used on any carburetors.
Source
Second phase
Now let's move on to the main second stage of carburetor adjustment in the Urals. Place the Ural motorcycle on the center stand, or in any way convenient for you, hang the rear of the motorcycle so that the rear wheel is in free rotation.
Start the motorcycle again and remove the spark plug wire from the right cylinder. Engage 4th gear, add a little gas, and the speedometer should show 55 km/h. Lock the throttle in any convenient way in this position (there is a small screw in the throttle for this). Then put the right spark plug wire back and remove the left one. Using the screws on the carburetor covers, we adjust the length of the cables so that when working on each cylinder, the speed on the speedometer does not change. This will ensure synchronized operation of the throttle valves during transient operating conditions.
Synchronization with oil pipe
Today I had experience synchronizing carbs using the traditional method. Equipment: Take 4-5 meters of transparent gas-resistant tube (I took a transparent gas hose). Bend it in half (make sure it doesn’t break at the bend) Pour in the oil so that each column has half a meter from the bend. Air bubbles should be removed so that the oil in the tube is continuous. I used 20W shock absorber oil, but any thick oil, such as transmission oil, will do. We have a U-shaped tube, the oil in the columns of which is kept at the same level. For convenience, you can mount it on a rail or hang it from something. The essence of the method:
Warm up the engine. Before connecting the tube, you should squeeze it in any convenient place (otherwise the first connected pot will suck up all the oil). We stick the tube into the vacuum fittings of the carbs. The oil level will immediately show which carb sucks the most. We level this out using the quantity screw XX. Then we open the throttle slightly - now we adjust the opening of the dampers with the screws of the cable jacket. Then turn off the gas and check the idle. That's all the synchronization is. The oil in the tube dances a little during operation, but due to its thickness this does not interfere.
I didn’t take a photo of my device, here’s an example of how they do it:
There is also an advanced version with two banks:
Now about the results: 1) This method is really simpler, faster and more visual than the shamanism of spinning a wheel on a step. 2) The thicker the oil, the better - at the beginning of the procedure there is no more than a minute for adjustment, then the oil will crawl to the cylinder.
3) I'm pleased with the result. The idle became smooth, during acceleration everything was also smooth, no dullness or vibrations. More precisely, only vacuum gauges, but they cost money.
Source
Third stage
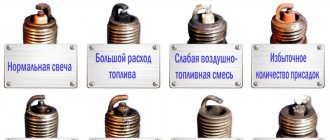
Let's move on to the final part - adjusting the carburetor of the Ural motorcycle. Now you need to adjust the main dosing system. It consists of throttle valves, needles and main fuel jets. The bottom line is that due to the variable cross-section of the carburetor needle, directly proportional dosing of fuel occurs depending on the amount of air passing through the carburetor diffuser. Make sure that the carburetor needles are straight and the holes for them in the throttle bodies are not worn out. Replace the spark plugs with new ones or clean the old ones. Ride a motorcycle at a constant speed of 70 km/h for 10 minutes. Stop, turn off the engine, unscrew the spark plugs and, according to the photo below, determine the correct adjustment:
- This is the color of the candle when properly adjusted. As you can see, the brick color of the spark plug insulator is due to correctly tuned carburetors.
- If the candle is black, this is a sign of a rich mixture. Therefore, we lower the needles in the carburetors by one notch (initially they should be installed in the middle position).
- If the candle has white carbon deposits, raise the needles by one notch.
If, after moving the needles one notch, you cannot achieve a brick shade of the candle, try setting it 2 notches lower or higher, depending on the color of the insulator. As a result, we will get the correct mixture at constant engine speeds when driving along the highway.
It is important to know: if the spark plugs have black soot with a shine, perhaps the cylinder-piston group of the motorcycle is worn out, and the spark plugs are simply splashed with oil. It is worth thinking about repairs as soon as possible.
This is interesting: Device repair and adjustment of carburetor to 135
In this article we looked in detail at what it is to adjust the carburetor of a Ural motorcycle. Correctly setting the carburetors on a Ural motorcycle is the key to good engine performance.
Mixture quality synchronization
The above-described technique using a synchronizer allows you to achieve only a synchronized amount of mixture supplied to the carburetors. At most service stations or amateur “garage” workshops, the synchronization procedure is limited to this. What about quality? After all, a rich mixture can be fed into one carb, and a poor mixture into another. On one cylinder the spark plugs will constantly turn black and flood, on the other it will not be possible to achieve maximum power due to depletion.
For this purpose, there is a device called a gas analyzer. Full synchronization and perfect tuning of the motor operation with several pots will be possible only with it. But such a device can only be found at service stations. Ordinary car and motorcycle enthusiasts usually don’t have it. But once you feel how ideal the engine’s operation will be after full synchronization, you won’t settle for anything less!
Source
Kempo › Blog › Practical methodology for tuning Ural motorcycle carburetors
1. Before adjusting the carburetors, you must check all other related engine settings - the condition of the spark plugs, gas tap, breaker contacts, ignition coil. Adjust (check) the ignition timing. The ignition timing is set according to the standard method. A. Align the engine flywheel to the mark. — open the rubber plug on the crankcase (the surface of the flywheel becomes visible) and with small pushes of the kick starter lever, slowly turn the flywheel until a mark on the flywheel appears in the hole and aligns it with the mark on the crankcase (a very painstaking procedure). b. The breaker contacts are closed (if they are open, loosen the screws securing the breaker to the crankcase and turn the breaker until the contacts close), the battery is connected, the 6x8 key is attached to the end of the ignition coil (if the coil is working, the key should be magnetized). Having loosened the fastening screws, we turn the breaker body very slowly (millimetre by millimeter) “along the way” (we saw the direction of shaft rotation when we set the flywheel), until the contacts open (the key falls). In this position, tighten the fastening screws of the breaker housing. V. The air must be completely open. A rich mixture can be obtained not only due to incorrect carburetor settings, but also due to a lack of air. A lack of air occurs when the rubber air pipes are pinched, as well as when the air filter is severely clogged. You also need to check the floats in the carburetors to ensure that they are floats, i.e. were sealed. If there is gasoline in the floats, replace the floats.
2. Carburetor adjustment, at the first stage, is performed on each cylinder separately. First, you should set the “quantity” screw to approximately the middle position. “Quality” screw - as in the instructions - 1 turn from the fully tightened state. The spark plug cap of the second cylinder is shorted to ground. To do this, some piece of iron is inserted between the ribs of the cylinder (screw, nail, small key, metal screwdriver, etc.) and the spark plug cap of the non-working cylinder is put on it (the central contact inside the cap must be shorted to ground). — We start the engine on one cylinder. If it does not start or stalls immediately, we try to slightly unscrew the “quantity” screw in order to increase the amount of incoming fuel. You just need to get more or less stable engine operation, at any speed for now. After this, we begin the adjustment. — Adjustment consists of finding the correct position of the “quality” screw. This position is for each specific carburetor - only one
. Therefore, the “quality” screw is adjusted only once and in the future there is no need to adjust it at all (I haven’t adjusted it in my Urals for 10 years