The design of a scooter carburetor is quite simple; Once you understand it, you will be able to understand how to properly configure the carburetor so that the vehicle does not let you down in bad weather, how you can tune it and improve the performance of the engine. You will be able to control the quality of the mixture and many other processes that affect the operation and operation of the device.
The principle of operation of a scooter carburetor
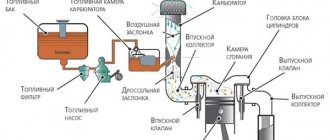
The carburetor design of a 4t scooter is not very complicated. The basic principle of its operation is as follows: a certain amount of fuel and oxygen enters the float chamber of the device, where they are mixed in the required proportions and supplied to the combustion chamber of the engine.
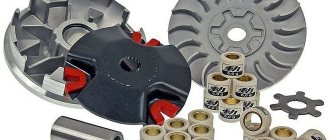
The design of a 4-stroke scooter carburetor may vary slightly depending on the model, but in general it is the same for all types of carburetors. The float version of products is most often used. It is distinguished by the presence of a float chamber in which fuel is mixed with air, after which the finished mixture is fed into the cylinder. In order for air to enter the fuel in the required proportion, the carburetor includes the following elements:
- Jets.
- A needle that meters the supply of oxygen.
- Spool.
- Throttle valve.
Sometimes the design of a 4t carburetor on a 50cc scooter includes an element such as an accelerator pump. It works in tandem with a starting mixture enricher. These devices help the scooter engine to work correctly and start in damp and wet weather. The correct operation of the motor depends on the coherence of the devices, so it is important to pay attention to their settings.
1 – starting enrichment, 3 – float, 4 – float chamber, 5 – main jet, 6 – carburetor heater, 7 – throttle with needle
Scooter starter booster
Most often, scooters are equipped with an electric starting enrichment; on older models you can find a manual one. The task of this device is to create the right mixture in order to start the engine after a long period of inactivity.
Starting enrichment device
The carburetor has an additional channel for connecting the enricher. If the device is automatic, the channel opens itself when you try to start the scooter and closes as the engine warms up. If the enrichment is manual, you need to close its valve yourself. The operating principle of the device is as follows:
- Inside the housing there is an element heated by electricity, which pushes out a needle that blocks the fuel channel.
- After the engine is stopped, the needle will be retracted.
Float chamber device
Mixing of fuel with air in the carburetor occurs with the participation of the float chamber; Thus, the finished fuel, saturated with the required amount of oxygen, enters the combustion chamber, where it explodes and sets the scooter in motion.
Float chamber device
From the gas tank, fuel enters the carburetor through special pipes. But mixing cannot occur in them, so first the fuel ends up in the float chamber, and only then it is enriched with oxygen and further moved. To ensure that gasoline does not flow continuously, but in the right quantity, the carburetor is equipped with a special system with a float and valve. When the chamber is full, the float rises and the valve blocks fuel from entering the carburetor; when the float is lowered, the flow of fuel resumes.
Signs of necessary adjustment
The only parameter that the driver controls while driving is the throttle position. It affects the volume of mixture supplied to the scooter.
There are a number of signs by which you can determine the condition of the carburetor. These include:
- drop in engine power;
- failures when accelerating the scooter;
- hard start;
- increased fuel consumption;
- abnormal reaction to the accelerator handle;
- sudden engine stop.
Signs do not have a noticeable periodicity; they can occur at any time.
Why adjust the carburetor?
Carburetor adjustment may be required in the following cases:
- The spark plugs are serviceable, but do not work very well; their color has changed to black or yellowish.
- The engine does not provide the required power
- Scooter won't start
- Fuel consumption has increased excessively.
All these problems in most cases are caused by an insufficiently enriched or, conversely, overly enriched mixture with oxygen, and they can be corrected by correctly adjusting the carburetor.
The settings, regardless of whether you have a 2t or 4t scooter, have three phases and are made as follows:
- Idle speed adjustment
- Setting the fuel level
- Adjusting the quality of the mixture.
On some carburetor models there is no screw that adjusts the fuel quality, so you have to disassemble the carburetor to change the position of the needle.
The idle speed adjustment is carried out after the engine has warmed up: this takes no more than 15 minutes. For this purpose, the design provides an idle screw. It allows you to make the engine stable by selecting the desired idle speed. When the screw is tightened, the speed will increase, and when it is rotated counterclockwise, it will decrease.
It is important to adjust the quality of the mixture. If it is too lean, the scooter will ride with difficulty, and the engine will noticeably lack power. If the mixture is too rich, the spark plugs will turn black and quickly fail. Fuel quality adjustment is usually carried out using a screw located on the carburetor body. To enrich it you need to turn it clockwise, to lean it counterclockwise. If there is no screw, the carburetor is opened, the locking ring on the needle moves up for a richer mixture, down for a leaner one.
What is the need?
In order to prevent parts from wearing out too quickly, it is important to select the correct mixture at idle, at full throttle and in modes when the throttle is not fully open. What should make the owner think about adjusting the carburetor of the Alpha moped in these modes? Violation of the ratio of air and gasoline
Ideally, it should correspond to 1:15, where there is only 1 part of gasoline. Signs of a violation may include:
- Difficulty starting the engine.
- Any instability in idle speed can be heard as irregular engine operation.
- When you turn the throttle all the way, the engine does not rev up and accelerates slowly.
- Popping sounds in the carburetor or exhaust pipe.
- Candle color is white or black.
What is the carburetor of a Chinese scooter and its capabilities, disadvantages, tuning
The carburetor circuit of a Chinese scooter is, in principle, standard and suitable for both 2t and 4t engines. The design of the carburetor allows certain actions to be taken to improve its performance, however, if the engine is two-stroke, the efforts will not make sense.
The simplest approach is to replace the carburetor with a more advanced one, for example, with an accelerator motor, if you have a fairly old version without it. Most often, simple tuning is limited to replacing the main fuel jet, this is especially true for engines with low power. Replacing the nozzle helps to increase the fuel channel and, due to this, add a little power to the engine.
Quite often, more serious tuning involves the use of a 150 cc scooter carburetor. Interesting models with a diffuser diameter of 17.5 mm. It is great for 70cc piston. Less often you come across a large diameter of 19-24 mm, it is just ideal for a bored 150 cc piston engine. However, the diameter must be selected correctly, otherwise the motor will begin to choke.
Starting enrichment, electrovalve
Sit back, we will talk about one of the most mysterious parts of the scooter - the starting enrichment. This detail is small, but very important. It is this that helps start a cold scooter engine without hemorrhoids in any weather. Only thanks to her, the scooter starts easily with half a kick, and for those who don’t, it means their arms are growing crookedly. Thanks to her, my dear, the scooter does not shoot into the muffler like domestic motorcycles, but idles quietly and smoothly. Thank the Japanese for inventing this thing! - I say in all seriousness.
So, what does it mean - a starting enrichment agent? This is essentially an additional small carburetor, standing parallel to the main one. It is connected to the main carburetor by three channels - air, emulsion and fuel, drilled in its body. The air is taken in before the throttle valve, the emulsion (mixture) is supplied after it, directly into the carburetor outlet pipe. Gasoline is taken from a common float chamber. Thus, with some stretch, the enrichment can be considered an independent device. It’s a stretch, because it is, nevertheless, structurally inseparable from the carburetor.
Now let's look at the drawing.
The carburetor has a small additional fuel chamber 7, which is connected to the main float chamber 8 through the start jet 9. The tube from chamber 7 leads to the mixing chamber into which air is supplied and from which the air-gasoline mixture goes into the engine. A valve 6 can move in the mixing chamber, similar to a carburetor throttle valve, only much smaller in size. Just like in the throttle valve, there is a spring-loaded needle in the starting valve, which closes the fuel channel when the valve is lowered. When starting a cold engine, the valve is raised (open). At the first engine revolutions, a vacuum is created in the emulsion channel and gasoline located in chamber 7 is sucked into the engine, causing a strong enrichment of the mixture and facilitating the first flashes in the engine.
After the engine has started, but has not yet warmed up, it needs a rich mixture. The enricher works like a parallel carburetor; gasoline enters it through jet 9, mixes with air and enters the engine. When the engine is running, alternating current from its generator is always supplied to the contacts of the ceramic heater 2 of the thermoelectric valve of the starting system. The heater warms up the drive 3. Inside it, obviously, there is a gas or liquid boiling at a low temperature and a piston connected to the rod 4. When the drive is heated, the rod gradually extends by 3-4 mm and through the pusher 5 sets the damper in motion. Valve body 1 is wrapped in thermal insulation (polyethylene foam) and covered with a rubber boot.
Thus, the engine warms up along with the thermoelectric valve and the mixture gradually becomes leaner. After 3-5 minutes, the damper closes completely and the degree of enrichment of the mixture on a hot engine is set only by the carburetor idle system. When the engine stops, heating of the valve stops, the damper drive cools down and under the action of spring 10, pusher 5, rod 4 and damper 6 return to their original position, opening the channels for subsequent start-up. Cooling down and returning to its original position also occurs within a few minutes.
This enricher design is used on almost all modern scooters. Older models may use a design without an electric heater; heat is transferred to the drive through a copper heat-conducting cylinder directly from the engine cylinder. Sometimes, there is also a manual drive of the damper through a cable from the handle on the steering wheel (“Choke”).
Now the “diseases” of the system
1. The air channel may be clogged with dirt. In this case, the mixture becomes very rich, even after the engine has warmed up.
2. The jet may be clogged with dirt. It is very thin and this happens quite often. In this case, the enricher works in the opposite way - it leans the mixture, making starting difficult.
3. Contact with the heater “tablet” is broken. The valve does not heat up and does not close. The engine runs all the time on an over-enriched mixture and does not develop the required power. The resistance at the valve contacts is easy to measure; it should be in the region of several ohms.
4. The antennae are broken off
Design and connection of a Yamaha scooter carburetor
The Yamaha Jog scooter is one of the most popular on the Russian market: this is explained by the simplicity and reliability of the model, and its affordable price. The carburetor design of this scooter is standard, so you can figure it out using the description given above. However, when installing it, inexperienced owners may encounter some difficulties, which we will help you sort out.
Carburetor of a Japanese scooter Yamaha Jog
The device is worth considering in more detail. This will help you understand not only how to adjust the carburetor and use it correctly, but also how to connect it correctly.
- A starter enricher is attached to the carburetor body: it is small in size and housed in a plastic case. It has two bolts with rubber seals. The enricher is powered via a 12 V battery. This device is used to start the engine when cold, as it allows you to automatically enrich the mixture with oxygen.
- The fitting is connected to the fuel supply hose coming from the gas tank tap.
- If the enrichment unit needs to be removed, you will need to not only unscrew the bolts, but also disconnect the electric valve, to which there are only two wires.
- The mixing chamber has a special cover to which a bolt is attached. If you unscrew it, you can get to the throttle valve. This allows you to check whether the throttle cable is connected, and also to get to the needle that regulates the level of fuel and air supply. If the carburetor needs cleaning, you will definitely need to remove the throttle.
- The enrichment connector has two wire outputs, the yellow one is connected to the generator, the green one goes to ground. In principle, if you reverse the polarity, nothing will happen and the device will still work.
- For the enricher to operate, voltage must come from the battery. When the element inside the device heats up, the needle will extend.
- A special fitting is connected to the air filter, and there is a rubber elbow between them.
- There are several screws on the carburetor body with which you can adjust the idle speed and mixture quality.
- The float chamber is screwed from below and has 4 mounting bolts.
- There is an additional fitting for oil supply: it is the smallest.
- The second fitting is needed for communication with the atmosphere; you do not need to put anything on it.
- The third one is connected to a gas hose. It goes to the gas tank vacuum valve.
Thursday, September 28, 2021
Carburetor diagram for 139qmb
Check all O-rings for damage. Replace if necessary.
When cleaning the carburetor, remove the vacuum diaphragm before using purge air or cleaning solvents. This will prevent damage to the diaphragm.
Possible malfunctions of the CVK carburetor
1.The engine is difficult to start
— No spark - Poor compression
2. There is no fuel in the carburetor
-Closed fuel line -Closed fuel filter -Blocked vacuum line -Damaged Broken vacuum line -Clogged inlet needle -Float level set too high
3. Too much fuel for the engine
-Dirty air filter -Air leak in the manifold -Faulty enrichment valve -Blocked air passage in the carburetor
4. Air/fuel mixture too rich or too pale
-Faulty enrichment valve -Tightened idle screw -Float needle stuck or dirty -Float height too high or too low -Blocked carburetor air passage -Dirty air filter -Carburetor or manifold air leak
5. Engine does not accelerate
-Bad spark -Air mixture screw too tight -Accelerator pump faulty
6. Almost does not respond to the throttle
-Weak spark/poor ignition -Blocked fuel line -Blocked fuel filter -Bad fuel -Water in fuel -Air leak in carburetor or manifold -Faulty enrichment valve -Fuel flow difficult in carburetor -Vacuum choke stuck -Damaged vacuum diaphragm -Dirt in carburetor
Removing the carburetor
1. Remove the seat and container underneath. 2. Remove the right side panel. 3. Disconnect the starter cable connector. 4. Loosen the carburetor drain screw and drain the fuel from the float chamber. 5. Loosen the clamps in the intake pipe and intake manifold. 6. Loosen the throttle cable and pull it out of the caliper and out of the throttle control sector. 7. Disconnect the fuel line from the carburetor. 8. Remove the air intake tube and pull the carburetor straight back out of the intake manifold. 9. Remove the starter enricher from the carburetor.
Checking the enrichment valve
1. Check the resistance level. 2. The standard value is below 5 if it is cold. 3. Connect the enricher to a 12 V battery. 4. The plunger should extend 3/8 inch (approximately 10 mm) after 5 minutes.
5. Check the needle and its working place in the carburetor. 6. Replace if necessary. 7. Place the enrichment valve in the installation location and press down. 8. Install the retaining ring and tighten the screws.
Air shut-off valve
1. Unscrew the two screws of the traverse, the throttle cable, and remove it. 2. Unscrew the two screws of the air shut-off valve. 3. Remove the spring and vacuum membrane. 4. Check for membrane wear, replace if necessary. 5. Clean the channels, remove dirt.
Vacuum chamber
1. Remove two screws and remove the cover. 2. Remove the spring and membrane flap. 3. Remove the fuel needle. Be especially careful not to damage the membrane. Replace if damaged.
1. Check the needle for wear and replace if necessary.
Float chamber.
1. Remove the three screws and float chamber pan. 2. Remove the pin that holds the float. 3. Remove the main fuel jet, idle speed jet and idle mixture quality adjustment screw.
Be careful not to break the fuel jets and mixture screw. Count the number of revolutions when removing the mixture quality screw. When reinstalling the jets and screw, do not tighten them.
4. Clean the jets with solvent and compressed air. 5. Clean the carburetor body and all passages with compressed air.
1. Check the float needle and its seat and blow off any dirt. 2. Install the idle jet, fuel needle nozzle, main fuel jet into the carburetor.
3. Install the float. Adjust the fuel quality screw. Standard setting is 2 turns, plus or minus 1/4 turn. 4. After installing the float chamber pan, check the fuel level using a small ruler or calibrator. The correct fuel level is 20.5 mm (0.807 in).
Carburetor design (video)
For clarity, we suggest watching a video instruction about the design of carburetors and the principle of their operation:
Knowing the structure of the carburetor and understanding what needs to be connected where, you can easily disassemble, reassemble, clean and adjust it yourself, regardless of what brand and model of scooter you have, with some skill. All these procedures will not take much time and will help you save money on car services. The ability to carry them out will help you out when the engine does not want to start.
Maintenance Procedure
Scooter motors are manufactured in different volumes. The most common are 50 and 150 cubic meters. The gas distribution system has both 2t and 4t options. The differences between the models are minimal, so maintenance of 2 and 4 stroke 50cc mopeds is carried out according to the same principle.
- Carburetor adjustment at idle speed. The scooter starts and its operation without load is analyzed. The assessment is carried out based on the evenness of the strokes and the stability of the engine speed.
- The position of the screws for the quantity and quality of the mixture is adjusted.
Due to the relative lightness of the structure, adjustment is made with two control bolts. If stable operation cannot be achieved, it is necessary to remove the unit and carry out deep cleaning and adjustment.
Important: before servicing the carburetor on a 4t and 2t scooter, you should make sure that the piston group and ignition system are in good condition. Otherwise, the adjustment will have no effect.
Removal
Because of the way it works, the carburetor is attached directly to the intake manifold. The fuel line and air duct are connected to it. All removable hoses are removed from the body and the part is exposed.
The starting enrichment is switched off. The fastening bolts are unscrewed with a spanner wrench, and the entire assembly is pulled out.
Installation is in the reverse order.
Carburetor cleaning
An excellent cleaning method is to blow out the internal channels with compressed air from a compressor. For this, a special gun with a pointed tip is used.
During operation, plaque forms on the surfaces of the carburetor. This is due to the quality of gasoline. Most of the dirt stops in the fuel filter, but some gets into the intake tract.
To remove deposits, you can use either a solvent or a special liquid for cleaning carburetors. It is also suitable for scooters. The advantage of using it is that the cleaning agent is under pressure and is able to penetrate into the most inaccessible channels.
The scooter carburetor has rubber gaskets. To avoid exposing them to cleaning mixtures, it is recommended to insulate these parts in advance.
When cleaning the intake mechanism of a scooter, it is not recommended to use fluffy rags. Their threads can get stuck in the carburetor components, which will lead to additional difficulties.
Idle speed adjustment
An indicator of proper operation of the carburetor on a scooter is a stable idle. The absence of “floating” speeds and confident operation indicate a prepared mixture inside the combustion chamber.
For this purpose, there is a screw on the device that is responsible for dosing fuel when the scooter is operating without load.
Some carburetors do not have adjustment bolts. In this case, you need to adjust the idle mode using a needle and floats in the fuel chamber.
The scooter is started and allowed to run for a few minutes. This is necessary for better evaporation of gasoline inside the intake manifold and its mixing with air.
After warming up, turn the idle screw until the engine becomes stable. The criteria for correct adjustment are:
- the scooter maintains stable speed indicators;
- there is no engine tremors or failures in operation;
- the carburetor confidently switches to power gain mode (when over-throttled) and back.
Sometimes the scooter refuses to respond to idle adjustment. This behavior indicates additional problems in the intake system.
Mix quality
The two main components in the operation of any internal combustion engine are air and fuel. The force from their combustion pushes the pistons and forces the vehicle to move.
But simply mixing these substances is not enough. You can achieve maximum energy output only by maintaining the correct proportion of components. In a carburetor, this procedure is called adjusting the quality of the mixture and the entire operation of the 50cc scooter depends on it.
There are three types of air-fuel mass:
- poor;
- rich;
- optimal.
Maintaining the correct mixture ratio in the carburetor is vital for reliable engine operation.
Mixture control diagram
First, you need to start the scooter and warm it up. After setting the temperature, you should proceed according to the following algorithm:
- The mixture quality screw is tightened until it stops.
- Loosen the adjusting bolt one and a half turns counterclockwise.
- Start the scooter, tighten the screw a third.
- If the speed increases, turn it a quarter.
- We adjust until the speed stops falling.
This scheme allows you to configure all types of motorcycles.
- — Before adjusting, you need to check that the air filter is clean and soaked in engine oil. How to clean the air filter, read the article: Scooter maintenance.
- — If the rubber cuff on the quality screw is torn, then it can be replaced with a cuff from the quality screw of the classic Lada carburetor.
- — On Suzuki Sepia models, lets 2,
In the latest models of Honda Dio 34 everything is simpler. The carburetor has only one large screw, which is used to regulate the XO. The small one on dio 34 is located under the plug.
How to change the quality of the fuel mixture
For all scooter engines, it is important to receive fuel with an adjusted ratio of gasoline to air. A lean mixture leads to improper operation of the engine, a drop in power and overheating of the engine, while a rich mixture leads to an increase in consumption and the formation of soot.
Adjustment operations are performed by changing the position of the quality screw and moving the throttle needle.
Turning the screw to the right causes the mixture to become richer, and unscrewing in the opposite direction causes it to become leaner. The same happens with the needle: when the needle is raised, the mixture becomes richer, and when lowered, it becomes poorer. The integrated use of both methods allows you to achieve optimal results during setup. However, not all carburetors have this feature, so, as a rule, one of two options is used.
Idle speed: settings features
Adjusting the Suzuki Sepia carburetor is impossible without using the idle speed. It regulates the number of revolutions, where when the screw is tightened, the speed indicator increases and the wheel spins independently without the throttle. When you unscrew the idle screw, the scooter will start only when you add more revolutions with the throttle. It is advisable to adjust this jet last, that is, first adjust the quality of the mixture, the needle in the throttle valve, and, if necessary, the air screw, and then adjust the idle speed.