Hello.
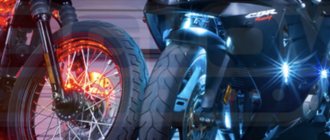
It happened like this: we were repairing and repairing the tidy on my brother’s motorcycle, as a result he crashed and completely ruined everything. The tidy glasses could no longer be repaired, so it was decided to order a new tidy housing, and leave all the old guts and scales. At the same time, my brother decided to increase the lighting of the dashboard of his motorcycle. Result on KDPV:
And under the cut is the process.
Customizing → LED lighting in wheels. Part one.
And I decided to look a little for options for implementing this idea. I suggest you take a look at my version of the backlight design.
I found the following options online: 1. Various LED caps. The easiest and cheapest way. There are many sold on Ali and in our stores. But the brightness is very low, and it doesn’t look serious. For lisapeds in general. 2. You can use batteries - they are heavy and need to be recharged. It's hard to imagine. In short, also for lisapeds, where there is no speed. 3. Two discs are mounted on the wheel and there are two brushes attached to them. I don’t argue, it’s a serious option, but it’s quite difficult to sculpt, and you know, the brushes aren’t very good in bad weather. And it’s unpleasant to think that somewhere you have something rubbing against the wheel.
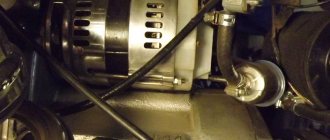
Then I decided to try to implement the circuit without wires. By electromagnetic induction method. In fact, everything is simple - you need a high-frequency generator, an amplifier, and two windings. And there will be happiness on wheels. I’ll say right away that I’m not very good at electrical engineering. Well, okay, let's get started. We are looking on the Internet for a circuit of any high-frequency generator - I chose the UC3845 chip. I collected it and looked at it with an oscilloscope: a rectangular signal, 30 kHz, amplitude 12V. Exactly what is needed. We are looking for a MOSFET operating in key mode; the control signal was less than 12V. We connect it and hang it on the radiator. The simplest thing left is to wind two coils. I wound a coil around the transmitter about 5 cm in diameter, 20 turns. Receiver - 30 turns of the same diameter. You can generally experiment with the coil.
I collected it, and this is what came out of it.
Consumption 2.8 W. Output power 1 W. Power can be increased by decreasing the coil resistance.
All that remains is to attach one coil to the wheel (I suspect it will fit best on the brake disc mount), the other to the fork, glue the tape and you will be ready. This is in the next part.
Source
INSTALLATION RULES
To illuminate your motorcycle efficiently, pay attention to the following recommendations:
- Choose a tape that is moisture-resistant, protected from dirt, vibration and shock, or individual LEDs.
- Determine where to install the LED lighting on your motorcycle. To create a uniform glow, and not a “garland on the Christmas tree” effect. Try the tape on the inside of the body, pointing the lights towards the engine.
- Prepare and degrease the mounting area; the reliability of adhesion of the adhesive base of the diodes to the surface depends on cleanliness.
- Do not connect the motorcycle's LED lighting directly to the on-board network; automatic switching on simultaneously with the use of the head light can create additional voltage on the network and damage the electrics. The optimal installation option is connecting to the battery via a switch or connecting to an audio system. The switch is placed under the seat or on the steering wheel.
- If, after installing the LED lighting of the motorcycle, there are wires left, secure them securely with clamps, the fastening points should be insulated, make ring terminals at the ends or heat-shrink them.
Homemade wheel lighting on Jupiter
Good day everyone, and in this article the author decided to highlight the wheels on Jupiter. Anyone can do this. No special expenses will be required.
Materials for making this homemade product:
1) Plexiglas 2) LED strip 3) Glue 4) Metal disc from the clutch 5) Brush from the generator (used to transfer positive contact to the wheel) 6) Several wires 7) Sandpaper
Step 1.
We cut out rectangles from plexiglass, the author took approximately 5 mm thick. We try on the dimensions according to the wheel
Step 2.
Next, we clean our part with sandpaper to a matte state, so that the light is distributed evenly. We make 3 blanks for each wheel.
Step 3.
Now, our task is to place the LED strip on the plexiglass. To do this, we glue the tape to the plexiglass using super glue; for better fixation, the author also glued the cuts with another glue. We carry out all these manipulations with the remaining blanks. Connect the power and check.
Step 4.
Well, now we need to attach our clutch disc. The author attached it to an aluminum wheel cap and insulated it; he used a motorcycle inner tube as an insulator, cut everything to size and fastened it all with plastic clamps.
Now we bring out the wires.
We connect them plus to plus, minus to minus.
Step 5.
We put everything in place, place all the parts so that they slide along the metal circle, power it from the battery, you can make a separate switch.
Source
How to install a kit (t-disc) for lighting motorcycle wheels
The articles posted on our website are copyrighted and are PROHIBITED for copying, publication on other sites and sources of information is PROHIBITED, and the use of photographic materials is also prohibited.
If you found this article useful, please post a link to our site on other resources on the Internet for greater distribution. To illuminate the wheels of a motorcycle, it is necessary to install a system for transmitting electricity from a standard battery from the frame to the moving wheels. This is done using the T-disk kit, developed by the GreenRound.ru workshop.
Additionally, each set for lighting motorcycle wheels can be equipped with a radio controller with a remote control, which allows you to remotely control the motorcycle lighting and turn on a number of programs (smooth blinking, strobe, brightness, alternate turning on of wheels and engine lighting, “heartbeat”, etc.)
For ease of installation of the LED strip, it is recommended to dismantle the wheel. Remove dirt and wash.
We use a degreaser to treat the surface for mounting the LED strip and current collector disk. Next, add a little magic and glue the LED strip onto the wheel.
LED strip for motorcycles is an exclusive product that differs in its properties from the usual decorative LED strip. We install the T-disk on a special removable fastener. We connect the cable from the T-disk with the cable from the LED strip and cover the connection points with a heat-shrinkable tube.
Having previously measured the installation distance from the T-disk, we add the height of the brush and compare it with the mounting location on the wheel axle. We bend the bracket in a vice, you can use a hammer. The T-bracket fits onto the wheel axle like a washer and, when installing the wheel into the fork, is clamped with the standard wheel mount.
The distance between the brush body and the T-disc tracks should be 2-3 mm. Fixing the cable on the wheel and installing the LED strip are described in more detail in the instructions supplied with the T-disk. Using our installation technology, the LED strip does not come off over time and is not afraid of water.
LED lighting for a motorcycle is an element of motorcycle tuning for a lightweight vehicle. In this article we will tell you what rules you should follow when choosing equipment, describe the installation process and teach you how to do it yourself.
Handmade Belt Buckle / Kraken / Abyss
Study nature. Start with the idea that you don't know her completely. It is much richer than you thought, are thinking and will think about it.
Final scene of Act I
All the characters and furniture are on stage. Only the second cast and extras with the scenery remained behind the scenes. )
Cast buckle Material: nickel silver + bronze Multi-layer patination
Size: 70 x 115 mm
Work process. As I said earlier, complete dirt and no aesthetics.)))
Additional lights
An effective way to improve lighting on a gravel road or in off-road conditions is to install additional headlights. Until last year, in order to avoid problems with inspection, the owner of a bike or scooter installed an additional light and did not turn it on on public roads. In 2020, any post can stop a vehicle and check the legality of the updates made.
Handmade Belt Buckle / Kraken / Steering Wheel
a bit of interior to follow