Do no harm!
It is no secret that many owners of Stealth 500 ATVs criticize the design of the carburetor installed on the car, believing it to be the main culprit for the incorrect operation of the fuel system and problems with the traction characteristics of the engine. There is no doubt, there are certain grounds for such statements. But when trying to do their own repairs, some motorcycle owners forget that interfering with the operation of a complex device without the appropriate knowledge and training can bring irreparable harm rather than benefit.
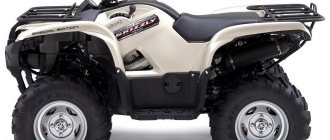
Technical characteristics and equipment
The ATV has the following dimensions:
- length - 176 cm;
- width - 107 cm;
- height - 110 cm;
- ground clearance - 11 cm.
The weight of the car without equipment is 120 kilograms, and the volume of the gas tank is 4.2 liters.
The heart of the ATV is a four-stroke 150 cc carburetor engine , which is capable of accelerating the all-terrain vehicle to 65 km/h.
The motor is cooled forcibly through air cooling. The gearbox paired with the power unit is a CVT with reverse.
The chassis of the rear-wheel drive car is represented by a pendulum with a solid axle and monoshock absorbers at the rear, and a double-wishbone independent design at the front.
The ATV's hydraulic braking system uses discs mounted on each wheel .
The chain drive has a spring tensioner, and the engine is started using an electric starter.
All this is mounted on a spatial steel frame. Off-road tires measuring 23x7.00/10 (front) and 22x11.00/10 (rear) are used as standard tires.
Make no mistake
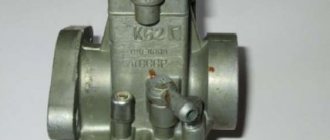
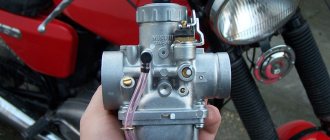
Let's try to clarify. First of all, the statement that the Stealth 500 carburetor was allegedly made in Japan is not true. As often happens, products are manufactured in China under license (or perhaps without it), and it can only be regarded as a product copied from successful Japanese models. The carburetor of the Stealth 500 GT and other modifications of the popular ATV has the factory marking PD36J. It is a design with one float chamber and one diffuser and, during normal operation, ensures stable engine operation in all modes with fairly economical fuel consumption.
WHY DO YOU NEED A FUEL SYSTEM ADJUSTMENT?
The carburetor is the central power supply unit of the engine. Fuel consumption, engine power and speed characteristics directly depend on the quality of its work. If the unit is configured correctly, then it forms an emulsion (combustible mixture) in accordance with the requirements of the engine. In case of inaccurate settings, the following operational errors occur:
- Difficulty starting. Periodically, the equipment begins to choke or does not start at all.
- Insufficient acceleration dynamics. Dips in the throttle handle, which leads to spontaneous jolts when driving.
- Slowness during acceleration, which leads to increased fuel consumption. This affects the ride quality and interferes with high-speed dynamics.
- The appearance of carbon deposits in the engine, which naturally leads to a decrease in the service life of the engine and other technical units.
Be consistent
It should be understood that there are reasons for increased fuel consumption and unstable engine operation. It is necessary to accurately determine the cause of the malfunction before proceeding with its elimination. But if there is still an assumption that the carburetor of the Stealth 500 ATV is to blame, first of all, you should carefully check the tightness and reliable fixation of the fuel and air hoses. It is their leakage that can be the source of problems. And only if everything is in order with this, you should think about more complex repairs.
There is an opinion that the main reason for the poor performance of the unit is a defect during its manufacturing process. Indeed, there are carburetors with cracks in the body or improperly processed air and fuel channels. If this is indeed the case, then the part will have to be replaced. But if no obvious damage is found, adjusting the Stealth 500 carburetor can solve the problems that have arisen. But first you need to make sure there is no contamination. To do this, the part will have to be removed, disassembled, and, if necessary, washed. It is important to pay attention to the integrity of the gaskets and be sure to replace damaged ones.
Adjusting the ATV carburetor mixture quality on the go
1. Start the ATV and take it for a test ride. Wait until the engine has completely cooled down.
2. Check the condition of the spark plug. To do this, unscrew the cap and inspect the spark plug.
What to pay attention to:
- A light brown coating around the entire circumference of the insulator is a sign of optimal carburetor operation.
- Brown color on one side of the insulator means the engine has a lean mixture.
- A thick black deposit on the spark plug insulator is an indication that the carburetor is supplying too much fuel mixture while the ATV is moving.
- A completely black spark plug, insulator and electrode are too rich a mixture, which results in excessively high fuel consumption and a decrease in power, as well as gas contamination in the chamber.
- White insulator – lack of air and gasoline supply. Leads to overheating and increased gasoline consumption.
- A completely white spark plug is a too lean mixture.
- Brick color - a large volume of additives with a high metal content in the composition.
- The absence of carbon deposits and the simultaneous melting of the electrode means a very lean mixture at high speeds.
- A spark plug with a broken tip is a breakdown of the central electrode with a ceramic skirt.
- A spark plug with oil deposits inside the electrode is a sign of used rings and valve stem seals.
- Shiny inclusions and shavings indicate engine destruction due to driving at high speeds.
- Oxidation – problems with piston rings.
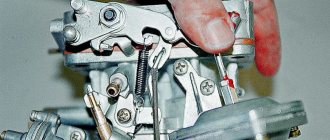
3. Unscrew the needle cap at the top of the carburetor. Pull the needle. This is the main element that regulates the supply of fuel to the combustion chamber, since the needle is connected to the gas trigger. When the trigger is pressed, the needle rises, slightly opening the hole for supplying the fuel mixture. This directly affects the increase in power and speed of the ATV.
4. Remove the cable, then press the needle to pull it out. The needle has 5 grooves and a locking ring. By default it is set to medium. The lower the locking ring is located, the higher the needle is raised, which means a lot of gasoline and little air is supplied. Accordingly, the higher the ring, the less gasoline and more air.
5. Move the retaining ring in the desired direction to optimize carburetor performance. Insert the needle into place.
6. Start the engine and pull the throttle trigger. If adjusted correctly, the engine should not stall from sudden pressure.
And remember, you should resort to adjusting the needle only as a last resort, when adjusting the quality and quantity screw does not bring any results.
Operations Performed
Let's face it, servicing a device installed on an ATV is not very convenient. All that the developers took care of for such a case when designing the Stealth 500 carburetor was adjusting the idle speed. This is done with the engine warmed up to operating temperature by turning the adjusting screw. The optimal mode is considered to be when the tachometer needle is set at 1600 rpm.
In order to change the qualitative composition of the fuel mixture, the part will have to be dismantled. The design provides two stages of adjustment.
- Rude. It is done by changing the position of the installation washer on the dosing needle rod. To do this, you have to unscrew the two fastening screws and remove the diaphragm along with the needle and piston. Only after this will it be possible to rearrange the ring into one of the five positions provided by the manufacturer. Such an adjustment affects the total amount of fuel mixture entering the engine, changing the traction characteristics of the engine and gasoline consumption.
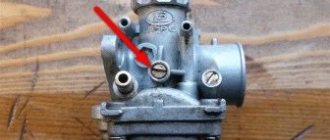
- Thin. To do this, you will have to use a screw, initially hidden under a plastic plug. The plug will have to be removed. After this, the screw is tightened until it stops, and then unscrewed 1.5 - 2.5 turns, after which the plug is installed in place. In this way, it is possible to achieve the optimal mixture composition at idle speed and in transition modes.
You can judge the result of the work done by the color of the electrodes of the spark plug removed from the engine. If everything is in order, then after 15 - 20 minutes. When the engine is running they will be light brown in color. Black, sooty electrodes indicate excess fuel. A whitish coating indicates a lean mixture. In both cases, the position of the screw will have to be changed slightly. Be prepared for the fact that you will have to do this operation several times.
Carburetor restoration
It means that with the help of certain technologies the carburetor is restored to its original, unworn state (complete restoration of the carburetor). How this happens: The carburetor is disassembled “to zero”, sandblasted, the throttle valve axles are replaced, the throttle block is bored, new bushings are installed. Same thing with the air damper axis. All mating planes are processed - polished. A new float, needle valve assembly, new jets, vacuum control diaphragms, thermocouples, return springs, and remote shims are installed. The carburetor of a forklift, motorcycle and ATV can be additionally equipped with seals installed on the throttle shaft to protect it from water, sand, etc.
A rebuilt carburetor has no worn parts.
The technological characteristics of the restored carburetor (completely repaired) are returned to their original state.
How to set up a carburetor on a 125cc pit bike
To adjust the carburetor on a 125 pit bike, you first need to check the color of the spark plug. Ideally, the color of the candle should be dirty orange. The second option is more suitable for an experienced pit bike owner. When you start to let off the gas and you hear shooting, this will mean that the mixture is not of the proper quality. And if, when you sharply press the gas pedal, the engine seems to be choking and there is no correct pickup, this also means that the mixture is of poor quality.
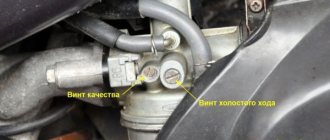
The idle speed is adjusted using two screws: a quality adjustment screw and a quantity adjustment screw. If the quality screw is on the diffuser side, then it regulates the fuel supply, and if on the air filter side, it regulates the air supply accordingly. Initially, we set the minimum stable speed using the quantity screw, i.e. your pit bike should almost stall, then we slowly begin to rotate the quality screw. We should hear maximum revs. After the number of maximum revolutions has been found, we begin to turn the quantity screw, setting the optimal speed for the engine.
How to adjust the carburetor on a pit bike
In order to adjust the carburetor on a pit bike. It is necessary to remove the carburetor and filter, completely disassemble it, wash it with gasoline, and blow it with a compressor. Also rinse the filter thoroughly and dry it and apply special oil. After the manipulations are completed, we put everything in place. We test the pit bike on a flat, deserted area. The engine will need to be turned off so that the throttle position is at full. And then we unscrew the spark plug and carry out the above manipulations. We figured out how to adjust the carburetor on a pit bike. But I would like to describe in more detail about changing the jet. In order to determine whether we generally need to change the jet or not. It is necessary to unscrew the gas handle a quarter turn. This is necessary to check that the carburetor is set correctly. And then we check by sharply turning the throttle. If your pit bike does not stall, then you did everything right.
Having determined the need to change the jet, we select the correct size. Everything is simple here, for a mixture that has a dark color (rich mixture) we select a larger nozzle size. For a pale mixture (poor), select a smaller jet size.
As a result of everything, I want to highlight the three stages of setting up the carburetor on a pit bike.
Source
Causes of ignition coil failure
Complete or partial breakdown of this functional component of the ATV can occur for the following reasons:
- serious mechanical damage. During long-term operation, any equipment wears out and some of its elements fail, which is why the insulation is damaged;
- contact damage. Most often occurs due to liquid penetration into the ATV's power system;
- ignition coil overheating. Regular overheating can significantly reduce the service life of this part;
- Excessive vibration of the ATV engine.
It is worth noting that the insulation coils themselves are distinguished by a high degree of reliability and durability. Therefore, their breakdowns are in the overwhelming majority of cases associated with either aging or breakdowns in insulation.
I often observe this situation - girls, if they are walking in a group of 2 to plus infinity people, take up the ENTIRE sidewalk along the sidewalk. They walk, talk and don’t even think about forming a column one at a time. As a matter of principle, I don’t push to the sidelines when such a company comes my way. When there is half a meter left before the collision, I stop and look with interest at the girl in front of me, and there is panic in her eyes! It’s clear that she JUST realized that there was someone in front of her! Ladies, do you really not see the obstacle in your path until you are nose to nose with it or do you just give a damn?
How to adjust the carburetor on a pit bike
In order to adjust the carburetor on a pit bike. It is necessary to first determine the quality of the mixture. The quality of the mixture must meet the standard. The correct quality of the mixture must be achieved by raising (lowering) the needle. As a rule, the needle must be lowered if the mixture has a dark (black) color, and if the mixture has a very light color, then lower the needle accordingly. If it was not possible to adjust using the needle, then you need to return the ring on the needle to the position in which it was previously.
Another option would be to change the jet. The jet looks like a thick nut with a hole inside and a recess on the surface of the head for a flat-head screwdriver. In order to change or change the size of the jet, you need to remove the carburetor from the pit bike. But first you need to drain all the gasoline and open the float chamber. Depending on the color of the mixture, we select the nozzle; for a light mixture we increase the size, for a dark mixture we decrease it.
If it happens that all your efforts are in vain and the adjustment, alas, did not help, washing and blowing the channels in the carburetor can help (this can happen if sand or dirt has disappeared into the carburetor. For those owners who have little experience or do not have time to adjust the carburetor on your pit bike, we advise, of course, to contact specialists
Setting the gasoline level
The last step in adjusting a 125cc ATV carburetor is to adjust the gas level. To do this you need:
- Find the drain hose.
- Lift the bottom of the tube.
- Unscrew the screw and remove the mixture.
- Open the float chamber.
- Find the tab that covers the needle.
- Bend it slightly downward to increase the fuel flow rate.
Note: Be careful when making adjustments as the system components are very fragile. Ideally, carburetor adjustment should be carried out by a specialist.