During the operation of the scooter, various breakdowns occur. It doesn’t matter at all who the manufacturer is (Japan or China). The difference is that one vehicle breaks down earlier, while the other breaks down over time. Problems can occur with the wiring, engine, or chassis. But, as a rule, almost everyone is faced with replacing the CPG. This abbreviation implies the term “cylinder-piston group” or, as people say, “piston group”. Looking ahead, it must be said that replacing the piston, piston and rings separately is not as difficult a task as it might seem at first glance. It is also worth knowing that the process of removing and replacing the CPG is almost the same on all scooters. Therefore, the article will discuss the main points. Looking ahead, let us remind you that the power of the CPG can vary. It is recommended to install a piston engine with the same power as a standard CPG.
Preparatory moments
Before replacing the piston or rings (CPG in total), you need to get to the cylinder. For beginners who have no idea where this element is located, we will tell you. The muffler is just bolted to the cylinder. If you have no idea how to correctly install the piston on a 4t or 2t scooter, then first you need to remove the old CPG. The upcoming repairs can be divided into the following stages:
- Removing the scooter trim (plastic);
- Disconnecting electrical wires;
- Disconnect the oil hose;
- Engine dismantling;
- Removing the old piston, rings (CPG in total);
- Installation of new parts;
- Engine installation, wire connections and hose;
- Plastic fastener.
The plastic is folded to the side so as not to be crushed if careless. All bolts and screws are placed in a pile and, if necessary, sorted separately. After making sure that all hoses with gasoline and oil are disconnected, remove the engine. It is necessary to understand that engine removal differs depending on the design features of the scooter model. Once the engine is removed, you can begin to remove the plastic casing, which protects the CPG from external factors. Then remove the cylinder head. It is secured with 4 bolts. In order not to break the thread, all bolts are unscrewed crosswise.
We remove the cylinder and immediately inspect it. If there is no damage, then it can continue to be used. While the piston most likely cannot be used back.
Scooter tuning - muffler tuning (exhaust system)
| A good exhaust system can easily help you add horsepower to your scooter. The operating features of a two-stroke engine are such that a well-chosen exhaust system can increase power by up to 20%, which is a very significant amount. Moreover, modern scooters, forced to meet the most stringent environmental requirements, are equipped as standard with exhaust systems that have a detrimental effect on performance. Exhaust systems, like cylinders, are divided into different classes, so you need to choose a system based on the piston system that will be used on the scooter. Sport class exhaust systems are quite versatile. Many of them show excellent results with both standard 50cc cylinders and 70cc Sport class cylinders. But not all, so you should be careful when choosing. Pipes from certain manufacturers have proven themselves to be extremely short-lived and fragile, so you should not buy the first pipe you come across. Chrome-plated exhaust systems deserve special attention: they retain their appearance much better and are also protected from corrosion, which is very important in Russian operating conditions! |
How to properly install a piston on a scooter
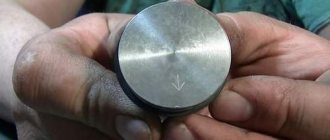
The new piston is equipped with a pin, two retaining rings and additional rings. If the scooter is 2-stroke, then the number of additional rings is 2. In 4-stroke engines, 3 rings are almost always installed, one of which is an oil scraper ring. Let's look at installing a piston and rings using the example of a 2-stroke scooter. First, two compression rings are placed on the piston in special grooves. Next, we use the so-called “finger” to connect the piston and crankshaft; the fastener is considered complete after installing 2 retaining rings on both sides of the finger. The rings should fit tightly in the intended holes. Remember: the arrow on the piston should point downward, towards the floor. The “processes” described above are not complicated if you look at them. It is best to watch a training video or read the scooter maintenance instructions. Then, for sure, questions like “How to install rings on a scooter piston” will not arise.
Scooter tuning - carburetor tuning
| You can get more complete output from a larger-volume piston by appropriately improving the operation of the power system. First of all, we are talking about the carburetor. Scooters come standard with carburetors from a variety of manufacturers, but they all have a common feature by which they can be classified - the size of the diffuser. On standard 50cc engines there are carburetors with diffusers from 12 to 17.5mm. Tuning carburetors are also diverse: there are cases of installing even 28mm carburetors on 70cc tuning engines, but all this is already in the realm of experimentation. Carburetors with a diffuser diameter of more than 17.5 mm (19, 21, 24, etc.) are impractical to operate and require regular attention and reconfiguration. Of course, all this is not important if you are going to make a street rocket out of a scooter, sacrificing convenience and reliability. A standard and proven recommendation for 70cc cylinders is to install a 17.5 carburetor, if one is not included in the standard equipment (for example, on the latest Piaggio HiPer2 engines). |
Cylinder installation
This is the final stage and must be approached with caution. After all, if the fastening is incorrect, the slightest gap will not provide the necessary compression. As a result, the scooter will not start. Install a gasket between the engine and the cylinder, and between the cylinder and its head. The head is clamped with bolted connections crosswise. It is easy to check the correctness of the work performed. To do this, you need to start the engine. If the motor runs smoothly, everything is done correctly. You can also make a few efforts with the kick starter to feel the compression.
As you have already killed yourself, there is nothing complicated. Installing rings on a scooter piston and replacing the CPG in total do not require any special knowledge. All you need are details, time and desire.
Help
Need help finding spare parts?
We will help and advise!
+7-927-653-31-57
Gradually the time comes and your two-wheeled four-stroke friend needs to change the piston. There may be 2 reasons for this: wear or installation of a more powerful piston. In this article we will tell you how to replace the piston (CPG) on a 4-stroke scooter with a 139QMB engine.
If you have a different engine model, for example 152QMI or 157QMJ (150 cc scooter), then this article will also suit you to replace the CPG, since there are no fundamental differences. For 2-stroke scooters, we recommend reading the article “Replacing the piston on a 2-stroke scooter”
Read also: Availability of fines by number
We will describe the process gradually step by step. First of all, we need to remove the plastic that prevents us from getting to the engine.
The next step is to unscrew and remove the carburetor (In this case, it is not necessary to disconnect all the hoses from the carburetor, but simply move it to the side).
We unscrew the muffler at the place where it is attached to the cylinder head and at the place where it is attached to the engine crankcase (2 long bolts). Now remove the muffler.
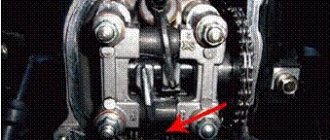
The next step is to unscrew the plastic cylinder head cover. (2 halves connected by two screws) After this, remove the cylinder head cover by unscrewing the 4 bolts. We unscrew the chain tension regulator, which is located near the carburetor.
Next, you need to unscrew the 4 cylinder head nuts, after which we can remove the cylinder head. When we removed the chain tension regulator, we freed the chain and can easily remove it (after we removed the chain from the camshaft, it is necessary to secure it, for example with a wire, so that it does not fall into the engine crankcase)
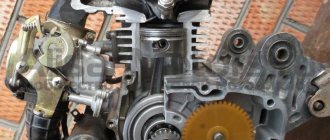
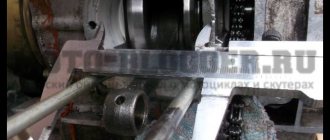
In this photo the head has not yet been removed, but only the camshaft has been removed and the chain is fixed. The next step is to remove the cylinder from the studs. If problems arise with this, you can lightly tap with the wooden part of the hammer on all sides of the cylinder.
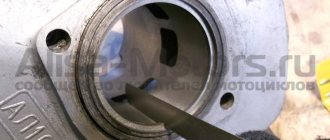
We put the piston in the top dead center position (the highest position of the piston, we are guided by the marks on the generator rotor.) It is necessary to ensure that the chain does not fly off the drive sprocket, so as not to mess with installing it in the reverse position. Take a clean rag and cover the hole in the engine crankcase to prevent any debris from getting into it. Remove the retaining rings from the piston and thereby free the pin (here you can use round-nose pliers or small pliers.) Remove the pin using a small wooden block (while trying not to create a load on the crankshaft connecting rod). This completes the process of removing the old cpg.
We take a new piston kit for 72 or 80 cubic meters (piston diameter 47mm or 50mm, respectively). You can, of course, use a standard new 50 cc CPG. The kit includes: cylinder, piston, piston rings, pin, retaining rings, as well as head and cylinder gaskets. You can buy a 72 cc cpg at a low price in our online store.
Installation is carried out in the reverse order, having previously lubricated the cylinder, piston and rings with a small amount of oil. We first install a thin ring on the piston in the lower groove, then an oil scraper ring and again a thin ring (the wavy ring - the oil scraper ring will thus be between the two thin ones in the lower groove). Next, install 2 compression rings (which are thicker). The cuts of all rings should not be located on top of each other. After installing the rings, place the piston on the crankshaft connecting rod, fix its position with a finger and locking rings. We take the connecting sleeves from the old cylinder and insert them into the new one.
We put a gasket under the cylinder on the studs. Carefully place the cylinder on the piston with rings so as not to damage the cylinder. We push the chain into the groove for the chain. Then install the chain bar on the cylinder head. Now we can put the chain on the camshaft sprocket (the position of the sprocket should be as follows: a large hole at the top, and two small ones on the sides, parallel to the edge of the cylinder head). We fix the position of the cylinder head with the gasket by screwing it on. Then we install the plastic cylinder head cover, chain tensioner, carburetor and muffler. The installation is now complete!
If you haven’t changed the oil for a long time, you need to change it before starting with a new piston. Before putting a full load on the scooter engine, it is necessary to run-in, i.e. drive 300-500 kilometers at a speed of no more than 40-45 km per hour.
Along with an increase in the power of the scooter with the installation of a tuning cpg, the load on the variator with the gears of the gearbox also increases. Remember this and if possible, replace the variator with gears with tuned ones (more reinforced.)
Scooter tuning - impeller tuning
| If on one side the belt in the drive pulley rests against the variator, then on the other it rests against the impeller. The impeller got its name for the additional function it has - transmission cooling. Tuning impellers have larger blades, allowing them to operate with greater productivity. Considering the low price of this part, we can safely recommend it for purchase. Sometimes, when installed with an appropriate variator, the impeller allows for a larger operating radius of the drive pulley, for example in the case of the Polini kit for the Honda X8R scooter. |
Our production
In our online store you can find and purchase new piston groups at low prices. A complete list of piston engines can be found at this link
Installing a piston with a larger volume than stock is perhaps the simplest, most affordable, affordable and effective way to significantly increase the maximum speed and power of a scooter. There are, of course, even more effective ways to increase maximum speed and power, but these methods, or rather the hardware, cost simply unrealistic money...
If you charge the engine of the same 139QMB to the maximum, then such tuning before the “increase” cost the client about 35,000 rubles and this does not include work.
Read also: The license can be revoked by decision
It is clear that not everyone can afford such amounts. Yes, even if it’s affordable, what’s the point? It’s easier to buy an old branded scooter and ride it than to charge the “Chinese” and then throw it in the trash after a season. But that's what I think.
Scooter tuning - belt tuning
| The role of the belt in the transmission of a scooter cannot be overestimated. By connecting the drive and driven pulleys, it is the belt that transmits torque from the crankshaft to the gearbox mechanism. As you know, the belt on a scooter is a consumable item and wears out quite quickly. When tuning, the load on it increases, so the wear process accelerates. A variety of manufacturers, right up to the tire giant Continental, offer samples that are more wear-resistant than the standard one. Rigid Kevlar belts are not recommended for use with a standard CVT to avoid premature wear of the latter. The choice of belt should be approached very carefully, since according to the tests carried out, different belts can work completely differently in the same transmission. And sometimes, without appropriate settings, they can only worsen the dynamic and speed performance of the scooter. |
Preparation
So that you don’t have green snot later about the fact that the tuning piston does not fit into the crankcase and you were allegedly deceived here - remove the old piston from the engine and measure the hole for the liner with a caliper. If the hole is smaller than the tuning piston sleeve, the “meat” of the crankcase allows it, hands grow from where it is needed - a round file will help you (only before boring - disassemble the engine, assemble the empty crankcase with bolts, bore the hole, make sure that the piston enters the crankcase without problems - wash the parts from shavings and reassemble the engine. Or, as a last resort, coat the crankcase and file with grease to at least somehow protect yourself from sawdust getting into the inside of the engine.)
The hole for the 162QMK engine sleeve (such engines are installed on Chinese scabs, more popularly known as “Leika”) in stock is 65 mm. Without boring, a piston of 57mm (150CC), 61mm (1700CC) and 62mm (180CC) easily fits into this crankcase. You won’t find a 62mm piston on sale during the day, so it was decided to install a regular 61mm piston on this engine.
By the way, for those who do not know, a piston with a diameter of 61 mm can be easily installed not only on the Leica engine, but also on any other Chinese 150 equipped with a 157QMJ series engine. There, if you put your hands to it, you can stick a piston at 62mm, but only if the “meat” of the crankcase allows it. Everything is individual, you need to look at the place. In any case, the distance along the studs is the same for both the 61mm piston and the 62mm piston.
From left to right: 61mm, 57mm
On the 139QMB series engine from a regular Chinese 80-six, you can easily install a piston 39mm (45CC), 47mm (72CC), 50mm (84CC)
From left to right: 39mm (45CC), 47mm (72CC), 50mm (84CC)
Scooter tuning - gearbox tuning
| What scooterists often complain about, even after a little tuning, is that they cannot reach the maximum speed. After all, when tuning the Sport class, the maximum engine speed increases quite slightly, which means that there is simply nowhere to get a significant increase in the maximum speed. However, the increased volume gives the motor more traction, which allows you to overcome hills at maximum speed, which previously could not be done without slowing down. A new gearbox, or rather, gearbox gears, will help turn this increase in traction into additional km/h on a straight line. With their help, you can change the transmission ratio, thus increasing the maximum speed. Of course, the engine’s thrust reserve is not infinite, so you won’t be able to increase the maximum speed endlessly! |
Installing piston rings
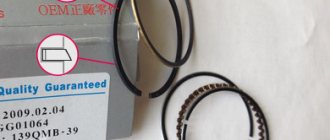
Remove the set of piston rings from the box. A piston ring set for a Chinese four-stroke scooter usually consists of five items. Three of which are a single assembled oil scraper ring, the other two: upper and lower compression.
A typical set of piston rings looks something like this
Carefully unpack the kit with perfectly clean hands.
In the kit you will find two of the thinnest rings and one thick corrugated ring (expander) - this will be an assembled oil scraper ring that needs to be installed on the piston first.
We place an expander in the lowest groove of the piston
We place thin oil scraper rings in the same groove - one under the expander, the second on top of the expander
We find the lower and upper compression rings in the kit and install them, respectively, in the middle and upper grooves of the piston - with marks on the side surface to the cylinder head (cylinder head). The lower compression ring differs from the upper one in color (not always) and the shape of the working edge (always). In most kits, the lower compression ring is painted black, and its working edge has a slight bevel.
The top compression ring in the vast majority of piston ring sets is a uniform light color. But this is in most cases, and in practice it happens that the kit comes with upper compression rings that are black or even red. By and large, the color is not particularly important to us, something else is important to us: the working edge of the upper compression ring has small roundings (chamfers) on the sides, and the working surface of the edge of the upper compression ring is covered with a shiny protective coating.
For example, in this kit both compression rings are black. But the working surface of the upper compression ring is covered with a layer of protective coating, and small chamfers are removed on the edges of the working surface.
The lower compression ring has a matte working surface, and the working edge is beveled at a slight angle. All these moments are clearly visible in the photo.
The compression rings in this kit are red and black. As in the first case, the upper compression ring has chamfers on the working edge and a protective coating, and the lower one has a matte working edge beveled at an angle.
On classic piston ring sets, the upper compression ring has a light color and a rounded working edge. The bottom is dark in color and the working edge is beveled at a slight angle.
Read also: How to add fuel to a Kamaz injection pump video
When installing the piston rings, do not forget about the marks. The marks on the rings after installation on the piston should be oriented towards the cylinder head (cylinder head).
Scooter tuning - air filter tuning
| To properly power the engine, you need not only gasoline, but also air. Excess gasoline will do nothing for your engine unless it is enriched with enough air. To improve the air supply to the cylinder, special air filters are used. The most universal and balanced solution is to use a more efficient filter element, for example, Malossi Red Sponge, instead of a standard filter element. It is installed in the standard air filter box. Another type of tuning air filters is the so-called zero-resistance filters (or simply - FNS). When installing them, the standard box is completely removed, and in its place is a small filter element, usually either cylindrical or cone-shaped. It has less resistance, which improves cylinder power at high speeds. However, firstly, these filters are almost not protected from external influences of dust, dirt and water, and secondly, unlike standard air boxes, they do not have a resonance effect. As a result, installing such a filter requires a thorough and precise reconfiguration of the carburetor, which only a few specialists can handle. If the service center tells you that they can “simplely” and “easily” set up a carburetor to work with the Federal Tax Service, most likely the qualifications of the workers there are below average. Leave and never come back! |

Piston installation
Insert a retaining ring into any boss of the piston pin. It is most convenient to insert the ring with small round nose pliers. After installation, check how well and tightly the retaining ring fits.
- If the retaining ring does not cover the entire surface, but only a small part of it, replace it with a new one.
- If the retaining ring does not lie tightly in the groove and dangles, straighten it a little
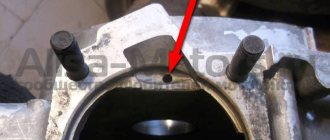
Lubricate the bearings of the lower and upper connecting rod heads and the piston pin bosses with clean engine oil. We put the piston on the connecting rod, orienting it with the “IN” mark to the inlet port; if there is an “arrow” on the piston instead of the “IN” mark, orient the arrow to the exhaust port. We insert the piston pin into the boss - orient the piston on the connecting rod so that the pin hits the connecting rod - install the pin all the way into the locking ring and secure it from falling out with the second locking ring.
We install the cylinder guide bushings on the studs and put on the gasket. It is advisable to place the gasket on the sealant, but without fanaticism.
Cylinder installation
Fill the rings and piston with clean engine oil. We tighten the piston rings with a clamp. We cut the clamp from a piece of any sheet metal - cut out a strip of the required length, give it a profile along the piston and make a retainer from the same piece of sheet metal.
Lubricate the cylinder mirror with clean engine oil
We hook the timing chain with a piece of wire, pull the chain through the cylinder and put the cylinder on the studs.
Very carefully and slowly insert the piston into the cylinder. After the rings are completely inserted into the cylinder, unfasten the clamp and install the cylinder into the crankcase.
Scooter tuning - reed valve tuning
As a rule, a reed valve is installed directly at the inlet of the crankcase, also known as a “house” for its traditionally angular shape. However, not all reed valves have the characteristic “house” shape. The following engines use single reed valves as standard:
It is these scooters that, first of all, require a tuning flapper valve, even when tuning the Sport class. In many other cases, you can easily use a standard valve, but with carbon petals. Of course, if we are talking about tuning of the Racing class and above, a tuning valve is required! |
Setting the valve timing ch1 (in collective farm style - ignition)
We push the cylinder all the way into the crankcase and set the piston to top dead center (TDC). It is best to set the piston at TDC using an indicator or, at worst, visually/touch. You can also align the piston according to a special mark on the generator rotor, but I have more than once encountered the fact that the marks on some engines are stamped incorrectly and, in order to avoid troubles, I advise you to use them only as a last resort, for example, when the cylinder head is not removed and you need to adjust valve
We insert the cylinder head guide bushings and the lower timing chain guide into the cylinder, degrease the surface and install the gasket.
We install the cylinder head, insert the valve bed guide bushings.
Scooter tuning - intake pipe tuning
| The gasoline-air mixture prepared by the carburetor then flows into the crankcase through the inlet pipe. This part is sometimes mistakenly called a manifold, which is incorrect, since this pipe does not collect anything, but only directs the mixture into the crankcase. It is important that the flow area of this part is no less than the size of the carburetor, otherwise there is no point in installing a carburetor! The flow area of the standard pipes on most scooters is such that you can easily use a 17.5 mm carburetor instead of the standard one. The same cannot be said about 19 mm carburetors! What can we say about such scooters, subjected to grief tuning with the help of 21 or even more carburetors without replacing the intake pipe!? Through tears, we call these “scooters named after the 19th carb”... An anecdote comes to mind: Stirlitz gave the dog gasoline and let him go. The dog ran 5 meters and fell. “The gasoline has run out,” thought Stirlitz. |
Setting the valve timing ch2 (in collective farm style - ignition)
Without knocking the piston off from TDC, we orient the camshaft so that the large hole and marks on its sprocket become as shown in the photo and, while putting on the chain, install the camshaft in bed.
Ideally, the marks on the sprocket should be strictly parallel to the plane of the valve cover connector. In practice, unfortunately, such accuracy is difficult to achieve. And this is mainly due to the stretching of the timing chain. And there’s nothing you can do about it - either change the timing chain to a new one or catch the phase by switching the teeth, but this method of setting the valve timing is not acceptable to me personally.
We orient the camshaft bed with a mark in the form of the letters “E” and “X” towards the exhaust channel and install the bed.
Tighten the bed nuts crosswise and then tighten the two bolts on the side boss of the cylinder head.
Scooter tuning - clutch tuning
| The centrifugal clutch, installed on the shaft of the variator driven pulley, gives the scooter the ability to move away independently as the engine speed increases. Often, when tuning, the scooter receives a fundamentally new character of the engine and, in order to fully realize its capabilities, the clutch must operate at higher speeds. Sometimes this can be achieved by replacing only the clutch springs, but sometimes (as a rule, starting with the Midrace tuning and higher) you have to change the entire clutch. Tuning clutches have pads made of more advanced material, and also often offer more options for tuning - it all depends on the class of the selected product. When tuning Midrace and above, the load on the clutch assembly is sometimes so high that in order to avoid overheating it is wise to replace the clutch complete with a bell, which is also offered by various tuning manufacturers. |
Installing the timing chain tensioner
If you have a 157QMJ series engine, do the following: unscrew the plug on the tensioner body; We insert a thin flat screwdriver into it and begin to tighten the bolt until the tensioner rod goes inside the body.
Without releasing the screwdriver while simultaneously holding the tensioner body, with your free fingers, insert the tensioner into the cylinder, screw it in with bolts, and only then release the screwdriver and screw the plug into place.
If you have a 139QMB series engine, then do this: unscrew the plug from the tensioner housing and remove the spring; push the rod inside the body; install the tensioner in the cylinder; insert the spring into the housing and screw in the plug.
After installing the piston, do not forget to adjust the thermal clearances of the valves and break in the engine.
Scooter tuning - CVT tuning
| Despite the fact that a variator is essentially the entire scooter transmission system, including 2 pulleys and a belt, in the world of scooter tuning the term “variator” is assigned to only part of this system - the moving (internal) part of the drive pulley. As a rule, installing any tuning part, for example a muffler, is quite simple, but often after installation new tuners are perplexed... Why did the scooter start to ride worse? The answer is simple - the scooter is not configured. But even when more than a dozen tuning configurations made from weights and springs have been tried, it is not always possible to achieve smooth acceleration at constant speeds. This is where the tuning CVT comes to the rescue. By smoothing out failures in the transmission, it allows you to configure it optimally. Sometimes you can easily do without a tuning variator, but sometimes it is simply irreplaceable!! |