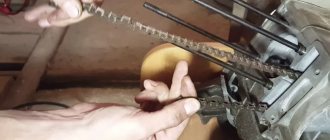
The heart of any chainsaw is the internal combustion engine, which drives the working element - the sawing chain. During the operation of a garden tool, it becomes necessary to disassemble the engine. This could be scheduled maintenance, cleaning from carbon deposits and soot, troubleshooting or replacing components. If you take the chainsaw to a service center for this, then you will not have any questions. However, when independently servicing a gasoline engine of a garden tool, the question often arises: how to correctly install the pistons back and where the arrow points to them.
What is a fuel mixture and how to prepare it?
Although many people simply pour gasoline into the tank first, and then oil, and lightly shake the mower, we will do everything right for the new unit. To prepare the fuel mixture for the Fubag lawn mower, 92-octane gasoline and a special semi-synthetic motor oil designed for 2-stroke air-cooled engines are used.
Please note that oil for water-cooled engines (boat engines) and oil for 4-stroke engines are not suitable here - they form carbon deposits on the spark plug, clog the exhaust port and damage the piston. For our engines, we recommend Fubag 2T Extra semi-synthetic oil - an optimally selected high-quality composition.
The recommended proportional ratio of oil to fuel mixture is 1:40, that is, for 1 liter of gasoline you need approximately 25 grams of oil, this can be exactly the volume of a standard cap from an oil container. In the case of a fuel mixture, oil can ruin the porridge, because... excess slightly increases the smokiness of the mixture during operation, and therefore carbon deposits.
Not adding oil is also not good, because... Lack of lubrication critically affects the service life of 2-stroke engines.
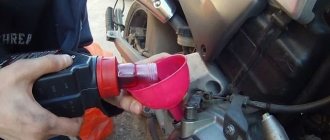
Before refueling the Fubag gas trimmer. This mixture must be thoroughly mixed in a separate canister, and only then poured into the gas tank. The quality of mixture preparation directly affects the engine life of a gasoline trimmer. Therefore, do not use fuel mixture prepared more than two weeks ago. This may lead to premature failure of the unit.
Pour the mixture into the gas tank, it is advisable to fill it no more than 80%.
On our trimmer, the tank is translucent, which makes it possible to monitor the amount of mixture by eye. it is very comfortable!
By the way, there is a reminder on the fuel tank - so you won’t forget.
EXPERT TIP: Under no circumstances should you store gasoline in a plastic water container. When mixing the fuel mixture, a static charge accumulates and a spark can be caught.
— Assembling the braid
So, first you need to properly assemble the lawn mower. It's very simple.
1) Connect the rod and the motor. To do this, we align the rod relative to the engine so that the spindle is located in the same plane with the engine fuel tank.
2) Install the rod flange into the engine and secure it with 4 screws.
To do this, you need to unscrew the thumbscrew on the top cover of the fastener. And remove the top cover. Next, insert the handle into the fastener, install the cover, and tighten the screw. We put the control handle on the pipe and fix it with a screw. On this trimmer, the adjusting screw allows you to adjust the handle to suit the user: you just need to loosen the “thumb” and move it to the required distance, and then secure it.
READ How to remove the pole from a Patriot trimmer
Connect the throttle cable to the engine and insert its end into the throttle joint. Connect the red wire of the control handle to the red wire of the engine, and the black wire to the black wire.
9) Holding the rod, twist the spool of fishing line counterclockwise until it stops. All that remains is to install the two-shoulder belt. Attach the shoulder strap carabiner to the shoulder strap attachment ring. We adjust the position of the ring on the rod of the product and fix it with the fastening screw. Adjust the length of the shoulder strap.
What is the difference between a good trimmer and a bad one?
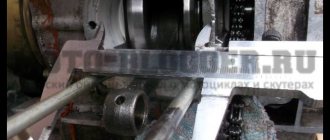
The main difference: the level of assembly and manufacturability. To do this you need to disassemble the engine. In the figure we see that there is a grid on the engine cylinder mirror. The mirror is finished with final honing. We see a network of small grooves that retain oil, which creates ideal conditions for lubrication of the piston and removal of excess heat.
The cylinder mirror is chrome-plated - this application strengthens the surface layer of the cylinder mirror made of porous chromium, which increases wear resistance and service life, reduces friction and increases the specific power of the engine. Therefore, this particular engine will last a long time even under intense load.
How to Correctly Install the Piston on the Trimmer
Replacing the piston group in a chainsaw or trimmer
Repairs of this level must always be balanced. In such small engines operating at high speeds, replacing the first piston, which is burned out or jammed, does not give a long result and, if necessary, you need to change the entire piston group. » How to position it correctly in a chainsaw or trimmer. Making sure the piston sits on. Therefore, you need to consider whether to continue to use this saw or purchase a new saw.
If this is a professional model, then such repairs are worth carrying out, but if it is an ancient household model like the Husqvarna 40 and it has worked for more than 10 or 12 years, it is unprofitable to repair it. Therefore, how much will it cost to repair it? the same as purchasing a new saw, albeit not a Husqvarna, but a PARTNER P350XT CHROME, at a price of 165 will definitely be enough. Moreover, such saws are sold by Husqvarna, since PARTNER is its subsidiary.
But if you still decide to repair a chainsaw or trimmer, then you need unique spare parts that are not cheap. If the engine is used correctly, the first repair may not occur soon and only the piston ring or rings will have to be replaced, depending on the model. But if the saw jams, then you need to change the entire piston group - the cylinder, piston and rings.
You need to see that Husqvarna 136/141 chainsaws have approximately a service life of 500-600 hours, Husqvarna 340/350. 1000-1200 operating hours, professional chainsaws more than 2000-2500 operating hours, subject to strict adherence to the operating instructions. In fact, you cannot rely on these numbers, because the real resource can differ significantly, both hugely and minimally. But approximately we can say that semi-professional saws work 3-4 times longer than amateur saws, and professional ones up to 10 times or more.
Naturally, nothing is endless, but it’s one thing if you change the piston group, after many years of operation and it has worked its hours, it has completely paid for itself, and another thing is that this saw was filled with, for example, only gasoline, without oil, and it jammed. Such a saw has to be repaired, because all other parts are ordinary.
Many companies deliberately inflate the price of spare parts so that new models can be purchased. For chainsaws and trimmers, for example, from the STIHL office, spare parts are available in a larger assortment than for Husqvarna. Therefore, when choosing a specific model, find out how things are with spare parts. RVT
How to correctly install rings on a two-stroke scooter piston
There is nothing complicated about installing rings on the piston of a two-stroke scooter, just like a four-stroke scooter, and many people understand this. But most scooter riders who only recently acquired similar equipment do not even have an idea of how to change the piston on a scooter, how to correctly install the rings on the piston , where the arrow on the piston should point, and almost everything else. In this lesson, I will tell you how to correctly put the rings on the piston and assemble the piston in place. Because we have already talked about four-stroke engines, here we will only talk about two-stroke engines. So, our piston is worn out and requires replacement. Pridonok shows and tells how to correctly install the piston into the cylinder on a scooter and motorcycle. How to install a piston on a lawn mower in this lesson, I will tell you how to correctly put the rings on the piston and assemble the piston in place. The rings wear out first. The rings and piston wear out first, and usually only those need to be replaced. If the piston is severely worn, it is necessary to bore the cylinder. It is also bored when the piston jams in the cylinder, forming deep scratches on the walls of the latter. There is nothing wrong with this, and if your new cylinder has been properly bored (which will only cost about 10), it will need a repair set of rings with a new piston. Such rings are marked 0.25. The second boring is 0.5, respectively, etc. to one. After purchasing a piston, it needs to be assembled. In the kit, as a rule, you will find the piston itself, two compression rings, a third thin corrugated ring (more on its purpose later), a piston pin and two piston pin retaining rings
How to change the piston on a Trimmer.
In this video I will show you how to quickly change the piston on a trimmer yourself. I will change it on the trimmer.
How to install the piston correctly
Pridonok shows and tells how to correctly install a piston into a cylinder on a scooter and motorcycle. Now about the third ring in the kit. Its purpose is to spring the lower compression ring. It installs it directly under it, and usually does not provide any benefit during operation. You can throw this ring away or you can put it in, it makes no difference. How to properly install a piston on a chainsaw. Many piston manufacturers do not include it at all.
It's time to put everything back in place. Depending on the scooter model, compression rings may be the same or vary in thickness and cross-section. Most pistons for Honda scooters, for example, have different rings, where the upper one is thinner than the lower one and has a different cross-section.
You should definitely pay attention to this when installing; the top one is thinner and ground at an angle.
Also pay attention to the inscription on the ring (usually the letter T or repair size); the inscription should always be on top, that is, opposite to the finger. First you need to put on the bottom, then the top. There is no need to stretch or bend them. These manipulations must be carried out carefully.
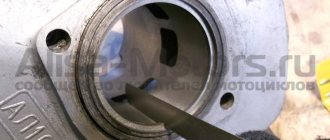
There are locks in the grooves for the rings that prevent the rings from turning during operation, so the ring gap must be in these locks, otherwise you will not stick the piston into the cylinder.
And the last important point is the arrow (1) on the bottom of the piston or the inscription EX. Both the arrow and the inscription must be directed towards the exhaust (2). In this case, the ring locks will be located on the side of the reed valve. How to properly install a piston on a chainsaw. How right. If the locks are placed towards the exhaust, the piston will not last long, the rings will be pulled into the exhaust port and gradually grind it down.
During all manipulations with the piston, it is imperative to put a rag in the crankcase window so that nothing inadvertently gets in there; we still need a crankshaft with bearings.
When installing the piston pin, pay attention to the condition of the separator (bearing); it may need to be replaced. Before installing the piston pin, install the snap ring on one side before installing the piston (usually on the side where you won't be able to fit the pin and the second snap ring in). Then place the pin with the bearing and the second retaining ring; when fixed in the groove, it will make a certain click.
That's all, now put on the cylinder, not the piston (remembering to check the condition of the gaskets and lubricate the piston and cylinder walls with engine oil), the cylinder head and tighten the bolts one by one in a cross pattern.
MTD-600 trimmer repair advice.
Today I want to share useful information about trimmer repair, which was kindly provided to me by our reader Yuri. With his consent, I am publishing this, in my opinion, very useful information.
READ Replacing fishing line with union trimmer
I’ll share how I repaired the MTD-600 trimmer (ignition problems), maybe someone will find it useful.
At first, nothing is clear, the trimmer simply won’t start, it won’t even sneeze.
I checked the compression (to exclude damage to the mechanics in the cylinder, rings, connecting rod, etc.) - the compressor shows 10 bar after a couple of jerks - this is quite enough, the cylinder-piston-rings are in order.
Gasoline is supplied through the carburetor - the spark plug is wet and the top of the piston is wet.
The spark plug is clean, the gap is 0.6 mm. When cranking, a spark occurs - we temporarily connect the inverted spark plug (its threaded skirt) with a wire to the cylinder and turn the starter - everything is in order.
There is compression, there is gasoline, there is a spark, but it does not start - this means there are problems with the ignition (ignition timing). But the ignition timing on trimmers/chainsaws and similar two-stroke engines is not adjustable! Therefore, we disassemble the trimmer and remove the engine from the shaft with the starter. The magneto opens - a coil with two terminals-contacts and with two “cheeks” of the core, which at some point are closed by a magnet built into the flywheel to which the starter clings when cranking. It was discovered that this short circuit (it can be seen is the combination of both ends of the magneto core with such well-defined magnet areas in the flywheel, the gap there is a fraction of a millimeter, while in other positions of the flywheel a few millimeters remain above the magneto) does not coincide with the TDC ( top dead center) of the piston (this point is easy to find by turning the shaft, observing the piston into the hole in which the spark plug is turned out).
Here comes the breakdown! The magneto should close somewhere near “top dead center”, but it closes when the piston has gone down somewhere! We unscrew the nut that presses the flywheel to the tapered shaft. It is detected: the pin has been cut off, which fits into the grooves on the outside of the shaft cone and on the inner cone of the flywheel and which rigidly mates them in one position. How to replace and how to properly put fishing line on a trimmer. After this, install the coil. The flywheel "turned". Most likely, someone jerked the starter too stupidly, so he tore off the flywheel, knocking out the ignition (the trimmer is American, it should be easy to start even by a child, no force is needed, but there are tractor drivers with experience in starting a diesel starter, for them this technique will be a bit delicate) .
If there is no standard pin, then you need to make it yourself: a small plate, curved in the shape of a “U”, so that with its “horns” it fits into two grooves in the flywheel, and with its curved part into a wide groove on the conical shaft. How to properly install the reel on the trimmer. How right. Its size is selected experimentally so that the flywheel is lowered on the shaft and securely fixed.
We check the coincidence of the magneto and “TDC” closures, tighten the flywheel nut, assemble the trimmer , and start it according to the instructions.
Many thanks to Yuri for such useful information!
How to install a piston into a cylinder on a trimmer
How to install the piston correctly
Pridonok shows and tells how to correctly install the piston into the cylinder on a scooter and motorcycle
Now about the third ring in the set. Its purpose is to spring the lower compression ring. It installs it directly under it, and usually does not provide any benefit during operation. You can throw this ring away or you can put it in, it makes no difference. How to properly install a piston on a chainsaw. Many piston manufacturers do not include it at all.
It's time to put everything back in place. Depending on the scooter model, compression rings may be the same or vary in thickness and cross-section. Most pistons for Honda scooters, for example, have different rings, where the upper one is thinner than the lower one and has a different cross-section.
You should definitely pay attention to this when installing; the top one is thinner and ground at an angle.
Also pay attention to the inscription on the ring (usually the letter T or repair size); the inscription should always be on top, that is, opposite to the finger. First you need to put on the bottom, then the top. There is no need to stretch or bend them. These manipulations must be carried out carefully.
There are locks in the grooves for the rings that prevent the rings from turning during operation, so the ring gap must be in these locks, otherwise you will not stick the piston into the cylinder.
And the last important point is the arrow (1) on the bottom of the piston or the inscription EX. Both the arrow and the inscription must be directed towards the exhaust (2). In this case, the ring locks will be located on the side of the reed valve. How to properly install a piston on a chainsaw.
During all manipulations with the piston, it is imperative to put a rag in the crankcase window so that nothing inadvertently gets in there; we still need a crankshaft with bearings.
When installing the piston pin, pay attention to the condition of the separator (bearing); it may need to be replaced. Before installing the piston pin, install the snap ring on one side before installing the piston (usually on the side where you won't be able to fit the pin and the second snap ring in). Then place the pin with the bearing and the second retaining ring; when fixed in the groove, it will make a certain click.
That's all, now put on the cylinder, not the piston (remembering to check the condition of the gaskets and lubricate the piston and cylinder walls with engine oil), the cylinder head and tighten the bolts one by one in a cross pattern.
How to change the piston on a Trimmer.
In this video I will show you how to quickly change the piston on a trimmer yourself. I will change it on the trimmer.
Related Posts
How to place a plunger on a chainsaw
Gasoline tools. LIKBEZ
Blog search (non-strict match):
Documents that satisfy your request: 9 [5 shown]
All my attempts to find out what model it was and in what years it was released have ended. to no avail (I will be VERY grateful if you can help me on this matter). However, I can roughly guess that it is somewhere in the 60-70s of the last century. The chainsaw uses contact ignition from BOSCH.
The number on the crankcase has been removed. 21554. What is this number? a mystery for me.
There is a nameplate on the left side of the saw.
What information about him is indicated for me. dark forest :-))).
Part of the chainsaw was partially dismantled by me (to clean and assess the condition of the parts). I also replaced the spark plug tip (everything was cracked) and the ignition key was installed (missing when I purchased the saw). These details, as you understand, are not original :-))). And another drawback is that there is no oil tank cap. (Everything is indicated by arrows in the photo).
Carburetor air damper drive.
There is a chain on the saw. TAKASAGO (I've never heard of them, but you can see it from the inscription on the cutting tooth).
Well, at the end, a short video: the saw starts normally and responds well to pressing the throttle control key.
Replacing the piston group in a chainsaw or trimmer
Repairs of this level must always be balanced. In such small engines operating at high speeds, replacing the first piston, which is burned out or jammed, does not give a long result and, if necessary, you need to change the entire piston group. » How to position it in a chainsaw or trimmer. Making sure the piston sits on. Therefore, you need to consider whether to continue to use this saw or purchase a new saw.
If this is a professional model, then such repairs are worth carrying out, but if it is an ancient household model like the Husqvarna 40 and it has worked for more than 10 or 12 years, it is unprofitable to repair it. Therefore, how much will it cost to repair it? the same as purchasing a new saw, albeit not a Husqvarna, but a PARTNER P350XT CHROME, at a price of 165 will definitely be enough. Moreover, such saws are sold by Husqvarna, since PARTNER is its subsidiary.
But if you still decide to repair a chainsaw or trimmer , then you need unique spare parts that are not cheap. If the engine is used correctly, the first repair may not occur soon and only the piston ring or rings will have to be replaced, depending on the model. But if the saw jams, then you need to change the entire piston group - the cylinder, piston and rings.
You need to see that Husqvarna 136/141 chainsaws have approximately a service life of 500-600 hours, Husqvarna 340/350. 1000-1200 operating hours, professional chainsaws more than 2000-2500 operating hours, subject to strict adherence to the operating instructions. In fact, you cannot rely on these numbers, because the real resource can differ significantly, both hugely and minimally.
Naturally, nothing is endless, but it’s one thing if you change the piston group, after many years of operation and it has worked its hours, it has completely paid for itself, and another thing is that this saw was filled with, for example, only gasoline, without oil, and it jammed. Such a saw has to be repaired, because all other parts are ordinary.
Many companies deliberately inflate the price of spare parts so that new models can be purchased. For chainsaws and trimmers, for example, from the STIHL office, spare parts are available in a larger assortment than for Husqvarna. Therefore, when choosing a specific model, find out how things are with spare parts. RVT
How to correctly install rings on a two-stroke scooter piston
There is nothing complicated about installing rings on the piston of a two-stroke scooter, just like a four-stroke scooter, and many people understand this. But most scooter riders who only recently acquired similar equipment do not even have an idea of how to change the piston on a scooter, how to correctly install the rings on the piston, where the arrow should point , and almost everything else.
READ Trimmer Husqvarna 128r what gasoline
In this lesson, I will tell you how to correctly put the rings on the piston and assemble the piston in place. Because we have already talked about four-stroke engines, here we will only talk about two-stroke engines. So, our piston is worn out and requires replacement.
Pridonok shows and tells how to correctly install the piston into the cylinder on a scooter and motorcycle. How to install a piston on a lawn mower in this lesson, I will tell you how to correctly put the rings on the piston and assemble the piston in place. The rings wear out first.
The rings and piston wear out first, and usually only those need to be replaced. If the piston is severely worn, it is necessary to bore the cylinder. It is also bored when the piston jams in the cylinder, forming deep scratches on the walls of the latter.
There is nothing wrong with this, and if your new cylinder has been properly bored (which will only cost about 10), it will need a repair set of rings with a new piston. Such rings are marked 0.25. The second boring is 0.5, respectively, etc. to one.
Result
We investigated the main causes and malfunctions of the Stihl ms 180 chainsaw that require CPG replacement. But, as a rule, in each case the reasons may overlap, and proper repair requires an integrated approach to solving the problem. Installing a new piston on the pole does not always solve the problem. Be sure to eliminate the cause of the malfunction, and the tool will last a long time without problems or the need for repair.
What You Can Come Up with Instead of a Line on a Trimmer... How to Correctly Change the Line in a Trimmer To cut small bushes and cut grass, use a trimmer. It is easy to maintain and operate, has a low weight, so even the...
Trimmer Doesn't Start Spark Plug Wet Spark Yes... Why won't the gasoline trimmer start? Causes and their elimination Recently, a gasoline trimmer has acquired the status of one of the main tools in the arsenal of summer residents. And this is not surprising, because the motorized...
Gasoline Into the Trimmer How to Prepare the Mixture... How to dilute gasoline with trimmer oil? The trimmer specifications contain links to recommended fuels and lubricants. At the same time, the octane number of the gasoline brand is indicated specifically, but in terms of oils it is at length...
independent chainsaw repair
possible if you follow the instructions
A private homeowner must have a chainsaw on his property. An indispensable thing in the household if you need to chop firewood, trim dry branches on garden trees, or even a whole tree.
Related Posts
In recent years, Stihl has been a market leader in garden technology. Chainsaw companies have an affordable price in the region of 7000-8000 rubles and high quality at this price. That's why they were welcomed not only by private sector residents, but also by loggers and utility companies to improve land. Unfortunately, even high-quality equipment develops over time and requires replacement of individual components. You often have to do chainsaw repairs yourself, since breakdowns usually begin after the warranty period.
Source
Progress:
First you need to make the base of the nozzle. To do this, use a grinder to cut out a square with a side of 100 mm from a metal plate. You need to mark it in such a way that there is a hole exactly in the center (at the intersection of the diagonals). To do this, from the center of the selected hole perpendicular to the short side of the plate, measure a distance of 50 mm and mark the trimming line.
We cut off the excess and get a square of 100 mm x 100 mm. Now you need to slightly round the corners and drill out the central hole for the trimmer shaft.
Round the corners and drill the central hole for the trimmer shaft
We cut the metal sheets, measuring 8 cm from each end. We get 4 blanks with ready-made holes.
These blanks must be shaped into knives. To do this, we mark the cutting line by eye (special precision is not required), fasten all 4 blanks together and grind off the excess.
As a result, we get knives of the same weight and size; they can be sharpened a little on one side. Now all the parts of the homemade trimmer attachment are prepared, you can start assembling.
We put a small washer on the screw and insert it into the corner hole. We put the knife on top, placing the sharpened side in the direction of rotation of the trimmer shaft. Next comes a large washer and a nut, which is not tightened so that the knife rotates freely. We attach the other 3 knives in the same way.
The end of the screw must be riveted so that the nut does not fly off.
The nozzle is ready. It is installed with nuts to the ground and secured in the same way as the three-bladed knife that comes with the trimmer. When colliding with a stone, the knives fold and go inward a little.
This idea was proposed by our regular video author Tatyana (Tula region). You can see in more detail the entire process of making such a trimmer attachment and learn some of the nuances by watching the video she prepared.
When working with a trimmer, it is important not to forget about safety precautions when using any attachments, especially homemade ones.
Where to place the piston arrow on 2- and 4-stroke engines | Pin offset (Desaxial) | Dnepr/Ural.
We invite you to discuss this idea in the comments to the publication. Share your thoughts with us and also tell us about your successful decisions.
Without taking either side of this heated (literally and figuratively) debate, let me show you one of the latest models of lawn mowers from the German company Robert Bosch. It has both a deflecting knife and an arc-shaped bracket, which prevents the knife from “striking” against objects not intended for mowing. I show a general view of the brush cutter and the knife itself, in two positions. General view of the brush cutter
Good evening everyone! Exactly three years have passed since the discussion of the “acute” problem for the trimmer. Over the past 1000 days, a clear picture has emerged: “Glory to the author - the craftsman who is conducting an experiment on himself to achieve the yield point of the metal from which these knives are made.
He has every right to risk his own health.” Nowadays, in stunt films you can often see the phrase - “Don’t try to repeat movie stunts that were performed by professional stuntmen.” The very first article should have ended with approximately the same phrase:
» Dear summer residents. This is my personal experiment. If you are not confident in your locksmith skills, please do not repeat it. AND THE MOST IMPORTANT THING - I am not responsible for the operation of the tool made in the wake of my article.” And one last thing. Do I see errors, judging by the photographs, of the implementation of this tool.
Alas, the author of this device does not even know how the hole for the shaft should be made.
I inform you that the distance from the point of the hole closest to the edge of the plate to the very edge should be NO LESS than the diameter of the hole itself. Mechanical engineering students will learn this truth no later than their second year at the institute. What do we see here? A thin isthmus reminiscent of a narrow PEREKOP, making a peninsula out of Crimea.
This is a priori the place that is weak in this design - it experiences the same loads as other knives, and the “dig” there is very thin. Where it is thin, there it is... I would like to hope, and quite sincerely, that over these three years this isthmus has not undergone loads comparable to the yield strength of this metal, but rather the alloy from which the perforated plate is stamped.
What is a piston in an internal combustion engine
A piston is an element of a piston internal combustion engine designed to convert the energy of changes in the pressure of compressed gas in the cylinder into the energy of translational motion. Next, the energy is converted into rotational motion using the crankshaft and connecting rods.
When disassembling the chainsaw engine, be sure to remember or mark how you removed the pistons from the cylinders. Important information is usually indicated on the surface of the piston ring heads, which can be seen by removing soot deposits.
Where does the arrow on the chainsaw piston point?
The heart of any chainsaw is the internal combustion engine, which drives the working element - the sawing chain. During the operation of a garden tool, it becomes necessary to disassemble the engine. This could be scheduled maintenance, cleaning from carbon deposits and soot, troubleshooting or replacing components. If you take the chainsaw to a service center for this, then you will not have any questions. However, when independently servicing a gasoline engine of a garden tool, the question often arises: how to correctly install the pistons back and where the arrow points to them.
Fault detection algorithm
The cause of saw failure or deterioration in its performance may be:
- clogged fuel tank cap breather;
- air leakage from the carburetor due to the destruction of the gasket or loosening of the threaded fasteners;
- mechanical jamming of removable saw equipment and other minor defects.
Before you begin disassembly, you should make sure that more extensive repairs are necessary.
It will most likely not be possible to independently assemble a new chainsaw after repair with the original quality. The design of modern chainsaws often uses press fits of mating parts, which have minimal repairability.
Even partial disassembly of a chainsaw using improvised tools can lead to undesirable consequences. In most cases, to eliminate a malfunction, you can limit yourself to dismantling a separate unit or system.
This list includes:
- connecting rod and piston group;
- carburetor;
- clutch mechanism;
- saw chain drive sprocket.
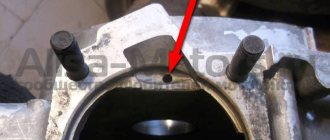
Where does the arrow on the piston point?
Due to the fact that the pistons have the correct cylindrical shape, after removal, many inexperienced craftsmen are confused about how to properly return them to their place.
- Remember the main rule: the arrow on the chainsaw piston points in the direction of the exhaust towards the exhaust hole of the cylinder.
Installing a piston on a Chinese lawn mower
The pistons in the cylinders in modern internal combustion engines have a very strict position, so the arrow always points in the direction where the exhaust gases move. If you still have questions, the garden tool has an instruction manual. Even if it is in English, it will not be difficult to translate it.
Photo report: Installing a piston on a two-stroke scooter engine
Learning to install a new piston, today we will be using the most ordinary Chinese two-stroke Forsage scooter with a 1E43QMB engine. Scooters equipped with this engine are found on our roads less and less often, due to their ancient and extremely unsuccessful design, which in modern realities does not withstand even the slightest criticism...
A few words about choosing a piston group: The piston (43mm 65CC) shown in the photo below is simply of disgusting quality, so there is no point in buying it, much less putting it on a scooter. It’s better to drink the 1200 rubles it costs in the first tavern you come across than to give it away for this bullshit.
If possible, then it is worth looking for a piston from the manufacturer presented below (41mm 50CC), although it is of a smaller volume, the quality is much superior to the first sample, and its price is noticeably lower.
Work on the implantation of our piston should always begin with the correct installation of the piston rings, and only then move on to other “things”.
We take one retaining ring from the kit and insert it into any groove of the piston (it is most convenient to install retaining rings with round nose pliers).
The retaining ring must lie tightly in the groove, evenly fitting around the entire circumference, and at the same time rotate freely in it.
Lubricate the mounting holes for the piston pin with motor oil, preferably for 2T engines, for more information about motor oils, read the article: Motor oil for scooters
It is best to lubricate this kind of parts using a regular medical syringe, in this way it is possible to protect the engine parts from dirt getting on their surface, plus everything: it is very convenient to rub the oil over the surface of the parts with the syringe needle.
After applying the oil, rub it evenly over the surface of the parts.
We take the piston pin from the kit and insert it so that it extends slightly from the mounting hole into the piston.
What can result from incorrect piston installation?
Incorrect installation of the piston ring in the chainsaw engine will lead to the fact that it will work strained and intermittently, and may stall. Eventually, at best, the piston or cylinder will be damaged. In the worst case, the engine itself will fail and require expensive repairs.
If your chainsaw needs repair or maintenance, take it immediately to a specialized service center. It is better to pay a specialist than to buy new garden tools.
Sources:
https://jusof.com/kak-pravilno-stavit-porshen-na-trimmere/ https://vseopilah.ru/trimmery/kak-ustanovit-porshen-v-tsilindr-na-trimmer/ https://navro. org/kuda-ukazyvaet-strelka-na-porshne-benzopily/
Why do engine parts break?
Breakdowns can be planned or emergency. Planned failure depends on the manufacturer, the materials used to manufacture the group, and the intensity of use. Usually the life of a saw is calculated in engine hours. After working out the required number of engine hours, you should submit the tool for repair for engine maintenance.
Causes of unexpected piston failures:
Each start of the tool is a certain stress for the piston and cylinder. Therefore, the life of the device also depends on the number of starts. If you notice extraneous sounds from the engine, a decrease in power, or an increase in consumption, it’s time to take the equipment to a service center for preventative repairs.