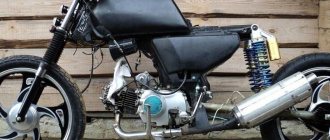
Many scooter owners, after a few months of riding, think about the question “How to increase the speed of the scooter?” And no wonder!
After all, the notorious 50 “cubes” are often not enough, and it is not possible to quickly raise money for new, more powerful equipment. That is why various tricks are used to increase the power of the moped, as well as its speed from the usual 60 km/h to 80 and above.
How to get the most out of a scooter with tuning?
Scooter tuning is a fairly extensive process, but consists mainly of styling (improving appearance), chassis tuning (modifying driving characteristics) and engine tuning. The last point consists of many different operations that are aimed at increasing engine power, its better implementation and increasing acceleration and maximum speed. Below we will consider modifications to the engine and transmission.
It’s worth noting right away that the scheme is general and suitable for Italian, Japanese and Chinese models. Those who doubt the quality of Chinese scooters should be reminded that the level of production of modern models from the Middle Kingdom has increased significantly over the past 10 years, and most of the spare parts on the market for all models are from Chinese manufacturers.
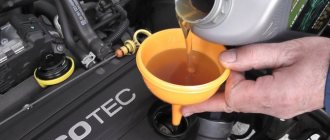
There are many ways to speed up your scooter and, first of all, they depend on the current technical condition of the unit. Let's take, for example, an old scooter with an incorrectly configured variator, a clogged air filter, a dirty carburetor and a number of other problems that arise when the equipment is not properly maintained. Such an engine has great potential, but it can only be realized after proper tuning. After thorough cleaning and adjustment of all systems, even standard engine performance will seem like a significant improvement.
It follows that any work aimed at improving driving performance must begin with a complete revision of the engine.
Removing factory limiters is a very popular type of tuning and quite simple. Most of the Japanese equipment and similar Chinese equipment comes from the factory with special limiters that do not allow the engine to operate at full power. Fortunately, you can get rid of restrictions in any garage, and any tuning of a scooter with your own hands begins with the elimination of such restrictions.
When childhood illnesses are over, it is worth paying attention to real tuning, namely, improving or modifying existing components and assemblies. We are talking, of course, about the cylinder-piston group, carburetor, muffler, variator, air filter and ignition system. At this stage, the degree of involvement in improving a particular element depends on the budget. If funds are limited, then we will make the most of the existing set by modifying the described units.
If you have a certain budget for tuning, you can go the route of replacing parts with special tuning ones. Special parts designed for such modifications automatically improve the basic characteristics of the engine, plus they are designed for higher loads. We have figured out the general scheme of improvements, and below we will look at how tuning occurs, using examples of specific components.
How to increase the voltage and speed of an electric scooter
The first step is to analyze the installed controller. You need to look at what maximum voltage the internal capacitors and transistor switches are designed for. You can try to apply a higher voltage to the existing controller: perhaps its safety margin allows this to be done, and the controller will not burn out.
It’s better not to take risks with a standard motor control controller and immediately change it to a model designed for a higher voltage. You can choose a controller in the Voltbikes online store. This is an inexpensive purchase: the price of control controllers starts from 1500 rubles, on average it is about 3000-5000 rubles. There are more expensive models with a price tag of 15,000-26,000 rubles: these are programmable, powerful models with Bluetooth technology, improved protection against breakdowns and malfunctions. To install the controller, you need to solder about 15 wires: if you do not have the appropriate skills, feel free to contact the Voltbikes specialists. We will help you carry out the installation quickly, efficiently and are guaranteed to protect you from any errors in installing components.
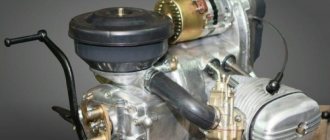
We remove the engine.
Specialists, experts or garage technicians begin tuning a scooter with their own hands by dismantling the factory limiters. They are necessary to, firstly, keep the equipment within the established speed limits (Japanese models), and also to increase the service life of the motor. The problem is that you can find this element only after studying your engine model on various forums. The reason for this is the different locations of these same limiters, it could be a blind fork in the exhaust, an electronic limiter installed on the variator or even in the carburetor.
- Plug in the variator. In this case, the part is a special plate mounted on the side of the weights. It prevents the belt from reaching its maximum radius, which means it is impossible to achieve the maximum possible speed. If you have such a part, then by removing it you can significantly increase the maximum speed.
- Limiter in the variator. Sometimes the limiter is the lip on the bushing itself; here you cannot do without the work of a turner. By loosening the limiting edge of the variator, you can increase the speed. Also for many models a ready-made, bored part is sold.
- Carburetor. In this assembly, the plug looks like a valve. With a significant increase in pressure, it opens, thereby preventing the full entry of the air-fuel mixture into the combustion chamber. This can all be treated as in previous options - by dismantling the element or replacing the entire part.
- Exhaust. An interesting restriction system is located in the exhaust. It represents a branch where one of the channels is a dead end. Thus, turbulence and internal pressure in the exhaust increase, which prevents high-quality purging of the combustion chamber. The problem can be solved by brewing dead-end branches.
- Electronic system. Finally, the switch limiter can be considered the most advanced by modern standards. Some Chinese and Italian models can be deceived by cutting the limiter wire, for this you will have to study a lot of literature on electrical engineering. Other models get rid of the problem by simply replacing the unit.
Increasing the speed of an electric scooter for the disabled
The speed of electric scooter models for the disabled is mainly limited by manufacturers. This is done using software methods or by activating a jammer. It is not recommended to increase the speed of such electric scooters. This not only creates a threat of failure of individual parts of the scooter, but can also lead to dangerous situations along the way and a threat to the health and life of the driver and other road users.
We adjust valves (4t engines).
As mentioned earlier, the engine must be serviced before boosting. Work that will help improve dynamics includes adjusting the valves. The procedure is suitable for tuning Chinese 4t scooters and other 4-stroke engines. For small-capacity equipment, it is recommended to carry out such adjustments at least once every 3, and preferably once every 2 thousand km. It is also necessary to carry out adjustments after manipulations with the CPG.
Before you begin, you need to make sure that the engine has completely cooled down and that you have a set of keys (8,9) and feelers of 0.05 for the intake valve and 0.07 mm for the exhaust valve at hand. You can get to the adjusting nuts by first removing the valve cover. When access to the valves opens, the piston is installed at top dead center. Next, a feeler gauge is installed in the intake valve gap and, depending on the current position, an adjustment is made.
To increase or decrease the clearance, you need to loosen the lock nut (while holding the adjusting bolt), turn the adjustment bolt and, while holding it, tighten the lock nut back. Thus, we achieve a gap when the probe passes into it with little effort. After adjustment, make a full revolution of the crankshaft and make sure that the adjustment is accurate.
AC switch
It differs from DC switches in the ability to do without a stable 12V current. It is designed a little differently, because, despite having a more conventional design, it has a more complex connection to the electrical circuit. Unlike DC switches, AC switches are mostly without a speed limiter due to their small size and fairly simple design; they can boast the ability to function perfectly in the absence of a number of nodes, without which a DC switch
will not be able to work in principle. Even if you remove the battery, relay-regulator, ignition switch, keep only the high-voltage generator coil and the Hall sensor, and the scooter will still start and drive. There are quite cleverly organized switches of the provided type that can compete with the DC type, but this is rare. Despite the lack of need for direct current, speakers are very dependent on alternating current and the relationship between the engine block and the frame, and if you burnt or damaged one coil in the generator, which produces high voltage, then the scooter will not start under any circumstances.
Tuning the carburetor and air filter.
The basic principle of driving fast is to burn more gasoline per unit of time, it is suitable for tuning Chinese 4t scooters, Japanese 2t scooters and any other models and types of engines, and the carburetor helps in this, first of all. You can modify the standard unit by installing more efficient jets, but in practice it is better to install more efficient models. Scooter tuning is made easier due to productive models of carburetors produced by DellOrto, a set of pipes and other accessories for them.
A high-performance carburetor will deliver more fuel to the cylinder, and more fuel requires more air. Therefore, the standard filter should be reviewed; it is best to replace the filter element with a new one, while making sure that the entire system is tight. If you are preparing a high-power device, it makes sense to install a minimum resistance filter, but do not forget that it requires constant care, otherwise the filter element will dry out and sand will begin to get into the engine.
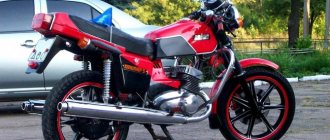
Lacks low end and traction power
You will have to disassemble the motor and change the technical specifications. Alfa moped engine tuning is provided with components of different prices and quality. A motor of this configuration is an exact copy of a Honda motor that has been produced for many years. There are clubs for moped lovers with this engine all over the world. Road races, enduro and off-road races are held. And, as a rule, where there is serious sport, there is civilian tuning. Forged piston and connecting rod, four-valve head with Ducati-style desmodromic mechanism, dry clutch, water cooling. The injection system is from Yoshimura... But since we are now talking about an Alpha moped, the price of which in the store is less than the cost of any of the listed components, our tuning option is more modest.
Alpha engine tuning
Engine tuning can be immediate aggregate or unit and stage-by-stage. On sale you can find engines with the same method of mounting to the frame, but with a volume of 110 cc, 125 cc or 150 cc. An increase in engine capacity will entail the need to register with the traffic police, but this is an organizational issue. The technical side will be as follows: the electrical wiring remains the same, a larger engine will require a different carburetor and a different exhaust pipe. Most likely, they will be found in the same place as the motor itself.
Exhaust tuning.
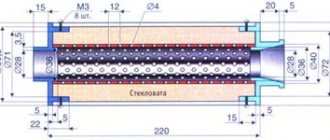
It is better to immediately replace the standard exhaust of a scooter with a sports one. Alas, the production of this system is a very precise and labor-intensive process, so it is very difficult to create an effective exhaust, especially for 2t engines, with your own hands. We recommend purchasing ready-made kits in a special store. Well-known models include Laser X, Technical Next or Leovince. With the new pipe, the engine will breathe easier, throttle response at high speeds and maximum speed will increase.
Cleaning the cylinder, boring windows.
Improvement suitable for scooters with two-stroke engines. Their peculiarity is that very often the casting inside the drain and exhaust channels is defective, that is, it has roughness. These shortcomings lead to the fact that the piston is not blown through properly and, accordingly, loses power. Having removed the cylinder and armed with a rolling cutter, you can polish the channels, and then round off the sharp edges on the inside. When tuning scooters, in the photo you can see the differences between the motor before and after polishing. This action will help make the engine work easier at high speeds and potentially add a couple of kilometers to the top speed.
You can go further and increase the diameter of the inlet/outlet windows. For each 2T engine, this parameter is calculated individually. For example, it is enough to bore some 50 cc engines by 1 mm to obtain optimal intake/exhaust parameters. Do-it-yourself tuning of a 150cc scooter and other engine sizes is done in the same way.
Scooter ignition switches
This type of switch often has an engine speed limiter, which allows you to increase its service life. From us you can buy standard scooter switches:
- CDI GY6 125/150СС 152QMI/157QMJ;
- CDI GY6 50CC 139QMB;
- CDI HondaDio AF18;
- CDI Honda Dio AF-27;
- CDI Honda Dio ZX AF-34;
- CDI Honda Dio ZX AF-35;
- CDI Honda Dio ZX AF-34 small. plug;
- CDI JH70 Delta;
- CDI Yamaha Jog 3KJ;
- CDI SuzukiLet's AS50;
- CDI switch Honda Dio AF-27;
- CDI JH110 Delta;
- CDI Honda Lead 90CC;
- CDI JH70 Delta;
- CDI GY6 with wire;
- CDI Yamaha Jog 3KJ;
- CDI GY6 139QMB/152QMI/157QMJ;
Also on sale are CDI switches combined with an ignition coil:
- CDI TB50 Suzuki Ran (BM Style/Joy) - suitable for Chinese scooter engines with chain drive;
- CDI E0120 Suzuki Address AD50 50CC.
Cylinder-piston group.
Finally, the most effective improvement for any engine is replacing the CPG. But not just a replacement, but the installation of a new, larger piston. Fortunately, there are now many ready-made kits on the market; you don’t have to sharpen or adjust anything, as with Soviet equipment. Moreover, there is even a lot to choose from. For example, for various models with a volume of 50 cubic meters, they offer kits to increase to 63, 72, 82 and even 90+ cubic cm. In some cases, this is an almost double increase in power.
The situation is similar with larger engines, for example, for 125 cubic meters, sets of 150 or 170 cubic meters are sold. Some, in the process of tuning a scooter, manage to increase 150 cubic meters with their own hands to 225 cubic meters. Choosing the right part is not the most difficult thing, the most difficult thing is installing it. After all, this process involves almost complete disassembly of the engine. You will be faced with the need to have several special removable keys in your arsenal; you can ask them from friends or borrow them for the evening at auto repair shops. We strongly recommend studying the technical component in order to properly disassemble, replace the necessary elements and assemble the motor.
Alas, for some, increased power does not promise anything other than breakdowns or inadequate performance. This is because by significantly increasing power, you inevitably entail work on all other nodes. Let's imagine that we installed a new 92 cc CPG on an old 50 cc engine. The first thing to check is the condition of the connecting rod, crankshaft and bearings. Otherwise, they will fly first, followed by our new system of both cylinder and piston.
Great, we added new bearings to the CPG, an elbow with a connecting rod, now we can be sure of reliability. But the engine does not go faster, and we decide to purchase a new carburetor. Now the mixture is too rich, and we understand that the exhaust needs to be changed. After such modifications, the engine sounds loud, accelerates perfectly, but the maximum speed is slightly higher than before and the variator sounds strange. After installing a high-speed CVT, for example from the Italian manufacturer Polini, the engine will be able to fully realize its new power. The last stage is an inspection of the brake system; you don’t want to find out at a speed of 60 km/h that the brakes are now comparable to bicycle ones.
As a result, after replacing almost all the components, we got a very fast “flea” that can surprise your friends and experts in this technology. Over time, you can make changes to the chassis system, replace shock absorbers, and install more attractive wheels. Often, the modernization process does not stop there, and after tuning a scooter 50, 150 with your own hands, impressive improvements in appearance are made. The moped is repainted, panels are changed, new devices, lighting, and so on appear.
Tip 1: How to make a moped go faster
All owners of four-stroke and two-stroke scooters have wondered what they can do to make their moped go faster. There are several main areas of tuning a moped engine. Depending on the desired increase in speed and financial capabilities, several levels can be distinguished.
- How to make a moped go faster
- How to convert a moped
- How to make a moped
You may be interested in:How to adjust the ignition on a scooter
Question “what category of license is needed to drive a moped” - 1 answer You will need
- Tuning or sports parts
Instructions 1 To tune a moped to the most budget level, replace the variator weights, remove the maximum speed limiter and bore a standard cylinder for a piston with a diameter of 44 or 47 mm. You can buy weights at any parts store or make your own. Leave the cylinder boring to professionals. The total cost of such tuning will be about 1000-2000 rubles. When the cylinder is bored to 44 mm, the moped will begin to develop 65 km/h, when bored to 47 mm – up to 70 km/h. Acceleration dynamics will improve, but this will have almost no effect on engine life. 2 To tune a moped at an average price level, replace the standard 50 cc piston group with a larger piston group (for example, 72 cc), install a sports variator. Compared to the tuning described above, the engine life will not decrease, and the speed will certainly reach 70 km/h, mainly due to an increase in the gear ratio of the variator. 3 For expensive tuning of a moped, replace the piston with an 80 cc one or bore the cylinder for a 50 mm piston, install a cylinder head with enlarged valves and a sports variator. In addition, buy a tuning carburetor or replace the old jet with a larger one. If desired, install a wide-phase camshaft. With this level of tuning, the speed reaches 75-80 km/h, the engine life is slightly reduced (especially the crankshaft with bearings). It becomes possible to move away with slippage and “goat”. 4 For maximum tuning, completely rebuild the engine. Install a 90 cc piston (cylinder diameter 52 mm), a head with enlarged valves, a sports variator, a proprietary cylinder-piston group, a sports variator. Install the carburetor from a light motorcycle 125-150 cc or a tuning sports one. Be sure to install a proprietary wide-phase camshaft, reinforced or sports crankshaft. As a result of these changes, the engine life will be reduced, the dynamics will become comparable to a 125-150 cc motorcycle, and the speed will reach 90 km/h. Don't forget to install an air intake in the cooling system and provide oil cooling to protect against overheating. Sources:
- what can be made from a scooter
You may be interested in: How to set the ignition in the Urals
Tip 2: How to make a moped A bicycle that serves its owner faithfully can be improved by equipping it with an outboard engine. Converted into a moped, your updated vehicle will help you save effort when traveling long distances. To modernize a bicycle, you need to have a little understanding of technology and be able to handle the simplest tools.
You will need
- - old bicycle;
- - Gas engine;
- — spare parts for the moped;
- - a set of locksmith tools.
Instructions 1 Use a used bicycle, which will serve as the basis for the design of the future moped. Make sure the frame is free of defects and can carry a relatively heavy load. In the place where the moped engine will be located, strengthen with welding or bolts an additional reinforcing platform, since the structure will have to withstand not only the driver, but also the power plant. 2 Equip the frame with two wheels. Use rims from an old, worn-out moped. If necessary, modify the front and rear forks if the wheel rim is wider than the stock bicycle rim. Mount a sprocket on the axle of the rear wheel, which through the chain will perceive the rotational movement of the engine shaft. 3 Equip the front fork of the vehicle with shock absorbers removed from an old moped or light motorcycle. This is required in order to effectively smooth out the shocks and shocks that inevitably occur when driving at high speed. 4 Provide the moped with additional brakes - front and rear. One rear brake will not be enough to ensure driving safety. Place the brake system control handles on the steering wheel. 5 Hang the power unit onto the frame. It is best to use a standard gasoline engine from a moped, for example, the D-6 brand. This single-cylinder engine is relatively light, simple and reliable in operation. Before installation, overhaul the power plant, wash the engine parts with gasoline, and check the serviceability of the unit. Replace piston rings if necessary. Pay special attention to the reliability of mounting the engine to the frame. At the front upper part of the frame, secure the fuel tank with clamps. 6 Attach the transmission - the chain that connects the engine sprocket to the large rear wheel sprocket. Adjust the chain tension and lubricate it well. Now you can connect the clutch and throttle cables to the control handles. 7 Install the front headlight and rear light reflector on the moped. Without them, driving at night can be difficult and unsafe. 8 Fill the moped with fuel and adjust the engine controls. Consistently adjust the throttle, clutch and brake system. Paint the finished structure in a practical color, this will give your former bicycle a completely new look. Now your moped is ready for the first start. Tip 3: How to make a scooter faster In the life of every scooter , there comes a time when maximum speed and dynamics are required. If a scooter is a means for the owner to stand out from the crowd, then the device simply must amaze everyone with its speed. But only the right approach to tuning a scooter leads to the desired result. Although it often makes more sense to change a scooter to a more powerful one than to tune your old one.
You will need
- Scooter and purchased tuning kits.
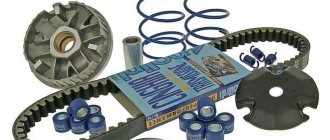
Instruction 1 After completing the break-in phase of the scooter, you can remove the maximum speed limiters. Without it, the speed will increase to 80-90 km/h. This is the most affordable way to increase your top speed. 2 Options for inexpensive scooter tuning First, changing the scooter muffler to a tuning resonance pipe suitable for the scooter’s cylinder-piston group (CPG) or to a muffler with a “torque” release. For the first option, Laser X, LeoVince ZX, Technigas Next pipes are suitable. For the second – Polini No Smoke, LeoVince SP3/Turing, Technigas Silent Pro. In combination with adjusting the transmission in accordance with the parameters of the new exhaust pipe, this will give an increase of 10-15 km/h. Secondly, changing the carburetor to a carburetor with a diffuser diameter of 17.5 mm as the most optimal and easy to configure. The highest quality carburetors are produced by DellOrto. Thirdly, replacing the variator with a sports one. Such a variator allows you to accurately and efficiently adjust the transmission to new engine characteristics. The most effective way to increase the power and speed of a scooter is to install a sports CPG of increased volume. At the same time, for a two-stroke engine, not only the cylinder volume increases, but also the purging process improves, i.e. even more power and speed are added. The kit also includes a cylinder head with an optimized combustion chamber. When installing such a kit, it is very important that the crankshaft and bearings are in perfect condition. Otherwise, increased loads on these parts will quickly destroy them. 3 The next stage of scooter tuning is racing. It requires a lot of expense, as a result of which it is easier to purchase a faster scooter than to tune it. First, a reinforced crankshaft with suitable bearings and a reinforced connecting rod is installed. Only such engine parts will withstand shock loads, help realize high power, and ensure stable and reliable operation of the engine. High speeds of a racing engine (up to 10,000 rpm) require appropriate reliability of components, which factory parts cannot provide. The carburetor diffuser diameter must be at least 17.5 mm to provide power to the racing engine. The carburetor setting should ensure good mixture formation at high speeds. The best option is a 19 mm carburetor in combination with a sports air filter. The remaining racing tuning procedures are repeated as described in paragraph 2, only all components are used of higher quality and performance. For example, it is recommended to install a CVT in Polini Evo or Malossi OverRange. Racing scooters have high dynamics and maximum speed (well over 100 km/h) and are able to satisfy the needs of many high-speed lovers. 4 The pinnacle of boosting is Hi End class tuning. It allows you to shoot up to 3 HP. from every 10 cc of engine volume. Manufacturers of tuning kits of this level are Malossi, Polini, Kunda, 2Fast, Fabrizi, MetraKit. These are elite components and their prices are appropriate. The engine of this level develops up to 20,000 rpm. There is no question of efficiency: the engine is tuned to work as efficiently as possible in two 15-minute racing sessions and several training hours. Then the engine requires a revision with replacement of worn parts. Installing tuning kits requires serious modifications to the engine crankcase and chassis of the scooter. You cannot do without rotary ignition - it allows you not to lose spark power at ultra-high speeds. Installing this component will require abandoning all of the scooter's electrics that are not associated with the ignition system. The ratio in the gearbox is selected experimentally. Such scooters are capable of covering a distance of 400 m in 12-14 seconds from a standing start. The service life of the rings is 1500-4000 km when used for everyday driving. You should use only 98 gasoline, and of the highest quality, and not the kind that is sold at gas stations. Only very expensive oil is used. Useful advice Almost all scooter tuning kits are designed for self-installation. However, the more expensive the purchased kit, the more recommended it is to install it in a specialized workshop. Tip 4: How to repair a moped Some time passes and you realize that it’s time to repair your scooter. It is best, of course, to turn to professionals, then your repair work will not be delayed and you will be confident in its quality. But you can still try to repair some parts yourself.
Instructions 1 To repair the front shock absorber struts, you must first remove them from the scooter. To do this, first remove the front wheel and release both struts. Unscrew the nuts, take them out, and then pull out first one and then the other rack. Clean dirt from them and rinse in gasoline. 2 Remove the rubber boot from the stand. Next, remove the stopper from its socket. Do this with an awl or a very thin screwdriver. Clamp the chrome rod in a vice. Place the rack in a comfortable way and try to pull. Insert the pre-prepared axle into the hole for the wheel axle and hit it with a hammer in the direction the rod comes out. But be careful. Hit just a couple of times and the structure will move on its own. Carefully remove everything, clean and inspect. Wash this unit well in gasoline. Remove the bushings from the stem and assess their wear. 3 After this, remove the damping spring from the rod. The main spring remains in the strut; you need to get it out, and don’t forget the rubber bumper in the very depths. Use a long screwdriver or narrow pliers. After this, thoroughly clean the inside surface of the stand. 4 After disassembling and checking the spare parts, you can improve your racks. To do this, place two valve springs from the car in a row for shock absorption, as well as one spring for damping in a separate rack. Use an emery reamer in an electric drill. 5 Next, proceed to making new bushings. Entrust this work to an experienced turner. Give him the rod and the old bushings with the stand. Please note that bushings cannot be made from aluminum, as they will instantly become unusable. 6 After this, check the stem. Don't worry if it turns out to be rusty. But if you still want to replace it, then order a new one from the factory. 7 And the final procedure is thorough lubrication. Drill small holes with an area of about 0.5 sq.cm in the lower bushing, which is located at the very bottom of the rack. Then the oil from the bottom of the rack will not interfere with the operation of the spring mechanism. 8 After this, reassemble the stand in reverse order. Don't forget to install the rubber bumper first. And be sure to check that you have put the retaining ring in place. Tip 5: How to repair a moped A moped , like any other equipment, breaks down over time. And then the owner of the equipment is faced with a choice: buy a new vehicle or repair the old one. It all depends on the nature and scale of the breakdown. If they are minor, then it makes sense to carry out the repairs on your own.
You will need
- Keys, screwdrivers, awl, vice, hammer and pliers.
Instructions 1 Inspect your faulty moped and determine which parts need replacement or repair. It is better to order new ones from a workshop or a specialized store. Don’t skimp on the details - they will pay for themselves many times over in the future, and besides, your safety on the road depends on their quality. Invite a more experienced friend to help you with the repair. 2 First, thoroughly wash and dry your moped. Remove elements that will interfere with your repair process. If the damaged parts are small in size, then it makes sense to take them to the table - this will make it much more convenient for you to deal with them. 3 When disconnecting individual elements of the moped, remember their sequence. Don't forget that eventually the entire structure will have to be put back together. Wash the parts to be dismantled in gasoline or wipe with a cloth soaked in it. Start disassembling the front wheels, boot and struts. Inspect even the smallest elements that may well affect the performance of the moped. 4 If a part is heavily rusted or has visible defects - chips, bends, dents, replace it without hesitation. It won't last long. After you have carefully inspected everything and removed the damaged parts, thoroughly lubricate each part. 5 Reassemble the structure in reverse order, replace the old parts with new ones. Try not to forget even the smallest details - they are no less important than the same wheels and steering wheel. It is better not to drag out repairs for a long time; if possible, do everything in a day or two. Otherwise, it’s easy to forget something or lose small details. Please note: These tips can only help if the breakdown affected only individual parts of the rack. If, for example, your engine has failed, you are unlikely to be able to fix it yourself, and a visit to the salon will become inevitable.
Source