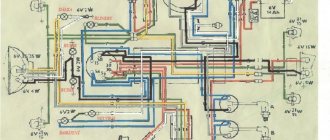
Ignition advance is a shift of several degrees in the timing of the spark at the spark plug before the engine piston reaches top dead center (TDC). When ignited, a combustible mixture of fuel and air does not explode instantly, as many believe, but burns; this combustion takes some time. The engine will operate more efficiently and economically when the maximum pressure from the explosion of the burning fuel mixture occurs immediately after the piston passes TDC, i.e. when the piston begins to move downwards. To do this, you need to ignite the combustible mixture before the piston reaches top dead center. Ignition timing in electronic CDI ignition systems - switches - of modern scooters is not adjustable, but is completely controlled electronically. But to check the timing of the ignition installation, some modern scooter models have measuring marks.
To check the ignition timing of a scooter you need a special device - a strobe light. Such a device is not included in the tool kit of a regular scooter, and its purchase should not be considered absolutely necessary - the average scooter rider will rarely use it.
How does a strobe light work? A strobe is a device in which a bright light flashes at the moment a spark “shoots” in a candle. By determining the ignition moment with a strobe while the engine is running (the light flashes at the moment of ignition), you can see the dimensional marks and determine whether they are in the right places relative to each other. Such risks are located on the flywheel of the scooter generator and counter risks are on the housing next to the flywheel. But not all scooter models have these risks, and therefore in this case the strobe light will not help here.
Since ignition timing is determined for a certain crankshaft speed, some stroboscopes are equipped with a speed sensor - take this into account when purchasing a device if you still need it. If the crankshaft speed is not regulated, this usually means that the test must be carried out with the engine idling. In this case, first you need to find out whether the idle speed corresponds to the regulated characteristics of the scooter. The strobe is connected in accordance with its manufacturer's recommendations. A regular strobe has three wires, two of which are power, the third is connected to the spark plug wire. Some scooter manufacturers do not recommend or prohibit connecting the strobe light's power to the electrical network of the scooter itself - otherwise the readings will be incorrect; This may be due to small surges in the load on the power supply during the strobe flash. The check is carried out on a warm engine.
To check the ignition timing of a scooter, you need to point the strobe light at the synchronization risks - they must completely or almost completely coincide. In the most undesirable case, the marks on the flywheel are located at a considerable distance from the corresponding marks on the body during strobe flashes, or are not visible at all. The electronic ignition system of a scooter, for all its advantages, is inconvenient in the sense that the average scooter owner cannot check it, therefore, if the scooter’s ignition timing is incorrect, a trip to the workshop is the only correct method to find out the cause. Ignition system parts are not cheap, so they are difficult to replace on the basis of “Isn’t it broken?” You can, of course, try replacing parts if someone you know has a similar scooter whose parts can be used.
How to set the ignition on a scooter, moped and walk-behind tractor?
How to set the ignition on a scooter and find out if it is working correctly? What to do if you decide to adjust it? The answers to these and many other questions related to the ignition of scooters, walk-behind tractors, and mopeds can be found out by reading the following article.
What is ignition and how does it work?
So, let's start getting answers. The ignition system in a scooter is responsible for the correct operation of its engine and the appropriate moment of ignition of the mixture of fuel and air. The required proportions of these components are provided in the carburetor, and then the combustible composition enters the cylinder. At the moment of the highest degree of compression, a spark is supplied to the spark plug, which ignites the mixture. The spark voltage in some engines reaches 40 thousand volts.
The ignition system of a scooter is responsible for ensuring all this; it has a similar principle of operation in a moped, walk-behind tractor and any other mechanical vehicle with a gasoline engine. The result of its correct operation are such characteristics as a quick increase in engine speed, the usual level of exhaust gases emitted from the pipe and the absence of suspicious pops.
If suddenly, after repairs, you sit on your own “iron horse”, and for some reason it no longer gallops with the agility inherent in it, it’s worth checking the spark plugs. They must have a light brown soot. If the spark plugs have a black, tarry, thick layer, this is not a good symbol; in general, any deviation from the norm may be evidence of a malfunction of the ignition system.
Read
A sure sign of a poorly adjusted mechanism is also a slow increase in engine speed, exhaust pipe shots, and excessive smoke density. While driving, you may experience jerking and uneven acceleration when accelerating. Any one of these signs or a composition of several is a direct indicator of a malfunction of the ignition system; in most cases, this problem is solved by adjusting it.
Which method is preferable?
It is logical that the first option with complete disassembly of the scooter engine is more complicated and takes more time and effort. But, as you can see, it is more reliable. Firstly, the factory integrity of the circuit is not compromised; secondly, when disassembling the scooter engine, you can see any defects, such as cracks, wear, change the seals, clean the parts.
The second option is more simplified and can be used when you only need to replace the chain. And you are confident in the quality of your work.
Final word
The scooter is a fairly popular vehicle and is in increasing demand. Because it leaves traffic jams behind, has low operating costs and is economical in terms of fuel and lubricants. Many people prefer to do scooter repairs on their own, especially since four-stroke engines are simple and reliable to use. Timely technical inspections, careful operation and the above article will allow you to enjoy riding this miracle of the Asian motorcycle industry for a long time.
Sources:
https://avtomoto-best.ru/kak-na-skutere-vystavit-zazhiganie-ve.html https://zinref.ru/000_uchebniki/03450motocikli/100_Skutery_dvukhtaktnye_i_chetyrekhtaktnye_Expluatatsia_obsluzhivanie_i_remont/063.htm https://pros cootera.ru/masterskaya/ ekspluatatsiya/kak-vystavit-zazhiganie-na-skutere https://real-biker.ru/articles/zamena-cepi-grm-skutera-s-podrobnym-opisaniem-24/ https://real-biker.ru/articles /zamena-cepi-grm-skutera-s-podrobnym-opisaniem-24/
How to set the ignition on a scooter - contact system
Now we will learn how to set the ignition on a moped, walk-behind tractor or scooter. The scheme of actions depends on the type of spark creation system; it is known that there are only two of them - contact and non-contact (contact-transistor). Their main difference lies in the mechanism of operation. All old models of scooters, mopeds and walk-behind tractors had contact ignition. Currently, the second option is mostly used, since it is more advanced and tens of times more reliable.
How to set the ignition on a 4t engine
How to set the ignition on a 4T engine, How to adjust the valves on a scooter, I'M IN CONTACT-.
How to adjust valves on a scooter
For those who want to support me: 5355-5711-8360-4115 Georgievsky Stanislav.
Read
Contact ignition is based on a mechanical interruption system. In the closed state, low voltage current flows through the primary circuit. When a contact in the secondary winding system opens under the influence of electromagnetic induction, a current surge occurs with a high voltage, and then the distribution block works with it. Ignition different from the norm may be early or late. It is displayed on a distributor; this device combines a circuit breaker and a distributor. Most often, this part is installed on the crankcase, but there may be other assembly specifics; you need to look at the instructions for the design and operation of the vehicle. The adjustment procedure is as follows:
- Having previously disassembled the crankcase, on the contact group we set the maximum permissible gap for a full circle of shaft rotation.
- Next, set the piston to a position whose distance from the engine dead center corresponds to the technical documentation.
- Now we loosen the stator mount and adjust it until the contact closes.
- Now we put all the details in place and admire the result.
SONYA MARMELADOVA – NO, THANKS FUCK FRESH BLOOD
*No flex, I’m hammering nails into the join, **No, thanks, I don’t want to be under a fat boss. **My character showed you the bunk further, **RPM, your king is hanging out by the bucket. **Vlad PM, hit-and-run , pig, fuck it,**If Restor buys me a Tahoe.**I won’t spend more than a couple of bucks,**Your fat ass, Vitya Brovi, f.k.a., the best punch of the season.**Revizorro took a fake scalp,** Like a wig from Kobzon, from your Caudly.**Who is the legend here on the beats?**A cool MC would not be called Gleb.**Hello, Egregor, tank turret, tick-tock, boom-boom,**And tick-tock, boom-boom, the era of cyber-punk is over** Even Herman couldn’t remove such feces** The new Fresh-blood is a zombie farm.** Inferno! Bad Bass era, a bunch of freshmen in a stall for a hundred.**You're fresh, like a set of three tomatoes,**This is really too much, your codla is eight p.dorov.**Shame the pigeons by flying in like Harry Kane,**I one can read like sixteen of these readers.**My guys, two grandfathers and Booker,**I’m corrupt, yes, but who the fuck will buy me.**One girl, panties for a week,**Bro, I’ll bend you , like Uri Geller.**My dick is like a tube, tastes like hummus,**Jews love hubba-bubba.**Your staff is bubble gum, a pack of punch lines,**Bang-bang, I'm stupid There’s no one here to even battle.**Bang, they say, share a big cipher,**My family is like a Gatling gun.**Yes, I’ll crush you like fucking cockroaches,**I’ll crush you on Harry’s masks , e.u, like Matu Hari.**Brutal, like Dukalis, you didn’t even try to battle.**Your style gets me in, like the fucking ore Rallis.**Them.ya, man, they really pretend ,**The current “House 2” is fucking dynamite.**No, thanks, and rather the enemy is some Sobolev,**After all, the rappers from Fresh Blood, you battle worse than the bloggers.**Hey, this is Slava STS, where "S" is suck my dick, stupid p.dor,**I fucked you all, fucked up the protest,**But the names of the enemies are on the gravestones.**Hey, in a white T-shirt on the block,* *Hey, I'm probably broken,**Hey, beat, I'm ashamed of the lines,**What these motherfuckers are shouting.**Hey, battle rap is dead,**Hey, a homeless person in an abandoned construction site.* *Hey, but why are you fucking**How old is he?**No, thanks.**Help me get to 1000 subscribers, please
We adjust the contactless ignition system
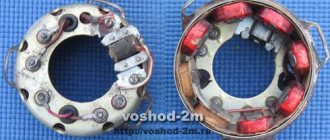
The contactless system operates through a sensor, switch, primary and secondary ignition windings. When the rotor with magnet closes the sensor, it sends a signal to the commutator, which, in turn, begins to accumulate current from the generator and transmit it to the primary winding. At this moment, high voltage appears in the secondary ignition winding. Its purpose is to ignite the spark. If there are any malfunctions listed above, adjustment is carried out by simply aligning the crankcase and ignition marks; to do this, remove the valve cover. The next steps are:
- We disassemble the crankcase in accordance with the technical description for your car.
- A mark is made on the rotor and crankcase at the dead center position of the engine in a place convenient for viewing.
- By rotating the crankshaft, we achieve a spark, make a mark on the crankcase relative to the mark made on it in the MTD. The difference between these marks on the crankcase is the ignition timing.
- Unclench the stator mounting bolts and set the advance angle corresponding to the technical documentation.
It is important to ensure that two of the three holes in the gear for the chain are at the level of the cylinder, and the remaining one is above the plane in which the cylinder and the mentioned holes are located.
The Alpha moped has a reliable ignition system, but it can also break; you should not put off this breakdown and ride on a faulty moped. You just need to try setting the ignition. You can set the ignition yourself if you have special tools and minimal skills. If this is not the case, then it is best to contact specialists.
How to replace the timing chain in an engine
Having decided on such an action as replacing the timing chain of a scooter, you need to decide on how to implement your plan.
There are two replacement options:
- With a thorough disassembly of the scooter engine
- No engine disassembly.
How to change, everyone decides for themselves. Both methods, advantages and disadvantages are described in detail below.
With disassembly
You should choose the right tools - generator and variator pullers (you can make them yourself), a kickstarter sprocket puller, 8, 10, 12 and 17 mm sockets, a hammer, two screwdrivers (flat, Phillips).
The engine is removed from its place, the oil is poured out, all parts are wiped and cleaned. Next, remove the muffler and cooling casing. We remove the generator only with a puller. To do this, unscrew the bolts from the impeller and remove it from the rotor. It is necessary to fix the rotor with a puller and unscrew the nut. Then we tear the rotor off the crankshaft journal. Remove the variator cover. Also, secure the impeller with a puller, unscrew the nut, and remove the variator from the axle.
Below the variator is the kickstarter gear. Likewise, a puller is required for it. Then we clean the cylinder connector, valve covers and cylinder head. After unscrewing the bolts on the valve covers, remove it. Next, remove the scooter's timing chain tensioner. After unscrewing the bolts on the cylinder head, we pull out the camshaft bed.
Next, remove the chain from the camshaft and pull it out of bed. To avoid losing the guide bushings that center the parts relative to each other, you need to remove them and put them away. We remove the cylinder head, the cylinder itself, and the piston (to do this, remove the retaining ring and pin from the upper connecting rod head).
After unscrewing the bolts on the crankcase cover, tapping it a little, remove it from the engine. We take out the starter intermediate gear, use a screwdriver and a hammer to unscrew the overrunning clutch nut (clockwise) and remove the gear and housing from the trunnion. We reached the chain!
Remove the protective shield from the oil pump. Place a metal stick under the chain, twist the nut on the oil pump sprocket, remove it and remove the chain.
No disassembly
We take the following tools: a Phillips screwdriver, pliers, a new chain and a special puller. More details about it will be below. We flare the new chain - to do this, use a puller to press the pin out of the joint of the links, but not completely.
A little about the puller
It is called a timing chain puller. It can be made by a turner by turning a threaded extruding pin and rolling a strong pin into it with a diameter similar to that of a chain pin. You can purchase a ready-made bicycle one. Just narrow the pin a little to the desired size.
Remove the cooling casing from the scooter engine, then the cylinder head cover. Next you need to remove the chain tensioner. We remove the camshaft bed, take out the shaft, remove the star.
We take the puller, center it with the pin, and gradually press out the pin. You can press it out completely, it will not be useful. We compare the links of the new and old chains, thread the wire into the seat of the pin and fix the ends of both chains. We turn the cooling impeller counterclockwise, gradually replacing the old chain with a new one.
Then we separate the ends of the chains, throw out the old one, and combine the new links from the ends. We check the alignment, install the pin, and use pliers to carefully press the pin in so as not to damage the new chain. We first check the mobility of the links. We finalize the pin with a puller. Again we control mobility. This point is very important: if you install the pin unevenly and miss it, it will begin to rest against one of the links and squeeze out the next one.
As a result, the subsequent pin or link bends, causing it to jam and become immobile.
Next, we assemble the engine in reverse order, placing marks on the rotor. When installing the camshaft bed, after tightening the nuts, you need to check the valve clearances with a feeler gauge. Upper valve – inlet: 0.05mm, lower – exhaust: – 0.1. The feeler gauge should fit freely between the valve and the adjusting bolt.
Then install the chain tensioner. We unscrew the bolt on the top of the tensioner, install a screwdriver in the groove, and, turning it, push the rod back. We fix everything else back according to the diagram.
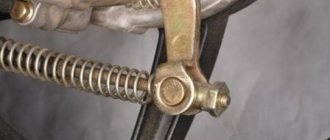
Strobe. Connecting a strobe.
You need to check with a strobe whether there are any risks to the ignition synchronization.
To check the synchronization of the marks on the system, you need to warm up the moped engine. After that we connect the strobe. There are 2 wires coming from the strobe, the first one needs to be connected to the power supply of the moped, and the second one (induction wire) is connected to the spark plug. When starting, a spark will appear on the spark plug; the strobe light will indicate this. This light that appears must be directed to the location of the measuring marks and see how they are located to each other. If the risks are level, then further adjustment is not necessary. If the measuring marks do not simultaneously touch each other, then the ignition timing needs to be adjusted. To do this, first of all, you should study the documentation for your moped. In order to find the location of the measuring marks, you need to carefully examine the generator flywheel and the flywheel housing.
To operate, you need a strobe light, which is equipped with a sensor for counting the rotation of the hot shaft. This check must be carried out with the engine idling (the stroke must work accurately). The test result should reveal the position of the measuring marks at which the ignition will work ideally. Once such a position is found, it will need to be set.
The main difficulty in setting up the ignition on a Chinese moped is the atypical location of the marks by which it needs to be adjusted.
On a 4t scooter? Problems with ignition of a 4-stroke engine can appear for various reasons, but they all lead to the same result - the engine stops starting. But the lack of a timely spark may not be the only reason that the engine does not start. To make sure that it is the ignition that is causing the engine failure, it is necessary to check all other possible faults that may interfere with engine operation and eliminate them. Breakdowns may occur in the ignition system, the causes of which can arise from both the mechanical and electrical side. Using simple techniques, you can determine whether the problem is a mechanical fault or an electrical component. At home, you can fix any breakdown in the ignition system of a 4-stroke scooter engine.
Which method is preferable?
It is logical that the first option with complete disassembly of the scooter engine is more complicated and takes more time and effort. But, as you can see, it is more reliable. Firstly, the factory integrity of the circuit is not compromised; secondly, when disassembling the scooter engine, you can see any defects, such as cracks, wear, change the seals, clean the parts.
The second option is more simplified and can be used when you only need to replace the chain. And you are confident in the quality of your work.
Final word
The scooter is a fairly popular vehicle and is in increasing demand. Because it leaves traffic jams behind, has low operating costs and is economical in terms of fuel and lubricants. Many people prefer to do scooter repairs on their own, especially since four-stroke engines are simple and reliable to use. Timely technical inspections, careful operation and the above article will allow you to enjoy riding this miracle of the Asian motorcycle industry for a long time.
Reasons for failure of a 4-stroke scooter engine
If the engine, then the reasons can be very different:
1. There is no fuel supply to the combustion chamber.
2. Air supply is not adjusted.
3. There is no compression. Burnt and deformed valves do not provide compression. The reason for the lack of compression may be improper assembly or a malfunction of the cylinder itself.
4. The one responsible for the operation of the valves is faulty.
5. Defective
6. An ignition spark is not produced during the mechanical operation of the generator.
Tools
- Small pliers or special wrench
- Open-end wrench 9
- 14mm socket wrench or socket
- Socket wrench 8
- A set of measuring probes, preferably with a pitch of 0.02 mm
We free access to the cylinder head: depending on the scooter model, we remove the hood or seat tank. We find the valve cover there, unscrew the four 8mm bolts and remove it from the engine.
The valve cover looks like this. In my case, to get to it I had to remove the hood, saddle and seat tank.
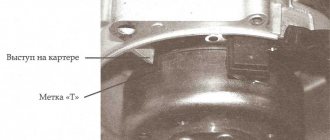
There is a generator casing on the right side of the engine - remove it. If you are too lazy to remove it, just take out the plug. The plug is located in the upper part of the case and can be removed using a regular screwdriver. Through the plug we will control the position of the marks on the rotor.
We insert a 14 mm socket wrench into the center of the generator casing and turn the engine (clockwise) until the “T” mark (from the English “Top” means top, in our case the piston position is at TDC) on the generator rotor is exactly opposite the ledge.
After the mark on the generator coincides with the ledge on the engine crankcase, we check what position the camshaft is in. The camshaft should be in a position where both valves are closed. And it gets into this position every second revolution of the crankshaft since it rotates twice as slow.
The principle of operation of the ignition on a 4-stroke scooter engine
Ignition on a 4t scooter depends on the synchronous movement of the gas distribution shaft located in the cylinder head and the magneto. There is a protrusion on the outside of the rotor housing that contacts the ignition sensor during rotation. At the moment of contact, a spark appears on the spark plug. The rotor is connected to the crankshaft. At the moment the spark occurs, the crankshaft and piston are in the extreme dead center position. How to set the ignition on a 4t scooter? It is necessary that during the passage of the dead center the position of the gas distribution shaft corresponds to the moment of ignition of the fuel in the combustion chamber.
Notes
Experienced repair technicians for devices such as mopeds explain the frequent ignition failure of these devices as follows. Even at the manufacturer’s factory, the moped is equipped with a late ignition, which results in incredibly sluggish ignition response to the accelerator handle and accumulating carbon deposits on the spark plug.
Therefore, it is important to know the method of how to set the engine to start in order to independently bring it back to life
Operating a scooter and enjoying its ownership brings a lot of positive emotions to the owner. In general, a scooter is a truly unique motor scooter, which is an almost universal transport. The scooter is great for driving around the city and for traveling outside of it. And everything would be fine, but sooner or later the moment comes when it has to be repaired and maintained, something that motorcyclists like to do much less of. Also, you often have to adjust and set the ignition, which few people know how to do correctly. It’s exactly how to set the ignition on a scooter that will be discussed in today’s article.
scooter 4t
In order for the rotation of the generator rotor and gas distribution shaft to correspond to the desired piston operating cycle, it is necessary to set their position according to the marks. On the magneto body there is a marker for the position of the dead center of the cylinder in the form of the letter “T”. The rotor can be adjusted manually, or using a kick starter. The position of the camshaft is determined by the marks on the timing sprocket. Three points marked on the star from the outside form the top of which should be directed to the extreme position from the piston. Adjusting the ignition consists of setting the correct position of the timing star.
How to replace the timing chain in an engine
Having decided on such an action as replacing the timing chain of a scooter, you need to decide on how to implement your plan.
There are two replacement options:
- With a thorough disassembly of the scooter engine
- No engine disassembly.
How to change, everyone decides for themselves. Both methods, advantages and disadvantages are described in detail below.
With disassembly
You should choose the right tools - generator and variator pullers (you can make them yourself), a kickstarter sprocket puller, 8, 10, 12 and 17 mm sockets, a hammer, two screwdrivers (flat, Phillips).
The engine is removed from its place, the oil is poured out, all parts are wiped and cleaned. Next, remove the muffler and cooling casing. We remove the generator only with a puller. To do this, unscrew the bolts from the impeller and remove it from the rotor. It is necessary to fix the rotor with a puller and unscrew the nut. Then we tear the rotor off the crankshaft journal. Remove the variator cover. Also, secure the impeller with a puller, unscrew the nut, and remove the variator from the axle.
Below the variator is the kickstarter gear. Likewise, a puller is required for it. Then we clean the cylinder connector, valve covers and cylinder head. After unscrewing the bolts on the valve covers, remove it. Next, remove the scooter's timing chain tensioner. After unscrewing the bolts on the cylinder head, we pull out the camshaft bed.
Next, remove the chain from the camshaft and pull it out of bed. To avoid losing the guide bushings that center the parts relative to each other, you need to remove them and put them away. We remove the cylinder head, the cylinder itself, and the piston (to do this, remove the retaining ring and pin from the upper connecting rod head).
After unscrewing the bolts on the crankcase cover, tapping it a little, remove it from the engine. We take out the starter intermediate gear, use a screwdriver and a hammer to unscrew the overrunning clutch nut (clockwise) and remove the gear and housing from the trunnion. We reached the chain!
Remove the protective shield from the oil pump. Place a metal stick under the chain, twist the nut on the oil pump sprocket, remove it and remove the chain.
No disassembly
We take the following tools: a Phillips screwdriver, pliers, a new chain and a special puller. More details about it will be below. We flare the new chain - to do this, use a puller to press the pin out of the joint of the links, but not completely.
A little about the puller
It is called a timing chain puller. It can be made by a turner by turning a threaded extruding pin and rolling a strong pin into it with a diameter similar to that of a chain pin. You can purchase a ready-made bicycle one. Just narrow the pin a little to the desired size.
Remove the cooling casing from the scooter engine, then the cylinder head cover. Next you need to remove the chain tensioner. We remove the camshaft bed, take out the shaft, remove the star.
We take the puller, center it with the pin, and gradually press out the pin. You can press it out completely, it will not be useful. We compare the links of the new and old chains, thread the wire into the seat of the pin and fix the ends of both chains. We turn the cooling impeller counterclockwise, gradually replacing the old chain with a new one.
Then we separate the ends of the chains, throw out the old one, and combine the new links from the ends. We check the alignment, install the pin, and use pliers to carefully press the pin in so as not to damage the new chain. We first check the mobility of the links. We finalize the pin with a puller. Again we control mobility. This point is very important: if you install the pin unevenly and miss it, it will begin to rest against one of the links and squeeze out the next one.
As a result, the subsequent pin or link bends, causing it to jam and become immobile.
Next, we assemble the engine in reverse order, placing marks on the rotor. When installing the camshaft bed, after tightening the nuts, you need to check the valve clearances with a feeler gauge. Upper valve – inlet: 0.05mm, lower – exhaust: – 0.1. The feeler gauge should fit freely between the valve and the adjusting bolt.
Then install the chain tensioner. We unscrew the bolt on the top of the tensioner, install a screwdriver in the groove, and, turning it, push the rod back. We fix everything else back according to the diagram.
Results
- The absence of a spark when power is supplied to the coil requires checking the high-voltage circuit and ground.
- If the high-voltage circuit and ground are fully operational, then the problem is most likely with the coil itself.
- If there is no voltage at the coil terminals, measurements are taken on the switch.
- If there is voltage at the switch terminals and there is no voltage at the coil terminals, the reason is most likely that there is no ground on the coil or the wire connecting the coil and the switch is broken - the break must be found and repaired.
- The absence of voltage on the switch indicates a malfunction of the generator, the switch itself, or the induction sensor of the generator.
The method for checking the CDI ignition system coil can be used not only for motorcycles, but also for any other vehicles. The diagnostic process is simple and consists of a step-by-step check of all parts of the ignition system to determine the specific causes of problems. Finding them is quite simple if you have the necessary knowledge about the structure and operating principle of the CDI ignition.
Preparation
From the above, you probably realized that the thermal gap exists in order to compensate for the thermal expansion of timing parts. The most important rule follows from this: the thermal gap can only be adjusted on a cold engine. If you start adjusting the heat when it’s hot, you’ll simply increase it since the initial gap will go to expansion. And when the engine cools down, the gap adjusted in this way will double. I hope this is clear.
Let's summarize the above
First, use a light bulb to check whether the switch generates a pulse or not:
- If the light is on, the switch and the modules that ensure its operation are 100% operational
- If the light does not light, it means that the switch or some module that ensures its operation has failed. And to understand for sure that the switch is faulty, we need to check all the modules.
- If the modules turn out to be serviceable, but the switch does not generate a pulse, then it is faulty and you can safely replace it with a new one
In conclusion, I would like to warn you against the temptation to take a known-good switch from someone and plug it in instead of your own. Yes, with this express method the faulty switch will be identified immediately. If it was really faulty, then with a known good one, a spark will immediately appear.
But how can we be 100% sure that the scooter’s wiring is in perfect order and no one has managed to put their smart personality into it before you? What if something shorted there or some tusk messed up the wiring in its own way and then the working switch will be in complete trouble. And then you will buy two switches - one for the person you asked for, the second for yourself. Do you need it?
Gaps
Here is the combustion chamber of an ordinary Chinese scooter engine.
During engine operation, the valves heat up to significant levels. And in order to compensate for the expansion coefficient of the valve and the entire timing belt as a whole, there is a small gap between the valve and its opening mechanism. Called thermal.
In our case, the gap that we will adjust is between the valve and the rocker arm adjusting bolt. By tightening the adjusting bolt within the required limits, we can adjust the thermal gap as much as we need.
But do not forget that the gap should not be very large - otherwise the mechanism will work with a shock load and quickly fail. And very small: the valve will heat up, hit the rocker arm and burn out.
COMMENTARE • 56
It looks more like he switched the 139 engine to the Japanese, the Japanese stopped driving, moved the piston to 80+ cc and got this result. fifty dollars will never work like that
Well, can someone tell me how to rearrange it?
Whether you moved them back or forward, it would be possible to explain in human terms!
And what's the point? Apparently you assembled it correctly for the first time. Well done
Motor from another stool