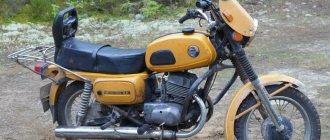
First, you need to understand the features of the motorcycle. IZH Jupiter-5 is a vehicle designed for road travel with different surfaces. You can attach a stroller and a cargo module. The appearance of Jupiter-5 is distinguished by the strict classics inherent in the Soviet era, but at the same time it has its own individuality.
The demand for this model lies in the small dimensions of the motorcycle, as well as decent power for that time. The engine of this motorcycle has two cylinders and two strokes. The cylinders are arranged in-line. The maximum developed power reaches 25 horses, which is 3 more than the single-cylinder IL Planet-5. This engine allows the motorcycle to move at a maximum speed of 120 km/h, while it has low fuel consumption.
What sets the bike apart is its ability to operate even in harsh climatic conditions. It is not at all whimsical: it can start both in -30 degrees and in heat over +40, and is not afraid of rain and dirt. However, moving on the ground during rain is not as easy as we would like. Unlike the “Planet”, no extra vibration is felt
. the movement is dynamic and very smooth.
The Izhevsk Machine-Building Plant began producing IZH Jupiter-5 in 1985, so spare parts are always available. However, the quality leaves much to be desired, which is why parts wear out quickly and the motorcycle requires fairly regular repairs. Sometimes, to find the cause of a breakdown, you have to disassemble half of what you didn’t even know about. Fortunately, in IZh everything is quite simple and the repair can be done at home. Repairing the IZ Jupiter 5 engine is not a difficult task, but if you are going to ride this motorcycle often, then you should not neglect to do the work correctly.
The main problems of Jupiter-5 include the current shock absorbers and cylinders, which alternately refuse to operate the engine. If you have encountered similar problems, then this article may help you in solving one of the annoying problems.
Photo report: Repair of the engine of the IZH-Planet motorcycle 2, 3, 4 and fifth model
Nowadays it’s rare to find a “Planet” anywhere, especially in stock form.
Grandfather's sheds where they once stood in abundance have long been cleaned out by the suffering, and the garbage dumps where they once lay are overgrown with grass... The only place where you can still find something more or less decent is local newspaper advertisements. You can also search on Avito, but before you buy it there, see the product in person, otherwise they will send you a bag of bricks instead of an engine...
I was lucky: I found an advertisement in a local newspaper for the sale of an engine from a sidecar, went to the place, inspected it, made an agreement, bought it and brought it home. Don’t let the fact that the engine is from a motorized stroller scare you - the engine is completely identical to the original Planetovsky one.
In general, when I tossed the engine around, I was happy and immediately upset... I was happy because the engine was stock and had no signs of interference. There was also original oil and a USSR spark plug. I was upset because the piston and lower connecting rod bearing were killed.
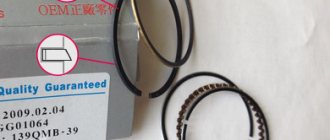
I had a good factory cylinder in stock: bored to repair size + a factory piston, chrome rings and pin were purchased for it a long time ago.
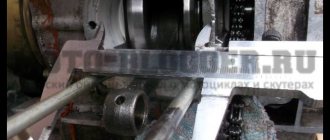
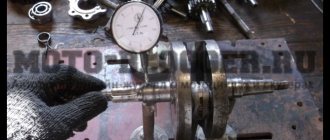
I bought the connecting rod from an online store. We managed to find a factory one - not plasticine. I modified it a little: I made a small cut in the lower head to improve bearing lubrication, decompressed the crankshaft, threw out the old connecting rod, installed a new one and then centered the crankshaft using an indicator.
Good day everyone! Yes, again a story about the beginning of the restoration of another motorcycle. Guest of our garage IZH-Jupiter 4 manufactured in 1983. This motorcycle has recently been in our neighborhood. How he ended up here is our fault (in a good way). I have a good friend, in the summer he is used to racing on the street on a scooter and pit bike. One summer we got to talking and he said that my grandmother had a Jupiter-4 with documents in original condition. I think it's cool, in original condition and with documents. He persuaded me to bring him here. And the one-way road was about 200 km. One fine day, in the morning, we went to pick up a motorcycle. Having experience in transporting Izha, I removed the back seat of the Priora and took all the necessary tools. So we went for this miracle. We've arrived. Since we came to visit a friend's grandmother, we were fed to our heart's content before dismantling the motorcycle. First we went into the barn, where, according to a friend, there were all sorts of spare parts. Found 4 boxes full of spare parts! While we were sorting through what we needed, we sorted out what was unnecessary. They only left spare parts from the Java and crankcase from Jupiter 2. But the most interesting thing was that there were spare parts that were still in solid oil and with factory tags. Wow! Everything they took was put in the trunk. Even then the car got a little stuck, and there was still the matter of loading the motorcycle... We went to the next street to the garage and rolled out this miracle. Hmmm, original condition and documents available. The condition was indeed “original”, but in a bad way, and the documents were of a new type, only the number was not updated. This is the culprit of the trip. How many original assembly solutions there were, it’s painful to even remember, but I’ll describe it. As usual, the muffler was removed and it was necessary to remove the front wheel and remove the fork. Having removed the muffler, I began to unscrew the front axle, but it didn’t move. I look from the other side, and there... The axle was hammered, it couldn’t move at all. I think why did we do this?!!! Well, I think okay, let's remove the plug. I loosened the feathers in the traverses, began to knock them down, but they didn’t fit. Then I looked closer, one feather was 5-7 centimeters longer than the second. And the long feather could not easily leave the traverse. Aaaaah,?*;%!4, we collected some crazy stuff! And at that moment it started to rain, we had to wait it out. Then I got angry at this “hodgepodge”, as I went into the pen, it barely came out. That's it, we loaded it somehow and went home.
After 3 hours we arrived home and began to unload the patient.
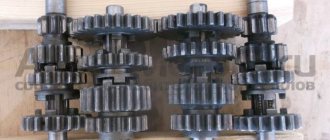
And here is one of the piles of spare parts brought. There were also 4 cylinders and another box in the distance. Like a brother, they gave me a few spare parts for moral damage when disassembling and assembling joint components)))))
Somehow I put the front non-separable fork back on. You will immediately see which feather is the longest... Well, otherwise she wouldn’t have gotten dressed) That’s how they collected it from what it was.
Of course, the motorcycle was not always in this condition. It was taken by a friend's grandfather from a store and was the family's daily vehicle. When the car appeared, it looks like the motorcycle was abandoned or maybe even had a minor accident, these guesses are made from the marks on the frame that you will see. Maybe after this accident, a friend’s uncle made it from what was at hand.
So a friend drove it all summer with a hole in the mufflers, with the second gear falling out, but almost every day he washed his mud mixer from the car wash. One evening we were talking about this and that, and I said to a friend, without seriousness, would you like to put him in proper shape? Well, he doesn’t seem to know, it’s all to do, but why, he still has no rights. And then let me persuade you, like, you’ll pass your license and you’ll have your own transport for now, get in and go. After I sent him what his Jupiter 4 might look like, he slowly began to warm up to the idea! And here is an example for inspiration that I sent to him.
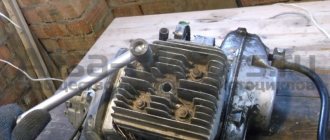
That's it, from that moment on we began to plan what and how. When the season was closed, they immediately took off the engine and brought it to me. There were complaints about knocking in the cylinders and unstable operation. Although, what kind of work is there) A friend loved to wash it from the car wash so much that there was water in the filter and carburetor, and when we removed the cylinder knees, it even dripped from there... Oh, how. Well, what can you do, first experience, first serious motorcycle after a scooter and a pit bike. And now, the engine is at our disposal.
Having removed the cylinders, it became clear that the gap between the piston and the liner was too large, and the bearing of the lower connecting rod head was worn out... Plus there was also water in the cylinders.
And then everything is as usual: worn out seals and bearings, a stretched chain and dead clutch discs, incorrect clearances on the gearbox and a couple of worn out gears.
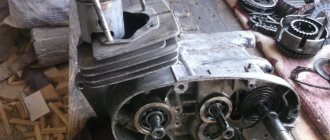
So we completely disassembled the engine. Next, we wash all the insides and immediately write down what else needs to be taken for repairs.
And then the engine goes to its fellow comrades.
After 3 weeks of leisurely assembly on weekends, the engine was assembled. The crankshafts were repressed. The connecting rods were placed under the separator. The cylinders were bored out for 1 repair. In general, a full-fledged cap. repair. After that, the engine lay with me with the others assembled warmly, waiting in the wings.
January. A friend (name is Andrey, I’ll call him that from now on) came here from the city for the weekend. That's it, I decided to take my Jupiter and disassemble it to zero, as I usually do when restoring.
At the back, the frame was “raised up,” the seat was from the 4th model, but they installed a bracket from the 5th model and reupholstered the cover.
The wiring was dangling and almost entirely covered with electrical tape. Everything is like in my worst dreams. There will be a lot of work to do.
And here is the frame... You can see for yourself. There is a giant weld on both sides. In front, too, everything was cooked and overcooked, as it seemed to me due to some kind of accident. We decided to change the frame. Just in my garage I had a good frame from Jupiter 5 collecting dust, I thought why should it just sit there, I’ll give it to Andrey and that’s it.
Wiring... wow, that's a lot of electrical tape. Everything is sloppy and crooked! Fu-fu-fu, we're sorting everything out.
Here are the feathers... How could they be so different!? Apparently, at that time they didn’t think about it, just to drive.
And this is something that didn’t give me any peace. For what?? To seal the front axle is blasphemy! I had to call the Bulgarian lady for help, without her the holiday would not have continued.
They removed the dashboard, the upper crossmember and the steering wheel. How ugly everything was here, complete neglect. Andrey asked, are we sure we can do it? Of course, there’s no other way, we’ll do it and everything will be in the best possible way.
Wiring scraps. We unscrew the remote controls, as well as the mirror brackets - we will paint all this.
We carefully put everything unscrewed against the wall, so that later we can sort out what we will need and what we no longer need...
Rear end. It was more difficult there. All the fasteners were rusty and took a long time to unscrew. And whoever didn’t want to get away with it got acquainted with a Bulgarian woman.
A cherished moment. Everything was taken apart. Having assessed the scale, we figured that we would have to look for a lot of spare parts. We started looking for uncreased mufflers, a rear pendulum, a driven sprocket, a chrome-plated rear seat fender and the right glove compartment, and I won’t even write down the little things - there’s a sea of them!
We found all this quite quickly, and decided on the long weekend of February 23 to paint everything black and put the motorcycle on wheels. We arrived in a warm garage and brought all our stuff.
I had to take the normal right glove compartment from my hands, since my original one had a huge crack. Plus, this still has the emblem, which we will then put on the freshly painted cladding.
Creative chaos))
We are preparing the frame and everything black for painting. Sand, clean, degrease.
The next day we came to the garage and removed everything painted from drying. Great, everything has dried and looks great!
The drive sprocket casing and the front brake drum... All this must be washed, sanded, sanded, polished.
The first step was to rebuild the suspension. While I was sorting out the fork stays, Andrei was grinding the front brake and rear drums and washing everything free of dirt. Since there were different stays before, we had to take spare ones from the garage, set aside for an occasion that just happened. Having replaced the bearings in the steering column, we put on the fork stays. Andrey immediately put on the new turn signals, he couldn’t just watch them lie on the chair ))
Rear shock absorbers line. After repressing the silent blocks, replacing the seals, cups and oil, the shock absorbers became like new.
While I was sorting out the shock absorbers, Andrey cleaned and ground all the aluminum parts and lightly polished them. Then they screwed the whole thing into place. The motorcycle was changing before our eyes! This certainly made us happy.
We installed glove compartments and a brake pedal. We started installing parts that had been cleaned of dirt - ignition coils, rods and others. No time wasted)
We walked at a good pace! Of course) The other day they left a whole bucket of pickled Istoben cucumbers (those in the know will understand what they are) and cabbage in the garage; we took some fresh bread and had a good meal there))) In the garage, all the food becomes even tastier!
Having replaced the wheel bearings and the driven star bearing, we put on the wheel and the updated rear casing. Now at least he can stand on the step and not fall))
We also replaced the bearings on the front wheel. We also changed the tires with the camera. The old camera was already in terrible condition. We also changed the brake pads and speedometer cable. All gears were generously lubricated. We went through the dashboard and put it in place. Now the motorcycle took on a completely different, pleasant look.
We certainly accomplished a lot that evening! They left the garage already after midnight. We decided to take a break on the last day of the weekend)) At first glance, it may seem that the volume is small. But when we did all this, time simply flew by and by nightfall we were already completely tired. Okay, I had enough experience of assembling it overnight, but Andrey was still just learning what it meant to sort through an IZh)))))
On this note we decided to end our busy weekend. Having put the motorcycle on its wheels, we rolled it into Andrei’s garage, so it would get in the way here on weekdays.
It’s nice to know that another IL is gradually being reborn from an incomprehensible state. Although it’s surprising that even in such a dead state, at the very least, he drove around. And I’m just happy in my heart that my friend decided to restore, and not finish, the motorcycle; of course, I will help him until the very end of the rebuild. Also, the approach to this matter is striking: no matter how many times I talked about repairs with citizens from 15 to 19 years old, most of them constantly want to save on all sorts of little things and don’t particularly bother with the result. But here it’s a completely different matter - if you need something, we take it without any questions. That is, a person is fired up by this idea and wants to properly make a motorcycle for himself, so that in the future he can simply sit down, go, service, go, go, go. If only we could have more people like this to do everything right once, although there will be more investments, it will be worth it.
At this point, the first part can be brought to an end. Now the cladding has already been sandblasted and will be powder painted. We are preparing the remaining spare parts for installation. Just a couple more days off and the motorcycle will be assembled)) See you soon, thank you for your attention 
Preparation
To perform a high-quality repair, the engine parts must be clean, the threads in the crankcase must be threaded, the seals and gaskets must be new.
First, we clean the oil channels in the crank chambers. There are two channels in the Izh-Planet engine: one in the left half of the crankcase, the other in the right. We find the channels and if they are very clogged, we clean them with wire, rinse them with clean gasoline and blow them with compressed air.
Installation of bearings and seals
We install a retaining ring in the left half of the crankcase.
Depending on the model of the main oil seal, we install a spacer sleeve in the mounting hole of the main bearing, or, if the oil seal was initially wide (there are some), we heat the crankcase and, on the inside of the crankcase, place the oil seal until it stops against the retaining ring.
My engine had a regular narrow oil seal, so I put in a bushing.
Using a mandrel, install the main oil seal into the preheated crankcase.
Quickly, before the crankcase cools down, place the oil guide washer on the oil seal. The oil guide washer has a saucer-shaped profile. We place it on the oil seal so that the concave side faces us, and the curved side faces the clutch basket.
While the crankcase has not cooled down, we press the outer race of the main bearing into it using a mandrel.
If you are going to replace the main bearings with new ones, don’t be lazy: find a sheet of iron 7-8 mm thick, cut a wedge in it for the connecting rod, pass the sheet of iron between the cheeks of the crankshaft and use a mandrel to drive the main bearing onto the axle.
This way you will protect yourself from damage to the crankshaft. The main bearing has a very high interference and fits into the axle with a very large force. It is not uncommon for people to simply knock out the axle (the axle on the planetary crankshaft is pressed into the cheek) inside the crankshaft, but they were never able to put the bearing on.
Instructions
Before starting assembly, clean the surfaces where the parts connect from any dirt. Throughout the entire process, pay special attention to evenly tighten the mounting screws, avoiding distortions. Before pressing, treat the bearings well with grease. Press the ball bearing into the right half of the crankcase, then install the installation ring into the left half. From the crank chamber side, press the oil seal into the crankcase, then install the second ring.
Insert the installation rings into the grooves of the crank chamber covers, press the ball bearings into them and put rubber sealing rings on them. Install the left crankshaft. When doing this, be careful not to damage the oil seal. Using a hammer and support, press in the crank chamber cover. Then screw the screws and lock washers into it. The tightening force for these screws should be maximum.
Insert the crankshaft into the right half of the crankcase. In the same way, using a hammer and support, press in the crank chamber cover. After installing the oil seals on the crankshaft axle shafts and in the crank chamber covers, press them in. Next, insert the installation rings, press the ball bearing into the left half of the crankcase and secure the crank chamber cover with screws with maximum tightening.
On both halves of the crankcase, secure the screws securing the crank chamber covers to protect them from spontaneous unscrewing. Place a gasket and a cover with a crankshaft oil seal on the right half of the crankcase. Secure it with screws and cap it in the same way.
To assemble the engine cylinder-piston group, place the rings on the pistons using plates. In this case, the plate locks must coincide with the piston pins. On the piston bosses, install a retaining ring in one of the grooves, and a piston pin, lubricated with machine oil, in the opposite groove. Place the piston on the upper head of the connecting rod so that the arrow points backward and the piston ring locking pins forward in the direction of travel of the motorcycle.
Align the holes of the piston bosses and the bushings of the upper connecting rod head. Press in the piston pin using a mandrel and a hammer. After this, install the second retaining ring on the piston. Assemble and install on the engine
second piston. Before installing the cylinder, check the connector planes. Clean these surfaces, install sealing gaskets on them, and place a wooden stand under the pistons. Lubricate the cylinder mirror with oil. Place the piston with pins on the cylinder and carefully thread the piston rings.
Remove the support from under the piston. While pushing the cylinder, place it in place and secure it. In this case, the ring locks should not fall into the cylinder windows. Replace the second cylinder in the same way, then install the carburetor pipe, gasket and head. Tighten the fastenings of the heads and pipe as follows: first tighten the middle screws until they stop, then the outer ones. Tighten the outer nuts evenly in a cross pattern.
note
IZ Jupiter-5 is very good in dynamics and speed, and as for acceleration, IZ Jupiter-5 is quite faster than its single-cylinder brother. The IZ Jupiter-5 engine is quite revving - up to 5000 rpm. Unlike heavy motorcycles such as “Dnepr” or “Ural”, the IZH Jupiter-5 has one carburetor for two cylinders, which means that fuel consumption is lower and the stability of both cylinders is better.
Helpful advice
The road motorcycle “Izh Jupiter 5-020-03” (Izh 6.113-020-03) belongs to the middle class motorcycles and is intended for use on roads with various surfaces. The motorcycle is equipped with an engine with a liquid cooling system, which ensures stable operation in any mode, reduces noise levels and reduces fuel consumption. The base model is equipped with a telescopic fork, spoked wheels and two-cam drum brakes.
First, you need to understand the features of the motorcycle. IZH Jupiter-5 is a vehicle designed for road travel with different surfaces. You can attach a stroller and a cargo module. The appearance of Jupiter-5 is distinguished by the strict classics inherent in the Soviet era, but at the same time it has its own individuality.
The demand for this model lies in the small dimensions of the motorcycle, as well as decent power for that time. The engine of this motorcycle has two cylinders and two strokes. The cylinders are arranged in-line. The maximum developed power reaches 25 horses, which is 3 more than the single-cylinder IL Planet-5. This engine allows the motorcycle to move at a maximum speed of 120 km/h, while it has low fuel consumption.
What sets the bike apart is its ability to operate even in harsh climatic conditions. It is not at all whimsical: it can start both in -30 degrees and in heat over +40, and is not afraid of rain and dirt. However, moving on the ground during rain is not as easy as we would like. Unlike the “Planet”, no extra vibration is felt
, the movement is dynamic and very smooth.
The Izhevsk Machine-Building Plant began producing IZH Jupiter-5 in 1985, so spare parts are always available. However, the quality leaves much to be desired, which is why parts wear out quickly and the motorcycle requires fairly regular repairs. Sometimes, to find the cause of a breakdown, you have to disassemble half of what you didn’t even know about. Fortunately, in IZh everything is quite simple and the repair can be done at home. Repairing the IZ Jupiter 5 engine is not a difficult task, but if you are going to ride this motorcycle often, then you should not neglect to do the work correctly.
The main problems of Jupiter-5 include the current shock absorbers and cylinders, which alternately refuse to operate the engine. If you have encountered similar problems, then this article may help you in solving one of the annoying problems.
Assembling the crankcase halves
We degrease the connector of the halves, knock out the guide bushings a little so that they extend 5-6 mm above the plane. Depending on your desire, we assemble the checkpoint. Personally, I assemble the gearbox only after assembling the engine, it’s more convenient for me.
We apply any automotive sealant to the connector, install the second half of the crankcase, tap it with a mallet, install the gearbox cover and tighten the crankcase with bolts.
We do not pull the bolts anyhow, but strictly according to Feng Shui: we pull about a third of the force, first the middle crosswise, then the periphery, and gradually increasing the force over several circles, we tighten the bolts as much as is sufficient.
Installation of the cylinder-piston group
It is not advisable to remove the gearbox cover until the sealant has dried; there is no need to rush in this matter. It’s better not to rush things and install the cylinder while the sealant dries.
Add some motor oil:
To improve lubrication, it is advisable to drill holes in the piston bosses. But you don’t have to drill - it depends on your desire.
Install the piston pin retaining ring into the boss. Before installation, it is advisable to bend the locking ring a little and be sure to check how it fits after installation:
We heat the piston with a hairdryer and, using a mandrel, drive the finger into the piston so that it comes out no more than 5-6mm.
We look for an arrow-shaped mark on the bottom of the piston.
We orient the piston with the arrow towards the exhaust port of the cylinder (“towards the exhaust”), put the piston on the connecting rod, hammer in the piston pin and install the second retaining ring.
We insert the rings into the cylinder and measure the gap between the locks with a feeler gauge:
To improve the wearability of the rings and reduce noise from engine operation, it is advisable to chamfer the edges of the rings. If hunting gets too much trouble: place the ring on a flat surface and use a file to slightly round the edges.
We put the rings on the piston, fill the piston with the rings with oil, install a gasket under the cylinder (preferably with sealant), tighten the rings with a clamp. We cut the clamp out of tin and from the same tin we bend the bracket with which we will fix it.
Motorcycle repair IZH JUPITER 5
Izh Jupiter 5 repair
Cylinder-piston group. Cylinder head
The group number is indicated on the plane of the horizontal edge of the head from below.
Pistons and cylinders. The amount of wear is determined by measuring the diameters of the pistons and cylinders. If the gap between the piston and cylinder is greater than 0.3. 0.4 mm, they need to be repaired. Repair is also necessary if the cylinders have deep marks and burrs on the working surface. Engine repair Izh Jupiter 5,
as a rule, it is produced:
* selection and installation of new sets (of normal size) of cylinders, pistons and piston rings to replace worn ones or * boring and honing of old cylinders and installation of rings and pistons of repair sizes. When replacing pistons and cylinders, select the same group according to the table
Piston pins and connecting rod upper head bushing. When installing a new piston (nominal or repair sizes), select the piston pin using the holes in the bosses. The pins and holes of the bosses are marked in different colors depending on the repair groups according to the table
The color of the piston pin markings must match the color of the piston markings. The pin group is marked in enamel on its inner diameter near the end, and the piston is marked on the boss inside the piston.
In case of wear of the holes in the bosses and the bushing of the upper head of the connecting rod, you can install a repair-size pin by reaming the holes for it, according to the table below.
Spare parts include pins from two repair groups. If the connecting rod upper head bushing is worn, replace it with a repair size bushing or a bushing made of bronze according to the figure.
Press out and press in the bushing according to the figure.
Piston rings. Install new piston rings when replacing (repairing) pistons and cylinders or in cases where the piston and cylinder have acceptable wear, and the gap measured with a feeler gauge at the joint of the ring installed in the cylinder at a distance of 10.30 mm from the top end is more than 2.5 mm . Before installing a new ring you must:
Right crankshaft oil seal, clutch control mechanism. For ease of disassembly, repair and assembly of these assembly units without removing the engine from the frame, it is recommended to disconnect the right and left mufflers and rod from the foot brake lever.
When disassembling the clutch control mechanism, it is necessary to keep in mind that the axis of the clutch automatic lever and the screws securing the automatic clutch bracket are anchored, and the clutch cable lever and the lever axis are removed after removing the automatic machine bracket. When assembling, check that the ball is in the hole in the input shaft; Lubricate the pusher, lever and cam of the clutch control mechanism with grease. In general, the design of the Izh Jupiter 5 engine is not too different from its predecessor.
Clutch Izh Jupiter 5, starting mechanism, transmission from engine to clutch
Disassemble, identify possible faults and assemble these assembly units in the same way as on the Planet engine. Check the alignment of the planes of the crankshaft sprocket teeth and the outer clutch drum. The permissible non-flatness of 0.4 mm is achieved by installing adjusting washers with a thickness of 0.2. 0.5 mm on the input shaft between the inner bearing race and the outer drum spacer. The sag of the motor chain should be within 2.9 mm. If the chain sag is greater, it is necessary to use sprockets with an increased diameter of the circle of the depressions between the teeth.
When assembling the Izh Jupiter 5 clutch, it is necessary to ensure that the spring nuts protrude by 3.5. 4 mm above the ends of the caps and movement of the pressure plate without distortion (allowable distortion up to 0.4 mm). To adjust the clutch control mechanism, after installing the right cover with the automatic clutch, screw the adjusting screw in the pressure plate until it stops, a. Then unscrew 1/4. 1/2 turn and lock the screw with the nut. Next, use the adjusting screw on the steering wheel to set the free play of the clutch lever to 5.10 mm.
Gearbox Izh Jupiter 5
Motorcycle engine Izh Jupiter 5
, when disassembling and assembling the gearbox, it must be removed from the frame. In this case, you do not have to disassemble the cylinder-piston group, but be sure to disconnect the inlet pipe from the cylinders. Drain the oil from the crankcase before disassembling.
Disassembly. Remove the trigger and shift levers, left crankcase cover and gasket. Disassemble the clutch, transmission from the engine to the clutch and the trigger mechanism. Disconnect the lower pipe of the motorcycle wheel drive chain cover from the engine crankcase. Knock out the mounting sleeve at the front of the engine to half its length.
Unscrew the seven screws securing the crankcase halves and, having unscrewed the nuts, remove the engine mounting bolt at the rear. Remove the remote flywheel cavity hatch cover with the gasket and drain the oil. Use the special wrench from the tool kit to loosen the bolt holding the flywheel together. Separate the crankcase halves using screwdrivers, installing them in the grooves of the rear and front parts of the crankcase, or using a hammer and drift. Remove the remote flywheel and keys.
Remove the input and intermediate shafts with gears and washers, the worm shaft with gear shift forks from their seats, and mark the installation locations and the number of adjusting washers. Disassemble the gear shift mechanism in the following order: * straighten the ends of the cotter pin and remove it from the hole in the gear shift mechanism shaft; * unscrew the coupling bolt on the cam, remove the adjusting washers and the clutch cam, remove the key from the groove; * remove the gear shift shaft, anchor stopper and sector, taking precautions, since the mechanism spring with its ends is wound behind the anchor stop; * straighten the lock washer and unscrew the nut securing the anchor stop to the crankcase; Disconnect the spring from engagement with the bolt stop and remove the stopper.
Tuning the IZH Jupiter engine
Before you start, you need to decide how much power you would like to give to your engine. If you are quite satisfied with the average power, then you will need a ZiD-200 resonator. But if you want to make the IZH Jupiter 5 motorcycle fast and powerful, start tuning the engine by installing a resistor from the SMB-5 “motoblock”.
Replacing the air filter plays a big role in engine modification. The better the air is cleaned, the more horses the engine will be able to produce. After all, the degree of engine overheating depends on the amount of incoming air. It is best to use imported air filters. They provide improved cleaning and longer service life.
Next you should work hard on the injection system. An excellent option is to install a “Planet” carburetor with a diffuser diameter of 0.32 cm. Two carburetors will provide much greater acceleration and good dynamics. We take the flanges securing the cylinder from the standard tube, grind out the aluminum studs, and cut off the flange from the carburetor from the inlet tube from the Planet.
We grind the ends of the cylinder heads on a machine, and press the cylinders themselves. The maximum permissible volume of PIC is 18 cubic meters. see Install factory copper layers under the cylinder heads. And we adjust the ignition advance angle to increase compression.
We use the second flange from the old carburetor. Then we weld the parts using “cold” welding. And finally, we modify the assembly to be compatible with the inlet channels. all cracks with epoxy liquid
. Voskhod carburetors will provide uniform traction. In this simple way, you can add not only a couple of additional horses to your pet, but also provide more lively dynamics that give a good riding experience. The motorcycle is very reliable for everyday use, and if you take good care of it, breakdowns will occur very rarely.
issue 10 part 1.IZH Jupiter 5 engine
Description
: we are here: https://vk.com/enduro_club
In this issue. Restoration of the crank mechanism of the IZH JUPITER motorcycle engine 5. Correction of the consequences of unqualified repairs and modernization of the crankshaft main bearings. motor repair Ivanovo Master: Mikhail Dunaev Telephone number of the master
7! in Ivanovo ****************************************************** ************* FOR THOSE WANTING TO HELP OUR PROJECT.
throw some money into your webmoney wallet: R 302 360 519 441 Thank you. **************************************** *******
Izh Jupiter gearbox assembly.wmv
Self-assembly of the Izh Jupiter
5 after its repair is a responsible operation. Inattention and errors during assembly will sooner or later lead to breakdowns during its operation. However, attention and observation shown when disassembling it will allow you to avoid most mistakes.