Deterioration in traction, a drop in maximum speed, blue smoke from the muffler and weak dynamics of the scooter are a sure sign of worn piston rings or a worn cylinder-piston group. Most often they wear out because The diameter of the piston group in scooters is small, the working area of the rings is very small and therefore they do not run for so long.
So, if you are faced with the need to replace piston rings on a scooter, and in addition to the main problem that they need to be changed, there is another one - how to correctly put the rings on the piston. You can't just take any ring and put it in any of the "grooves" on the piston. You need to understand which ring is the upper compression ring, which is the lower compression ring, and also how to correctly install the oil scraper ring.
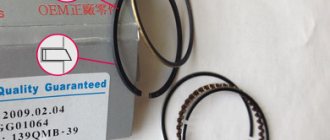
Installing piston rings on a 4-stroke Chinese scooter. The photo below shows which piston ring is which.
As you may have noticed, the piston ring set consists of two compression rings (upper and lower), as well as an oil scraper ring, which consists of two regular (thin) rings and a central expander.
The second compression ring is dark black
color, as well as unique (beveled) geometry.
The color of the rings may vary among different manufacturers, for example, for the CMR company - the lower compression ring is red
color.
The following diagram shows the correct placement of the rings.
You can see inscriptions on the compression rings, they may be different depending on the brand of the rings, but their essence is the same - installation of the rings should be done with the inscriptions UP
! Those. the inscriptions must be directed towards the cylinder head.
As a rule, there is no inscription on the oil scraper rings (two thin ones), so they can be placed on either side, the main thing is that a so-called expander is installed between them, as shown in the photo below.
We will omit the process of installing the rings, because... there is nothing complicated there. You should only be careful when inserting the rings into the grooves, because The rings are made of high-strength cast iron and strong tensile stress may cause the rings to break. If you did everything correctly, then in the end the rings on the piston should be installed, as shown in the following photo.
At this point, all the features of installing piston rings on a four-stroke scooter have been announced; now you can install the piston in the cylinder, having previously lubricated the rings and cylinder with oil.
Installing piston rings on a 2-stroke scooter. So, let's say you purchased a new piston with rings and want to install it on your scooter. The piston kit for a two-stroke scooter comes with only two compression rings.
In some cases, depending on the scooter model, the rings may also include a so-called expander or, as it is also called, an expander. Such an expander is installed under the second (lower) ring.
Before you begin installing the rings on the piston, you need to understand where the upper compression ring is and where the lower one is. Because The rings are very different in geometry; incorrect installation of one of the rings will lead to its breakage. Please note that the top ring has an internal bevel, please inspect each ring carefully before installation. Below is an installation diagram that clearly shows where which ring should be placed, as well as where the expander is installed, if one is included in the kit.
There is nothing complicated about installing rings on the piston of a two-stroke scooter, as well as a four-stroke scooter, and many people know this. But most scooter riders who have only recently acquired such equipment have no idea how to replace the piston on a scooter, how to correctly install the rings on the piston, where the arrow on the piston should point, and much more. In this lesson, I will tell you how to properly put the rings on the piston and assemble the piston in place. Since we have already talked about four-stroke engines before, here we will talk only about two-stroke engines. So, our piston is worn out and requires replacement.
The rings and piston wear out first, and usually only those need to be replaced. If the piston is severely worn, it is necessary to bore the cylinder. It is also bored when the piston jams in the cylinder, forming deep scratches on the walls of the latter. There's nothing wrong with that, and if your new cylinder has been properly bored (for which you'll only need to shell out about $10), it will need a ring repair kit with a new piston. Such rings are marked 0.25. The second boring is 0.5, respectively, etc. to one.
After purchasing a piston, it needs to be assembled. In the kit, as a rule, you will find the piston itself, two compression rings, a third thin corrugated ring (more on its purpose later), a piston pin and two piston pin retaining rings.
Now about the third ring in the set. Its purpose is to spring the lower compression ring. It installs it directly under it, and usually does not provide any benefit during operation. You can throw this ring away or you can put it in, it makes no difference. Many piston manufacturers do not include it at all.
It's time to put everything back in place. Depending on the scooter model, compression rings may be the same or vary in thickness and cross-section. Most pistons for Honda scooters, for example, have different rings, where the upper one is thinner than the lower one and has a different cross-section.
You should definitely pay attention to this when installing; the top one is thinner and ground at an angle.
Also pay attention to the inscription on the ring (usually the letter T or repair size); the inscription should always be on top, that is, opposite to the finger. First you need to put on the bottom, then the top. There is no need to stretch or bend them. These manipulations must be carried out carefully.
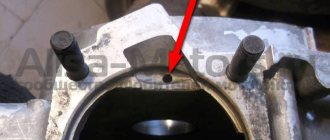
There are locks in the grooves for the rings that prevent the rings from turning during operation, so the ring gap must be in these locks, otherwise you will not stick the piston into the cylinder.
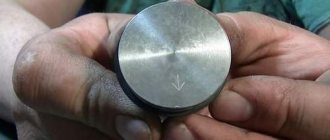
And the last important point is the arrow (1) on the bottom of the piston or the inscription EX. Both the arrow and the inscription must be directed towards the exhaust (2). In this case, the ring locks will be located on the side of the reed valve. If the locks are placed towards the exhaust, the piston will not last long, the rings will be pulled into the exhaust port and gradually grind it down.
During all manipulations with the piston, it is imperative to put a rag in the crankcase window so that nothing inadvertently gets in there; we still need a crankshaft with bearings.
When installing the piston pin, pay attention to the condition of the separator (bearing); it may need to be replaced. Before installing the piston pin, install the snap ring on one side before installing the piston (usually on the side where you won't be able to fit the pin and the second snap ring in). Then place the pin with the bearing and the second retaining ring; when fixed in the groove, it will make a certain click.
That's all, now put on the cylinder, not the piston (remembering to check the condition of the gaskets and lubricate the piston and cylinder walls with engine oil), the cylinder head and tighten the bolts one by one in a cross pattern.
If you have any questions during the piston replacement process, you can ask them in the comments field or on the forum of our website. Good luck with the repair.
There is nothing complicated about installing rings on the piston of a two-stroke scooter, as well as a four-stroke scooter, and many people know this. But most scooter riders who have only recently acquired such equipment have no idea how to replace the piston on a scooter
,
how to correctly install the rings on the piston
,
where the arrow on the piston should point
and much more. In this lesson, I will tell you how to properly put the rings on the piston and assemble the piston in place. Since we have already talked about four-stroke engines before, here we will talk only about two-stroke engines. So, our piston is worn out and requires replacement. The rings and piston wear out first, and usually only those need to be replaced. If the piston is severely worn, it is necessary to bore the cylinder. It is also bored when the piston jams in the cylinder, forming deep scratches on the walls of the latter. There's nothing wrong with that, and if your new cylinder has been properly bored (for which you'll only need to shell out about $10), it will need a ring repair kit with a new piston. Such rings are marked 0.25. The second boring is 0.5, respectively, etc. to one.
Our production
In our online store you can find and purchase new piston groups at low prices. A complete list of piston engines can be found at
Installing a piston with a larger volume than stock is perhaps the simplest, most affordable, affordable and effective way to significantly increase the maximum speed and power of a scooter. There are, of course, even more effective ways to increase maximum speed and power, but these methods, or rather the hardware, cost simply unrealistic money...
If you charge the engine of the same 139QMB to the maximum, then such tuning before the “increase” cost the client about 35,000 rubles and this does not include work.
It is clear that not everyone can afford such amounts. Yes, even if it’s affordable, what’s the point? It’s easier to buy an old branded scooter and ride it than to charge the “Chinese” and then throw it in the trash after a season. But that's what I think.
Preparation for the procedure
You need to start by cleaning the exterior of the scooter from dirt, sand, and dust. The work itself must be carried out indoors, where there is no risk of debris getting inside the mechanisms from the outside. Operations may be carried out outdoors, but subject to the following conditions:
- the air temperature should be 18-25 degrees;
- little or no wind;
- the presence of a flat, hard surface for repairs - concrete or asphalt are best suited;
- It is not recommended to open the inside of the scooter for at least two hours after turning off the engine for safety reasons.
For fastening, you will need to prepare a box with cells for each type, so as not to lose or mix up the varieties. The work may take about an hour depending on your skill level. If you lack experience, it is better to call another person for help and carefully record what was removed (and in what sequence) in order to reassemble the vehicle correctly after everything.
Preparation
So that you don’t have green snot later about the fact that the tuning piston does not fit into the crankcase and you were allegedly deceived here - remove the old piston from the engine and measure the hole for the liner with a caliper. If the hole is smaller than the tuning piston sleeve, the “meat” of the crankcase allows it, hands grow from where it is needed - a round file will help you (only before boring - disassemble the engine, assemble the empty crankcase with bolts, bore the hole, make sure that the piston enters the crankcase without problems - wash the parts from shavings and reassemble the engine. Or, as a last resort, coat the crankcase and file with grease to at least somehow protect yourself from sawdust getting into the inside of the engine.)
The hole for the 162QMK engine sleeve (such engines are installed on Chinese scabs, more popularly known as “Leika”) in stock is 65 mm. Without boring, a piston of 57mm (150CC), 61mm (1700CC) and 62mm (180CC) easily fits into this crankcase. You won’t find a 62mm piston on sale during the day, so it was decided to install a regular 61mm piston on this engine.
By the way, for those who do not know, a piston with a diameter of 61 mm can be easily installed not only on the Leica engine, but also on any other Chinese 150 equipped with a 157QMJ series engine. There, if you put your hands to it, you can stick a piston at 62mm, but only if the “meat” of the crankcase allows it. Everything is individual, you need to look at the place. In any case, the distance along the studs is the same for both the 61mm piston and the 62mm piston.
From left to right: 61mm, 57mm
On the 139QMB series engine from a regular Chinese 80-six, you can easily install a piston 39mm (45CC), 47mm (72CC), 50mm (84CC)
From left to right: 39mm (45CC), 47mm (72CC), 50mm (84CC)
Installing rings on a scooter piston
Repair |
Scooter Sooner or later, the owner of both Chinese and Japanese scooters will have to replace the piston rings. Why is this happening? This is all due to the fact that Chinese spare parts, rings in particular, wear out in 2-3 seasons. If you have a used Japanese scooter, then you can say with a high probability that it also has a Chinese piston and rings installed, since when they are transported here they are repaired and one of the frequent breakdowns is low compression. The result is a new Chinese piston with rings. Replacing piston rings is not a very difficult task. It is within the power of everyone.
Installing piston rings
Remove the set of piston rings from the box. A piston ring set for a Chinese four-stroke scooter usually consists of five items. Three of which are a single assembled oil scraper ring, the other two: upper and lower compression.
A typical set of piston rings looks something like this
Carefully unpack the kit with perfectly clean hands.
In the kit you will find two of the thinnest rings and one thick corrugated ring (expander) - this will be an assembled oil scraper ring that needs to be installed on the piston first.
We place an expander in the lowest groove of the piston
We place thin oil scraper rings in the same groove - one under the expander, the second on top of the expander
We find the lower and upper compression rings in the kit and install them, respectively, in the middle and upper grooves of the piston - with marks on the side surface to the cylinder head (cylinder head). The lower compression ring differs from the upper one in color (not always) and the shape of the working edge (always). In most kits, the lower compression ring is painted black, and its working edge has a slight bevel.
The top compression ring in the vast majority of piston ring sets is a uniform light color. But this is in most cases, and in practice it happens that the kit comes with upper compression rings that are black or even red. By and large, the color is not particularly important to us, something else is important to us: the working edge of the upper compression ring has small roundings (chamfers) on the sides, and the working surface of the edge of the upper compression ring is covered with a shiny protective coating.
For example, in this kit both compression rings are black. But the working surface of the upper compression ring is covered with a layer of protective coating, and small chamfers are removed on the edges of the working surface.
The lower compression ring has a matte working surface, and the working edge is beveled at a slight angle. All these moments are clearly visible in the photo.
The compression rings in this kit are red and black. As in the first case, the upper compression ring has chamfers on the working edge and a protective coating, and the lower one has a matte working edge beveled at an angle.
On classic piston ring sets, the upper compression ring has a light color and a rounded working edge. The bottom is dark in color and the working edge is beveled at a slight angle.
When installing the piston rings, do not forget about the marks. The marks on the rings after installation on the piston should be oriented towards the cylinder head (cylinder head).
Photo report: Installing a tuning piston on a Chinese 4T scooter
Installing a piston with a larger volume than stock is perhaps the simplest, most affordable, affordable and effective way to significantly increase the maximum speed and power of a scooter. There are, of course, even more effective ways to increase maximum speed and power, but these methods, or rather the hardware, cost simply unrealistic money...
If you charge the engine of the same 139QMB to the maximum, then such tuning before the “increase” cost the client about 35,000 rubles and this does not include work.
It is clear that not everyone can afford such amounts. Yes, even if it’s affordable, what’s the point? It’s easier to buy an old branded scooter and ride it than to charge the “Chinese” and then throw it in the trash after a season. But that's what I think.
Preparation
So that you don’t have green snot later about the fact that the tuning piston does not fit into the crankcase and you were allegedly deceived here - remove the old piston from the engine and measure the hole for the liner with a caliper. If the hole is smaller than the tuning piston sleeve, the “meat” of the crankcase allows it, hands grow from where it is needed - a round file will help you (only before boring - disassemble the engine, assemble the empty crankcase with bolts, bore the hole, make sure that the piston enters the crankcase without problems - wash the parts from shavings and reassemble the engine. Or, as a last resort, coat the crankcase and file with grease to at least somehow protect yourself from sawdust getting into the inside of the engine.)
The hole for the 162QMK engine sleeve (such engines are installed on Chinese scabs, more popularly known as “Leika”) in stock is 65 mm. Without boring, a piston of 57mm (150CC), 61mm (1700CC) and 62mm (180CC) easily fits into this crankcase. You won’t find a 62mm piston on sale during the day, so it was decided to install a regular 61mm piston on this engine.
By the way, for those who do not know, a piston with a diameter of 61 mm can be easily installed not only on the Leica engine, but also on any other Chinese 150 equipped with a 157QMJ series engine. There, if you put your hands to it, you can stick a piston at 62mm, but only if the “meat” of the crankcase allows it. Everything is individual, you need to look at the place. In any case, the distance along the studs is the same for both the 61mm piston and the 62mm piston.
From left to right: 61mm, 57mm
On the 139QMB series engine from a regular Chinese 80-six, you can easily install a piston 39mm (45CC), 47mm (72CC), 50mm (84CC)
From left to right: 39mm (45CC), 47mm (72CC), 50mm (84CC)
Installing piston rings
Remove the set of piston rings from the box. A piston ring set for a Chinese four-stroke scooter usually consists of five items. Three of which are a single assembled oil scraper ring, the other two: upper and lower compression.
A typical set of piston rings looks something like this
Or so
Carefully unpack the kit with perfectly clean hands.
In the kit you will find two of the thinnest rings and one thick corrugated ring (expander) - this will be an assembled oil scraper ring that needs to be installed on the piston first.
We place an expander in the lowest groove of the piston
We place thin oil scraper rings in the same groove - one under the expander, the second on top of the expander
We find the lower and upper compression rings in the kit and install them, respectively, in the middle and upper grooves of the piston - with marks on the side surface to the cylinder head (cylinder head). The lower compression ring differs from the upper one in color (not always) and the shape of the working edge (always). In most kits, the lower compression ring is painted black, and its working edge has a slight bevel.
Tags
The top compression ring in the vast majority of piston ring sets is a uniform light color. But this is in most cases, and in practice it happens that the kit comes with upper compression rings that are black or even red. By and large, the color is not particularly important to us, something else is important to us: the working edge of the upper compression ring has small roundings (chamfers) on the sides, and the working surface of the edge of the upper compression ring is covered with a shiny protective coating.
For example, in this kit both compression rings are black. But the working surface of the upper compression ring is covered with a layer of protective coating, and small chamfers are removed on the edges of the working surface.
The lower compression ring has a matte working surface, and the working edge is beveled at a slight angle. All these moments are clearly visible in the photo.
The compression rings in this kit are red and black. As in the first case, the upper compression ring has chamfers on the working edge and a protective coating, and the lower one has a matte working edge beveled at an angle.
On classic piston ring sets, the upper compression ring has a light color and a rounded working edge. The bottom is dark in color and the working edge is beveled at a slight angle.
When installing the piston rings, do not forget about the marks. The marks on the rings after installation on the piston should be oriented towards the cylinder head (cylinder head).
Piston installation
Insert a retaining ring into any boss of the piston pin. It is most convenient to insert the ring with small round nose pliers. After installation, check how well and tightly the retaining ring fits.
- If the retaining ring does not cover the entire surface, but only a small part of it, replace it with a new one.
- If the retaining ring does not lie tightly in the groove and dangles, straighten it a little
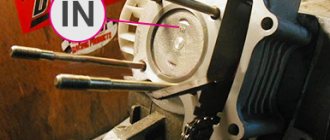
Lubricate the bearings of the lower and upper connecting rod heads and the piston pin bosses with clean engine oil. We put the piston on the connecting rod, orienting it with the “IN” mark to the inlet port; if there is an “arrow” on the piston instead of the “IN” mark, orient the arrow to the exhaust port. We insert the piston pin into the boss - orient the piston on the connecting rod so that the pin hits the connecting rod - install the pin all the way into the locking ring and secure it from falling out with the second locking ring.
We install the cylinder guide bushings on the studs and put on the gasket. It is advisable to place the gasket on the sealant, but without fanaticism.
Piston ring lock alignment
- Place the lower oil scraper ring lock opposite the red arrow
- Place the upper oil scraper lock opposite the blue arrow
- We place the lock of the lower compression ring opposite the yellow arrow
- We place the lock of the upper compression ring opposite the green arrow
Cylinder installation
Fill the rings and piston with clean engine oil. We tighten the piston rings with a clamp. We cut the clamp from a piece of any sheet metal - cut out a strip of the required length, give it a profile along the piston and make a retainer from the same piece of sheet metal.
Lubricate the cylinder mirror with clean engine oil
We hook the timing chain with a piece of wire, pull the chain through the cylinder and put the cylinder on the studs.
Very carefully and slowly insert the piston into the cylinder. After the rings are completely inserted into the cylinder, unfasten the clamp and install the cylinder into the crankcase.
Setting the valve timing ch1 (in collective farm style - ignition)
We push the cylinder all the way into the crankcase and set the piston to top dead center (TDC). It is best to set the piston at TDC using an indicator or, at worst, visually/touch. You can also align the piston according to a special mark on the generator rotor, but I have more than once encountered the fact that the marks on some engines are stamped incorrectly and, in order to avoid troubles, I advise you to use them only as a last resort, for example, when the cylinder head is not removed and you need to adjust valve
We insert the cylinder head guide bushings and the lower timing chain guide into the cylinder, degrease the surface and install the gasket.
We install the cylinder head, insert the valve bed guide bushings.
Setting the valve timing ch2 (in collective farm style - ignition)
Without knocking the piston off from TDC, we orient the camshaft so that the large hole and marks on its sprocket become as shown in the photo and, while putting on the chain, install the camshaft in bed.
Ideally, the marks on the sprocket should be strictly parallel to the plane of the valve cover connector. In practice, unfortunately, such accuracy is difficult to achieve. And this is mainly due to the stretching of the timing chain. And there’s nothing you can do about it - either change the timing chain to a new one or catch the phase by switching the teeth, but this method of setting the valve timing is not acceptable to me personally.
We orient the camshaft bed with a mark in the form of the letters “E” and “X” towards the exhaust channel and install the bed.
Tighten the bed nuts crosswise and then tighten the two bolts on the side boss of the cylinder head.
Installing the timing chain tensioner
If you have a 157QMJ series engine, do the following: unscrew the plug on the tensioner body; We insert a thin flat screwdriver into it and begin to tighten the bolt until the tensioner rod goes inside the body.
Without releasing the screwdriver while simultaneously holding the tensioner body, with your free fingers, insert the tensioner into the cylinder, screw it in with bolts, and only then release the screwdriver and screw the plug into place.
If you have a 139QMB series engine, then do this: unscrew the plug from the tensioner housing and remove the spring; push the rod inside the body; install the tensioner in the cylinder; insert the spring into the housing and screw in the plug.
After installing the piston, do not forget to adjust the thermal clearances of the valves and break in the engine.
alisa-motors.ru
Piston installation
Insert a retaining ring into any boss of the piston pin. It is most convenient to insert the ring with small round nose pliers. After installation, check how well and tightly the retaining ring fits.
- If the retaining ring does not cover the entire surface, but only a small part of it, replace it with a new one.
- If the retaining ring does not lie tightly in the groove and dangles, straighten it a little
Lubricate the bearings of the lower and upper connecting rod heads and the piston pin bosses with clean engine oil. We put the piston on the connecting rod, orienting it with the “IN” mark to the inlet port; if there is an “arrow” on the piston instead of the “IN” mark, orient the arrow to the exhaust port. We insert the piston pin into the boss - orient the piston on the connecting rod so that the pin hits the connecting rod - install the pin all the way into the locking ring and secure it from falling out with the second locking ring.
We install the cylinder guide bushings on the studs and put on the gasket. It is advisable to place the gasket on the sealant, but without fanaticism.
How to properly install a piston on a scooter
The new piston is equipped with a pin, two retaining rings and additional rings. If the scooter is 2-stroke, then the number of additional rings is 2. In 4-stroke engines, 3 rings are almost always installed, one of which is an oil scraper ring. Let's look at installing a piston and rings using the example of a 2-stroke scooter. First, two compression rings are placed on the piston in special grooves. Next, we use the so-called “finger” to connect the piston and crankshaft; the fastener is considered complete after installing 2 retaining rings on both sides of the finger. The rings should fit tightly in the intended holes. Remember: the arrow on the piston should point downward, towards the floor. The “processes” described above are not complicated if you look at them. It is best to watch a training video or read the scooter maintenance instructions. Then, for sure, questions like “How to install rings on a scooter piston” will not arise.
Cylinder installation
Fill the rings and piston with clean engine oil. We tighten the piston rings with a clamp. We cut the clamp from a piece of any sheet metal - cut out a strip of the required length, give it a profile along the piston and make a retainer from the same piece of sheet metal.
Lubricate the cylinder mirror with clean engine oil
We hook the timing chain with a piece of wire, pull the chain through the cylinder and put the cylinder on the studs.
Very carefully and slowly insert the piston into the cylinder. After the rings are completely inserted into the cylinder, unfasten the clamp and install the cylinder into the crankcase.
Signs of a CPG malfunction
To determine the breakdown of the piston group, you do not need to have complex measuring instruments. It is enough to pay attention to the following symptoms:
- the ringing of piston rings is heard;
- The scooter does not start on the first try. You have to perform the operation several times to achieve the result;
- rapid emptying of the gas tank due to excessive fuel consumption;
- noises are heard in the cylinder/motor that were not there;
- the vehicle operates unstably at idle speed;
- general reduction in power;
- sudden shutdown.
Additional signs include too much smoke and lack of resistance when trying to start the scooter's engine. After disassembling (detailed list of actions below) the motor can be seen on the piston cylinder with black traces - this is carbon deposits. This indicates a loose fit of the pistons to the cylinder walls, as a result of which gases constantly escaped from the inside, which reduced the overall pressure.
Old piston with signs of carbon deposits
In the case of a four-stroke engine, the signs of a CPG failure are slightly different:
- presence of thick black/blue smoke;
- increased oil consumption;
- change in power (this indicator can only be determined during diagnostics, since on a 4-stroke engine the change in parameter may not be immediately noticeable);
- inability to start the scooter the first time even with a cold engine.
If these problems are observed, it makes sense to disassemble the vehicle in order to reduce repair costs in the future due to malfunctions of other parts caused by the lack of replacement of the CPG.
Setting the valve timing ch1 (in collective farm style - ignition)
We push the cylinder all the way into the crankcase and set the piston to top dead center (TDC). It is best to set the piston at TDC using an indicator or, at worst, visually/touch. You can also align the piston according to a special mark on the generator rotor, but I have more than once encountered the fact that the marks on some engines are stamped incorrectly and, in order to avoid troubles, I advise you to use them only as a last resort, for example, when the cylinder head is not removed and you need to adjust valve
We insert the cylinder head guide bushings and the lower timing chain guide into the cylinder, degrease the surface and install the gasket.
We install the cylinder head, insert the valve bed guide bushings.
About the device and operation of the car
Deterioration in traction, a drop in maximum speed, blue smoke from the muffler and weak dynamics of the scooter are a sure sign of worn piston rings or a worn cylinder-piston group. Most often they wear out because The diameter of the piston group in scooters is small, the working area of the rings is very small and therefore they do not run for so long.
One easy fix for a motorcyclist is to install new motorcycle pistons. If you remove the pistons and the damage becomes more severe, you may need to restart the engine. Then you will need new piston rings. In both cases the procedure is the same.
Step 1 - Prepare the Pistons and Cylinders
Remove the engine cover and pistons. Pull the pistons up and to the side. Check pistons and cylinders for wear or damage. If you find that they need a reboot, take them to a machine shop for work. When you get the re-smothered cylinders back, wash them well with soap and water. Dry them, then clean and lubricate the cylinders. Clean the pistons by wiping them.
So, if you are faced with the need to replace piston rings on a scooter, and in addition to the main problem that they need to be changed, there is another one - how to correctly put the rings on the piston. You can't just take any ring and put it in any of the "grooves" on the piston. You need to understand which ring is the upper compression ring, which is the lower compression ring, and also how to correctly install the oil scraper ring.
Wipe down the rings, making sure they are clean and smooth. You will see that each ring has a very small gap, which is as recommended by the engine manufacturer and depends on the size of the hole. This can vary from 0.08 to 25 mm. You measure it by placing the ring in the cylinder and pressing it half an inch from the top of the cylinder. Using a piston to do this, square the ring, and guarantee and accurate measurement. If the rings are out of specification, correct them by carefully finishing the ends of the ring.
Step 3 - Install Piston Rings
Piston rings are hard and brittle and break easily. You can use a ring expander to stretch the rings for the piston, or you can use your fingers. The danger of using a ring expander is that it expands the ring and locks it into place. Different types of motors use different numbers of rings. On a four-stroke engine, you can have one whole ring or a three-piece ring. One at a time, slide the rings down the piston and into the grove near the top. Be careful not to twist or overlap them.
Installing piston rings on a 4-stroke Chinese scooter. The photo below shows which piston ring is which.
As you may have noticed, the piston ring set consists of two compression rings (upper and lower), as well as an oil scraper ring, which consists of two regular (thin) rings and a central expander.
The second compression ring is dark black
color, as well as unique (beveled) geometry.
Step 4 - Replace the Pistons and Engine Top
If you are using a three-piece ring, space the gaps around the piston half by one-third to maintain compression.
Make sure that the entire surface of the rings, pistons and cylinders is well lubricated with oil. Replace the pistons and engine cover, changing the pattern you used when you removed them. Always use the recommended size piston ring. Trying to improve engine compression with an oversized ring results in an incomplete seal between the piston and cylinder. Step 4 - Install the Barrel: Slide the new base gasket over the piston. This gasket only fits in one direction due to the cylinder studs.
The color of the rings may vary among different manufacturers, for example, for the CMR company - the lower compression ring is red
color.
The following diagram shows the correct placement of the rings.
Clean and check the hole for dust or other contaminants. Rub some lubricating oil around the lubrication hole. Gently begin to slide down the trunk onto the cylindrical pins. The barrel can only go in one way and continues with the sleeve towards the body. Once the tube is down on the piston enough to hit the first ring, you will need to squeeze the ring to get into the barrel.
Installing piston rings
Make sure that if the rings are rotated, the ends will return to align with the rings. Gently squeeze the rings with your fingers as you slide the bushing down the piston. Once one ring is in the barrel, you can switch to the second ring and use the same idea. Slide the barrel to the end of the piston and turn the flywheel to ensure the piston moves freely in the bore.
You can see inscriptions on the compression rings, they may be different depending on the brand of the rings, but their essence is the same - installation of the rings should be done with the inscriptions
UP
! Those. the inscriptions must be directed towards the cylinder head. As a rule, there is no inscription on the oil scraper rings (two thin ones), so they can be placed on either side, the main thing is that a so-called expander is installed between them, as shown in the photo below. We will omit the process of installing the rings, because... there is nothing complicated there. You should only be careful when inserting the rings into the grooves, because The rings are made of high-strength cast iron and strong tensile stress may cause the rings to break. If you did everything correctly, then in the end the rings on the piston should be installed, as shown in the following photo.
Once the barrel is in place and pressed onto the body, you can install a simple aluminum spacer. This only fits in one direction due to the placement of the cylinders. And add a washer and nut to each stud. One pin receives a special clutch nut into which the barrel hood is screwed. Tighten the nuts securely by hand only.
This image has been flipped to show what the head looks like with the engine mounted in the frame. This system makes it very unlikely that the head will become deformed when tightened. The green arrow shows the location of the connector nut. Finally, install the spark plug, cylinder head and start the engine.
At this point, all the features of installing piston rings on a four-stroke scooter have been announced; now you can install the piston in the cylinder, having previously lubricated the rings and cylinder with oil.
Installing piston rings on a 2-stroke scooter. So, let's say you purchased a new piston with rings and want to install it on your scooter. The piston kit for a two-stroke scooter comes with only two compression rings.
Installing rings on a scooter piston video
Breaking into the piston carefully is the best way to ensure long life from your top end. It's a very common mistrust of tuners that two of the easiest tuning improvements are cutting off the piston skirt and removing the lower piston ring. Most believe that these actions result in reduced friction, which improves cooling and therefore increases engine power. However, in most cases these modifications will result in piston seizure without any noticeable increase in power.
In some cases, depending on the scooter model, the rings may also include a so-called expander or, as it is also called, an expander. Such an expander is installed under the second (lower) ring.
Why do some pistons have one ring while others have two?
Especially on tall racing cylinders you will find pistons with a single piston ring. Let's first understand the benefits of a single piston ring. However, as always, there are disadvantages to using a single piston ring.
- One piston ring reduces compression.
- One piston ring makes the piston unstable.
When removing the second ring from two annular pistons, two important assumptions can be made.
Why do racing pistons have a shorter skirt than the original ones?
The piston will last shorter and also increase the stress on the cylinder due to its instability.
Compression losses must be equalized elsewhere. . The first assumption explains why we only find reciprocating piston pistons in aluminum cylinders. The second assumption tells us that we need to take material from the cylinder head to achieve at least the same compression as an engine with two piston rings. It is not necessary that racing pistons always have a shorter skirt.
Before you begin installing the rings on the piston, you need to understand where the upper compression ring is and where the lower one is. Because The rings are very different in geometry; incorrect installation of one of the rings will lead to its breakage. Please note that the top ring has an internal bevel, please inspect each ring carefully before installation. Below is an installation diagram that clearly shows where which ring should be placed, as well as where the expander is installed, if one is included in the kit.
During the operation of the scooter, various breakdowns occur. It doesn’t matter at all who the manufacturer is (Japan or China). The difference is that one vehicle breaks down earlier, while the other breaks down over time. Problems can occur with the wiring, engine, or chassis. But, as a rule, almost everyone is faced with replacing the CPG. This abbreviation implies the term “cylinder-piston group” or, as people say, “piston group”. Looking ahead, it must be said that replacing the piston, piston and rings separately is not as difficult a task as it might seem at first glance. It is also worth knowing that the process of removing and replacing the CPG is almost the same on all scooters. Therefore, the article will discuss the main points. Looking ahead, let us remind you that the power of the CPG can vary. It is recommended to install a piston engine with the same power as a standard CPG.
It can be said that racing pistons have never had a piston skirt longer than necessary. The secret is what you need. Obviously, durability is much more important for an original or eco-friendly racing cylinder than for a pure racing cylinder. However, we are running our cast iron cylinder issue again, which means our original cylinders are too soft to handle the increased instability of a shortened piston skirt.
These changes should not reduce the maximum piston length and you only need to reduce the necessary parts. The picture on the left shows the idea.
Although racing cylinders confirm that you can fit a single piston ring and a shorter skirt, this is not necessarily true for your set of cylinders. Both changes reduce the durability of the cylinder set and destabilize the piston. Additionally, removing the piston ring also reduces compression, and this loss of compression must be matched elsewhere.
Preparatory moments
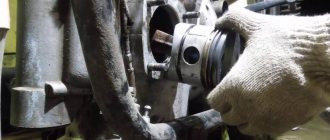
Before replacing the piston or rings (CPG in total), you need to get to the cylinder. For beginners who have no idea where this element is located, we will tell you. The muffler is just bolted to the cylinder. If you have no idea how to correctly install the piston on a 4t or 2t scooter, then first you need to remove the old CPG. The upcoming repairs can be divided into the following stages:
Piston skirt parts, however, can be removed when they interfere with flow at piston bottom dead center. However, this is not currently applicable to cable driven motors. Genuine Scooters are sold through our network of Genuine Authorized Dealers. Our list of dealers is always growing. There may not be a dealer near you, but that could change very soon.
We do not ship directly to customers. To better serve you, we have created a nationwide network of authorized dealers. A genuine authorized dealer will properly prepare and inspect your scooter to ensure it is in top working condition. They can also inform you about the operation, routine maintenance, local licensing requirements, proper safety equipment, and how fun and safe the driver experience is. Only your local authorized dealer can provide you with the service, support and warranty support you expect from a premium product.
- Removing the scooter trim (plastic);
- Disconnecting electrical wires;
- Disconnect the oil hose;
- Engine dismantling;
- Removing the old piston, rings (CPG in total);
- Installation of new parts;
- Engine installation, wire connections and hose;
- Plastic fastener.
The plastic is folded to the side so as not to be crushed if careless. All bolts and screws are placed in a pile and, if necessary, sorted separately. After making sure that all hoses with gasoline and oil are disconnected, remove the engine. It is necessary to understand that engine removal differs depending on the design features of the scooter model. Once the engine is removed, you can begin to remove the plastic casing, which protects the CPG from external factors. Then remove the cylinder head. It is secured with 4 bolts. In order not to break the thread, all bolts are unscrewed crosswise.
Do I need a special license to ride a scooter?
This depends on state laws and regulations. In many states, a standard driver's license is all that is needed to legally operate a 50cc. See either a displacement scooter or a moped. In most states, any scooter overloaded with more than 50cc. See, requires special licensing for legal work.
How to get a motorcycle license?
Please check your state's rules and regulations. Typically, you will first go to your local department of motor vehicle and take a written test. Once you pass the test, you will be issued a learner's permit, which will allow you to legally ride with a licensed rider during the day.
We remove the cylinder and immediately inspect it. If there is no damage, then it can continue to be used. While the piston most likely cannot be used back.
How to properly install a piston on a scooter
The new piston is equipped with a pin, two retaining rings and additional rings. If the scooter is 2-stroke, then the number of additional rings is 2. In 4-stroke engines, 3 rings are almost always installed, one of which is an oil scraper ring. Let's look at installing a piston and rings using the example of a 2-stroke scooter. First, two compression rings are placed on the piston in special grooves. Next, we use the so-called “finger” to connect the piston and crankshaft; the fastener is considered complete after installing 2 retaining rings on both sides of the finger. The rings should fit tightly in the intended holes. Remember: the arrow on the piston should point downward, towards the floor. The “processes” described above are not complicated if you look at them. It is best to watch a training video or read the scooter maintenance instructions. Then, for sure, questions like “How to install rings on a scooter piston” will not arise.
An alternative is to register for an accredited riding class, such as those organized by the Motorcycle Safety Foundation. There is usually a small fee required for the course. Motorcycles with low mobility are usually provided, but many riding courses are adding scooters to their fleets. It is also possible to obtain permission to use your own scooter. You will need to bring your own helmet, gloves, long sleeve shirt, long pants and ankle boots. Friday evenings typically feature classroom instruction where you can learn useful information about riding safely and skillfully in a wide variety of situations and weather conditions.
Cylinder installation
This is the final stage and must be approached with caution. After all, if the fastening is incorrect, the slightest gap will not provide the necessary compression. As a result, the scooter will not start. Install a gasket between the engine and the cylinder, and between the cylinder and its head. The head is clamped with bolted connections crosswise. It is easy to check the correctness of the work performed. To do this, you need to start the engine. If the motor runs smoothly, everything is done correctly. You can also make a few efforts with the kick starter to feel the compression.
Saturday usually starts with a short class session, followed by several hours of riding exercises. The exercise is conducted on cone courses at low speeds in a parking lot separated from vehicular traffic. The class ends with a riding test. As an added bonus, many insurance companies offer discounted rates for taking a safety course.
Aren? Are 2 stroke scooters illegal?
You should check with your state licensing agency for the laws that apply to you. These are the 50 states that have the right to own and operate. Due to their small size, scooter engines are much more sensitive to fuel and fuel contaminants than a car. Fuel passages in Scooters are small. Fuel that is great for a car can clog a scooter if it is left sitting for a longer period of time. Scooters are often driven short distances at slower speeds.
As you have already killed yourself, there is nothing complicated. Installing rings on a scooter piston and replacing the CPG in total do not require any special knowledge. All you need are details, time and desire.
Video
Setting the valve timing ch2 (in collective farm style - ignition)
Without knocking the piston off from TDC, we orient the camshaft so that the large hole and marks on its sprocket become as shown in the photo and, while putting on the chain, install the camshaft in bed.
Ideally, the marks on the sprocket should be strictly parallel to the plane of the valve cover connector. In practice, unfortunately, such accuracy is difficult to achieve. And this is mainly due to the stretching of the timing chain. And there’s nothing you can do about it - either change the timing chain to a new one or catch the phase by switching the teeth, but this method of setting the valve timing is not acceptable to me personally.
We orient the camshaft bed with a mark in the form of the letters “E” and “X” towards the exhaust channel and install the bed.
Tighten the bed nuts crosswise and then tighten the two bolts on the side boss of the cylinder head.
Installing the timing chain tensioner
If you have a 157QMJ series engine, do the following: unscrew the plug on the tensioner body; We insert a thin flat screwdriver into it and begin to tighten the bolt until the tensioner rod goes inside the body.
Without releasing the screwdriver while simultaneously holding the tensioner body, with your free fingers, insert the tensioner into the cylinder, screw it in with bolts, and only then release the screwdriver and screw the plug into place.
If you have a 139QMB series engine, then do this: unscrew the plug from the tensioner housing and remove the spring; push the rod inside the body; install the tensioner in the cylinder; insert the spring into the housing and screw in the plug.
After installing the piston, do not forget to adjust the thermal clearances of the valves and break in the engine.
It is worth noting that durable and trouble-free operation of the piston largely depends on the correct installation of the rings. There is absolutely no need for haste and dirt in this matter. Do everything carefully (for yourself, after all), slowly and most importantly: keep it clean!
First, let's take a little look at what a standard set of piston rings for a four-stroke scooter engine is. The standard kit consists of: two compression rings (upper and lower) and one oil scraper ring, which in our case has a collapsible design.
A set of piston rings for a two-stroke scooter engine differs from the previous one in the absence of an oil scraper ring; also, a set of rings for a two-stroke engine may include an expander (marked with an arrow).
So, we have more or less figured out the kits - it’s time to get down to business. We prepare in advance small strips of tin or thin plastic, with their help we will put the rings on the piston.
We thoroughly wash the rings and piston; when installing new rings on a used piston, do not forget to clean its grooves from carbon deposits, otherwise the new rings will not fit into the cylinder. We prepare a clean workplace and perform the installation.
We take the oil scraper ring expander from the kit and place it in the lowest groove of the piston.
In the same way, we install the expander from the kit for a two-stroke engine (if any), with the only difference being that the expander lock should be located in the area of the locking pin (marked with an arrow) of the piston groove.
We look for marks on the rings, apply pre-prepared strips to the piston, very carefully and slowly pull the rings along our strips onto the piston, in this order: first we put on the oil scraper ring, then we put on the second oil scraper ring, then we put on the lower compression ring (dark) and only then put on the upper compression ring (light). The marks on the rings after installation should be located upward towards the cylinder head.
We straighten the rings so that they stand exactly opposite their grooves and slowly pull out our strips from under them. Now the main thing: after you have pulled out the strips and the rings are in their grooves without fail, check each ring for mobility. The rings in the piston grooves should rotate freely in different directions.
The oil scraper ring should look something like this after installation:
After installation, the marks must be directed strictly towards the cylinder head.
Immediately before installing the piston into the cylinder, the piston ring locks must be moved apart in the correct order. This is done like this:
We unfold the upper compression ring so that its lock moves relative to the piston pin axis by approximately 45 degrees, and unfold the lower compression ring so that its lock moves approximately 180 degrees relative to the lock of the upper compression ring.
We rotate the upper oil scraper ring lock 90 degrees relative to the lower compression ring lock, and rotate the lower oil scraper ring lock 180 degrees relative to the upper oil scraper ring.
The photo shows approximately how the piston ring locks of a four-stroke engine should be positioned:
Red marks indicate compression ring locks. Blue marks indicate oil scraper ring locks.
Before final installation of the piston, the piston ring locks of a two-stroke engine must be positioned strictly in the center of the locking pins.
How to replace rings on a scooter cylinder
Sooner or later, the owner of a scooter is faced with wear on the piston rings. You can change them yourself. There is nothing complicated about installing rings on a piston; you just need to know how to do it correctly. Despite the fact that there are quite a lot of installation recommendations on the Internet, I decided to join them and tell you how I do it.
First of all, you need to determine where the ring is down and where the top is. By top we mean the part facing the piston head. The first way to determine: you need to inspect the ring and find some kind of letter or number engraving on it, for example, UP or N. The engraving is always applied to the upper side of the ring.
If there is no engraving (this can also happen), you need to follow the second method. The cross-section of the ring is not flat, but slightly curved. If you place the ring so that its outer rim is slightly higher and the inner rim is slightly lower (as in the picture), then this is the correct position of the ring. That is, the imaginary continuation of the cone should be directed upside down.
Rings can be of different thicknesses, for example, 1.3 mm and 1.5 mm. Before you put the rings on the cylinder, measure which ring fits which groove. It may also happen that you bought 1.3 mm and 1.5 mm rings, but on the cylinder both grooves have a size of 1.3 mm. In this case, the thick ring is unsuitable for installation. You can buy another set of the same and use a thin ring from it. It doesn’t matter which ring goes up and which goes down – there is no difference between the rings.
If you are installing rings on an old piston, I recommend that you clean the piston of carbon deposits before installation.
Now we put on the ring. First, we insert the ring's tendril into the groove near the lock:
Then we set it down:
We continue to plant further:
Until the ring is completely seated in the groove:
This was the top ring example. With the lower one, everything is done in exactly the same way, only the upper groove will be an intermediate point. That is, it is better to first put the ring on the upper groove and then move it down, so there is less risk of breaking the ring due to inexperience. Sometimes a special spacer ring-spring is placed under the lower ring (if it is included in the kit). Because it is springy, this ring is a breeze to put on.
Please note: This article and the images in it are subject to copyright. Partial or complete reproduction on other resources without permission is prohibited.
scooter777.ru