Deterioration in traction, a drop in maximum speed, blue smoke from the muffler and weak dynamics of the scooter are a sure sign of worn piston rings or a worn cylinder-piston group. Most often they wear out because The diameter of the piston group in scooters is small, the working area of the rings is very small and therefore they do not run for so long.
So, if you are faced with the need to replace piston rings on a scooter, and in addition to the main problem that they need to be changed, there is another one - how to correctly put the rings on the piston. You can't just take any ring and put it in any of the "grooves" on the piston. You need to understand which ring is the upper compression ring, which is the lower compression ring, and also how to correctly install the oil scraper ring.
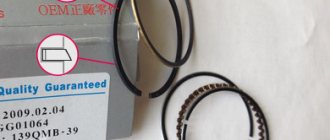
Installing piston rings on a 4-stroke Chinese scooter. The photo below shows which piston ring is which.
As you may have noticed, the piston ring set consists of two compression rings (upper and lower), as well as an oil scraper ring, which consists of two regular (thin) rings and a central expander.
The second compression ring is dark black
color, as well as unique (beveled) geometry.
The color of the rings may vary among different manufacturers, for example, for the CMR company - the lower compression ring is red
color.
The following diagram shows the correct placement of the rings.
You can see inscriptions on the compression rings, they may be different depending on the brand of the rings, but their essence is the same - installation of the rings should be done with the inscriptions UP
! Those. the inscriptions must be directed towards the cylinder head.
As a rule, there is no inscription on the oil scraper rings (two thin ones), so they can be placed on either side, the main thing is that a so-called expander is installed between them, as shown in the photo below.
We will omit the process of installing the rings, because... there is nothing complicated there. You should only be careful when inserting the rings into the grooves, because The rings are made of high-strength cast iron and strong tensile stress may cause the rings to break. If you did everything correctly, then in the end the rings on the piston should be installed, as shown in the following photo.
At this point, all the features of installing piston rings on a four-stroke scooter have been announced; now you can install the piston in the cylinder, having previously lubricated the rings and cylinder with oil.
Installing piston rings on a 2-stroke scooter. So, let's say you purchased a new piston with rings and want to install it on your scooter. The piston kit for a two-stroke scooter comes with only two compression rings.
In some cases, depending on the scooter model, the rings may also include a so-called expander or, as it is also called, an expander. Such an expander is installed under the second (lower) ring.
Before you begin installing the rings on the piston, you need to understand where the upper compression ring is and where the lower one is. Because The rings are very different in geometry; incorrect installation of one of the rings will lead to its breakage. Please note that the top ring has an internal bevel, please inspect each ring carefully before installation. Below is an installation diagram that clearly shows where which ring should be placed, as well as where the expander is installed, if one is included in the kit.
There is nothing complicated about installing rings on the piston of a two-stroke scooter, as well as a four-stroke scooter, and many people know this. But most scooter riders who have only recently acquired such equipment have no idea how to replace the piston on a scooter, how to correctly install the rings on the piston, where the arrow on the piston should point, and much more. In this lesson, I will tell you how to properly put the rings on the piston and assemble the piston in place. Since we have already talked about four-stroke engines before, here we will talk only about two-stroke engines. So, our piston is worn out and requires replacement.
The rings and piston wear out first, and usually only those need to be replaced. If the piston is severely worn, it is necessary to bore the cylinder. It is also bored when the piston jams in the cylinder, forming deep scratches on the walls of the latter. There's nothing wrong with that, and if your new cylinder has been properly bored (for which you'll only need to shell out about $10), it will need a ring repair kit with a new piston. Such rings are marked 0.25. The second boring is 0.5, respectively, etc. to one.
After purchasing a piston, it needs to be assembled. In the kit, as a rule, you will find the piston itself, two compression rings, a third thin corrugated ring (more on its purpose later), a piston pin and two piston pin retaining rings.
Now about the third ring in the set. Its purpose is to spring the lower compression ring. It installs it directly under it, and usually does not provide any benefit during operation. You can throw this ring away or you can put it in, it makes no difference. Many piston manufacturers do not include it at all.
It's time to put everything back in place. Depending on the scooter model, compression rings may be the same or vary in thickness and cross-section. Most pistons for Honda scooters, for example, have different rings, where the upper one is thinner than the lower one and has a different cross-section.
You should definitely pay attention to this when installing; the top one is thinner and ground at an angle.
Also pay attention to the inscription on the ring (usually the letter T or repair size); the inscription should always be on top, that is, opposite to the finger. First you need to put on the bottom, then the top. There is no need to stretch or bend them. These manipulations must be carried out carefully.
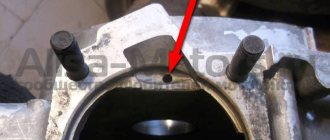
There are locks in the grooves for the rings that prevent the rings from turning during operation, so the ring gap must be in these locks, otherwise you will not stick the piston into the cylinder.
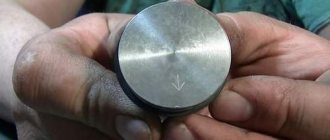
And the last important point is the arrow (1) on the bottom of the piston or the inscription EX. Both the arrow and the inscription must be directed towards the exhaust (2). In this case, the ring locks will be located on the side of the reed valve. If the locks are placed towards the exhaust, the piston will not last long, the rings will be pulled into the exhaust port and gradually grind it down.
During all manipulations with the piston, it is imperative to put a rag in the crankcase window so that nothing inadvertently gets in there; we still need a crankshaft with bearings.
When installing the piston pin, pay attention to the condition of the separator (bearing); it may need to be replaced. Before installing the piston pin, install the snap ring on one side before installing the piston (usually on the side where you won't be able to fit the pin and the second snap ring in). Then place the pin with the bearing and the second retaining ring; when fixed in the groove, it will make a certain click.
That's all, now put on the cylinder, not the piston (remembering to check the condition of the gaskets and lubricate the piston and cylinder walls with engine oil), the cylinder head and tighten the bolts one by one in a cross pattern.
If you have any questions during the piston replacement process, you can ask them in the comments field or on the forum of our website. Good luck with the repair.
There is nothing complicated about installing rings on the piston of a two-stroke scooter, as well as a four-stroke scooter, and many people know this. But most scooter riders who have only recently acquired such equipment have no idea how to replace the piston on a scooter
,
how to correctly install the rings on the piston
,
where the arrow on the piston should point
and much more. In this lesson, I will tell you how to properly put the rings on the piston and assemble the piston in place. Since we have already talked about four-stroke engines before, here we will talk only about two-stroke engines. So, our piston is worn out and requires replacement. The rings and piston wear out first, and usually only those need to be replaced. If the piston is severely worn, it is necessary to bore the cylinder. It is also bored when the piston jams in the cylinder, forming deep scratches on the walls of the latter. There's nothing wrong with that, and if your new cylinder has been properly bored (for which you'll only need to shell out about $10), it will need a ring repair kit with a new piston. Such rings are marked 0.25. The second boring is 0.5, respectively, etc. to one.
Our production
In our online store you can find and purchase new piston groups at low prices. A complete list of piston engines can be found at
Installing a piston with a larger volume than stock is perhaps the simplest, most affordable, affordable and effective way to significantly increase the maximum speed and power of a scooter. There are, of course, even more effective ways to increase maximum speed and power, but these methods, or rather the hardware, cost simply unrealistic money...
If you charge the engine of the same 139QMB to the maximum, then such tuning before the “increase” cost the client about 35,000 rubles and this does not include work.
It is clear that not everyone can afford such amounts. Yes, even if it’s affordable, what’s the point? It’s easier to buy an old branded scooter and ride it than to charge the “Chinese” and then throw it in the trash after a season. But that's what I think.
Design and principle of operation
The fundamental elements are two pulleys and, accordingly, a belt. The cut belt has a trapezoidal shape. The name of the belt (V-belt) comes from the principle of its operation. The transition of the belt to the maximum radius is similar to a wedge. As the pulleys wear out, the radius becomes smaller and the scooter loses speed.
The main condition for stable operation of the variator is its tightness on the pulleys and the absence of slippage. Experienced users of this type of technology claim that 100% absence of slippage cannot be avoided. But it is necessary to minimize it as much as possible. In case of severe slippage, the operation of the entire transmission is at risk. Breakdowns and replacement of parts cannot be avoided. In addition, efficiency is significantly reduced. A striking example of slippage is the drop in engine speed at the very start (the engine seems to be running, but the movement of the equipment is not significant).
Also, straight belt slippage depends on the pulley spring. If it has lost its rigidity, it must be replaced. In addition, unstable, deteriorated performance may be due to wear of the belt itself.
How else can you determine the correct operation of the variator? – when starting to move, the engine speed is the same until the start of acceleration. At maximum throttle, the engine speed should approximately correspond to the engine power. “People’s” craftsmen sometimes do some “alterations” so that the dynamic qualities of the scooter increase. Also, to speed up the scooter, there is an option to completely replace the variator. For example, you can buy a sports variator for a 50 or 150 cc scooter.
Preparation
So that you don’t have green snot later about the fact that the tuning piston does not fit into the crankcase and you were allegedly deceived here - remove the old piston from the engine and measure the hole for the liner with a caliper. If the hole is smaller than the tuning piston sleeve, the “meat” of the crankcase allows it, hands grow from where it is needed - a round file will help you (only before boring - disassemble the engine, assemble the empty crankcase with bolts, bore the hole, make sure that the piston enters the crankcase without problems - wash the parts from shavings and reassemble the engine. Or, as a last resort, coat the crankcase and file with grease to at least somehow protect yourself from sawdust getting into the inside of the engine.)
The hole for the 162QMK engine sleeve (such engines are installed on Chinese scabs, more popularly known as “Leika”) in stock is 65 mm. Without boring, a piston of 57mm (150CC), 61mm (1700CC) and 62mm (180CC) easily fits into this crankcase. You won’t find a 62mm piston on sale during the day, so it was decided to install a regular 61mm piston on this engine.
By the way, for those who do not know, a piston with a diameter of 61 mm can be easily installed not only on the Leica engine, but also on any other Chinese 150 equipped with a 157QMJ series engine. There, if you put your hands to it, you can stick a piston at 62mm, but only if the “meat” of the crankcase allows it. Everything is individual, you need to look at the place. In any case, the distance along the studs is the same for both the 61mm piston and the 62mm piston.
From left to right: 61mm, 57mm
On the 139QMB series engine from a regular Chinese 80-six, you can easily install a piston 39mm (45CC), 47mm (72CC), 50mm (84CC)
From left to right: 39mm (45CC), 47mm (72CC), 50mm (84CC)
What car owners say about replacing the CVT on a Lancer
- Incompetence of sellers “I called the seller to find out if it is possible to replace the variator for a Lancer with a 2.0 engine, to which I received a negative answer.
They tell me that the device is only available on 1.8. However, both models require the same variators. It also happens that when I call to inquire about the availability of a CVT on the Lancer, they start asking me questions about engine sizes.” - Repair or replacement “The Jatco variator, which is found on tenth Lancer, is a rather primitive device.
It can even be checked through the pressure ports using a regular pressure gauge. Spare parts, of course, exist, but the problem is that few people manage to repair them. In this regard, there is a high probability that you will spend a large amount of money, and the result will definitely not please you. For example, you can enter the query “jf011e repair” in the Yandex search engine, and you will see that, of course, there are offers, but it is better if they are supported by reviews from friends who have already used a specific service. As for doing the repairs yourself, it seems to me that only those who know how to think with their heads and work with their hands can do it.” - Why do they change CVTs? “I replaced both the fluid and the device itself.
I had to change the fluid after overheating occurred at 65 miles. I had just purchased the car and was not familiar with the style of the car’s former owner. At the same time, I myself stayed at 150–160 km/h on the highway, but this did not save me from overheating. When I replaced it, it drove for five months, and in the winter the variator burned out completely. This happened when I was drifting a little on an icy lake, sticking to the “D” mode (because it’s automatic). This should be done exclusively in manual mode, otherwise the box will deceive itself. It turns out that the revolutions begin to increase, because of this the gear ratio increases, the load increases, but the speed remains low, and this is extremely harmful. Under these conditions, even a slight drift of 5 minutes will cause the box to twitch. When I drove it cold in the morning, everything was normal, however, if the car warmed up a little, then everything happened according to the old pattern. As a result, I decided to install a new working variator.” “Replacing the driveshaft: when is it necessary and how to do it? » More details - How to change the oil in a variator “If you change the oil, but do not touch the main receiving filter, which does not have the form of a mesh, then consider that you spent money on oil in vain. In any case, even if the variator functions perfectly, the filter will remain in good condition for no more than 80–100 thousand km. This is confirmed in many official sources.”
- CVT resource “The resource of the CVT is largely determined by how you are used to driving.
If you drive, you won’t even reach a hundred. If you follow all the standards, then at 150–200 thousand km a replacement will be required. At the same time, it is still necessary to replace the fluid in a timely manner and not drive with a cold box in the winter.”
- zapchasti.expert
- www.drive2.ru
- rad-star.ru
Installing piston rings
Remove the set of piston rings from the box. A piston ring set for a Chinese four-stroke scooter usually consists of five items. Three of which are a single assembled oil scraper ring, the other two: upper and lower compression.
A typical set of piston rings looks something like this
Carefully unpack the kit with perfectly clean hands.
In the kit you will find two of the thinnest rings and one thick corrugated ring (expander) - this will be an assembled oil scraper ring that needs to be installed on the piston first.
We place an expander in the lowest groove of the piston
We place thin oil scraper rings in the same groove - one under the expander, the second on top of the expander
We find the lower and upper compression rings in the kit and install them, respectively, in the middle and upper grooves of the piston - with marks on the side surface to the cylinder head (cylinder head). The lower compression ring differs from the upper one in color (not always) and the shape of the working edge (always). In most kits, the lower compression ring is painted black, and its working edge has a slight bevel.
The top compression ring in the vast majority of piston ring sets is a uniform light color. But this is in most cases, and in practice it happens that the kit comes with upper compression rings that are black or even red. By and large, the color is not particularly important to us, something else is important to us: the working edge of the upper compression ring has small roundings (chamfers) on the sides, and the working surface of the edge of the upper compression ring is covered with a shiny protective coating.
For example, in this kit both compression rings are black. But the working surface of the upper compression ring is covered with a layer of protective coating, and small chamfers are removed on the edges of the working surface.
The lower compression ring has a matte working surface, and the working edge is beveled at a slight angle. All these moments are clearly visible in the photo.
The compression rings in this kit are red and black. As in the first case, the upper compression ring has chamfers on the working edge and a protective coating, and the lower one has a matte working edge beveled at an angle.
On classic piston ring sets, the upper compression ring has a light color and a rounded working edge. The bottom is dark in color and the working edge is beveled at a slight angle.
When installing the piston rings, do not forget about the marks. The marks on the rings after installation on the piston should be oriented towards the cylinder head (cylinder head).
Where to do repairs
The 4t piston system can be replaced either in a specialized workshop or independently.
The cost of repairing the piston will be considerable, but you can repair the moped yourself. The process of replacing a 4t piston on a Suzuki Sepia moped is quite painstaking and complex, so it must be approached with maximum attention and accuracy. Before starting to disassemble the moped, it is necessary to accurately diagnose the malfunction, that is, to absolutely determine that it is the piston on the Suzuki Sepia scooter that has become unusable
If you have doubts about your own abilities, it is better to immediately turn to specialists. The price for their services can be very different, you just need to find out how much it will cost. In a specialized station, technicians will not only correctly diagnose a faulty Suzuki Sepia moped, but will also replace the piston in accordance with all the rules. In order to return the 4t piston system to high-quality working condition, you may need special equipment that only professionals have, so you will need to drive the Suzuki Sepia moped to the station. But if you choose to replace the 4t piston system on a scooter yourself, then you should adhere to some rules, since the piston system on a scooter is a very complex mechanism.
Piston installation
Insert a retaining ring into any boss of the piston pin. It is most convenient to insert the ring with small round nose pliers. After installation, check how well and tightly the retaining ring fits.
- If the retaining ring does not cover the entire surface, but only a small part of it, replace it with a new one.
- If the retaining ring does not lie tightly in the groove and dangles, straighten it a little
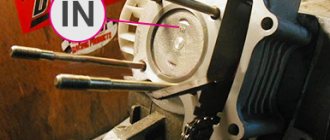
Lubricate the bearings of the lower and upper connecting rod heads and the piston pin bosses with clean engine oil. We put the piston on the connecting rod, orienting it with the “IN” mark to the inlet port; if there is an “arrow” on the piston instead of the “IN” mark, orient the arrow to the exhaust port. We insert the piston pin into the boss - orient the piston on the connecting rod so that the pin hits the connecting rod - install the pin all the way into the locking ring and secure it from falling out with the second locking ring.
We install the cylinder guide bushings on the studs and put on the gasket. It is advisable to place the gasket on the sealant, but without fanaticism.
Disassembly and assembly of the variator
First, prepare containers for spare parts (you can place them in order of disassembly for convenience). To be sure to remember the order of disassembly, film the procedure or mark the parts.
It is advisable that the room be ventilated and well lit:
- — Unscrew the cover bolts and remove it;
- — Remove the shaft and part of the housing;
- — Unscrew the rest of the bolts;
- — Remove the second part of the cover and gear;
- — Unscrew the screws of the pump housing;
- — Remove the pump gear and chain;
- — Remove the oil pump cover and remove the shaft;
- — Turn the variator over and remove the last cover using a screwdriver;
- — Tighten the belt with clamps;
- — Remove the pulleys with the belt;
- — Release the pulleys from the belt.
After disassembling the variator, check each system and component. First of all, inspect the condition of the bearings and the size of the play (if it has increased). Inspect the condition of the belt and its tension, gears, hydraulic unit and other spare parts.
If noise is heard in the transmission, this means increased bearing wear. This malfunction can be eliminated by replacing the bearings, which you can do yourself.
Cylinder installation
Fill the rings and piston with clean engine oil. We tighten the piston rings with a clamp. We cut the clamp from a piece of any sheet metal - cut out a strip of the required length, give it a profile along the piston and make a retainer from the same piece of sheet metal.
Lubricate the cylinder mirror with clean engine oil
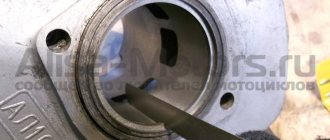
We hook the timing chain with a piece of wire, pull the chain through the cylinder and put the cylinder on the studs.
Very carefully and slowly insert the piston into the cylinder. After the rings are completely inserted into the cylinder, unfasten the clamp and install the cylinder into the crankcase.
Signs of a CPG malfunction
To determine the breakdown of the piston group, you do not need to have complex measuring instruments
It is enough to pay attention to the following symptoms:
- the ringing of piston rings is heard;
- The scooter does not start on the first try. You have to perform the operation several times to achieve the result;
- rapid emptying of the gas tank due to excessive fuel consumption;
- noises are heard in the cylinder/motor that were not there;
- the vehicle operates unstably at idle speed;
- general reduction in power;
- sudden shutdown.
Additional signs include too much smoke and lack of resistance when trying to start the scooter's engine. After disassembling (detailed list of actions below) the motor can be seen on the piston cylinder with black traces - this is carbon deposits. This indicates a loose fit of the pistons to the cylinder walls, as a result of which gases constantly escaped from the inside, which reduced the overall pressure.
Old piston with signs of carbon deposits
In the case of a four-stroke engine, the signs of a CPG failure are slightly different:
- presence of thick black/blue smoke;
- increased oil consumption;
- change in power (this indicator can only be determined during diagnostics, since on a 4-stroke engine the change in parameter may not be immediately noticeable);
- inability to start the scooter the first time even with a cold engine.
If these problems are observed, it makes sense to disassemble the vehicle in order to reduce repair costs in the future due to malfunctions of other parts caused by the lack of replacement of the CPG.
Setting the valve timing ch1 (in collective farm style - ignition)
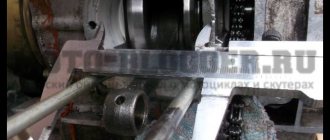
We push the cylinder all the way into the crankcase and set the piston to top dead center (TDC). It is best to set the piston at TDC using an indicator or, at worst, visually/touch. You can also align the piston according to a special mark on the generator rotor, but I have more than once encountered the fact that the marks on some engines are stamped incorrectly and, in order to avoid troubles, I advise you to use them only as a last resort, for example, when the cylinder head is not removed and you need to adjust valve
We insert the cylinder head guide bushings and the lower timing chain guide into the cylinder, degrease the surface and install the gasket.
We install the cylinder head, insert the valve bed guide bushings.
Advantages of manual transmission over automatic transmission
Quite often, Mitsubishi Lancer X car owners have a desire to change the automatic transmission in their car to a manual one. There are several explanations for this phenomenon:
- a manual gearbox is more reliable and breaks down less during operation;
- the use of a manual transmission improves the dynamic characteristics of the car (by spinning the engine to the required speed and shifting gears at the right moment);
- with proper driving with a manual transmission, you can reduce fuel consumption by almost a quarter than when driving with a CVT/automatic;
- the mechanics are free of such disadvantages as long gear selection or early switching;
- A manual transmission is cheaper to maintain (especially compared to CVT or robotic gearboxes).
Setting the valve timing ch2 (in collective farm style - ignition)
Without knocking the piston off from TDC, we orient the camshaft so that the large hole and marks on its sprocket become as shown in the photo and, while putting on the chain, install the camshaft in bed.
Ideally, the marks on the sprocket should be strictly parallel to the plane of the valve cover connector. In practice, unfortunately, such accuracy is difficult to achieve. And this is mainly due to the stretching of the timing chain. And there’s nothing you can do about it - either change the timing chain to a new one or catch the phase by switching the teeth, but this method of setting the valve timing is not acceptable to me personally.
We orient the camshaft bed with a mark in the form of the letters “E” and “X” towards the exhaust channel and install the bed.
Tighten the bed nuts crosswise and then tighten the two bolts on the side boss of the cylinder head.
Usage
If the piston is powered by a red stone signal, its wooden head will extend, which will try to push out the blocks in front (if they are movable and there are no more than 12 of them). The extension lasts about one and a half redstone ticks (0.15 seconds) and is accompanied by a sound that can be heard at a distance of 15 blocks from the piston along any axis. At the same time, if there are entities on the way, then if there are no blocks on their way, they will also be moved (and if the block being moved is a block of mucus, then the entities will be discarded), otherwise the head or block will pass through them; in the case of a block, entities can be smothered by the block if it is solid.
When the piston is turned off, the head will extend back. Moreover, if it is a sticky piston, then the head will try to move the block “glued” to it with it. The sticking effect only occurs when the head is moved, so falling blocks will still fall after moving if there is free space underneath them; also, a block that was moved by a sticky piston can be moved by another piston without any complications. In addition, if the sticky piston loses power before
before he manages to push out
block, then the piston “unsticks” from the block, which remains in its new place. If such a piston did not push anything out and the power is still turned off prematurely, then the block that was destined to be pulled along with it will be moved as usual (though somewhat faster).
Installing the timing chain tensioner
If you have a 157QMJ series engine, do the following: unscrew the plug on the tensioner body; We insert a thin flat screwdriver into it and begin to tighten the bolt until the tensioner rod goes inside the body.
Without releasing the screwdriver while simultaneously holding the tensioner body, with your free fingers, insert the tensioner into the cylinder, screw it in with bolts, and only then release the screwdriver and screw the plug into place.
If you have a 139QMB series engine, then do this: unscrew the plug from the tensioner housing and remove the spring; push the rod inside the body; install the tensioner in the cylinder; insert the spring into the housing and screw in the plug.
After installing the piston, do not forget to adjust the thermal clearances of the valves and break in the engine.
It is worth noting that durable and trouble-free operation of the piston largely depends on the correct installation of the rings. There is absolutely no need for haste and dirt in this matter. Do everything carefully (for yourself, after all), slowly and most importantly: keep it clean!
First, let's take a little look at what a standard set of piston rings for a four-stroke scooter engine is. The standard kit consists of: two compression rings (upper and lower) and one oil scraper ring, which in our case has a collapsible design.
A set of piston rings for a two-stroke scooter engine differs from the previous one in the absence of an oil scraper ring; also, a set of rings for a two-stroke engine may include an expander (marked with an arrow).
So, we have more or less figured out the kits - it’s time to get down to business. We prepare in advance small strips of tin or thin plastic, with their help we will put the rings on the piston.
We thoroughly wash the rings and piston; when installing new rings on a used piston, do not forget to clean its grooves from carbon deposits, otherwise the new rings will not fit into the cylinder. We prepare a clean workplace and perform the installation.
We take the oil scraper ring expander from the kit and place it in the lowest groove of the piston.
In the same way, we install the expander from the kit for a two-stroke engine (if any), with the only difference being that the expander lock should be located in the area of the locking pin (marked with an arrow) of the piston groove.
We look for marks on the rings, apply pre-prepared strips to the piston, very carefully and slowly pull the rings along our strips onto the piston, in this order: first we put on the oil scraper ring, then we put on the second oil scraper ring, then we put on the lower compression ring (dark) and only then put on the upper compression ring (light). The marks on the rings after installation should be located upward towards the cylinder head.
We straighten the rings so that they stand exactly opposite their grooves and slowly pull out our strips from under them. Now the main thing: after you have pulled out the strips and the rings are in their grooves without fail, check each ring for mobility. The rings in the piston grooves should rotate freely in different directions.
The oil scraper ring should look something like this after installation:
After installation, the marks must be directed strictly towards the cylinder head.
Immediately before installing the piston into the cylinder, the piston ring locks must be moved apart in the correct order. This is done like this:
We unfold the upper compression ring so that its lock moves relative to the piston pin axis by approximately 45 degrees, and unfold the lower compression ring so that its lock moves approximately 180 degrees relative to the lock of the upper compression ring.
We rotate the upper oil scraper ring lock 90 degrees relative to the lower compression ring lock, and rotate the lower oil scraper ring lock 180 degrees relative to the upper oil scraper ring.
The photo shows approximately how the piston ring locks of a four-stroke engine should be positioned:
Red marks indicate compression ring locks. Blue marks indicate oil scraper ring locks.
Before final installation of the piston, the piston ring locks of a two-stroke engine must be positioned strictly in the center of the locking pins.
CVT diagnostics
If a certain malfunction actually occurs with the electronic part, a “Service required” notification should appear on the monitor located on the dashboard. “Slow down” should appear on the same monitor if the liquid temperature has exceeded the norm. For self-diagnosis, you can use the program with Google Play CVTz50 and the ELM327 adapter
To accurately identify problems and fix them yourself, special diagnostics are required, which is performed using special equipment. Many faults have their own code, through which they are detected:
- — Sensor malfunctions;
- — Reduced or increased pressure in the pulley;
- — ECU malfunctions;
- — Damage to the stepper motor, line and valves.
When performing diagnostics, you should remember that the cause of a variator malfunction is not only the breakdown of a specific component. Often the cause of a CVT failure is damage to the wiring or some connector. Or the cause may be a malfunction of the variator control unit.
There are also situations in which, if a malfunction is detected, the variator control system is automatically switched to a special mode. The difference between the special mode and the normal mode is the presence of a fixed gear ratio.
If the CVT malfunction is concentrated in the mechanical part, then to identify it you will need to take a number of measures:
- — Checking the condition of the oil;
- — Test while driving;
- — Identifying signs of a problem;
- — ECU data analysis.
Checking the fuel tap
The simplicity of the crane design significantly increases its reliability. However, you need to remember that the fuel taps of the scooter cannot be repaired. This is due to the integrity of the product body, which cannot be disassembled.
To check the functionality of the faucet, you need to disconnect the hose from the carburetor and place it in any container that is at hand. Unscrew the air tube from the engine through which vacuum should be supplied. You can simply draw in air through it, and gasoline should begin to flow out of the fuel hose.
If fuel does not flow from the carburetor hose, it means the valve is clogged or faulty. It is imperative to clean the fuel filter installed on the tap. It is not recommended to blow the product with a compressor or pump; this will not give an effective result and will only increase the likelihood of serious damage to the membrane.
Source
Problems when paying with bank cards
Sometimes difficulties may arise when paying with Visa/MasterCard bank cards. The most common of them:
- There is a restriction on the card for paying for online purchases
- A plastic card is not intended for making payments online.
- The plastic card is not activated for making payments online.
- There are not enough funds on the plastic card.
In order to solve these problems, you need to call or write to the technical support of the bank where you are served. Bank specialists will help you resolve them and make payments.
That's basically it. The entire process of paying for a book in PDF format on car repair on our website takes 1-2 minutes.
If you still have any questions, you can ask them using the feedback form, or write us an email at [email protected]
How to adjust the carburetor of a Karpaty moped
Setting up the K-60 carburetor Questions often arise about setting up the carburetor. But in order to adjust the carburetor, you need to know what it is and why it is needed. So, a carburetor is a device for creating a fuel-air mixture, which will subsequently be compressed and ignited. A properly selected mixture gives higher engine efficiency. The proportion of the fuel-air mixture is regulated by the mixture quality bolt. A throttle is used to limit engine speed. And to prevent the engine from stalling when the throttle is fully released, there is an XX (idle) bolt that prevents the throttle from closing completely. Let's look at the settings of one of the most common carburetors - K-60.
1-Carburetor body; 2-Carburetor body cover; 3-Enrichment valve lock; 4-Adjusting free-play bolt for the throttle cable sheath; 5-Return spring; 6-Throttle valve; 7-Idle Speed Adjustment Bolt (XX); 12-Float chamber cover; 13-Jet; 14-Float; 15-Lock needle; 16-Strainer filter; 17-Stutzer; 18-Bolt for adjusting mixture quality; 19-Enrichment valve
In this carburetor, the bottom bolt is the mixture quality bolt, the top is XX. K60V is a “SPECIAL” carburetor, which is NOT adjusted by rotating the mixture quality bolt. In this carburetor, to adjust the quality of the mixture, you have to remove the carburetor and remove the float chamber cover (hereinafter PC). In order to lean the mixture, you need to lower the fuel level in the PC. In order to enrich the mixture, you need to raise the fuel level in pc. You can lower and raise the level in the PC by bending the petal of the float, which presses on the needle. Raise it up (if you look at the float in its working condition), the mixture becomes leaner. If you lower the tongue, the level rises and the mixture becomes richer.
In other carburetors, adjustment is carried out as follows: First, you need to tighten the mixture quality bolt until it stops and unscrew it 1-1.5 turns. Start the engine and if you open the throttle completely and the engine stalls or picks up speed poorly, this means that the mixture is too rich. The KS bolt must be screwed in. If the engine runs poorly at low speeds or picks up speed when the enrichment valve is opened, this means the mixture is lean. The screw must be unscrewed. Often the engine simply does not start if the mixture is too lean or too rich.
If the carburetor does not have a mixture quality bolt, then it is most likely regulated by the mixture using a needle located in a cylindrical valve. In this case, to lean the mixture, the needle lock must be raised, to enrich the mixture, the lock must be lowered.
Source
Outline
It happens that when installing it back, the stator is installed in reverse, and then depending on your luck: everything may go without consequences, or the spark may disappear or interruptions may appear. To avoid this, any, not just CDI-type scooter generators must be installed exactly as they were originally installed. If you follow this golden rule, you will be happy.
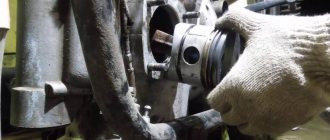
We unscrew the bolts.
We remove the stator. Installation of the generator is carried out in reverse order.
Difficulties
Our people don’t want to buy pullers and they put everything under the rotor and even try to knock it down with a hammer, and once I came across a scooter with a piece of some kind of metal welded to the rotor. They probably welded a hook and wanted to pull it off with a KAMAZ.
On the one hand, you can understand people: why buy an expensive tool for a one-time job?.. On the other hand, I don’t understand people: why buy and personally damage a scooter with a hammer, if you can give it to a mechanic for repairs? A dilemma, whatever one may say.
Theory
The generator consists of two main parts: the rotor and the stator. The stator is attached to the engine crankcase and can be removed very easily, literally “by hand”. But the situation with the rotor is different. The rotor is mounted on a cone and clamped with a nut, and it is clamped tightly, and in order to remove it from there, you must first secure it from turning, then unscrew the nut and only then use a puller to pull it off the cone.
Homemade puller
Unfortunately, homemade, just like factory-made, is not without its drawbacks. It is moderately reliable, versatile, and cheap, but it is not so convenient to use, and if you do not know how to use it, you can easily break the threads under the bolts of the cooling impeller.
Which puller you will use is up to you to decide. I have described all the pros and cons of both options for you.
For myself, I chose the option with a homemade puller. And the price has nothing to do with it. It's all about experience. Over the years of work, I tried a lot of things and eventually came to the conclusion that there is nothing better than a homemade tool puller.
I made my puller in literally an hour, if not less. I bought the largest washer that was available in the store, welded a smaller washer into its center, and welded a regular nut into the center of the small washer.
I screwed a bolt from a regular car puller into the nut, attached the washer to the cooling impeller, marked points with a pencil through the holes for the bolts, marked and drilled the holes.
If you don’t want to make a puller, buy a factory one at the store or ask your friends. Just before purchasing, just in case, remove the cooling impeller and look at the condition of the thread.