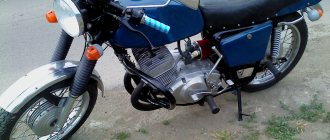
First, you need to understand the features of the motorcycle. IZH Jupiter-5 is a vehicle designed for road travel with different surfaces. You can attach a stroller and a cargo module. The appearance of Jupiter-5 is distinguished by the strict classics inherent in the Soviet era, but at the same time it has its own individuality.
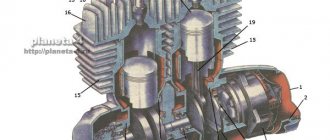
The demand for this model lies in the small dimensions of the motorcycle, as well as decent power for that time. The engine of this motorcycle has two cylinders and two strokes. The cylinders are arranged in-line. The maximum developed power reaches 25 horses, which is 3 more than the single-cylinder IL Planet-5. This engine allows the motorcycle to move at a maximum speed of 120 km/h, while it has low fuel consumption.
What sets the bike apart is its ability to operate even in harsh climatic conditions. It is not at all whimsical: it can start both in -30 degrees and in heat over +40, and is not afraid of rain and dirt. However, moving on the ground during rain is not as easy as we would like. Unlike the “Planet”, no extra vibration is felt
. the movement is dynamic and very smooth.
The Izhevsk Machine-Building Plant began producing IZH Jupiter-5 in 1985, so spare parts are always available. However, the quality leaves much to be desired, which is why parts wear out quickly and the motorcycle requires fairly regular repairs. Sometimes, to find the cause of a breakdown, you have to disassemble half of what you didn’t even know about. Fortunately, in IZh everything is quite simple and the repair can be done at home. Repairing the IZ Jupiter 5 engine is not a difficult task, but if you are going to ride this motorcycle often, then you should not neglect to do the work correctly.
The main problems of Jupiter-5 include the current shock absorbers and cylinders, which alternately refuse to operate the engine. If you have encountered similar problems, then this article may help you in solving one of the annoying problems.
How to disassemble the IZ Jupiter 5 engine
So, disassembling the IZ Jupiter 5 engine includes the following steps:
- First you need to wash the hard-working heart of the motorcycle. You need to rinse it as thoroughly as possible, since dirt should not end up inside the engine, otherwise most of the work will most likely go down the drain.
- Take a piece of paper with a pen to write down the location of the parts and the order in which they are installed as you work. All bolts, studs and dowels have their place and order of tightening. Therefore, there is no need to scatter them in different directions, but it is better to fold them as they are disassembled.
- It is necessary to tighten the exhaust tube. Don't throw it away, tie it to something strong.
- After unscrewing the 4 nuts, remove the cylinder covers and the cylinders themselves, being careful not to damage the gaskets. If the gaskets are damaged, then the pressure inside the engine will be compromised.
- Now you need to tighten the tube on the chain cover. We knock out the stud on the front of the engine halfway. It is important not to bend it, otherwise you will have to look for a new one.
- Unscrew the nuts and remove the bolt securing the engine at the rear. It is better to lay out the parts in groups so as not to lose or mix them up.
- We unscrew the seven bolts securing the pan, remove the flywheel plate and gasket, and fix the engine. It is better to fix the engine on a workbench; if you don’t have one, then a massive table will do.
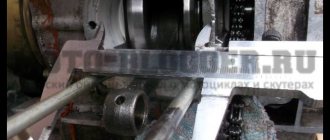
- Using a socket wrench and a long, strong pry bar, loosen the bolt holding the take-out flywheel together. Be careful not to strip the threads on the cap - this will make the task much more difficult.
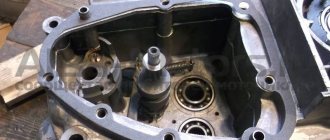
- Disconnect the crankcase halves. We don’t put them away, they will come in handy soon.
- Remove the take-out flywheel and veneer.
- We take out the middle and front shafts, the follower shaft, and remember the installation location of the adjusting washers. It is important to remember their exact location, otherwise parts will not fit together later.
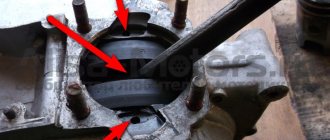
- We unscrew the pins securing the crank chamber covers and remove the covers with rings. The pins are quite fragile, if you break them while unscrewing them, it will be difficult to get them out.
- We remove the crankshafts from the halves of the pallet.
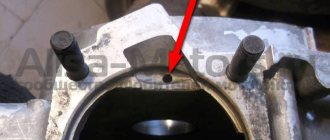
- Pull out the bearings of the crankcase half. Don't bend the crankcase or your oil will be used up very quickly.
- Unscrew the screws and the race with the crankshaft oil seal.
- We take out the installation rings and knock out the seals.
- We knock out the bearing of the right half of the pan.
- Disassembly of the IZH Jupiter engine is completed.
Now that you have looked at all the parts from the inside and found the problem, we replace the broken part. The easiest way is to look on the Internet at a spare parts sales site. You can also find it at a regular city market (flea market). Before assembling the IZH Jupiter 5 engine, carefully inspect its surface to look for chips, cracks, wear
again.
After you have thrown out the broken part and stuck a new, shiny one in its place, you need to return everything to the way it was. Assembling the IZ Jupiter 5 engine is a little more difficult than disassembling it. Everything is put together in reverse order.
As you can see, there is nothing complicated about this. It's another matter if you want to add a couple of horses to your pet. Then you will have to sweat a little, because tuning the IZ Jupiter engine will require a little patience from you.
Preparation
Russian is Russian, so until we process all the parts properly with a file before installation, nothing will work out...
Insert the cylinder rings and use a feeler gauge to measure the gap in the lock.
- If the gap is less than normal, file the ends of the rings with a file
To reduce engine noise and speed up the ring grinding process, remove small chamfers on their working edges (preferably)
To improve lubrication of the piston pin, use a 5-6 mm drill to drill through holes in the piston bosses (optional)
We remove flashes and deposits of metal in the cylinder windows and round the edges along which the rings go
After finishing work, we thoroughly wash all the parts, prepare a clean work area and begin assembly.
Tuning the IZH Jupiter engine
Before you start, you need to decide how much power you would like to give to your engine. If you are quite satisfied with the average power, then you will need a ZiD-200 resonator. But if you want to make the IZH Jupiter 5 motorcycle fast and powerful, start tuning the engine by installing a resistor from the SMB-5 “motoblock”.
Replacing the air filter plays a big role in engine modification. The better the air is cleaned, the more horses the engine will be able to produce. After all, the degree of engine overheating depends on the amount of incoming air. It is best to use imported air filters. They provide improved cleaning and longer service life.
Next you should work hard on the injection system. An excellent option is to install a “Planet” carburetor with a diffuser diameter of 0.32 cm. Two carburetors will provide much greater acceleration and good dynamics. We take the flanges securing the cylinder from the standard tube, grind out the aluminum studs, and cut off the flange from the carburetor from the inlet tube from the Planet.
We grind the ends of the cylinder heads on a machine, and press the cylinders themselves. The maximum permissible volume of PIC is 18 cubic meters. see Install factory copper layers under the cylinder heads. And we adjust the ignition advance angle to increase compression.
We use the second flange from the old carburetor. Then we weld the parts using “cold” welding. And finally, we modify the assembly to be compatible with the inlet channels. all cracks with epoxy liquid
. Voskhod carburetors will provide uniform traction. In this simple way, you can add not only a couple of additional horses to your pet, but also provide more lively dynamics that give a good riding experience. The motorcycle is very reliable for everyday use, and if you take good care of it, breakdowns will occur very rarely.
issue 10 part 1.IZH Jupiter 5 engine
Description
: we are here: https://vk.com/enduro_club
In this issue. Restoration of the crank mechanism of the IZH JUPITER motorcycle engine 5. Correction of the consequences of unqualified repairs and modernization of the crankshaft main bearings. motor repair Ivanovo Master: Mikhail Dunaev Telephone number of the master
7! in Ivanovo ****************************************************** ************* FOR THOSE WANTING TO HELP OUR PROJECT.
throw some money into your webmoney wallet: R 302 360 519 441 Thank you. **************************************** *******
Izh Jupiter gearbox assembly.wmv
Self-assembly of the Izh Jupiter
5 after its repair is a responsible operation. Inattention and errors during assembly will sooner or later lead to breakdowns during its operation. However, attention and observation shown when disassembling it will allow you to avoid most mistakes.
Instructions
Before starting assembly, clean the surfaces where the parts connect from any dirt. Throughout the entire process, pay special attention to evenly tighten the mounting screws, avoiding distortions. Before pressing, treat the bearings well with grease. Press the ball bearing into the right half of the crankcase, then install the installation ring into the left half. From the crank chamber side, press the oil seal into the crankcase, then install the second ring.
Insert the installation rings into the grooves of the crank chamber covers, press the ball bearings into them and put rubber sealing rings on them. Install the left crankshaft. When doing this, be careful not to damage the oil seal. Using a hammer and support, press in the crank chamber cover. Then screw the screws and lock washers into it. The tightening force for these screws should be maximum.
Insert the crankshaft into the right half of the crankcase. In the same way, using a hammer and support, press in the crank chamber cover. After installing the oil seals on the crankshaft axle shafts and in the crank chamber covers, press them in. Next, insert the installation rings, press the ball bearing into the left half of the crankcase and secure the crank chamber cover with screws with maximum tightening.
On both halves of the crankcase, secure the screws securing the crank chamber covers to protect them from spontaneous unscrewing. Place a gasket and a cover with a crankshaft oil seal on the right half of the crankcase. Secure it with screws and cap it in the same way.
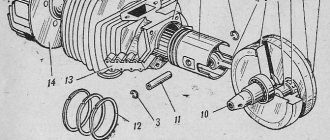
To assemble the engine cylinder-piston group, place the rings on the pistons using plates. In this case, the plate locks must coincide with the piston pins. On the piston bosses, install a retaining ring in one of the grooves, and a piston pin, lubricated with machine oil, in the opposite groove. Place the piston on the upper head of the connecting rod so that the arrow points backward and the piston ring locking pins forward in the direction of travel of the motorcycle.
Align the holes of the piston bosses and the bushings of the upper connecting rod head. Press in the piston pin using a mandrel and a hammer. After this, install the second retaining ring on the piston. Assemble and install on the engine
second piston. Before installing the cylinder, check the connector planes. Clean these surfaces, install sealing gaskets on them, and place a wooden stand under the pistons. Lubricate the cylinder mirror with oil. Place the piston with pins on the cylinder and carefully thread the piston rings.
Remove the support from under the piston. While pushing the cylinder, place it in place and secure it. In this case, the ring locks should not fall into the cylinder windows. Replace the second cylinder in the same way, then install the carburetor pipe, gasket and head. Tighten the fastenings of the heads and pipe as follows: first tighten the middle screws until they stop, then the outer ones. Tighten the outer nuts evenly in a cross pattern.
note
IZ Jupiter-5 is very good in dynamics and speed, and as for acceleration, IZ Jupiter-5 is quite faster than its single-cylinder brother. The IZ Jupiter-5 engine is quite revving - up to 5000 rpm. Unlike heavy motorcycles such as “Dnepr” or “Ural”, the IZH Jupiter-5 has one carburetor for two cylinders, which means that fuel consumption is lower and the stability of both cylinders is better.
Helpful advice
The road motorcycle “Izh Jupiter 5-020-03” (Izh 6.113-020-03) belongs to the middle class motorcycles and is intended for use on roads with various surfaces. The motorcycle is equipped with an engine with a liquid cooling system, which ensures stable operation in any mode, reduces noise levels and reduces fuel consumption. The base model is equipped with a telescopic fork, spoked wheels and two-cam drum brakes.
First, you need to understand the features of the motorcycle. IZH Jupiter-5 is a vehicle designed for road travel with different surfaces. You can attach a stroller and a cargo module. The appearance of Jupiter-5 is distinguished by the strict classics inherent in the Soviet era, but at the same time it has its own individuality.
The demand for this model lies in the small dimensions of the motorcycle, as well as decent power for that time. The engine of this motorcycle has two cylinders and two strokes. The cylinders are arranged in-line. The maximum developed power reaches 25 horses, which is 3 more than the single-cylinder IL Planet-5. This engine allows the motorcycle to move at a maximum speed of 120 km/h, while it has low fuel consumption.
What sets the bike apart is its ability to operate even in harsh climatic conditions. It is not at all whimsical: it can start both in -30 degrees and in heat over +40, and is not afraid of rain and dirt. However, moving on the ground during rain is not as easy as we would like. Unlike the “Planet”, no extra vibration is felt
, the movement is dynamic and very smooth.
The Izhevsk Machine-Building Plant began producing IZH Jupiter-5 in 1985, so spare parts are always available. However, the quality leaves much to be desired, which is why parts wear out quickly and the motorcycle requires fairly regular repairs. Sometimes, to find the cause of a breakdown, you have to disassemble half of what you didn’t even know about. Fortunately, in IZh everything is quite simple and the repair can be done at home. Repairing the IZ Jupiter 5 engine is not a difficult task, but if you are going to ride this motorcycle often, then you should not neglect to do the work correctly.
The main problems of Jupiter-5 include the current shock absorbers and cylinders, which alternately refuse to operate the engine. If you have encountered similar problems, then this article may help you in solving one of the annoying problems.
Quality of parts
The “quality” of parts for Soviet motorcycles that are currently on sale does not correspond to even the worst Soviet models. The Soviet one was not ideal either - believe me. The only thing there were no complaints about was the quality of the metal, but the manufacturing accuracy of Soviet manufacturers was lame and very, very bad
Rings
When purchasing new rings, insert them into the cylinder (new or after boring) and check for clearance
- If the rings fit tightly, we buy
- If the rings do not fit the mirror, try others
An example of a perfect fit of a ring to a mirror (“Ant”)
"Sunrise"
After checking for fit, we put the rings on the piston and measure the gap between the ring and the piston groove with a feeler gauge.
- If the gap is greater than 0.01-0.02 mm, try another ring
- If after several tried rings the gap is larger than expected, we try another piston
Voskhod piston with a gap clearly exceeding all conceivable standards
“Ant” piston with permissible clearance
Piston
One of the most dangerous and common problems in new pistons is the incorrect position of the ring stoppers. Customers have already brought pistons several times that had problems with the location of the stoppers
- Before purchasing a piston, use some pliers to tug on the stopper
- If the stopper is wobbly, we debug this piston and take the next one for check
Consequences of a flying stopper (“Ant”)
If the stopper fits tightly, place marks opposite the stoppers and insert the piston into the cylinder so that it does not reach the windows. Afterwards, we turn the piston so that it becomes exactly the same as in the engine. That is, the arrow is forward, and the axis of the finger is strictly along the axis of the crankshaft and look:
- If at least one risk has become opposite the windows or next to the window, we debug the piston and take another
- If there are risks between the windows, we buy
An example of the incorrect placement of stoppers on the assembled Voskhod engine. If the ring lock is in this position, the ring will inevitably break
An example of the correct position of the stoppers (“Ant”)
How to disassemble the IZ Jupiter 5 engine
So, disassembling the IZ Jupiter 5 engine includes the following steps:
- First you need to wash the hard-working heart of the motorcycle. You need to rinse it as thoroughly as possible, since dirt should not end up inside the engine, otherwise most of the work will most likely go down the drain.
- Take a piece of paper with a pen to write down the location of the parts and the order in which they are installed as you work. All bolts, studs and dowels have their place and order of tightening. Therefore, there is no need to scatter them in different directions, but it is better to fold them as they are disassembled.
- It is necessary to tighten the exhaust tube. Don't throw it away, tie it to something strong.
- After unscrewing the 4 nuts, remove the cylinder covers and the cylinders themselves, being careful not to damage the gaskets. If the gaskets are damaged, then the pressure inside the engine will be compromised.
- Now you need to tighten the tube on the chain cover. We knock out the stud on the front of the engine halfway. It is important not to bend it, otherwise you will have to look for a new one.
- Unscrew the nuts and remove the bolt securing the engine at the rear. It is better to lay out the parts in groups so as not to lose or mix them up.
- We unscrew the seven bolts securing the pan, remove the flywheel plate and gasket, and fix the engine. It is better to fix the engine on a workbench; if you don’t have one, then a massive table will do.
- Using a socket wrench and a long, strong pry bar, loosen the bolt holding the take-out flywheel together. Be careful not to break the thread on the cap - this will make the task much more difficult.
- Disconnect the crankcase halves. We don’t put them away, they will come in handy soon.
- Remove the take-out flywheel and veneer.
- We take out the middle and front shafts, the follower shaft, and remember the installation location of the adjusting washers. It is important to remember their exact location, otherwise parts will not fit together later.
- We unscrew the pins securing the crank chamber covers and remove the covers with rings. The pins are quite fragile, if you break them while unscrewing them, it will be difficult to get them out.
- We remove the crankshafts from the halves of the pallet.
- Pull out the bearings of the crankcase half. Don't bend the crankcase or your oil will be used up very quickly.
- Unscrew the screws and the race with the crankshaft oil seal.
- We take out the installation rings and knock out the seals.
- We knock out the bearing of the right half of the pan.
- Disassembly of the IZH Jupiter engine is completed.
Now that you have looked at all the parts from the inside and found the problem, we replace the broken part. The easiest way is to look on the Internet at a spare parts sales site. You can also find it at a regular city market (flea market). Before assembling the IZH Jupiter 5 engine, carefully inspect its surface to look for chips, cracks, wear
again.
After you have thrown out the broken part and stuck a new, shiny one in its place, you need to return everything to the way it was. Assembling the IZ Jupiter 5 engine is a little more difficult than disassembling it. Everything is put together in reverse order.
As you can see, there is nothing complicated about this. It's another matter if you want to add a couple of horses to your pet. Then you will have to sweat a little, because tuning the IZ Jupiter engine will require a little patience from you.
The 2021 motorcycle season is just around the corner, and I have completely abandoned my motorcycle and only thanks to my friend will I start working on my red dragon again) Photo of what it looked like at the end of the 2021 season.
I'll start with the engine. The engine is still the same, carbs, lx, flywheel in general as it was. BUT finally I replaced the CPG with a better one. Unfortunately, Kawasaki KE175 piston is very difficult to find, and it requires quite a bit of finance. In this regard, I took a completely new piston, bored at the factory, with pistons of the correct geometry and with thin 1mm rings.
I’ll say right away that the dimensions of the piston, the position of the pin, and the length of the skirt remained factory, which means that the ringing will be like this in any case. (who knows the defect of the air Jupe piston will understand).
Otherwise, the pistons are very good, the alloy is of high quality, the rings are thin (lower temperature + longer life). As time has shown, even after the most severe abuse of the engine in the heat and the tachometer in the red zone of the piston, they still stuck to the liner, BUT there are no consequences in the form of molten aluminum on the liner, the only thing in the places of sticking was that the piston changed color to a more matte one. Although cruising at a speed of 90-100 does not heat up the engine to forced stops, which is good news.
In addition to all this, I abandoned the separators and, as Grigoriev said in his book, installed a stacked bearing. As a rule, it is easiest to take needles from the same separators or look for Czech ones. I found 19.5mm needles (stock 17) made in the USSR, which I have had for half a year and are in perfect condition. What it looks like.
In general, I have already tested the piston, I erased the first set of rings (coated cast iron rings). Photo of ring wear + condition of new rings for 2021. Wear:
New:
I decided not to raise the blowing itself, especially the drainage phase, since I had already played enough with it. Issue 173-175, the inlet is sort of permanently purged according to Grigoriev. The plans are not to turn the engine above 7000 rpm, and even at stock it picks up 120 rpm quickly, no more is needed.
In general, everything about the engine, the rest of the modifications are in my other posts.
Well, now to the most interesting part, changes to the chassis, namely the front end.
I sold the front end from the PSA and decided to look for a whole front end from the Japanese. There were no ideal options for a small amount, but I came across a rather inexpensive option with a 1989 Kawasaki ZX10.
What it roughly looks like:
The main + of the chassis is, of course, the quality of work, and disc brakes, which are sorely lacking in city mode. Naturally, this is not without problems: 1. The main problem immediately was a broken disk, which in my city cannot be clamped with anything to align it. I had to Improvise it, bend it out in a garage, and then deal with balancing it and the rest.
2. The second problem is adapting the front end to the stock frame. As it turned out, the Japanese steering wheel is much longer and cannot be done without huge alterations. In addition, the installation of tapered bearings cannot be avoided because with such brakes the stock bearings will fly every month. Of course, I had thoughts of cooking and cutting, but I didn’t want to. As a result, they helped me make unusual bearings for my motorcycle.
3. The next problem is the brakes. Actually, I haven’t decided it yet. Unfortunately, the original calipers are not in the best condition, without pads, brackets, piston, they have oxidized and are not working at all. Maybe someone involved in repairs will sell it inexpensively or exchange it for workers with my additional payment.
4. Well, the last problem is the exact calculation of the model and behavior of this fork. It looks identical to the 1989 ZX 10, but mine has a rebound adjuster and the diameter is an issue. According to the manual the ZX is 41mm, but mine is 38mm. In this regard, I cannot accurately determine the volume of oil that needs to be filled.
In general, that’s all for now, special thanks to my friend Vovchik, for whose sake I took up my motorcycle again for joint trips to rallies with his IZH Jupiter 5,400cc, but that’s a completely different story;)
Tuning the IZH Jupiter engine
Before you start, you need to decide how much power you would like to give to your engine. If you are quite satisfied with the average power, then you will need a ZiD-200 resonator. But if you want to make the IZH Jupiter 5 motorcycle fast and powerful, start tuning the engine by installing a resistor from the SMB-5 “motoblock”.
Replacing the air filter plays a big role in engine modification. The better the air is cleaned, the more horses the engine will be able to produce. After all, the degree of engine overheating depends on the amount of incoming air. It is best to use imported air filters. They provide improved cleaning and longer service life.
Next you should work hard on the injection system. An excellent option is to install a “Planet” carburetor with a diffuser diameter of 0.32 cm. Two carburetors will provide much greater acceleration and good dynamics. We take the flanges securing the cylinder from the standard tube, grind out the aluminum studs, and cut off the flange from the carburetor from the inlet tube from the Planet.
We grind the ends of the cylinder heads on a machine, and press the cylinders themselves. The maximum permissible volume of PIC is 18 cubic meters. see Install factory copper layers under the cylinder heads. And we adjust the ignition advance angle to increase compression.
We use the second flange from the old carburetor. Then we weld the parts using “cold” welding. And finally, we modify the assembly to be compatible with the inlet channels. all cracks with epoxy liquid
. Voskhod carburetors will provide uniform traction. In this simple way, you can add not only a couple of additional horses to your pet, but also provide more lively dynamics that give a good riding experience. The motorcycle is very reliable for everyday use, and if you take good care of it, breakdowns will occur very rarely.