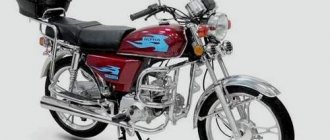
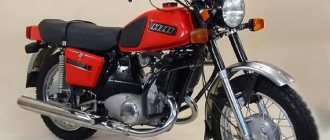
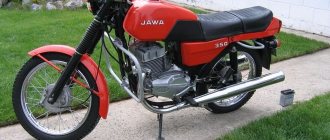
Full generator for 125 motors
YX 125 is definitely a cool engine!
One of the most reliable, torquey at the bottom, and overall a good engine, what can I say. The problem arises only in one thing - in the generator. This is not even a problem, but a solvable nuisance.
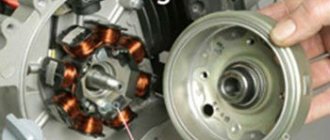
The torque of this engine is provided by a huge and heavy generator, which has a large centrifugal and inertial force, due to which the engine can effortlessly drive up a steep hill almost at idle speed.
But the whole problem with this generator is that the current that goes to the power wires, which mostly go to the headlight, is very small. Installing a headlight also, of course, requires installing a battery, otherwise it will work like a kerosene lamp, and the illumination from it will be the same. Someone will say, “Why do you need a headlight at all?”, but many spend their time not on cross-country trails, but simply ride through forests and fields enjoying a quiet ride, and it is these people who need a good headlight.
Let's assume that you installed the battery, but left the original generator.
Yes, it really does have power wires for the light, but they are powered by one single low-power coil, it’s funny! The headlight will drain the battery almost completely within 20 minutes, and the generator, which in theory should charge the battery, with its only dead coil cannot even cope with a AA battery, let alone a headlight, and even provide a stable charge to the battery.
You can, of course, install a full-fledged generator from the YX 140.
It will produce much better current, but it is light and will completely kill all the advantages and high-torque power of the 125, because there will be neither inertia nor the fact that it is the 125 motors that carry out this way. So this option is no longer available, unfortunately.
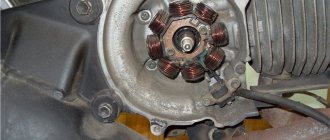
But the LIFAN engine manufacturers have solved the problem and are installing a full-fledged six-coil generator on their 125 engines, which is perfect for the YX. What is noteworthy is that this generator is heavy! This is exactly what you need and is ideal for 125 engines.
But the coolest thing is that there are six coils, and not one, as on YX engines. Such a generator will more than provide you with full-fledged operation of the headlight and a good, stable battery charge, so nothing cooler has yet been invented.
Bottom line: if you are a fan of the 125 engine and you want to have full lighting with a good battery charge, then you will not find a better generator for your tasks, unless of course you are an electronics genius and you make it yourself.
Source
Refinement of the PitsterPro pit bike
Today we’ll talk about modifying the pit bike for its long-term and trouble-free operation. We will be modifying the PitsterPro right out of the box.
Filterbox installation
By default, all pit bikes are now equipped with a zero-resistance filter (nulevik, fns, etc.), it has its pros and cons. The advantages are that air passes faster and in larger volumes. Disadvantages - it needs to be washed often, and when it rains, the filter quickly gets wet (since it is open), there is not enough air, the spark plug falls out, the engine starts to stall. Without a spark plug wrench on hand to unscrew and dry it, it will take a long time to get wet in the rain, kicking a stalled pit bike.
There are various options for a collective farm, such as a filter bottle or other protective cases made from improvised means, we will not consider them. Manufacturers came up with everything for us. Closed filterbox , with a pipe to the carburetor, fixed under the seat (as on adult motorcycles). The trick is that it is located in a place where even purposefully watered water will get into it with great difficulty; it is covered on both sides with plastic sides, a rubber mudguard protects it from below, and there is a driver’s seat on top. The box is not completely closed; there is a hole at the top into which air enters, passes through the foam rubber and then through the pipe into the carburetor. The entire structure is ventilated without visible effort, so the motor will have something to breathe .
Before installation, the box should be opened (by unscrewing three screws) and the filter element should be soaked in special oil. I used sticky filter oil . We squeeze out the excess by hand, then the filter is put in place and the box is assembled. After which we begin installation on the pit bike. We will need to remove the left side of the plastic to get to the mounting ears. The filterbox itself fits into its regular place without any problems, but I personally had a problem with the pipe.
The carburetor on my pit bike was apparently smaller than the required diameter, and the pipe on it was hanging loose . I found two solutions to the problem. The first thing is to wrap the required amount of electrical tape around the carburetor to equalize the dimensions. The second is more aesthetic, cut off the rubber ring from the old zero and glue it inside the filter box pipe. After a little fiddling with a knife, sandpaper and Moment glue, the design turned out to be reliable and airtight.
Tip: Having loosened the clamps, first attach the pipe to the carburetor, then screw on the filter box and then tighten the structure with clamps.
Next, we need to return the plastic sidewall to its place, but here too the designers miscalculated. The end of the plastic pinches the pipe. The problem is solved this way: we mark the diameter of the pipe on the spot, draw a semicircle in the place where the plastic interferes with us, then, armed with a hacksaw or drill, we cut out the marked semicircle, sand it in the place of the cut and try it on. If everything is cut beautifully and in the right place, screw the side panel into place.
Installing the fuel filter
It would seem like such bullshit as a gas filter , but this is not installed at the factory by default. Its absence risks the fact that during the first refueling, flash and other debris from the gas tank will be washed into the carburetor and clog the jets . There is persistent debate that the gasoline filter seems to pass fuel too slowly and situations occur when it runs out in the float chamber. Personally, I have not encountered anything like this, and the engines on pit bikes are not liter enough to drink gasoline at such a speed.
We go to any auto/motorcycle store and buy a small fuel filter. We install it in the cut of the hose coming from the gas tank tap into the carburetor. Directional filter! Carefully look at the arrow on the body; it should point along the route of the fuel, i.e. to the carburetor.
Replacing the spark plug
Apparently not everyone knows how to do this, so I’m telling you. It is not necessary to change immediately after purchase. Personally, my copy of the pit bike had an NGK C7HSA .
But if someone has such a need for replacement (for example, the default is Chinese shit), then you will need a spark plug wrench or a long 16mm socket . Can be purchased at any hardware store that has the tools.
Therefore, first we remove the cap with the wire, then unscrew the spark plug counterclockwise, write off the markings, run to a motorcycle/automotive store and buy the required spark plug, twist it clockwise (moderately), put on the spark plug cap, and go for a ride.
Installing the hour meter
Useful thing. Helps track service points when it is necessary engine oil Costs about 1000 rubles. Sold in motorcycle shops, mainly cross-country, there is also a large selection on Ebay and other online stores/auctions. It is a small box with a display and a wire. The box is powered by a battery sealed inside. Easy to install. We attach the box either with double-sided tape or with clamps in any convenient place, measure the wire to the spark plug cap with a margin of 5-6 turns , cut off the excess.
Next, we wrap the end around the high-voltage wire 5 turns and secure it either by wrapping electrical tape on top or with a tie, as I did. That's it, now the numbers on the display will change depending on the operating hours of the engine. We change the oil according to the manual.
That's all for today 
To watch online, click on the video ⤵
Rotor Kit, Pitbike Tuning, ROTOR KIT, YX 140More details
sports ignition for alpha Inner Rotor Kit Flywheel IgnitionRead more
Rotor kit, yx140, lightweight generator, tuning, rotor kitRead more
Malossi selettra on a pit bike, top ignitionRead more
PROJECT “ROCKET” THE MOST POWERFUL PIT BIKE 140/SERIES 2/INSTALLATION OF SPORTS IGNITION ON YX140.PAINTING.Read more
Rotor Kit Kayo-140 (In action)More details
Rotor ignition for a pitbike - test / Rotor Kit Engine Kayo 125 Pitbike HDMore
PROJECT “ROCKET” THE MOST POWERFUL PIT BIKE 140/SERIES 1/I am doing porting to the cylinder head yx140.sports camshaft z40More
HOW TO UPGRADE A PIT BIKE FOR 900 RUBLES. More details
The whale rotor burned out, Daytona is over, life is painRead more
Pit bike exhaust tuning. Megabomb installation from PonurovichRead more
Installing a 3 valve cylinder head on a 125YX engineRead more
WHAT happens if you install the wrong generator on a pit bike (motorcycle)Read more
Pitbike wheelie JMC 140 and rotor kitRead more
Source
To watch online, click on the video ⤵
We remove the generator rotor without a pullerRead more
How to remove the generator rotor on Irbis TTR 125More details
How to remove the rotor without a puller on an Irbis TTR 125 pit bike. Read more
how to remove an alternator without a puller on a scooter (yamaha 3kj) suzuki hondaRead more
How to remove a generator rotor in 2 minutesRead more
Analysis of Patron Sport 250. how to remove a magnet (Generator Rotor) from an engine with a starter overrunning clutchRead more
How to remove a generator rotorRead more
Remove the rotor without a puller on TTR 125More details
How to remove an alternator bell on a motorcycle without a special pullerRead more
How to remove a generator rotor (Experiment)More details
Homemade generator rotor puller from a Kayo125 pit bikeRead more
HOW TO REMOVE THE GENERATOR ON THE BSE PH10-150e PIT BIKE. FATAL MISTAKES! Read more
About how to easily and simply remove the generator rotor without a puller. Read more
How to remove the generator rotor on an alpha moped (without a puller)Read more
Replacing the generator oil seal on a pit bikeRead more
How to remove a generator rotor on a Chinese motorcycle. (without a PULLER)!! Read more
How to remove the generator magnet from Alfa, DeltaRead more
How to remove a magnet (generator rotor) from an alpha without a pullerRead more
Installing lights on a pit bike
Many riders who ride a pit bike not only during daylight hours, but also in the dark, are very concerned about the lack of standard light on the pit bike. This question affected me too. In this article, let's look at possible ways to install lighting equipment on a pit bike .
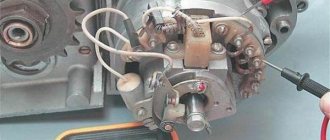
There are generally two options for installing lights on a pit bike. It all depends on what kind of engine your motorcycle is equipped with. Does the generator have windings for powering the light or not?
There are three wires coming out of the generator, one of which is plugged.
For example, we took the engine installed on PitsterPro - Zongshen 160cc . There are no windings for light devices on the generator. Possible options: either install a generator with a winding for light, or buy a powerful LED bicycle light with a battery compartment and attach it to the motorcycle. There are interesting offers, for example here. Some specimens will shine even better than the option described below.
There are six wires coming out of the generator, three of which are plugged.
For example, we took the engine installed on the BSE - Lifan 140cc . The generator has windings for light. Installing a headlight on a pit bike with such an engine according to the instructions will take no more than 2-3 hours.
Choosing a light for a pit bike
Having decided on the possibility of connecting the light, we proceed directly to the choice of headlights. But we don’t have much choice, I would say its complete absence. I’ll say right away that I’m not a fan of “collective farm” tuning and prefer ready-made kits for installation on a motorcycle.
A similar kit was discovered on ebay and it is called ACERBIC CYCLOPS STYLE HEADLIGHT KIT PITBIKE DIRT BIKE . There are several colors to choose from:
- Black
- White
- Red
- Green
- Blue
I chose black because... The plastic of the motorcycle was also black. There are two asymmetrical eyes on the muzzle, one lensed for low beam, the other regular with a reflector for high beam.
The advantage of this option is that it is a completely self-sufficient product that does not require any additional purchases , such as wires, regulator relays, remote control, etc. The package includes:
Wire harness, already soldered to contacts and laid in corrugation
Remote control with steering wheel switches (engine start/stop, off/low/high, electric start button)
Two regulator relays (why there are two is not clear, maybe the second one was installed by mistake)
- Meager instructions on one A4 sheet
Installing light on a pit bike
All we have to do is connect it all. To do this, remove the plastic with the seat, remove the gas tank , remove the switch , remove the number plate from the plug (a headlight will be installed in its place), remove start/stop button and disconnect all wiring .
Next, we attach four rubber clamps to the traverse stays, attach the muzzle to them, and bring the wires inside. We install the remote control on the steering wheel by unscrewing two bolts, lay the wire along the steering wheel to the traverse, and secure it with clamps where necessary.
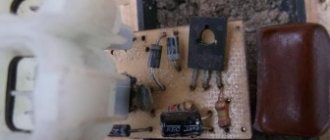
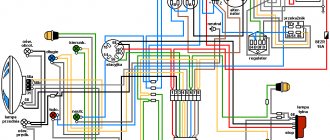
Universal adjustable switch
✔ in stock
RUB 1,690
about the product
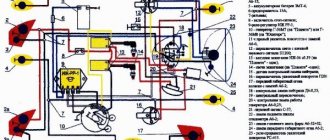
Before connecting, make sure that the voltage in the on-board network is no more than 15 volts (the norm is 14.5 V with a working regulator)! This is especially necessary if the old switch burns out. Otherwise, the new switch may also burn out. The measurement can be carried out with a multimeter on the terminals of the connected battery. If the test is done on a new switch and you don’t know whether the voltage in the network is normal, but the old switch is out of order, then the new switch, for safety and testing, MUST BE POWERED FROM A SEPARATE BATTERY. And then check the voltage in the network with the engine running. There is no speed (rpm) limiter. Adjusting the ignition timing. Adapter connector included: The switch fits 5-pin and 4-pin connectors. Suitable for most motors with DC commutator power system. Suitable for ATVs, pit bikes, dirt bikes and ATVs such as Lifan (LF110, LF125 engine), KAYO CFR MINI-A, Viper Active ZS110, HONDA CUB and many others Includes a male connector, it can be connected directly to the wiring, and already connect a switch to it. DC-CDI Switch for Chinese 4-Stroke Scooters and ATVs with DC Powered Switch! (DC-CDI), on such engines there is no high-voltage coil on the generator (wound with a thin wire and insulated), that is, all the coils are the same and wound with a thick wire. Does not fit 2-stroke Honda dio! A DC commutator is more stable (than a regular AC commutator), less dependent on engine speed and produces a more powerful spark at the coil. This switch can be installed instead of an AC switch; for this we isolate the supply wire from the generator; we take +12 volts anywhere in the wiring to power the switch as in the diagram below. We reconnect (if different from the diagram) the wires from the sensor, ground, coil. The switch with ignition timing adjustment is filled with silicone; if necessary, it can be easily removed to access the electronic components. Attention! Make sure the connection is correct! There are different options! Connecting our switch as in the diagram below: If necessary, rearrange the contacts in the chip. The switch has been tested, including on the VIPER (BASHAN) 200cc 167ML engine, works perfectly in the entire speed range. The switch has been tested, including on the ZiD lifan LF250ST-2 ATV with the SKYGO engine (172MM), it works perfectly in the entire speed range. The switch has been tested on Avantis Orion 250 and works great throughout the entire rev range. The switch has been tested on an Omaks SY200ZH-E tricycle and works perfectly throughout the entire speed range. The switch has been tested on an Irbis TTR250 and works perfectly throughout the entire rev range. Links to other universal switches: Link to a universal switch without manual adjustment UOZ 4-stroke Link to a universal DIGITAL switch 2-stroke