No matter what kind of electric scooter you buy, you need to maintain it in good working order so that you can enjoy it for a long time. Maintenance and inspection of your scooter's electric generator is very important, so you need to know how to properly diagnose and maintain it. Electric scooters and motorcycles require virtually no maintenance. In this article we will talk about the main ways to check the performance of an electric generator.
- Checking the scooter fuse
- Electric Scooter Motor Test
- Checking the speed controller
Most electric scooters use a hub motor or electric motor that is conveniently integrated into the hub of the front or rear wheel. This does not change the basic design of the device. Since the motor is attached to the wheel, it can move that wheel very efficiently. The generators are easy to install and easy to access for maintenance and repair. When you turn off the electric scooter to return to running mode, the hub functions just like a traditional wheel hub, which connects the tire, rim and spokes. To keep your electric scooter running, you need to regularly maintain your device.
Workshop Vspolye - Design and principle of operation of a scooter generator
Modern scooters are equipped with many electronic devices, which in turn consume current.
Oddly enough, even the battery is a consumer of current, because it requires charging. The headlight, battery, starting enrichment, tail lights and many other devices are powered by a generator. The role of the generator on a scooter is undeniably important, and its design from a technological point of view should not raise any questions, even for beginners. Ordinary physics, nothing more. The scooter's generator is a regular flywheel magdino. Power is supplied to consumers during rotation of the crankshaft, namely during engine operation.
When the flywheel with magnets rotates, an electric current is generated. The charging coil is located inside this flywheel. The magnetic field inside the charging coil is constantly changing, as a result of which a voltage is induced.
The scooter's generator produces only alternating current. Some scooter appliances require DC current as power. In particular, the battery must be charged using direct current only. Let's look at the differences between alternating current and direct current.
It is known that electric current is a directed flow of electrons from one pole of a current source to another. When the flow of electrons does not change motion constantly and does not change over time, such a current is called constant.
Alternating current consists of electrons that constantly change the direction of their movement. This is a short comparison, the details are not that important. In everyday life, the source of alternating current is the batteries of phones, cameras, laptops, ordinary batteries and other devices. Just like a scooter battery, they also require constant current to charge. As you know, any electronic device with a battery has a charger, external or internal. It is the charger that converts the mains voltage to the required one.
Same with a scooter, the battery must be charged periodically. It, like other electrical appliances, must be supplied with direct current. To convert alternating current to direct current, a rectifier is used on the scooter. Diodes are usually used to rectify current. As you know, current passes through diodes in only one direction, the “return” in this case is automatically filtered and we get the required direct current at the output. However, now it needs to be reduced to the desired value. The voltage regulator on the scooter, which is also a rectifier, is responsible for this indicator.
The current generated by the generator passes through a voltage regulator, which supplies the required current at the required voltage. Without it, normal operation of the scooter is impossible in principle, because the voltage constantly varies depending on the engine crankshaft speed.
The scooter battery is a constant consumer and is charged from the generator on a constant basis, even when charging is not required at a certain moment. The power of the generator is usually greater than the power consumption of all electrical appliances, but only slightly, so when installing, for example, an additional headlight, you will need to reduce the number of consumers or reduce the load on the generator by reducing the voltage consumption of these consumers.
Preparatory procedures
Where should you start first? Check all electrical connections on your scooter. Most of them can be found in the battery compartment. Make sure they are all tightly connected to each other. At this time, your scooter's battery pack will automatically check the main and individual battery connections. Bundles of wires should not hang freely.
Usually the battery compartment on a scooter is located at the bottom of the floor
Scooter engine initial test
Test the generator by making a direct connection to the battery. You will need to find an insulated wire to perform this procedure and cut 2 pieces approximately 20cm long.
- Raise the scooter so that the rear wheel does not touch the ground.
- Remove the battery cover and locate the 2 wires that come from the engine. Disconnect the motor wires from the controller - this is easy to do by unfastening the clamps.
- Using 2 wires, attach the first jumper wire to the red positive wire inside the motor wire clamp. Do the same with the black negative wire coming from the engine. Then take the red wire and make contact with the positive terminal of the battery and do the same with the black wire at the negative terminal.
- If the engine starts and the rear wheel rotates, the generator is fully operational. If the rear wheel does not rotate, then the problem is in the engine.
Generator on a scooter. Operating principle and repair.
Any modern scooter has such an important device as a generator. This device is an important element of the scooter, because it contains many electrical components.
The job of a scooter generator is to provide power to most appliances and all other items that require electricity. These include headlights, starter enrichment, parking lights, and even your scooter battery. If you have never seen this device, it is a magdino. The generator produces electricity through the process of rotating the flywheel. The flywheel itself contains a charging coil with an alternating magnetic field. Accordingly, when the scooter’s crankshaft rotates, the generator also rotates, delivering the required amount of current to all devices.
Difficulties
Our people don’t want to buy pullers and they put everything under the rotor and even try to knock it down with a hammer, and once I came across a scooter with a piece of some kind of metal welded to the rotor. They probably welded a hook and wanted to pull it off with a KAMAZ.
On the one hand, people can understand: why buy an expensive tool for a one-time job. On the other hand, I don’t understand people: why buy and personally damage a scooter with a hammer, if you can give it to a mechanic for repairs? A dilemma, whatever one may say.
Generator operating principle
As you already understand, the generator is the most important device of the scooter, and it is capable of producing only alternating current. But there are many cases when headlights, batteries and other devices only need direct current. And before we begin to consider this problem, we will study the concepts of alternating and direct current. Any type of electric current is a stream of charged particles, in other words they are called electrons. In the case of direct current, energy generation occurs without changing direction or magnitude. When the generator operates using the alternating current method, the flow of particles always changes direction and magnitude. Accordingly, to operate alternating current, batteries are required, which are found in most household devices. They allow devices to operate with alternating current, but in turn require a direct current source to charge them directly.
Alfa moped wiring diagram: features of domestic operation
With the development of trade relations between Russia and China, in addition to traditional knitted goods and consumer electronics, various auto and motorcycle equipment began to be imported en masse to our country.
And since the domestic motorcycle industry was experiencing a decline, the new items were to the taste of motorcyclists and began to be purchased en masse for their own needs. Of particular interest is the ALPHA moped with an air-cooled engine, which is sold in the Russian Federation as “Alpha 110cc” or “Alpha 49”. The numbers in the name indicate the engine displacement:
- 49 cc four-stroke air-cooled engine. cm, power 4.5 hp;
- 110 cc four-stroke air-cooled engine. cm, power 7 hp.
Mopeds, due to their external resemblance to motorcycles, differ from scooters, although they represent a separate class. However, the combination of technical parameters, ease of do-it-yourself maintenance and low operating cost have made this moped a sales leader on the Russian motorcycle market.
The role of a generator on a scooter
As you already know, a scooter battery always needs current, constantly, and to provide this, a generator is included in the work, which charges the battery throughout its operation. If the battery does not need to be charged, the generator still works and, if necessary, immediately transfers charge to the device. Even though the power of the generator is several times higher than other scooter devices, if it is necessary to install an additional device, in any case it is necessary to remove some other energy consumer. Let's say you wanted to install another headlight, but to do this you will have to remove the old one, otherwise the generator will not be able to function normally.
Generator circuit for a 150cc scooter
This is the main task and operating principle of such a complex, but at the same time very necessary device. Repairing a scooter generator can be very complicated, so it's best to take this issue to a professional.
Appearance of Alpha RX
Alpha RX is an updated version of the previous classic moped. The new moped has become more interesting and elegant in appearance. The exterior has a modern look which I liked. The tank has been updated, a two-level seat has been installed - the passenger is now slightly higher than the driver. The passenger's visibility is now better. The wings are now made of plastic, but only the front wing is painted. This already saves the wings from corrosion.
The headlight became larger than that of the classic Alpha, a serious halogen lamp was installed, and the light became brighter. The rear shock absorbers have become more advanced in shape. The motorcycle is also equipped with serious lighting equipment - front and rear lights, turn signals with sound, high and low beams, a signal and a brake light.
Very easy to use. Repair is possible with a minimum set of tools, but you will have to stock up on additional open-end wrenches: 9, 11 and 15.
It comes in two versions for sale: with a 72 cc and 110 cc engine. But lately they have been supplied partially unserviceable with a 50cc piston that will need to be upgraded. These versions of the models are called Alpha 7 and Alpha 11.
These numbers are deciphered as follows:
- 7 is an Alpha, which after modification will become a 72 cc model.
- 11 is the Alpha, which will become a 110 cc model.
Initially, these models cost like “fifty dollars” and they will not be able to drive. In any case, they will have to be modified. But according to the documents, they are like mopeds with 49.9 cubic meters and there is no need to register them with the traffic police. The only thing you need is a driver's license of any category.
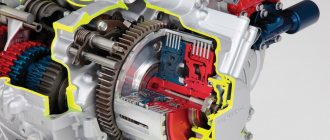
Design and principle of operation of a scooter generator
To the average person who is not experienced in electrical matters, a scooter generator may seem like a very complicated device. This is partly true: electric current is an invisible thing to the eye, and if we can see or touch mechanical faults, then we can only guess about faults in the electrics of a scooter or identify them using special measuring devices.
However, “it’s not the Gods who burn the pots” and if a person has a desire for something, then this article will be a good help, but for those who don’t want anything, there’s no point in continuing.
The scooter generator is a flywheel type generator with permanent magnet excitation. This type of generator is used on the vast majority of scooters, as well as mopeds and small motorcycles.
Designation of the main elements of the generator
The scooter generator consists of a rotor (in collective farm language - “anchor”) and a stator. The rotor is mounted directly on the crankshaft and while the engine is running, the rotor rotates around the stator coils
The stator is attached directly to the engine crankcase. And while the engine is running it remains motionless. The stator is a metal base made of several plates of special transformer iron. On the base of the stator there are special projections (coils) on top of which a copper wire is wound in a strictly defined order - forming the generator windings.
Depending on the generator model, there may be two or three windings. The generator shown below has three windings: supply, control and high-voltage
Permanent magnets are installed on the inner surface of the rotor. Magnets have different polarities. The magnets in the drain are covered with a lid; if you remove it, you can see them
Each magnet forms a static (constant) magnetic field around itself. In turn, the field of each magnet will be different: blue is negative (“north”), red is positive (“south”)
If we insert the stator into the rotor in the same way as is done on the engine, then we will see that the stator coils will be in the magnetic field of the magnets located next to them.
After we start the engine, the rotor magnets will begin to rotate around the stator coils. During the rotation of the rotor, magnets of different polarities will approach the coils, which always stand still, and the field in which the coils are located will change at a very high speed. Due to the rapid change of magnetic fields, magnetic induction will occur in the generator coils and the generator will begin to generate electric current.
Current is good. But the current of a generator with excitation from permanent magnets is not a constant value and directly depends on the engine speed: the higher the engine speed, the more often the field of the coils changes - the induction increases and, as a result, the voltage in the coils increases. So it turns out that at idle engine speed the generator voltage will be 8-10V, and at maximum 60-70V.
In order to stabilize the generator voltage to specified limits, a special generator voltage regulating module was introduced into the scooter’s power supply system. That’s what it’s called: generator relay-regulator.
Factory puller
The rotor can be removed using either a factory puller or a homemade one. The option with a factory and homemade puller has its pros and cons. I'll start with the disadvantages of the factory puller.
The main disadvantage of a factory puller is its price. A factory puller is very, very expensive. About 500-600 rubles. But price is essentially not a very important criterion for me. Versatility, reliability, ease of use and durability are much more important to me. Unfortunately, the factory puller does not have all these advantages, except perhaps ease of use.
The versatility of the factory puller is zero and, unfortunately, it is only suitable for a certain series of engines. And if you need to repair a scooter that is not widely used in our country, then you will also have to buy a new puller for it. And this will be very, very difficult to do, since tools for rare models of scooters are as rare on sale as spare parts.
The reliability of the factory puller is extremely low. I won’t say that the problem is in the design itself, rather the opposite: the design is more than perfect. And it’s much more perfect. Nut + bolt - that’s all its design.
But the quality... There is something to discuss here. The quality of factory pullers leaves much to be desired. They are enough for literally several times, and I’m talking about expensive pullers for 500-600 rubles.
Cheap ones at 220-250 rubles in terms of quality are completely out of the question. Not only are they made of some kind of plasticine, but even this seems not enough for the manufacturer of this shit. He still manages to make them thinner or even thicker than necessary.
This is what the cheapest puller looks like, or rather, what’s left of it: a bolt from it is lost somewhere. It was used only once - the thread was immediately torn off, both on the puller itself and on the rotor, although before using this guan it was good there.
How to unscrew the nut?
To fix the rotor, I sometimes use a homemade puller similar to the factory one. I made it from old unnecessary pieces of hardware, and it works no worse than the factory one.
If you don't mind the money, you can buy yourself a factory one. It is inexpensive and easier to operate than a steamed turnip: insert the pins into special holes in the rotor, rest the lever on something and calmly unscrew the nut. By the way, such clamps are sold not only in spare parts stores, but also in power tool stores.
In power tool stores, traders position this device as a universal wrench for loosening nuts on angle grinders (angle grinders). It’s called: “universal wrench for angle grinders.” It costs only 160 rubles, and the original, supposedly “correct” one costs 350 rubles.
If you buy the same one for yourself, immediately cut its pins, otherwise they are very long in stock and can damage the generator windings during operation.
Unscrew the bolts and remove the impeller from the rotor.
Let me digress a little: do not lose the bolts that secure the impeller to the rotor, but it is best to immediately remove them. I had the opportunity to repair a scooter, the owner of which lost the original bolt and tightened another one in its place, but it turned out to be a little longer and broke the windings when starting the engine.
The bolt was only a few millimeters longer than the original one.
We fix the rotor and unscrew the nut. As I already said: in my work I sometimes use homemade tools, in this case a puller.
We unscrew the nut and remove it together with the washer from the rotor. If the puck is not there, then someone has already managed to dig around there before you...
Homemade voltage regulator.
Greetings to all! Somehow my voltage regulator (not a relay-regulator, don’t confuse it) on a Chinese 4-stroke “fly”; I wasn’t planning on buying a new one, since the standard LV on all 4Ts is crap, so I went online to look for a diagram. I didn’t have to search for long; I found a very simple and cheap option: a shunt RN. But for proper operation, it was necessary to disassemble the generator and disconnect the wire from ground, and lead it out with a separate wire.. Well, okay, I won’t explain further, because not everyone knows about electrics. In Chinese 4t, as a rule, these are the LVs: The circuit is crap, the efficiency is crap, the resource is crap. Let’s assemble this one (For a single-phase generator, in our case): For a three-phase one: We have two options for connecting a homemade LV, I won’t drag it out and tell you what and how: The first option (with alteration of the generator): 1) We disassemble the generator, remove the stator from engine and this is what we see: Important: Where it says “The mass needs to be soldered off” we solder a separate wire onto the winding and bring it out, this will be one end of the winding. The other end will be the white wire. That's it, we're done, putting the generator back together. It should turn out like this: That is, we have two wires coming from the generator (Actually, there will be three of them, but we will need two). I won’t describe the connection of the LV further, I’ll show you a better picture: Done, all that remains is to connect the yellow wire from the old LV to the “+” of the battery. With this, the first version of the alteration is completed. Now our board. the network has a constant voltage.
Removing the rotor
Insert the bolts into the required holes. We take the bolts from the cooling impeller - they fit there perfectly. In order not to touch the windings, we screw restrictive nuts onto the bolts - they will not allow the bolts to go deep inside the generator.
We apply the puller to the rotor and screw the bolts into the holes. In order not to break the thread, slightly tighten the central bolt and see if all the bolts are tight. If any bolt is loose, tighten it.
This way we will evenly distribute the load between the bolts. If you neglect this moment, the entire load, unnoticed by you, can rest on only one bolt or two, and then they will break out of the rotor along with the thread. We don't need this, of course.
Now the main thing: what is there, you cannot tighten the central bolt by force. In this case, excessive force will not achieve anything. Everything must be done slowly and competently. Otherwise, you will tear the puller out of the rotor along with the roots, and then your budget will become completely financially insolvent.
You only need to remove the rotor this way: Lightly tighten the central bolt of the puller with a wrench, lightly hit the end of the central bolt with a small hammer - the rotor, usually, after the first blow, flies off the cone without talking, if it doesn’t fly off, pull the bolt again and hit again.
I learned this technique back in 1996, when I had the opportunity to remove the reel drive pulley of the Kolos combine harvester from the shaft. If it weren’t for one smart person who promptly told me how to work with a puller correctly, then I would have smashed both the pulley and the puller and the sledgehammer along with the combine...
The rotor sits on a key. If you do not plan to further disassemble the engine, leave it as is. And if you plan, you better get it, otherwise you’ll lose it.
A broken key can be easily removed with small pliers; if the key fits very tightly, leave it, it won’t get away from you.
So that you don’t have to guess later how your stator was positioned, we put marks with a core or take a photo, remember it, or do something else. This is necessary in order to protect yourself from problems with a lost outline.
Signs that a check is needed
If the battery on your scooter often runs out, and it is still quite new, this means that there is a problem with the operation of the relay regulator. As practice shows, it burns out quite often. If the device is faulty, the battery stops charging completely and loses its capacity. This means you won’t be able to start the scooter with a button; you’ll have to start it with a kickstarter.
Another characteristic sign of incorrect operation of the device may be the frequent burnout of incandescent light bulbs. They themselves are durable and have a good durability, but are quite sensitive to voltage changes. This happens because the optimal voltage in the scooter network is considered to be 12-13 V. Increasing this value even by 2 V reduces the service life of electronics and components by 2 times.
The greater the deviation from the norm, the greater the likelihood that something will burn out in the scooter. Therefore, when starting the scooter from the starter due to a power surge and a faulty relay, the bulbs usually burn out.
Signs of a malfunctioning regulator are identical for all models of Chinese scooters. They are especially typical for charging relays for scooters of Chinese models with an engine capacity of 50 cc. Therefore, before making a decision to replace something in electronics, testing systems and devices should begin with the relay regulator.
Read more: Replacing spark plugs for Nissan Maxima
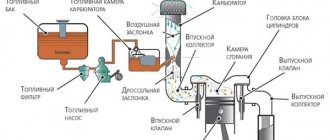
Checking the ignition coil
Disconnect the battery and remove the beak on the scooter. We disconnect the connector on the switch and measure the resistance on the coil with a meter. We put one probe in the connector on the black wire, and the second on the negative (green wire). There should be 4 ohms - this means that the wiring and the primary winding of the coil are working properly.
We check the second winding of the coil. We take out the probe from the contact of the green wire and insert it into the candlestick instead of the candle. And we leave the other probe on the contact of the h/w wire. The resistance should be about 7.85 kOhm. This indicates that the second winding, the armored wire and the candlestick itself are in good working order.
Let me remind you that the armor wire and the candlestick separately from the coil have a resistance of 5 - 8 kOhm. Such resistance is needed to suppress radio interference from the spark discharge, so as not to interfere with others listening to the radio in the car or at home. If you make an armored wire and a candlestick without resistance and drive next to someone who is listening to the radio. Then the radio stops working normally and begins to crackle in time with the spark discharge on the scooter (moped).
And if the device shows a break (i.e. does not react at all), then remove and check the candlestick and armored wire separately. If they ring, it means a break has occurred in the ignition coil. It cannot be repaired, it is solid, you will have to replace it with a new one. It's inexpensive and you can always buy it without any problems.