Lightweight and maneuverable mini-mopeds, also called scooters, have become the most mobile solution for city streets. It is convenient to maneuver in a traffic jam on a scooter; there are no problems with parking; in addition, learning how to operate it is quite simple. However, the owner of this vehicle will have to master at least minimal repair skills, since sooner or later parts will begin to fail. One of the repair operations is replacing the crankshaft.
How to remove, change and install the crankshaft on a scooter with your own hands
Compact and economical mini-mopeds, commonly called scooters, have flooded city streets. Owners of this type of equipment have to master the basics of repair, including learning how to change the crankshaft on a scooter. In any case, this procedure is available to everyone without exception and does not require special devices or special technical knowledge.
Replacing the crankshaft on a scooter - reasons for repair
Like any other engine, a scooter motor must have a crankshaft. Its task is to convert the reciprocating motion of the piston in the cylinder into rotational motion and ensure rotation of the rear wheel axis. The crankshaft on a scooter consists of two massive disks connected to each other by a connecting rod journal offset from the axis to the edge of the circle.
These discs perform the task of flywheels and ensure uniform rotation of the shaft in a given direction. Axle shafts on which bearings are mounted extend from the centers of each disk in different directions. Conventional ball bearings provide shaft rotation. The ends of the shaft transmit rotational motion to the generator and gearbox through the clutch.
The replacement of the crankshaft itself on a 4t scooter and other models is very rare, since this part is quite durable. However, there are several reasons for repair - replacement of a part, namely:
- tuning enthusiasts change shafts in an effort to change the technical characteristics of the engine;
- In the vast majority of cases, removing the crankshaft is necessary to replace bearings and seals. It is these parts that are subject to active wear and periodically need to be replaced;
- oil leak, engine vibration during operation, loss of power.
Actually, this ends the list of main factors explaining the need to start repairs.
Any moped repair begins with preparation
Since a scooter is one of the smallest types of vehicles, you won't have to put in much effort to repair the scooter's crankshaft. In a garage, with a set of auto repair tools and a workbench on hand, it is quite possible to complete the entire cycle of repair work. In order to remove the crankshaft and remove the bearings from its axle shafts, you need to stock up on simple pullers.
The crankshaft on a scooter is, without exaggeration, its central part. In order to get to it, you need to remove the engine and free it from all attachments, including: cylinder, generator, starter, carburetor and oil pump.
How to remove the crankshaft on a scooter?
The crankshaft is located in the engine block, which consists of two halves. Among motorcyclists you can hear the term “split the engine”. We are talking about separating the engine halves from each other and removing the crankshaft. This is done as follows:
- in order to prevent damage to the connecting rod and block, the surface of the connecting rod is wrapped in rags;
- unscrew the screws holding the halves of the block together (8 pieces);
- if the bearings are heavily worn and the block has already been disassembled, the halves will easily separate;
- if the block cannot be disassembled, then it is necessary to put a bar with holes on the crankshaft axle shaft (the central one is put on the crankshaft axle shaft, bolts are inserted into the other two, which are screwed into the threads of the block screws);
- with gradual tightening of the bolts, the opposite half of the block is squeezed out through the crankshaft.
As a rule, the bearings remain on the crankshaft axle shafts and can be removed using a puller. The oil seals are quite firmly fixed in the cages of the block halves. Having selected a nozzle of the appropriate diameter, which can be replaced by the head of a socket wrench, the oil seals are carefully knocked out.
Changing bearings on the crankshaft
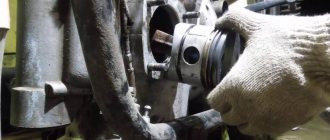
In order for the replacement of crankshaft bearings on a scooter to be carried out correctly, you must have a vice and a hair dryer. After securing the crankshaft with the axle shaft up, you need to use a hair dryer to heat the inner race of the bearing to about 100 degrees Celsius. After thermal expansion, the bearing should fall into place without much effort. The bearing is driven until it stops using a tube of suitable diameter. A similar procedure is carried out with the bearing of the second axle shaft.
What do you need to know and consider before starting work?
Before removing old oil seals from the engine block, you should mark or remember their seating depth. New oil seals are installed in a clean, dry race using a piece of tube or a nozzle of a suitable diameter. On many engines, the right and left oil seals differ in size. This must be taken into account before replacing the crankshaft on a scooter when purchasing a new kit. The oil seals must be installed exactly to the same depth as the old ones.
Features of replacing the crankshaft oil seal on a scooter
So, before us is a crankshaft with installed bearings and halves of the engine block with oil seals. It seems that the completion of the work is approaching, but the most crucial and difficult moment is yet to come. People's repair experience suggests the following features of the technology:
- if you just try to insert the crankshaft back into the block, then probably nothing will come of it;
- if the bearings fit into the block’s seat races too easily, then a new repair with replacement of blocks is not far off;
- the bearing must fit into the block with good interference. To overcome resistance, you should use a hair dryer. First, you need to heat the bearing seat in the block to a temperature of approximately 100 degrees Celsius, and only after that begin installing the crankshaft;
- When using a hairdryer, you must be careful not to heat the oil seal, otherwise it may overheat and melt;
- When installing the crankshaft, it is important to monitor the position of the connecting rod so that it does not rest against the block;
- after the crankshaft is installed in one half of the block, it is necessary to lubricate the joint with sealant (but very carefully), heat the seat of the second bearing and connect the halves of the block;
- they can be compressed together using a press, a vice or the screws with which they are held together;
- it is important that both parts approach each other strictly parallel without distortions;
- The crankshaft axle shafts must be lubricated with oil in advance to avoid damaging the seals.
Several proven rules for repairs
Opening the crankcase of any engine is a kind of surgical intervention in the “organism” of the vehicle. Whether a repair will be successful depends largely on the conditions in which the repair takes place. For successful repairs, you must follow some rules.
Before disassembling, the engine should be washed and the oil drained. You must work on a clean workbench with clean tools. Each removed part must be washed with kerosene, wiped and dried. No matter how much you rush, before assembling, all parts of the motor must be wiped dry and all threaded connections must be cleaned with compressed air.
For any repair, you must have the instructions for assembling the motor in front of you and strictly follow the order. There are no trifles in this matter. Good luck with the renovation.
Important Features
Usually it is not possible to simply install the crankshaft back into the block; to do this you need
know a few tricks. Bearings must be installed with great difficulty, and to simplify the work, the landing site is heated with a hair dryer. Thermal expansion will help complete the job much faster. When the crankshaft is placed in the first part of the block, the joint is pre-treated with sealant. In the same way, the place of the second bearing is heated, after which the halves of the block are connected. Both parts should be aligned exactly, without deviations or unnecessary distortions.
Any repair involving engine disassembly is comparable to surgery, so all work is carried out extremely carefully. Before work, the engine is washed and the oil is drained. All repair operations must be carried out exclusively on a clean workbench. It is better to disassemble a scooter yourself for the first time under the guidance of a more experienced technician, this will allow you to avoid unpleasant mistakes.
Photo report: Replacing scooter crankshaft bearings
Typically, scooter crankshaft main bearings last as long as the big end bearing, if not longer. But there are situations when, after disassembling and carefully checking all engine parts, it turns out that the crankshaft is still suitable for further use, but its main bearings are not.
And there's nothing you can do about it. Either change the crankshaft to a new one, or get rid of it and change only the bearings, which, by the way, cost pennies, and a new crankshaft is very, very expensive - this is the first important point.
Piston installation
Insert a retaining ring into any boss of the piston pin. It is most convenient to insert the ring with small round nose pliers. After installation, check how well and tightly the retaining ring fits.
- If the retaining ring does not cover the entire surface, but only a small part of it, replace it with a new one.
- If the retaining ring does not lie tightly in the groove and dangles, straighten it a little
Lubricate the bearings of the lower and upper connecting rod heads and the piston pin bosses with clean engine oil. We put the piston on the connecting rod, orienting it with the “IN” mark to the inlet port; if there is an “arrow” on the piston instead of the “IN” mark, orient the arrow to the exhaust port. We insert the piston pin into the boss - orient the piston on the connecting rod so that the pin hits the connecting rod - install the pin all the way into the locking ring and secure it from falling out with the second locking ring.
We install the cylinder guide bushings on the studs and put on the gasket. It is advisable to place the gasket on the sealant, but without fanaticism.
How to remove the crankshaft from a scooter?
The crankshaft is an integral part of a scooter or moped engine. Unlike the crankshafts of car engines, this part of the scooter is not a single piece, but a prefabricated or welded one. The crankshaft of a scooter engine consists of two disks that are connected to each other using a crankpin. From the center of each disk comes an axle shaft, on the landing belt of which a bearing is located.
The level of complexity of the scooter engine design allows you to remove the crankshaft yourself in a garage or small workshop. The main requirement for organizing a workplace for dismantling the crankshaft is the availability of a clean workbench of the required dimensions.
Why might your scooter require a crankshaft rebuild? There are the following reasons that require removing the crankshaft from the engine:
- Replacement of the crankshaft due to unsatisfactory workmanship of the original part. This reason occurs on inexpensive Chinese-made products.
- Replacement of bearings and oil seals. The quality and service life of bearings directly depends on the price category of the scooter. Inexpensive models are characterized by the use of low-quality components in the design, which may require their replacement.
- High level of vibrations, requiring balancing.
Installing piston rings
Remove the set of piston rings from the box. A piston ring set for a Chinese four-stroke scooter usually consists of five items. Three of which are a single assembled oil scraper ring, the other two: upper and lower compression.
A typical set of piston rings looks something like this
Or so
Carefully unpack the kit with perfectly clean hands.
In the kit you will find two of the thinnest rings and one thick corrugated ring (expander) - this will be an assembled oil scraper ring that needs to be installed on the piston first.
We place an expander in the lowest groove of the piston
We place thin oil scraper rings in the same groove - one under the expander, the second on top of the expander
We find the lower and upper compression rings in the kit and install them, respectively, in the middle and upper grooves of the piston - with marks on the side surface to the cylinder head (cylinder head). The lower compression ring differs from the upper one in color (not always) and the shape of the working edge (always). In most kits, the lower compression ring is painted black, and its working edge has a slight bevel.
Tags
The top compression ring in the vast majority of piston ring sets is a uniform light color. But this is in most cases, but in practice it happens that the kit comes with upper compression rings that are black or even red
By and large, the color is not particularly important to us, something else is important to us: the working edge of the upper compression ring has small roundings (chamfers) on the sides, and the working surface of the edge of the upper compression ring is covered with a shiny protective coating
For example, in this kit both compression rings are black. But the working surface of the upper compression ring is covered with a layer of protective coating, and small chamfers are removed on the edges of the working surface.
The lower compression ring has a matte working surface, and the working edge is beveled at a slight angle. All these moments are clearly visible in the photo.
The compression rings in this kit are red and black. As in the first case, the upper compression ring has chamfers on the working edge and a protective coating, and the lower one has a matte working edge beveled at an angle.
On classic piston ring sets, the upper compression ring has a light color and a rounded working edge. The bottom is dark in color and the working edge is beveled at a slight angle.
When installing the piston rings, do not forget about the marks. The marks on the rings after installation on the piston should be oriented towards the cylinder head (cylinder head).
Crankshaft removal technology
Disassembling the engine to remove the crankshaft involves the following sequence of actions:
- Wrap the engine connecting rod with a rag to protect the part from accidental damage.
- Unscrew the screws securing the cover using a wrench of the appropriate size. In the case of a stud connection, instead of screws, you need to unscrew the nuts, but it is not necessary to unscrew the studs from the body.
- Remove the engine housing cover. If the cover is difficult to remove, you need to use a puller. The puller is a strip with three holes. The crankshaft axle shaft is threaded into the central hole, and the other 2 have threads into which screws are screwed, which then enter the mounting holes on the engine housing.
- Remove the bearings from the crankshaft using a special puller.
Before starting dismantling work, you need to drain the engine oil from the engine housing and wipe the contaminated parts with a rag. After removal, the dismantled crankshaft must be washed with kerosene, wiped thoroughly and dried.
Setting the valve timing ch1 (in collective farm style - ignition)
We push the cylinder all the way into the crankcase and set the piston to top dead center (TDC). It is best to set the piston at TDC using an indicator or, at worst, visually/touch. You can also align the piston according to a special mark on the generator rotor, but I have more than once encountered the fact that the marks on some engines are stamped incorrectly and, in order to avoid troubles, I advise you to use them only as a last resort, for example, when the cylinder head is not removed and you need to adjust valve
We insert the cylinder head guide bushings and the lower timing chain guide into the cylinder, degrease the surface and install the gasket.
We install the cylinder head, insert the valve bed guide bushings.
Crankshaft restoration
Due to the fact that recently the vast majority of people have begun to look towards Chinese scooters, their number has increased. As you know, the quality is not at the highest level, but it is quite acceptable for trouble-free operation for 2-3 years or even more. I don’t want to write about factory scooters, because their quality is high (they keep the brand), but not all of them.
In general, this article is intended for all scooter riders without exception and does not have clear boundaries in the brand and year of manufacture of the scooter. We will consider the KShM - the crank mechanism of a 2-stroke engine.
Brief information: The crankshaft is designed to convert reciprocating energy into rotational energy. In other words, the crankshaft. This unit is not very complicated in design, but requires very precise weight distribution and proper installation. Also, certain conditions are required for normal operation.
Crankshaft design
similar for all scooters.
I touched upon the Chinese because their raw material for the crankshaft does not meet any quality standards. Naturally, there are also normal ones, but, as a rule, they are installed on good Chinese scooters and fail very rarely. I had a case - they brought an AF34E engine removed from a scooter for repair. They said it is very difficult to start, pulls so-so, overheats and consumes fuel immeasurably. After a 1-2 minute diagnosis, it turned out that the radical dead were in the trash. He told me to come in 2-3 days. Imagine my surprise when I disassembled the engine... The indigenous people stood with Daelim (56-20-12), they were in a clear state. But the Chinese, self-installed knee
gave itself away immediately. The bearing seat on the crankshaft on the variator side was so broken that the crankshaft moved up and down by more than 1 mm. This is a very critical situation. The bearings had to be pressed out with a puller. And they put it on the knee so easily that no effort was needed at all. In general, the situation is bad, and I had to look for a replacement knee and resort to bearing seat analysis.
Dismantling engines and gearboxes of Alpha mopeds
In order to disassemble the engine you need to do the following:
Remove the screws located in the intake manifold.
Remove all cylinder covers and screws.
Remove the cylinder head.
The gearbox is disassembled to replace parts such as rotors, clutches or cylinders.
In order to disassemble the gearbox you need to do the following:
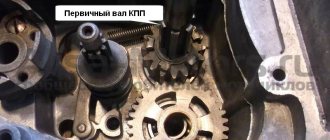
Remove the retaining ring, then the drive gear is removed.
Unscrew the locking gear screw, then remove the gear shift mechanism itself
Remove the shift fork and shaft, then the crankshaft and drum.
Put everything back to front.
And in conclusion, we would like to say that although the Alfa moped rarely breaks down, it is not worth disassembling and repairing it yourself if you lack knowledge and experience, or you are simply not completely sure that you can handle it, since if you want to save money, you can lose a lot more . Therefore, you should not refuse the services of professionals. But still, if you decide to repair the engine of the Alpha 110 moped yourself, do not forget to use the diagram or training video. And if there is no diagram, then mark the location of the parts on a piece of paper so as not to forget.
Alpha moped engine assembly (part 1)
Alpha moped engine assembly (part 2)
You might be interested in the Alfa 125 cc engine with automatic clutch, tuning
How to replace the timing chain in an engine
Having decided on such an action as replacing the timing chain of a scooter, you need to decide on how to implement your plan.
There are two replacement options:
- With a thorough disassembly of the scooter engine
- No engine disassembly.
How to change, everyone decides for themselves. Both methods, advantages and disadvantages are described in detail below.
With disassembly
You should choose the right tools - generator and variator pullers (you can make them yourself), a kickstarter sprocket puller, 8, 10, 12 and 17 mm sockets, a hammer, two screwdrivers (flat, Phillips).
The engine is removed from its place, the oil is poured out, all parts are wiped and cleaned. Next, remove the muffler and cooling casing. We remove the generator only with a puller. To do this, unscrew the bolts from the impeller and remove it from the rotor. It is necessary to fix the rotor with a puller and unscrew the nut. Then we tear the rotor off the crankshaft journal. Remove the variator cover. Also, secure the impeller with a puller, unscrew the nut, and remove the variator from the axle.
Below the variator is the kickstarter gear. Likewise, a puller is required for it. Then we clean the cylinder connector, valve covers and cylinder head. After unscrewing the bolts on the valve covers, remove it. Next, remove the scooter's timing chain tensioner. After unscrewing the bolts on the cylinder head, we pull out the camshaft bed.
Next, remove the chain from the camshaft and pull it out of bed. To avoid losing the guide bushings that center the parts relative to each other, you need to remove them and put them away. We remove the cylinder head, the cylinder itself, and the piston (to do this, remove the retaining ring and pin from the upper connecting rod head).
After unscrewing the bolts on the crankcase cover, tapping it a little, remove it from the engine. We take out the starter intermediate gear, use a screwdriver and a hammer to unscrew the overrunning clutch nut (clockwise) and remove the gear and housing from the trunnion. We reached the chain!
Remove the protective shield from the oil pump. Place a metal stick under the chain, twist the nut on the oil pump sprocket, remove it and remove the chain.
No disassembly
We take the following tools: a Phillips screwdriver, pliers, a new chain and a special puller. More details about it will be below. We flare the new chain - to do this, use a puller to press the pin out of the joint of the links, but not completely.
A little about the puller
It is called a timing chain puller. It can be made by a turner by turning a threaded extruding pin and rolling a strong pin into it with a diameter similar to that of a chain pin. You can purchase a ready-made bicycle one. Just narrow the pin a little to the desired size.
Remove the cooling casing from the scooter engine, then the cylinder head cover. Next you need to remove the chain tensioner. We remove the camshaft bed, take out the shaft, remove the star.
We take the puller, center it with the pin, and gradually press out the pin. You can press it out completely, it will not be useful. We compare the links of the new and old chains, thread the wire into the seat of the pin and fix the ends of both chains. We turn the cooling impeller counterclockwise, gradually replacing the old chain with a new one.