VESKO-TRANS.RU
AutoNews / Reviews / Tests
How to Remove the Generator Rotor on an Alpha Moped
Alpha Moped (72): Technical characteristics
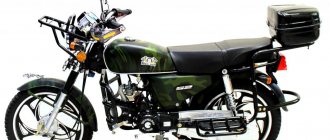
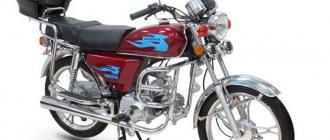
The Alpha moped (72) is the most common means of transportation for lovers of light motorcycles. This is due to the price of this equipment, its functionality and repair. The travel, speed and small amount of fuel needed to drive this vehicle were supplied by an Alpha moped (72 cubic meters). Popular alongside the most famous Japanese brands. This is no coincidence, because the engine that powers these lightweight motorcycles is an exact copy of Honda's Japanese Cuba, which is significantly comparable to the AK-47. Single engine 139 FMB 72 cc. cm works in any weather conditions and does not require frequent repairs or replacement of spare parts. Technical characteristics allow this vehicle to be used in the most extreme conditions, including in the cold, on sand and on any SUV. This is the best light motorcycle for Russia. In rural areas you can often find Alpha 72 mopeds. Photos of this model are easy to recognize. Simple and concise design, low cost, good speed, maneuverability, maintainability, efficiency and a number of other advantages. this is what stands behind the reputation of this mode of transport.
Unique ability to intersect
Because the Alpha wheels are thin, they can be submerged in wet sand under the rider's weight. But without the latter, this moped can be pulled on any road, helping it run the engine in first gear at low speeds. In urban conditions, if necessary, at the intersection of stairs or high curbs, the Alpha can climb like a regular bicycle. That's why the most remote corners are accessible to this lightweight motorcycle in the riverside forest where you can only ride a bike. Many lovers of hunting, fishing and mushroom picking prefer this moped because of its light weight. It is impossible for heavier and more powerful cars to drive along the path taken by a fallen tree in the forest, but for the Alfa there is no problem.
Good speed
The Alpha design allows it to be equipped with more “solid” engine options, increasing their power to 8 liters. With. But “Alpha” with such engines often requires repairs, the service life of the most important chassis elements is noticeably shorter, and dangerous vibration destruction begins. A more powerful engine will require an increase in the mass of other structural elements. This would be a loss of many benefits, especially in terms of potential and economics between countries that are alpha mopeds (72). The speed characteristics of these mopeds are perfectly balanced with the lightness and durability of their design and chassis.
engine
The reliability and unpretentiousness of the Alfa 72-liter four-stroke engine is due to its perfect design developed by Japanese specialists. Even in a slightly simplified version, using cheaper materials and lower demands on the quality of the unit, the FMB 139 engine is surprisingly reliable, which indicates the balance of all its components. The volume of this engine is only 5 liters. With. and maximum speed. 7500. However, thanks to a well-designed four-speed gearbox, the Alpha engine copes with constant loads across its transmission range.
Engine design
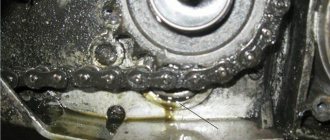
The design of the engine is very simple. There are two valves in the cylinder head. input and output. Their work is ensured by the time star located there, the rotation of which occurs synchronously with the magnet through a chain transmission. To the left of the engine is the gear lever, which operates a very simple gear system mounted on two parallel shafts in the engine housing. The oil pump is driven by the timing chain and is located under the crankshaft. On the right side of the engine is the clutch assembly inside the crankcase, which is operated by a lever using the clutch cable on the left drive.
Remove the generator rotor without a puller.
Our VKontakte group: we are removing a rotary generator
without a puller and remove the crankshaft.
How to remove the generator rotor
I continue to disassemble the engine.
Prevention and repair of Alpha engine at home
The alpha moped (72 cubic meters), like any car, needs regular maintenance and repair. Regular oil changes are essential for expansion. The oil change process is very simple. The engine warms up, then turns off and, using a drain hole located under the crankcase, hot oil is easily removed from the crankcase into a specially prepared tank. Then add new oil. Getting your engine running properly starts with adjusting the carburetor to enrich or neutralize the mixture. It is also necessary to regularly check the valves, adjusting the required clearances with a special 0.5 mm feeler gauge. Two or three times a season, you should check the chain tension, as well as the condition of the tensioning mechanism, rubber rollers and depressors. Any malfunctions in the Alpha engine are easily resolved. If thrust is lost, you must take off
Cylinder head and valve integrity check. Flushing valves are one of the possible faults of this engine. To restore functionality, you need to clean and reinstall them. This procedure is familiar to many owners of old Lada models. If the timing chain is damaged, it is necessary to remove the rotary generator and replace all timing components, and when reassembling the engine, ensure that the generator rotor and sprocket are synchronized with the correct cylinder stroke.
The coupling should be disassembled once a season and washed with gasoline, as it contains a viscous mixture of oil and metal powder. When the engine is regularly inspected and worn parts are properly installed and replaced, the FMB will operate reliably. Repair of alpha mopeds (72 cc). It does not require much investment and can be successfully done with minimal skills at home.
Recipes to increase 139 FMB power at home
The most common way to increase engine power on an Alpha moped. replace the piston group with a larger cylinder. Usually this replacement adds engine power, but does not greatly affect the speed of the moped. There are other ways. The easiest. This is dual ignition. You can step along the lip located on the rotor body, cutting a layer 0.5 mm thick from half of its metal surface from the edge that first touches the sensor while the rotor is moving. This will increase power by 5-10%. You can increase the diameter of the intake and exhaust valves. To do this, drill holes in the cylinder head for larger valves taken from the larger FMB 139 piston group. This operation increases power by 15-20%.
Design and principle of operation of a scooter generator
To the average person who is not experienced in electrical matters, a scooter generator may seem like a very complicated device. This is partly true: electric current is an invisible thing to the eye, and if we can see or touch mechanical faults, then we can only guess about faults in the electrics of a scooter or identify them using special measuring devices. However, “it’s not the Gods who burn the pots” and if a person has a desire for something, then this article will be a good help, but for those who don’t want anything, there’s no point in continuing.
The scooter generator is a flywheel type generator with permanent magnet excitation. This type of generator is used on the vast majority of scooters, as well as mopeds and small motorcycles.
Designation of the main elements of the generator
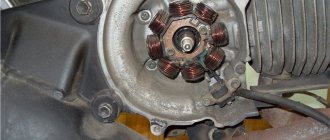
The scooter generator consists of a rotor (in collective farm language - “anchor”) and a stator. The rotor is mounted directly on the crankshaft and while the engine is running, the rotor rotates around the stator coils
The stator is attached directly to the engine crankcase. And while the engine is running it remains motionless. The stator is a metal base made of several plates of special transformer iron. On the base of the stator there are special projections (coils) on top of which a copper wire is wound in a strictly defined order - forming the generator windings.
Depending on the generator model, there may be two or three windings. The generator shown below has three windings: supply, control and high-voltage
Permanent magnets are installed on the inner surface of the rotor. Magnets have different polarities. The magnets in the drain are covered with a lid; if you remove it, you can see them
Each magnet forms a static (constant) magnetic field around itself. In turn, the field of each magnet will be different: blue is negative (“north”), red is positive (“south”)
If we insert the stator into the rotor in the same way as is done on the engine, then we will see that the stator coils will be in the magnetic field of the magnets located next to them
After we start the engine, the rotor magnets will begin to rotate around the stator coils. During the rotation of the rotor, magnets of different polarities will approach the coils, which always stand still, and the field in which the coils are located will change at a very high speed. Due to the rapid change of magnetic fields, magnetic induction will occur in the generator coils and the generator will begin to generate electric current.
how to remove the generator without a puller on Alpha/Delta mopeds, etc.
[sc:ads1] Despite the fact that the variator is one of the most durable and wear-resistant components of two-wheeled vehicles, sooner or later the motorist faces the problem of replacing it. A beginner inexperienced in the intricacies of motor mechanics, in view of the widespread opinion about the ease of operation and maintenance of minibikes, will most likely consider this a piece of cake, but everything is far from so simple .
Replacing a CVT in a home garage is quite difficult. The reason is that to dismantle this unit you must have dexterity (that is, straight hands), an understanding of the structure of the vehicle being repaired and, most importantly, specified tools.
If the first and second are purely a matter of profit, then the availability of the necessary repair kit will not be solved by itself. At specialized service stations, the variator is replaced using special pullers, which are provided by official representative offices of brands or are made independently by Kulibin motorcycle mechanics.
The main difficulty in removing the variator from a scooter is fixing the pulley and moving parts. To do this, it is necessary to have pullers suitable for the specific design of the vehicle assembly. This holder is available in several versions.
It can consist of two plates connected in the middle with a bolt (like scissors), with pins welded to the edges. The principle of operation of the tool is to fix the impeller. To do this, puller pins are inserted into the holes on it. Then, using a wrench of a suitable size, the nut on the axle is unscrewed and the variator is dismantled.
There is another design for a homemade puller. It consists of a ring slightly larger than the outer pulley with the teeth of a used variator plate welded along the inner circumference. For convenience, the tool is equipped with a handle holder. Despite the fundamentally different design, the principle of operation of such a puller is similar - fixation.
Air conditioning compressor from Chrysler
Around this time, I came across a refrigeration compressor and it turned out to be ideal as the basis for the engine I had planned. It was a Chrysler RV-2 automatic air conditioning compressor. The crank moved the pistons 90 degrees (V-twin design), with a 58.7mm bore and 33.4mm stroke.
In both cylinders, combined with the correct gas path, the displacement was 127.8 cc, which is more than double the volume compared to the Philips MP1002C engine. Being a refrigeration compressor, the design was made thoroughly and with sufficient margin of safety for such strong compression. In addition, this compressor contained a gerotor oil pump, which under pressure lubricated the edges of the large connecting rod bearings. Each aluminum piston had one compression ring and was connected through Alcoa aluminum connecting rods. This compressor turned out to be the most optimal for my idea.
Air conditioning compressor Chrysler RV-2
Years of development
Over the course of several years, I have designed and developed all the necessary components in order to adapt the compressor to work in a Stirling engine. I also designed a tubular support frame to support the engine. The frame is styled to resemble that used on a Philips generator set.
The heater head, displacer and inner cylinder are made of stainless steel 302 pipes of various sizes. I used a coil of copper wire as a regenerator. The cooler, located on the compression side of the engine, was made of aluminum tubes. Used a small 200 watt 12 volt belt driven generator that was originally purchased and intended to run on a garden tractor.
Here is this engine, called SV-2 MK I (Stirling V-2 Mark I):
Generator based on the Stirling engine SV-2 MK I (Stirling V-2 Mark 1)
Procedure
To properly remove the generator from the scooter, use the instructions below:
- Place your vehicle on the step and unscrew the side casing held on by 4-5 bolts;
- After removing the casing, you will need to remove the impeller that allows you to cool the engine;
- Then unscrew the nut on the shaft, which will become visible after unscrewing the impeller, using a wrench or a clamp;
- Remove the hall sensor by first removing the plate on which it is attached.
It should be noted that the hall sensor and the generator itself are connected to each other by a single wiring harness coming out of the casing, which is why you will have to disconnect the wires to dismantle the generator. To do this, you will need to crawl under the plastic and carefully disconnect all the connectors.
After this, you will need to unscrew the two bolts that secure the generator and easily disconnect the last one.
During such work, you must carefully ensure that the bolts and nuts that secure the scooter parts are not lost, since you are unlikely to be able to find suitable components if they are lost.
When the generator is properly removed, you can proceed to repair it or install a new device. By acting carefully, you can not only preserve the generator, but also save on the services of specialists.
Alfa moped wiring diagram: features of domestic operation
Did you like the article? Follow our channel for new ideas of useful car tips. Subscribe to us in Yandex.Zen. Subscribe.
With the development of trade relations between Russia and China, in addition to traditional knitted goods and consumer electronics, various auto and motorcycle equipment began to be imported en masse to our country. And since the domestic motorcycle industry was experiencing a decline, the new items were to the taste of motorcyclists and began to be purchased en masse for their own needs.
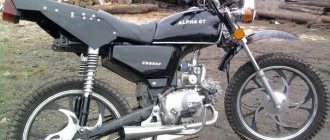
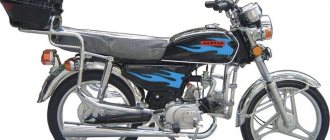
Of particular interest is the ALPHA moped with an air-cooled engine, which is sold in the Russian Federation as “Alpha 110cc” or “Alpha 49”. The numbers in the name indicate the engine displacement:
Mopeds, due to their external resemblance to motorcycles, differ from scooters, although they represent a separate class. However, the combination of technical parameters, ease of do-it-yourself maintenance and low operating cost have made this moped a sales leader on the Russian motorcycle market.
For reference: in China, several manufacturers assemble the ALPHA model. Among them are Horse, Chong Qing Bull, WONJAN, Omaks and a number of others. Companies such as AVM and SMoto also assemble mopeds in Russia. At the same time, the wiring diagram of the Alpha moped is identical, regardless of the location of assembly.
Scooter rear variator: disassembly and malfunctions
A CVT for a scooter is like a gearbox for a car. In principle, this is the gearbox. The rear variator is a manual continuously variable transmission. As a rule, all modern scooters are equipped with a V-belt variator. The peculiarity of its operation is that it works depending on the engine speed and despite the number of loads. If the scooter's rear variator is worn out, it can be easily felt while driving. The scooter loses its smooth ride, acceleration speed and maximum speed drop. It is not comfortable to ride a scooter for the reasons mentioned above.
The rear variator of a scooter is also called a centrifugal clutch. The operating principle of a centrifugal clutch is quite simple. At certain engine speeds, the clutch automatically connects the secondary shaft of the variator with the gearbox, this ensures a smooth start of the scooter from a standstill. To ensure comfortable travel, the rear variator must always be in good working order.
A scooter's variator (centrifugal clutch) usually lasts for more than one season. In Japanese scooters this can be 5 years or more. But even despite such excellent service, sooner or later he becomes unfit for service. To make it last longer, you need to disassemble the scooter’s variator before each season and evaluate its condition. Even for minor tuning of the variator, it needs to be completely disassembled.
First rules
How to calculate parameters, prevent overloads and short circuits, and also not overpay for fuel? This is the main question when choosing a reliable electric generator for your home, cottage or other facility. First of all, you need to check all the electrical equipment in the room, record the energy consumption of each device and calculate the amount. Most likely, the resulting amount will be quite high, and you should also remember about the inrush current coefficients and the required power reserve.
In order not to install a large 20 kW generator with a fuel consumption of 7 l/h, you need to select only those electrical appliances that you will need during power outages and the launch of an emergency power system. The lighting system, refrigerators, alarms and similar devices must be connected to the network. It is also important to run heating equipment with an electrical control system. Irons, hair dryers, vacuum cleaners and washing machines can wait until the city's power supply stabilizes. You should calculate which energy consumers will work all the time in non-stop mode, and which ones you will connect to the network periodically. For example, you may not run a microwave oven and an electric kettle at the same time so as not to create a high load. You can turn off the lights while using the computer or TV, and so on. Taking into account all these factors, you can approximately calculate the required operating efficiency of an electric generator.
Starting current coefficient
There is another important nuance that must be taken into account - the inrush current coefficient. When most electrical appliances start up, their power consumption increases for the first few milliseconds. For example, a standard 800 W microwave oven has a starting current coefficient of 2, so in the first second its energy consumption will be 1600 W. In most cases, these coefficients are distributed as follows:
Thus, you can calculate that if, during a power outage, 3 incandescent lamps of 100 W each are on in your home, a computer is running at 400 W, a refrigerator at 600 W, and you decide to clean with a vacuum cleaner at 1800 W (starting current coefficient 2.5) then you need a diesel - a 5.8 kW generator or gas generator, while it is advisable to leave some reserve and install a 7 kW power plant. If you try to perform these operations with an electric generator whose power is 4 kW, unwanted overloads will occur and the protection system will work. Therefore, calculating the optimal performance of a home station is of great importance.
Features of electrical equipment
Unlike domestic motorcycles and mopeds, Alfa already in its basic version has a number of advantages:
For reference: electronic ignition ensures trouble-free engine starting and stable operation in all operating modes. A simple circuit and the ease of replacing failed components with your own hands greatly simplifies the use of the vehicle.
Energy sources
The moped uses a circuit with a battery power source. The manufacturer does not recommend its operation without a battery, and the wiring diagram for the Alpha moped is additionally equipped with a relay regulator (see also the wiring diagram for UAZ 31512).
How to make a relay regulator with your own hands?
To make a relay regulator with your own hands, you need a diagram and a little knowledge. The model of a homemade regulator is based on the principle of disassembling the generator and outputting a separate end of the wire from ground.
As a diagram, you can take the relay-regulator connection diagram (Figure 3), and on its basis assemble a single-phase generator.
To collect the stabilizer you need:
- disassemble the generator and remove the stator from the engine;
- then you need to unsolder the ground from the generator, solder a separate additional wire for the winding to it and bring it out. This wire will be one end of the winding. The second end is the generator wire;
- After removing the wires, you need to reassemble the generator in reverse order.
With this device, the generator has 2 wires (there should be 3 in total). You can connect the stabilizer according to this scheme:
Do-it-yourself relay-regulator manufacturing diagram
At the end of the process, you need to connect the yellow wire from the old regulator to the “+” terminal in order to obtain a constant voltage on the sides of the network. Check the resulting voltage regulator on the scooter. At this point, the process of creating a homemade device can be considered complete.
The relay regulator is a very useful thing and necessary for the normal operation of the moped. However, it requires attention and constant monitoring of its work. Therefore, if the device fails or its performance is unsatisfactory, it is better to replace it with a new one, the cost of which today ranges from 300 to 500 rubles.
Owner reviews
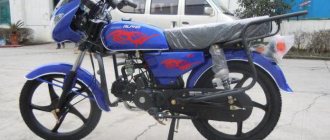
I drive a Zizer 400, the Alpha is parked in a country house in the countryside, there are no roads there, the Chinese is just right. The moped is already five years old, the mileage is less than 10k, the only breakdown is a broken clutch cable. Andrey, Volgograd.
It drives sadly, brakes sadly, looks boring, but what you pay is what you get. For the money, the Alpha RX is a decent bike if you need purely utilitarian transport at minimal cost. Spare parts are a penny, can be repaired on the knee. It copes with its tasks. Alexey, Novorossiysk.
I bought Alfa RX after buying two Chinese scooters - one was broken, the other was stolen. I liked driving with a manual transmission, you feel more confident. It picks up speed up to 60 mph confidently, then it becomes weaker. There is zero light from the standard headlight, so I installed a more powerful bulb. Otherwise ok. Dmitry, Saratov.
Moped maintenance
Like any vehicle, Alpha mopeds require routine maintenance, the essence of which boils down to:
Chinese engines quite confidently “maintain” 20,000 km on our domestic fuels and lubricants without breakdowns or overhaul of the piston group. The main thing is to change the oil in a timely manner, especially during the break-in period.
If you do not operate the moped in harsh conditions (winter, cross-country racing, etc.), then all oil seals and rubber seals will also last a long time.
Tip: Change your air filter often. This will save the carburetor and make it easier to start the engine in all operating modes.
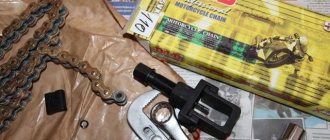
Factory puller
The rotor can be removed using either a factory puller or a homemade one. The option with a factory and homemade puller has its pros and cons. I'll start with the disadvantages of the factory puller.
The main disadvantage of a factory puller is its price. A factory puller is very, very expensive. About 500-600 rubles. But price is essentially not a very important criterion for me. Versatility, reliability, ease of use and durability are much more important to me. Unfortunately, the factory puller does not have all these advantages, except perhaps ease of use.
The versatility of the factory puller is zero and, unfortunately, it is only suitable for a certain series of engines. And if you need to repair a scooter that is not widely used in our country, then you will also have to buy a new puller for it. And this will be very, very difficult to do, since tools for rare models of scooters are as rare on sale as spare parts.
The reliability of the factory puller is extremely low. I won’t say that the problem is in the design itself, rather the opposite: the design is more than perfect. And it’s much more perfect. Nut + bolt - that’s all its design.
But the quality... There is something to discuss here. The quality of factory pullers leaves much to be desired. They are enough for literally several times, and I’m talking about expensive pullers for 500-600 rubles.
Supercharging (pressure injection in Stirling)
To obtain significant output power, it is necessary to increase the pressure in the working area of the engine. Knowing that the Philips engine operated at 12 bar (175 psi), I would like to have an engine that was structurally strong and compact to operate at these levels of internal working gas pressure. The working fluid was air, and it was chosen on the basis of practicality. I wanted my generator to be oil-lubricated, just like the Philips Stirling - this feature greatly contributes to the quiet operation and long service life that you really want in a Stirling engine.