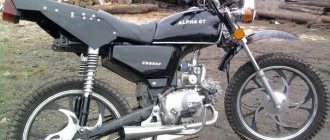
Chinese Alpha and Delta mopeds are in high demand among domestic consumers. They have an affordable price, as well as a modern electrical wiring system. You can choose a unit with a tachometer or electronic ignition. Ease of starting, reliability of the starter, and stylish design have made the Alpha the most popular motorcycle technology. If you have a moped like this and need to repair or update your electrical connections, we provide a clear wiring diagram to help ensure the green, blue, pink, yellow and black/red wires are connected correctly.
Extraordinary JAWA tuning in action!
Here, too, I simply have no words. On the one hand, most of the motorcycle is kept original - the lower part. The pipes are shiny, no oil is leaking from them, good tires are installed, the engine is clean
. Most likely, technically everything is fine with this motorcycle, but why “decorate” it like that?
I remember as a child I was perplexed when I saw motorcycles passing by, whose seats were covered with some kind of skin, carpet, fur coat or something like that. Is this really convenient?
What's wrong with standard casing? Even if it was in short supply, is it really impossible to use another, more suitable material?
Well, I’m generally silent about the fairing. The solution with lighting devices is strange, in my opinion. At the very least, very extraordinary. And yet it is not clear why he was wrapped in a rag. Probably to match the seat.
History of appearance and description of the motorcycle
The motorcycle's history dates back to 1929, when Frantisek Janicek acquired a license for the production of two-wheeled vehicles from the Wanderer company. The first motorcycles were not very popular due to their high cost, complexity of design and operation.
During the occupation of Czechoslovakia, the factory stopped producing equipment altogether and was completely transferred to the needs of the German military department. The jawa 638, familiar in the Soviet Union, began production in 1984 and had a modification of the jawa 638 5 00. This model replaced the previous machine with the index 350-633. Here the driving and performance characteristics of the motorcycle have been thoroughly improved.
The appearance of the motorcycle, although not very outstanding, is nevertheless eye-catching. Among its other brethren, it is distinguished by elements characteristic only of Java: a large headlight and turn signals protruding from it, a harmoniously located instrument panel above the headlight, a large, neatly shaped tank and a double, straight seat.
There are compartments under the seat and on both sides of the tank for storing tools or belongings. The maximum speed that the Java 350 638 motorcycle can reach according to its passport is 130 km/h, but many enthusiasts tuning the Java 638 achieved much higher figures.
The Java 638 engine is air-cooled, and this fact also left its mark on the appearance of the motorcycle. The engine is completely open, with clearly visible structural elements. The engine also operates at higher speeds than all Soviet motorcycles produced at that time.
The Java 638 gearbox leg served as a kick starter. To do this, it was necessary to press it a little into the gearbox housing and lift it up. In the Soviet Union there was only one drawback for the owners of this motorcycle - the almost complete lack of spare parts and zip kits for repairs.
The motorcycle has proven itself remarkably well in motorsports. This bike was used in both speedway and stage racing. Motorcycles with sidecars were also used for racing.
Specifications
| Length | 1840 mm |
| Width | 660 mm |
| Height | 1025 mm |
| Load capacity | 160 kg |
| Fuel consumption | 2 l/100 km |
| Maximum speed | 100 km/h |
| engine's type | four-stroke single-cylinder engine 1P39FMB |
| Cooling | air |
| Volume | 50 / 72 / 110 cc cm |
| Starting system | electric starter + kick starter |
| Maximum power | 7.2 hp at 7500 rpm. |
| Front suspension | telescopic fork |
| Rear suspension | pendulum, with two oil shock absorbers |
| Brakes | (front/rear): drum/drum |
| Front wheel size | 2.50-17 |
| Rear tire size | 2.75-17 |
| Color | Black mat, black gloss, blue, red, white, wet asphalt |
| Battery | 12 V |
| Fuel tank capacity | 5.5 l |
The Sabur Alfa scooter should not be confused with a similar model from the Jaguar manufacturer. They produce Alpha YQ50 mopeds, the technical characteristics of which are fundamentally different from those described above.
Improved appearance and safety
Think about safety first. Standard rims, and even more so drum brakes, are not able to cope with the increased power. It is recommended to install a good disc brake along with replacing spoked rims with alloy wheels. This will not only give a modern look to your bike, but will also significantly improve stability on the track. Accordingly, improved rims from another motorcycle are designed for greater braking force and have normal mounting for the brake disc. Good road tires are also a must.
Replacing headlights and other outdated lighting equipment will appeal to everyone. And the dashboard can be easily transformed by installing LED strip lighting.
The standard steering wheel can be easily replaced with clip-ons or a straight-shaped steering wheel, which will somewhat improve the driver’s aerodynamics due to the inclined seating position. Installing wind deflectors is no longer in fashion, as in Soviet times; they create too much air resistance in front of them. Much preferable is a sports body kit, which, depending on the financial investment, can be picked up from any other motorcycle, but if you really want to make it yourself from fiberglass and epoxy resin. Tuning a Java motorcycle in the photo:
And finally, we want to say that a forced engine requires good 2-stroke oil and timely maintenance. Java tuning is a fascinating activity that requires imagination and direct hands. If you follow the tuning technology, the result will not leave you indifferent
Adjusting the ignition timing of Jawa 350
Motorcycle engines have constant or variable ignition timing. With constant ignition timing, the beginning of the breaker break, and, consequently, the appearance of a spark, remains unchanged in all engine operating modes. With variable ignition timing, the moment of spark appearance is changed manually or automatically - with a centrifugal regulator, which, as the speed increases, increases the ignition timing from 10 to 30°. (see continuation)
In domestically produced motorcycles, the ignition timing is set according to factory data:
For two-cylinder engines M-61 and K-750, the breaker cam is a continuation of the camshaft, so the ignition timing is set at the factory. These machines have the same hammer break value for the right and left cylinders.
- - hole for decompressor;
- - rod for determining c. m.t.;
- — fixed contact of the breaker;
- — breaker lever;
- - fist.
Econostat
The econostat is a system that enriches the mixture at a high throttle position. Its device is very simple. The essence of the work is to take fuel from the float chamber with a pipe. Through the channels, the fuel rises into the diffuser and is sprayed in front of the throttle. This helps air bypass the throttle when it opens low.
In conclusion, we note that after each work carried out, adjusting the YAVA 638 carburetor is very important, see the video about which at the end of the article. It is also necessary to carry out timely maintenance of the carburetor, the essence of which is to clean the main working elements. Washing should be done as often as possible, preferably with diesel fuel or gasoline. It is better to treat resinous areas with caustic substances, for example, acetone. Otherwise, the system will not cause you problems.
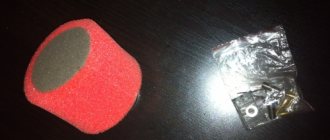
What will you need?
To install the ignition from a scooter in Java, we will need a specific conversion kit. First of all, there is the generator itself; there are two models to choose from. The simpler QMB-139 will perform all the necessary functions, but problems may arise with the light at night, since the winding for the head light is rather weak and will greatly depend on the speed. If this parameter is important to you, then choose a stator from the QMI-157 or 152QMI model - they will be sufficient to achieve your goals.
You will also need an ignition coil with two terminals, here again there is plenty to choose from. For our purposes, motor coils ZMZ-406 or from Oka are suitable.
You will need a 12 volt battery. We don't need a new one; any used motorcycle or new Chinese battery will do. Its role is to smooth out voltage drops in the turn signal and stop signal circuits.
Also, do not forget about the set of wires/terminals. It is better to take the latter from Japanese scooters.
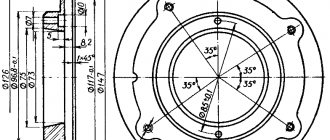
The last item is the adapter plate. Alas, it cannot be found on sale, but kind people have prepared the exact drawings presented below, according to which you can assemble your own adapter plate or order it. The thickness of the metal is 4 mm, this is an important parameter, because if you make the plate larger or smaller, some elements of the system may not fit or work incorrectly.
IL as a donor of spare parts
Let's consider, for example, the transition from 6 volts to 12 volts electrical equipment, and we will borrow the parts for such a conversion from the IZh motorcycle - fortunately, there are quite a lot of them sold in the post-Soviet space.
The wiring to Java will remain the same - if its condition is satisfactory, but the lamps and coil will have to be replaced. But you will get a more powerful system, which will affect all the characteristics of the motorcycle.
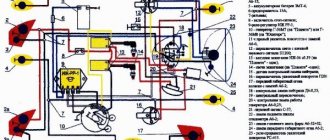
Scheme with decoding
Reasons for alteration:
- Elimination of weak headlight light is a phenomenon common to all Javas with 6V equipment;
- Elimination of undercharging of the battery during prolonged driving at low speeds;
- Breakdowns and failures due to wear of original 6V parts;
- Inability to purchase original components and consumables;
What do we take from the domestic motorcycle industry?
You will have to “implant” domestic parts into the Java scheme.
In fact, we will need a minimum set of parts from IZH:
- relay-regulator, indicated in the photo below under No. 1;
- generator rotor (under No. 2);
- stator windings (under No. 3);
- supply wire to the ignition switch at terminal 54 (under No. 4).
INSTALLATION OF BSZ
To do this, you need to prepare the following in advance:
- tools: screwdrivers, pliers, hammer, anvil, multimeter (preferably electronic), narrow ruler (up to 10mm wide) or calipers, file and needle files
— parts: switch (VAZ-2108), Hall sensor, connecting wire harness for them (ready-made for sale), two-terminal ignition coil from Gazelle or Oka, modulator (butterfly is made of magnetic metal 0.7-1 mm thick according to the drawing below) high-voltage wires (armored wires) high power (preferably silicone)
1.Initial stage
First, let's make a modulator if you haven't already made one. The easiest way to do this is to print out the drawing in real size (the dimensions of the drawing correspond to real measurements), stick the printout on a metal plate and cut out the modulator along the contours of the drawing
ATTENTION. Millimeter precision is important here! So no “glaring” can be allowed here
The edges of the modulator must be processed with a file so that there are no nicks or burrs.
2.Dismantling
— Disconnect the high-voltage wires from the spark plugs.
— Disconnect the inductor wires from the ignition coils
— Remove the ignition coils along with the high-voltage wires (we won’t need this anymore)
— Disconnect the capacitors from the breaker contacts
— Disconnect the inductor wires from the breaker contacts
— Remove the contacts from the ignition plate
— Unscrew all the screws from the ignition plate and remove it from the generator
3.Preparation
— Place the anvil on a flat surface
- Place the ignition plate on the anvil and smooth out all the bends with a hammer, and remove the breaker pins with pliers
— Unscrew the generator rotor bolt
4.Installation
— Hang the 2-pin ignition coil in a convenient place under the tank
— Connect wires 1 and 4 of the commutator to the coil as shown in the diagram, as well as high-voltage wires to the spark plugs (ATTENTION: NEVER USE HIGH-VOLTAGE WIRES FROM YOUR OLD COILS
FOR ELECTRONIC IGNITION YOU NEED POWERFUL WIRES, PREFERABLY SILICONE, SOLD IN ANY CAR SHOP!)
— Screw the modulator to the rotor with a standard armature bolt
— Attach the Hall sensor to the plate as shown in the photo
— Secure the switch in a place convenient for you (it is recommended to install it on the right cover of the air cleaner directly under the facing cover)
— Lay the connecting wires of the switch and the DC and connect to the switch and the DC
— Ground wire 2 of the switch to the motorcycle frame (do not ground to the tank!)
5.Adjusting the ignition timing (IPA)
5.1. Set the left piston to top dead center, and using a ruler (or caliper) move the piston back 3mm
5.2
Loosen the generator bolt securing the modulator (ATTENTION DO NOT ALLOW THE SMALLEST ROLL OF THE CRANKSHAFT.)
5.3. Connect the multimeter like this: the red clamp to the green wire of the hall sensor (at the input to the sensor from the green wire, you need to move the white heat shrink and gain access to the bare wire), and connect the black clamp of the multimeter to ground (for example, to the engine crankcase)
5.4. Set the multimeter to read voltage in the range of 0-20 volts
5.5. Turn on the ignition (the multimeter should show a value either equal to or close to zero)
5.6. Rotate the modulator very slowly so that its metal enters the Hall sensor while keeping an eye on the multimeter!
5.7. As soon as a reading of 4-12 volts appears on the multimeter, stop rotating the modulator, and turn it even more slowly in the opposite direction so that the device just shows zero again!
5.8. Tighten the alternator bolt WITHOUT TURNING THE MODULATOR AND CRANKSHAFT!
5.9. Check the position of the piston again and recheck the position of the modulator and the readings in this position of the device when it is tightened; if the readings deviate, then adjust by loosening the screws securing the plate with the DC and slowly rotate the entire plate until the readings are correct.
5.10. Check the readings for the right piston, only if the readings deviate, do not move anything from its place (neither the plate nor the modulator), but use a file to sharpen the edge of the modulator that enters the Hall sensor at this moment.
Alteration work
Let's start working directly in Java.
The modification instructions will be as follows:
We fasten the faceplate with M6 bolts. We use only with flush-mounted heads, since regular bolts will interfere with the operation of the rotor.
Installing the faceplate
We install the rotor and check its rotation. It should rotate freely and without play on the axis.
If the faceplate is installed correctly, the rotor will rotate freely
- We clamp it together with the flange under the modulator using a bolt.
- We mount the stator. First, we remove the terminal of the center of the stator windings - it will be needed for the relay for the generator operation indicator lamp.
We bring out the terminals for connecting a car relay from a VAZ 2101 to a control lamp
- We connect the wires.
- Install the breaker plate.
Installation of the plate. This option is made with a Hall sensor
That's all. All that remains is to check the functionality of our modernization, for which we start the engine with the cover removed. If necessary, set and adjust the ignition angle.
Types of BSZ
— Single-channel (one Hall sensor, two-lobe modulator, one switch, one two-terminal ignition coil operating on two cylinders at once)
— Two-channel (two Hall sensors, one, or better yet two, modulator lobe, two switches, two ignition coils, one for each cylinder)
It is preferable to install a single-channel system, since it will be more stable, because here you won’t have to adjust each cylinder (which you have to do at KSZ); here, if the modulator is made correctly, then only one cylinder is adjusted
Also, in a single-channel one, fewer wires are used, its parts take up less space, and energy consumption is lower (which is very important for 6-volt generators). There are many people who like to “get confused” who install a two-channel one, shouting at the same time that this way they can configure it more accurately, etc.
I assure you that these are unnecessary hassles, and there will be no accuracy here (why is indicated above)
There are many people who like to “get confused” who install a two-channel one, shouting at the same time that this way they can configure it more accurately, etc. I assure you that these are unnecessary hassles, and there will be no accuracy here (why is indicated above)
Spark plug. I said above that spark plugs “live” longer, which begs the question “Why?”
Actually the answer is simple. If you decide to install a single-channel BSZ (or a two-channel one with a two-lobe modulator), then this is what will happen:
When igniting in one cylinder, in the other, a spark will also strike at BDC, since it strikes simultaneously on both spark plugs, that is, spark twice per revolution on each spark plug.
Carburetor to the Planet, or how to distinguish a fake.
Hi all! After a long time, a good opportunity arose to talk about the K68 carburetor, and today I want to touch on the K68I carburetor, installed on the Planet 5 and Jupiter 5 motorcycles. There are, again, many myths and rumors about what the diffuser should be like, what the original K68 should look like , how to distinguish it from a fake of narrow-eyed friends from overseas, etc. The first thing I would like to note is that when compared with any Japanese analogue, and as it turns out they exist, it is quite primitive and terrible to set up. How many headaches and nightly thoughts before bed he brought me about how to set it up, and why it doesn’t work... Closer to the topic... The other day, after reading smart articles on the forums, I found a good article on how to distinguish a carburetor K68I from a Chinese fake. For general development, carburetors (Russia) are considered today one of the best offers on the market for motorcycles IZH Planet 5, as well as IZH Jupiter 5. So, the carburetor was ordered by me and delivered to me by the valiant Russian Post in 5 days, where I ordered I can give you a PM. The carburetor came in this form
On the box of the product itself, as well as on the product itself, there is the inscription “Made in Russia”; it’s up to you to decide whether this is a plus or a minus, but compared to my Chinese K68I, it’s still a plus. Also on the box there are instructions on how to check the product for authenticity, I checked, the carburetor is original. Also in the box, in addition to the carburetor, was a gasket and instructions with very useful information about everything related to the product itself. Setting, characteristics, etc.
But most importantly, my cat Kuzma approved the purchase, this, I think, is the main thing =)
Why so many photos? You will understand later. And so, let’s get started with the replacement, I didn’t bother removing and installing, it’s not difficult, and there’s information on the Internet on almost all forums, and that’s not what the article is about, but let’s continue. And so here are the photos of my Chinese “Kashka” and the original one. (In the first photo the original is below)
And so the differences:
1. Inscription. On the original it is clear, not blurry like on a fake, as well as the font size, on the original it is larger, the inscription language is ENGLISH.
2. Casting quality. It is also different, made with great passion for counterfeiting.
3. The color of the float chamber gasket should be BLACK.
4. The new “Pekarovsky” carburetor has transport cables, which are removed after installation; the Chinese fake does not have them.
5. Diffuser. In the original it is 32 mm, in my Chinese it is 30.5 mm, and this, for a minute, is a big difference, affecting primarily the power.
6. The diameter of the mixing chamber, in the original it is exactly 31.5 mm.
It seems that I have indicated everything, if I forgot something, I will definitely add it. I would also like to mention that even this original carburetor forced me to modify it a little, because there was a “bump” at the place where it adhered to the intake manifold, which is clearly visible in the photo above; I removed it with sandpaper. These problems are not very common, but they do occur. + Finally, I would like to wish everyone to be more vigilant when purchasing these products; there are a lot of, I repeat, a lot of Chinese feces on the market that do not allow your steel friends to work normally, not to mention the good ones characteristics, at least normal. Good luck to everyone, full tanks and smooth roads, take care of yourself!
Tags
- K68
- K68I
- Carburetor
- Fuel system
- Planet 5.
Installing the ignition from a scooter on Java 634
Post by krezo1977 » Mar 20, 2021, 9:47 pm
Hi all! This topic has been brewing for a long time, but unfortunately some of the developments were irretrievably lost.
First of all, I want to immediately clarify: very often some motorists point to the generator and say that it is the ignition. This is wrong; it is impossible to generalize completely different ignition and power supply systems into one whole. The presence of breaker contacts or sensors (optical or hall) on the generator does not give the right to call the generator “ignition”.
Many people are concerned about the problem of low lighting and battery charge. There are a lot of solutions, everyone approaches this in their own way. I also tried different options in search of the ideal generator, unfortunately, such an option does not exist, because... Not a single generator installed directly on the crankshaft without a gear ratio produces such an amount of electricity sufficient to power a halogen lamp in a headlight at idle speeds of up to 1000 and at the same time charge the battery. If in this case the battery charge indicator lamp on the dashboard does not light up, this does not mean that everything is in order; the problem can only be identified with a voltmeter. Some motorists believe that replacing the relay regulator can also solve this problem, again a misconception. The relay-regulator only cuts off excess voltage at high speeds so as not to burn out all consumers. You can install at least ten relay regulators, and if the generator does not generate the required amount of electricity, then it will not appear out of thin air, and all consumers are powered by the energy of the battery.
Features of electrical equipment
In many respects, the components and assemblies of the Czech motorcycle were similar to domestic products, but at the same time they differed:
- high quality;
- amazing wear resistance;
- maintainability and long service life.
In those years, Java motorcycles were in short supply, so they were often sold second-hand. And at the same time, the price remained quite high. New owners could immediately get behind the wheel and operate the equipment without any restrictions, because:
- wiring to Java did not require maintenance;
- the engine had a significant service life;
- shock absorbers and suspension had a fairly high safety margin;
- consumables were required no more often than provided for by the technical regulations.
However, the manufacturer constantly modernized its motorcycle models, and each time made changes to components and assemblies. In particular, in different years the following were supplied to the territory of the USSR:
- model 559-07 was produced since 1969 under the name “JAWA 250” and was a variant with a 250 cc engine producing 12 hp. with 6V equipment;
- model 634 (01-04) was produced from 1973 under the name “JAWA 350” and represented a variant with an increase to 350 cc. cm 16 hp motor, designed to work with 6V equipment;
- model 634 (01-08) was produced since 1977 under the name “JAWA 350”, but already with 12-volt equipment and on 16-inch wheels;
- Model 638 has been produced since 1986 under the name "JAWA 350". It had only visual differences in the shape of the frame and was equipped with 18-inch wheels (see wiring diagram for Java 638);
- Model 640 was the last modification that was officially supplied to our country. It was also designed to operate 12-volt equipment and had differences in design and suspension.
Equipment 6W
For the first 8 years of deliveries from Czechoslovakia, JAWA motorcycles were equipped with equipment designed for a current of 6V.
There are differences in the above diagram due to modification. In particular, the JAWA 634.8.00 model does not have:
- direction indicator warning lamp;
- neutral control lamp in the gearbox;
- breaker capacitors.
Subsequent motorcycles had these electrical parts installed at the factory. And domestic craftsmen independently equipped their “iron horses” using a new scheme.
Differences in voltage were not an obstacle for owners, who often independently converted the motorcycle’s power supply from 6V to 12V. This required:
- replace the generator with a new six-pole one with a self-excitation system of electric current, which made it possible to operate the motorcycle with a completely discharged battery;
- replace incandescent lamps with more powerful ones;
- install contactless electronic ignition;
- replace high voltage wires.
Equipment 12W
Later, the manufacturer recognized the promise of 12-volt equipment and began to equip its products with it. Thereby:
- electronic ignition appeared on motorcycles;
- changing the generator circuit made it possible to operate the vehicle without a battery (during the daytime);
- The luminous flux of the headlights has increased and the brightness of the side lights has increased.
Features of 12 volt equipment include a bipolar turn relay, which has not previously been found on motorcycles. Its operation scheme is based on the principle of the difference in the current consumption of the control lamp (6W) and the direction indicator lamps (21W):
when turning on the right turn, “+” from the generator or battery enters the right turn circuit, passing through the terminals of the bipolar relay;
- in this case, current is supplied to the right front and rear right turn signal lamps;
- The indicator lamp is directly connected with one contact to the right turn circuit, and the other to the left turn circuit. When the right turn is turned on, “+” is supplied to the control lamp, and “-” appears in the left circuit of the control lamp for the other contact, coming through the filament of the left lamp of the turn circuit (see also the Java 350 wiring diagram).
https://youtube.com/watch?v=icGYpxkA11o
Sports option
Tuning for sports, due to the technical features of Java, is the most common way of modifying it.
Basic requirements for sports motorcycles:
- Maximum speed.
- Acceleration speed.
- Controllability.
- Safety.
- Convenience.
One of the obvious disadvantages of the Java 350 is considered by many to be too light a front end, which begins to lose traction at high speeds. Therefore, despite the need for a general lightweight design, when installing a sports front fork, it will not be superfluous to place a counterweight. Changes to the chassis also include the installation of disc brakes, alloy wheels and a more wear-resistant chain from IZh motorcycles.
The performance characteristics of the Java 350 are largely relevant to this day, but the modernity of its design is a big question. The simplest option for external tuning for sports is to install parts from the Yamaha FZR400 and Kawasaki KR250 on a motorcycle. The first option is an excellent donor for the front wing, the second - for wheels, front forks and brakes, rear shock absorber and pendulum.
The last part for installation in the Java socket must be narrowed by replacing the standard bearings with needle bearings from the Volga pins. The combination of these innovations makes the motorcycle more maneuverable, stable and controllable. Body kits are made to order, both in workshops and by “home” craftsmen. Do-it-yourself external tuning of Java is also not uncommon. To do this, it is enough to be attentive and careful, and also to have a sufficient amount of plastic or fiberglass with you.
ADJUSTING THE QUALITY OF THE MIXTURE OF THE CARBURETOR JAVA 638 2928CE
The composition of the mixture at full and medium lift of the spool can be influenced in two ways - by changing the size of the main jet or the position of the needle. Moreover, the size of the nozzle has a greater impact on the composition of the mixture when the diffuser is fully open (raising the spool), and the position of the needle affects mainly at medium. Since when the spool is not fully raised, maximum power from the engine is not required, but efficiency is important, it is necessary that the mixture be lean. But excessive leaning will cause a “failure” in the engine’s operation at partial throttle opening modes. Therefore, it is necessary to choose a needle position such that the mixture is lean, and the engine operation remains stable in all modes, without “failures”. Lowering the needle (moving its latch upward) causes depletion, and raising it causes enrichment. Usually, after running in, the needle is lowered, moving the latch up one notch
However, it will be better if, when adjusting the carburetor in Java, moving the needle, you pay attention to the operation of the engine before and after the change, try different positions of the needle. It is advisable to make a selection, since this affects both the quality of engine operation and the overall fuel consumption of the motorcycle
Designations in the figure: 1 cylindrical spool; 2 needle valve; 3 idle jet; 4 additional system jets; 5 main jet; 6 spool needle; 7 needle guard.
We recommend reading:
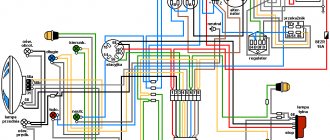
Another electrical connection diagram from the spare parts catalog for the Delta. Features of electrical equipment. The wiring for the Delta and all electrical equipment is quite traditional. However, this is exactly what will help toughen the motorcycle owner in the face of eternal breakdowns and make him a real ace in the electricity of his motorcycle.
There are 5 wires connected to the CDI module. Generators can also be different: 2-coil tachometer with two wires, 6-coil tachometer with three wires. As a result, the relay regulators will differ.
We recommend reading:. Wiring diagram for an Alpha moped with an electronic tachometer. The same simple operation of the moped also contributes to its popularity.
Wiring on an Alpha moped with an electronic switch in the ignition system For reference: electronic ignition ensures trouble-free engine starting and stable operation in all operating modes. Also, you cannot replace lamps with more powerful ones. The starting relay receives a thick red wire from the positive terminal of the battery. There are models where the motorcycle is completely converted to direct current, but these are old models and they are quite rare. ALPHA WIRING! ALPHA 110! MOPEDA WIRING
We install the ignition from the scooter to Java
First of all, we check whether our adapter plate is suitable, if so, then we attach it, install the rotor and stator. The latter should fit completely into the rotor; for convenience, we adjust the distance with washers. We install the sensor and make sure that everything rotates with a reserve and does not touch anything.
Now we need to modify the rotor. From the existing mark on the rotor, after 180 degrees we install a new mark. To maintain the accuracy of the procedure, it is best to use special devices that measure the angle of rotation; you can also use a lathe for this. We solder or weld the mark, obtaining 100% reliability of the unit.
The next step is to set the ignition timing. From the TDC point, we move the mark out from under the sensor by 2.5 mm, while the core should be located on the edge of the mark. The process is complex, so you should ask someone for help. The main thing is to securely fix the mark, turn it a few times and make sure that the settings still match.
Next, we set the gap, the optimal distance, between the plane of the mark and the core - 0.5 - 0.7 mm. To adjust, take a suitable probe and insert it between the mark and the core. The latter, under the influence of magnetic forces, will become at the optimal clearance distance. Next we make sure that the second gap is within the tolerances. If you have deviations in the gaps between the marks, you should make sure that they are within the acceptable values, otherwise the mark will have to be redone.
The next step is to assemble the circuit (wires, coils, etc.). To make it easier, you can use the diagram below.
Now, if you did everything correctly, you should check the operation of the entire system. First, we crank the crankshaft using a kickstarter, having previously unscrewed the spark plugs and placed them on the cylinders. The presence of a spark indicates that the electrical circuit is assembled correctly, but the accuracy of its settings can only be determined after the engine has been started. Smooth engine operation and responsiveness to gas are the first sign of success.
Why is it worth changing the electrical connections of the Alpha, Delta ignition
The need to replace individual elements of Alpha and Delta electrical wiring can be caused by various reasons. For example, your model was sold without a tachometer, but you want to install it. Or the wires responsible for connecting the ignition, starter, lighting devices and illuminating the indicators on the control panel have failed. There is also another reason why many drivers change not individual wires, but all electrical connections as a whole. This is due to the fact that even mopeds produced at domestic factories are not designed for operation in Russian climatic conditions. The cheapest plastic is used as insulation. Of course, this has a positive impact on the final cost of Alpha, Delta. However, at sub-zero temperatures, such insulation becomes brittle and begins to crumble. If you plan to use the moped in the cold season, it is better to immediately replace all electrical wiring with a better one. Moreover, this is not very difficult to do if you have certain skills, as well as a detailed diagram of connecting various wires.
The electrical connections of a moped can seem complicated and confusing unless you study the theory first. In this case, we offer for your reference the official wiring diagram for “Alpha” and “Delta” mopeds with an engine from 49.9 to 107 cubic centimeters.
Since this diagram is in color, you can easily determine where the blue, yellow, green, pink and black-red wires are connected. If you have a brand new moped, all wiring will fully match this color scheme. It's another matter if your vehicle has already been repaired or upgraded. Then you will have to focus on the location of the wires, as well as the devices connected to them. For example, the starter switch is powered by pink and black wires, and the ignition switch is powered by green, black, red and black and white.
Advantages of BSZ over KSZ
While writing the article, I sat and thought and thought, and still did not come to the conclusion of what exactly is the main advantage of BSZ; for me, all the advantages listed below are the main ones and are equal to each other.
— High stability of engine operation (synchronous operation of the cylinders, strictly in turn)
— Frisky review of the throttle
— Better engine thrust (which allows you to easily use the largest drive stars without difficult acceleration!)
— Candles “live” four times longer than on KSZ (I’ll write about this separately below)
— Less well-known “snot” from Java mufflers (since fuel and oil are burned much better)
— Longer service life of all crank bearings (as there is less extraneous detonation and vibration)
— Less fuel consumption (since it burns better, the carburetor must be adjusted to a lower fuel supply)
Electrical diagram
The electrical circuit of the YAVA 638 has been modernized based on the wiring of the previous model. The experimental 12-volt equipment was completely replaced and required the installation of a larger battery. Features of this innovation:
- the appearance of a 210-watt generator;
- possibility of installing an additional fog lamp;
- The stroller consumers were provided with current from a standard generator.
Thanks to the new system, the level of luminous flux was increased, which ensured driving safety at night. Spark formation has also improved, which contributes to more uniform and dynamic engine operation.
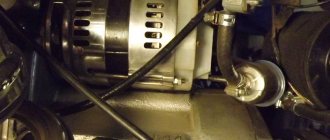
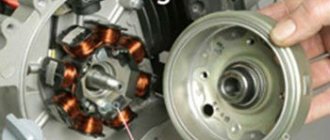
The new generator contains such basic elements as a rotor, stator and a metal casing. Its efficiency significantly exceeds the previously used 6-volt generator. This system allows charging even when the engine is running at low speeds.
However, the created system generated direct current, which needed to be converted into alternating current. For this purpose, a rectifier was built into the system. Its convenient location under the saddle makes it easy to carry out maintenance yourself.
However, when installing such equipment, the problem of overheating of the generator walls arose. It became impossible to use the rectifier inside a metal casing, so it was located under the driver's seat, providing air flow to cool the system.
The permissible power to a temperature of 150 degrees Celsius was 15 amperes. With the stroller and the use of all devices, it became possible to connect one additional consumer that does not require more than 40 watts of power.
Unfortunately, using a motorcycle in high temperature conditions of more than 30 degrees can lead to electrical equipment failure. For example, if the YAVA 638 does not start, there is a high probability that the stator winding has overheated or even the insulation has been damaged.
In general, we can say that innovations in the motorcycle have had a good effect not only on electricity consumers. Thanks to the new spark supply system, the engine began to work more evenly, as a result of which the bike became more dynamic. We can say that this unit was one of the best on the Soviet market.
Motorcycle chassis
The frame of this model is universal and made of durable components and materials. This was necessary in order for the motorcycle to work well with maximum load capacity and the installed sidecar. The telescopic fork Java 350 634 is made in such a way as to ensure confident movement not only around the city, but also in difficult terrain. Therefore, hydraulic front shock absorbers and a wheel with steel coil springs were installed.
To ensure good stability of the motorcycle on slippery roads, it was decided to install a wide rear fork support. By the way, the pendulum-type fork holds the rear wheel perfectly, which ensures traction.
Where to buy and how much it costs
You can buy a Sabur 110 scooter new or used. The price of a used moped ranges from $200 to $400. A new one will cost 550 conventional units. Official stores provide a 1-year warranty, sell equipment in installments and deliver throughout the Russian Federation.
In Ukraine, the price of a scooter is no different. Loans for motorcycles are issued by popular banking institutions, and transportation is carried out by transport companies (Novaya Poshta, Intime and others).
Sales in Belarus through stores. The cost of a used Sabur SB model released in 2009 with a mileage of 6000 km is 1160 Belarusian rubles. A new moped with a 72 cc engine will cost about 1,600 rubles. with the possibility of installments.