Cars admin26.02.2020
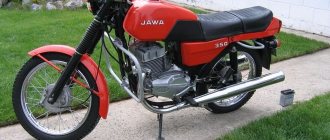
Until now, 6 volt Javas are famous for their reliability, superior even to modern models, but there is only one problem - their generator. Not only is the 6-volt generator very weak in power, but it also provides charging only at fairly high speeds, due to which you have to frequently rev the engine (reducing its service life), especially when traveling at night. Otherwise, the battery is discharged, because when the headlight is on, the generator cannot cope with its duties at speeds below a thousand. Well, one more disadvantage of all 6-volt motorcycles is that 6-volt electric spare parts are disappearing from sale. In this article we will look at one of the options for converting 6 volts to 12.
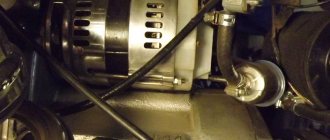
Moreover, we will replace the old Java 6 volt generator not with a 12 volt one from Java, as many do, but we will replace it with a very common and inexpensive (compared to Java) Izhevsk 12 volt generator, from Jupiter, which can be bought in any city. This generator is easy to install on a 6 volt 634 engine, and we will look at how to do this in detail.
I advise you to start upgrading by looking for a blank for the adapter faceplate, and as a blank I advise you to use a used piston from a truck (or rather the bottom of the piston), which can be found in the trash of any vehicle fleet in your city. Well, or look for a workpiece based on the reception of non-ferrous metals. Of course, the faceplate can also be machined from steel, but it is a little more difficult to process, and most importantly, it will be much heavier than aluminum.
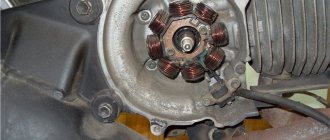
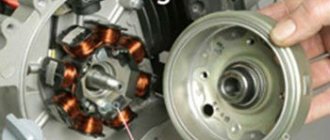
Faceplate for installing the Izhevsk generator (left) and modification of the Izhevsk stator (right). The red arrow shows the stator winding.
Having found the workpiece and reprinted the drawing on the left, you can go to a familiar turner. But don’t forget to take the Izhevsk stator, the side facing the crankshaft will need to be machined, as shown in the drawing. Moreover, grind it so that no more than 1 mm remains to the stator winding, that is, grind off the metal, which is shown in the drawing with a dotted line. Then, relative to the machined end, you will need to machine the seat for the faceplate by 4 mm. And ensure that the washer fits tightly onto the machined stator, but by hand, or by lightly tapping with a hammer. The gap (play) is undesirable here, but hammering the faceplate onto the stator with a sledgehammer is also inappropriate.
And warn the turner so that when fixing the stator into the machine chuck, he ensures that there is no slightest runout of the old bore diameter - this is important. Otherwise, after grooving and installing the stator, the armature will touch its windings (after all, the gap between the armature and the stator is very small).
Drill the holes for attaching the stator to the faceplate and for attaching the faceplate itself to the engine crankcase in place. By the way, an adapter for installing the Jupiter armature on the Java crankshaft cone is not needed. It is enough to slightly modify the Java key with a file, that is, make it lower in height and narrower in width, and the Jupiter armature will fit on the crankshaft of your Java. Just choose a slightly longer bolt to securely tighten the armature to the crankshaft.
When everything is ready and the holes in the faceplate for its fastening are drilled in place, tighten the faceplate to the crankcase, and be sure to use screws that have countersunk heads. Next, you should mark and, having removed the faceplate, drill holes in it to mount the generator, but so that its upper mounts are almost parallel relative to the surface of the earth. Moreover, the rear hole should be drilled slightly lower than the front, because this will make it easier for you to regulate the ignition.
When everything is secured, you will find that a little of the faceplate body will interfere with installing the motor cover in place. This means that this part of the body will need to be sharpened with a grinder. But still, the Jupiter generator (despite the fact that the turner grinds off part of the stator) protrudes out quite a lot. And in order to properly close the lid and tighten it with screws, you will need to cut a hole in it with a diameter of one hundred mm. This needs to be done carefully using a jigsaw in order to cut evenly and save the cut aluminum circle - it will come in handy.
How to find the center of this circle? Its center is located on the first letter A of the JAWA inscription on the engine cover. You will also need to cut out a jumper inside the cover (which is near the generator fastening bolt). Next, into the one hundred millimeter hole you cut, you will need to weld a piece of aluminum pipe with a diameter of one hundred mm and a height of 3 centimeters (30 millimeters) using an argon-arc apparatus.
You will also need to weld two threaded aluminum bosses on top to the pipe walls, in order to then pull the previously cut aluminum circle through a homemade rubber gasket. As I said, the pipe must be aluminum, firstly for normal welding, and secondly so that after cleaning the weld and polishing the welded pipe, the lid looks no worse than the branded one.
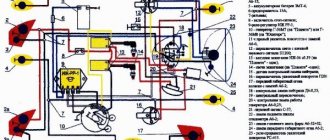
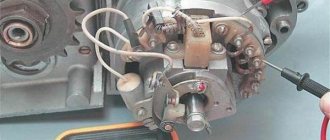
Electrical diagram for connecting Izhevsk electrical parts to Java electrical wiring. 1 - relay-regulator, 2 - generator rotor, 3 - stator windings, 4 - wire to terminal 54 of the ignition switch, x1 - x8 markings of the terminals on the Izhevsk relay-regulator.
Conversion of electrical equipment in Java
Our magazine has repeatedly discussed the shortcomings of the power supply of the YAVA-634 motorcycle, produced before 1985.
At low crankshaft speeds (up to 1800 per minute), the 6-volt generator does not produce energy, and all consumers at this time are powered by the battery. If the lights and headlights are on, the battery is quickly discharged, which, with repeated cycles, leads to its failure. The only measure to avoid this trouble is to maintain medium speed even on bad roads or stops at intersections. It is clear that this causes great inconvenience, especially for residents of rural areas. The currently produced JAVE model “638” uses a 12-volt electrical system (its description and diagram are given in No. 6, 1987), where a more advanced and powerful generator begins to operate already at 1000 rpm.
It is clear that many owners of the old model want to switch to new electrical equipment, but they encounter an obstacle: the main device - the generator - has different connecting and overall dimensions.
A student from the Ural city of Kurgan D. KUZNETSOV overcame this difficulty and successfully converted his car.
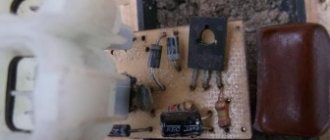
Through the Moscow special base of Rosposyltorg, the address of which is indicated in the instructions attached to the motorcycle, I received a generator (12 V, 210 W), a battery (12 V, 5 Ah) “Trepcha”. The choice is explained by the fact that the domestic battery 6 MTS-9 cannot be placed in the cramped underseat compartment without modification. I also purchased a rectifier, two ignition coils, and a turn signal relay. Since the “native” (model “638”) voltage regulator and warning lamp relay could not be found, I bought a PP330 relay from the Ural motorcycle, taking into account that the difference in generator power between JAVA and Ural is small - 210 and 200 W, respectively .
The essence of the change is as follows.
Mechanical part . We make transition flanges (Fig. 1) and cones (Fig. 2) from steel of any grade. When marking the flange, we use the generator stator as a template, and the cone as the rotor. In addition, it is necessary, having assembled the stator with the flange, to cut a small recess into them with a round file for the screw securing the right crankcase cover. We install the adapter flange instead of the old 6-volt generator in the crankcase bore and fasten it with two M6 X 30 screws. Then we put the adapter cone and the generator rotor on the crankshaft journal. We fasten the stator with four M6 X 10 screws to the adapter flange. To avoid damaging the brushes when installing new parts, it is better to temporarily remove them from the generator.
Rice. 1. Adapter flange.
Rice. 2. Transition cone .
Since the new generator is larger in size, it is necessary to process (preferably on a vertical milling machine, but also manually) the right crankcase cover, removing part of the partition. To avoid damaging the cover on the machine, first insert a spacer, as shown in Fig. 3. In addition, from a suitable material - plastic, cardboard, etc., we make a spacer under the cover with a thickness of 4 mm, using the right crankcase cover as a template.
Rice. 3. Crankcase cover : 1 - spacer; 2 - spacer; 3 - partition.
To protect the generator from dust and dirt, we glue in a rubber partition. We use epoxy glue for it and the gasket.
It is also necessary to prevent the brake pedal from touching the now “expanded” engine - by removing the pedal and the brake shaft, shorten it by 4 mm or make a new spacer sleeve 5 (Fig. 4) and grind sleeve 7 4 mm long. After assembly according to the figure, the pedal will be shifted to the right.
Rice. 4. Foot brake drive : 1 - brake lever; 2 - adjusting screw; 3 — felt ring; 4 — motorcycle frame; 5 — spacer sleeve; 6 — brake pedal shaft; 7 — additional spacer sleeve; 8 — brake pedal.
Electrical part . To redo the electrical wiring, you need to stock up on 6.3 mm wide plugs and colored automotive electrical wiring. If we use devices from the “638” model, we connect them according to the “native” circuit published in “Behind the Wheel” (1987, No. 6). When a PP330 relay-regulator is used (from Ural or another 12-volt one with the same terminals), we carry out the wiring as indicated in Fig. 5. In any case, you will have to change the connection diagram for the neutral control lamps and the operation of the generator. To do this, you need to remove the jumper connecting these lamps.
Rice. 5. Power supply system diagram : 1 - ignition coils; 2 — brake light switch; 3 - generator; 4 - rectifier; 5 - battery; 6 - fuse; 7 - relay regulator; 8 — neutral gear lamp switch; 9 — neutral gear lamp; 10 - indicator lamp for generator operation.
Further. We connect the blue wire coming from pin “54” of the ignition switch to the neutral control lamp. We connect the generator control lamp with an additional wire to the housing. To ensure a reliable “ground” for the tachometer and speedometer backlight lamps, it is necessary to lay another “negative” wire, as was done for the JAVA model “638” (see the above-mentioned diagram in the magazine). We connect the additional wire from the brake light switch to the “VZ” contact of the PP330 relay, the drive from the DF contact of the generator excitation winding to the “W” contact. We connect the blue wire from the generator warning lamp to the “LC” contact. Contact “86” of the generator is connected to contact “~” on the relay. It is advisable to immediately install the ground switch on the negative wire running from the battery to the motorcycle frame.
As for the headlight, to connect a new lamp you need to replace the narrow plugs with wide ones from any motorcycle or modern car headlight that has a 45/40 W lamp. You can use old wires from the ignition coils, bending their plug tips just a little. I installed the PP330 relay-regulator and rectifier in the seat compartment.
Replacing 6-volt to 12-volt ignition coils, light bulbs, turn signal relays and horn does not cause any difficulties.
In a similar way, I converted my model 634-7-00 nuclear power plant in 1985, and then two more cars were converted according to my drawings.
1988N07P14-15
Increasing the voltage: Java wiring with IL parts
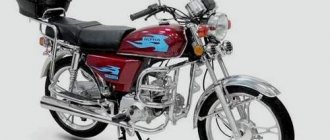
For various reasons, you may be the owner of a legendary Java - it’s your father’s, older brother’s motorcycle, or you just bought a legendary vehicle for the occasion. But here’s the problem - the motorcycle is often far from ideal condition, for example, you may be upset by such a nuisance as the wiring of the Java, which has delaminated from old age, was probably stored in an unheated barn or garage, and a new set cannot be found in your city.
There are few well-groomed specimens of Java left
What’s most annoying is that the work of replacing most parts and assemblies is quite simple , but the lack of spare parts immobilizes your vehicle indefinitely. Moreover, the price of parts tends to rise every year, which forces us to show skillful hands and ingenuity. But the result lives up to all expectations.
Five random motorcycles:
RUB 723,000*
Zero S 2015
Yamaha RD 500LC YPVS 1984
Victory Project 156 by Roland Sands 2015
KYMCO KR Sport/Quannon 2007
RUB 356,000*
KTM F reeride 250 2012
IL as a donor of spare parts
Let's consider, for example, the transition from 6 volts to 12 volts electrical equipment, and we will borrow the parts for such a conversion from the IZh motorcycle - fortunately, there are quite a lot of them sold in the post-Soviet space.
The wiring to Java will remain the same - if its condition is satisfactory, but the lamps and coil will have to be replaced. But you will get a more powerful system, which will affect all the characteristics of the motorcycle.
Scheme with decoding
- Elimination of weak headlight light is a phenomenon common to all Javas with 6V equipment;
- Elimination of undercharging of the battery during prolonged driving at low speeds;
- Breakdowns and failures due to wear of original 6V parts;
- Inability to purchase original components and consumables;
What do we take from the domestic motorcycle industry?
You will have to “implant” domestic parts into the Java scheme.
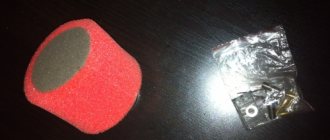
In fact, we will need a minimum set of parts from IZH:
- relay-regulator, indicated in the photo below under No. 1;
- generator rotor (under No. 2);
- stator windings (under No. 3);
- supply wire to the ignition switch at terminal 54 (under No. 4).
Custom parts
A faceplate for a generator - you can order it from a familiar turner.
You can’t do without the help of a turner. If so, then start by searching for him through friends or newspaper advertisements.
- Adapter washer (faceplate) for installing the generator;
- Modification of the stator - the side facing the crankshaft will have to be shortened;
- Groove of the seat.
The video below demonstrates the operation of a Java motorcycle with a 12-volt generator from IZH.
This is exactly the result that you will get if you follow the proposed procedure for modernizing your Java.
Source
Five random articles about motorcycles:
Using a chain cover from a motorcycle Voskhod on Java 634
Covers for Java On some Java-634 motorcycles (from the first batches of delivery), chain covers fail quite quickly, and it is still difficult to purchase new ones.
Instead, you can use covers from the Voskhod motorcycle to protect the chain. Alteration of the casing: 1— frame; 2—plate; 3— spacer sleeve; 4 - old part of the casing; 5 - extension To secure them. it is necessary to make two extensions 5 (see figure) and two spacer bushings 3, through which we connect the halves of the casing. We make extensions using a mandrel. We weld (or solder) frames 1 to them, which we first cut off from the old casings using a thin chisel. It is advisable to seal all connections on the casing by soldering or another method. For more reliable fastening of the covers, you should make new clamps or strengthen the old ones by welding metal plates to them. On my motorcycle, after a run of 5,000 kilometers, the covers have their original appearance.A. KORNILOV 606230, Gorky region… Read more >>
JAWA 210 AUTOMATIC
JAWA 210 AUTOMATIC JAWA mopeds, produced in Považska Bystrica (Czechoslovakia), continue the tradition of the plant, where in the post-war years they made micromotorcycles "Manet", and in the 50s - "JAWA Pioneer", JAWA-50, which were also supplied to our country.
Among its current products are the YAVA-207 mopeds, also known under the “Babette” brand (“Behind the Wheel,” 1980, No. 5). Inexpensive, fuel-efficient cars are quite popular; 80% of their output is exported to 35 countries. Recently, the plant mastered another moped model - YAVA-210. Its clutch and gearbox are automatic, making the moped especially easy to operate. It also has a foot pedal drive. A single-seater car reaches a speed of up to 40 km/h. Shoe wheel brakes are operated by levers on the steering wheel. Technical characteristics of the moped Java 210 automatic General data: curb weight - 54 kg; load capacity (including 5 kg of luggage) - 90 kg; speed - 40 km/h; fuel reserve - 3.8 l; consumption... Read more >>
To prevent the fork from knocking
How to eliminate play in the front fork rod in the upper bridge On some YAVA motorcycles, after 30 - 50 thousand kilometers, wear leads to play in the front fork rod in the upper bridge.
It reveals itself with unpleasant knocking noises when driving on bad roads. Using foil to reduce the gap is ineffective, and tightening the nut does nothing. It was possible to eliminate the backlash using a special nut and a conical ring (Fig. 1). They are made of tool steel (you can, for example, use 40X) with hardening to a hardness of 45 - 50 HRC. We install new parts instead of the round nut, as shown in Fig. 2. When the upper nut is tightened, the split ring opens and tightly fixes the fork rod in the upper bridge. In this case, you do not need to install the lock washer. Rice. 1. Nut (left) and ring. Rice. 2. Mounting unit for the upper bridge: 1 — steering column of the frame; 2 - cone nut: 3 - bridge: 4 - split ring; 5 - nut;... Read more >>
Difficulties when changing gears on an IZH Jupiter motorcycle
The reason is in the clutch “On my IZH-Jupiter motorcycle, something strange happens with the gear shift.
When parked, when the engine is not running, all gears shift quite clearly. When I start the engine, it is extremely difficult to switch gears on or off. What's the matter!" - asks Yu. Grinko from Irbit. Elimination of this defect must begin with adjusting the clutch release drive. Since Jupiter motorcycles have gear shifting interlocked with clutch release, there are several features in the adjustment operation. First, you need to completely screw in the fitting on the left side of the steering wheel to completely release the clutch cable. After this, open the hatch on the left crankcase cover (there is no need to talk about the fact that you first need to remove the gear shift lever), loosen the clutch adjustment lock nut and, by screwing in or out the adjusting screw in the center of the pressure plate, find where it is positioned... Read more >>
Motorcycle IZH Jupiter 4 with sidecar
The first material about editorial tests of the IZH-Jupiter-4 motorcycle with a sidecar (“Behind the Wheel,” 1981, No. 11) talked about what distinguishes this model from the previous ones, and about the beginning of the run-in.
Now the motorcycle has covered about 7,000 kilometers, and there is an opportunity to evaluate its driving performance and the design of some components. When the speedometer showed just over 6,000 kilometers and the engine was running perfectly, we began to be bothered by a noise, the source of which was somewhere under the left crankcase cover. The noise is not loud, but quite unpleasant (note that, unfortunately, this sound is well known to many Jupiter fans). The assumption arose that the fault should be looked for in the motor chain drive. When the crankcase cover was removed at a service station in Zagorsk, the diagnosis was confirmed: the motor transmission chain was very stretched. Willy-nilly, I had to replace it with a new one. This fact, naturally, cannot but upset, since the mileage of the motorcycle is... Read more >>
login registration forgot your password?
Motorcycle goods store About the store Terms and return procedure
IL as a donor of spare parts
Let's consider, for example, the transition from 6 volts to 12 volts electrical equipment, and we will borrow the parts for such a conversion from the IZh motorcycle - fortunately, there are quite a lot of them sold in the post-Soviet space.
Note! Motorcycle manufacturer JAWA itself changed the voltage on its next models. This is discussed in more detail in the publication about the wiring of Java 634 and 638. And it would be more logical to use original parts, but, as mentioned above, the lack of spare parts and their exorbitant price do not provide such an opportunity.
The wiring to Java will remain the same - if its condition is satisfactory, but the lamps and coil will have to be replaced. But you will get a more powerful system, which will affect all the characteristics of the motorcycle.
Scheme with decoding
Advice! If you decide to make such a modification, you will also need a Java 12 V wiring diagram, presented above in high resolution (1000x700)
Reasons for alteration:
- Elimination of weak headlight light is a phenomenon common to all Javas with 6V equipment;
- Elimination of undercharging of the battery during prolonged driving at low speeds;
- Breakdowns and failures due to wear of original 6V parts;
- Inability to purchase original components and consumables;
What do we take from the domestic motorcycle industry?
Note! The 12-volt IZh components are quite easy to adapt to the 634 motor with your own hands. That is why this modification should be considered as a working option.
Advice: There are modifications using parts from Chinese Delta scooters and mopeds. But we do not recommend them, since the quality of the parts is not up to par.
In fact, we will need a minimum set of parts from IZH:
- relay-regulator, indicated in the photo below under No. 1;
- generator rotor (under No. 2);
- stator windings (under No. 3);
- supply wire to the ignition switch at terminal 54 (under No. 4).
For reference: also on the installation diagram of “Izhevsk” parts in the Java electrical circuit, the terminal markings of the relay-regulator block are indicated (from X1 to X8).
Custom parts
You can't do it without the help of a turner. If so, then start by searching for him through friends or newspaper advertisements.