How to remove a generator on a scooter
The generator is removed from the scooter in the same way, regardless of the model, manufacturer and year of manufacture.
The only thing you will need is a special tool called a generator rotor puller. You can purchase a generator rotor puller at any specialized store. The main thing is to check whether the tool is suitable for your scooter model. If you can’t find a puller in stores in your city, it’s better to order it online, since you won’t be able to remove the generator on a scooter without this tool - damage to the winding is guaranteed and, as a result, the purchase of a new generator.
In addition to the puller, you may need a lock that can be used to lock the rotor or clutch bell in one position.
It should be noted that the generator needs to be dismantled only if such faults are detected as:
- generator breakdown and winding damage;
- if the crankshaft oil seal on the generator side begins to leak;
- if necessary, overhaul the entire scooter engine.
Procedure
To properly remove the generator from the scooter, use the instructions below:
- Place your vehicle on the step and unscrew the side casing held on by 4-5 bolts;
- After removing the casing, you will need to remove the impeller that allows you to cool the engine;
- Then unscrew the nut on the shaft, which will become visible after unscrewing the impeller, using a wrench or a clamp;
- Remove the hall sensor by first removing the plate on which it is attached.
It should be noted that the hall sensor and the generator itself are connected to each other by a single wiring harness coming out of the casing, which is why you will have to disconnect the wires to dismantle the generator. To do this, you will need to crawl under the plastic and carefully disconnect all the connectors.
After this, you will need to unscrew the two bolts that secure the generator and easily disconnect the last one.
During such work, you must carefully ensure that the bolts and nuts that secure the scooter parts are not lost, since you are unlikely to be able to find suitable components if they are lost.
When the generator is properly removed, you can proceed to repair it or install a new device. By acting carefully, you can not only preserve the generator, but also save on the services of specialists.
Similar chapters from other books
Scooter repair
16. Scooter repair 16.1. Scooter repair. Facings - removal and installation Partial or complete removal of the facings is necessary for most scooter maintenance and repair operations. ATTENTION! The plastic of the scooter is fragile; when removing and installing it, you must
16.1. Scooter repair. Facings - removal and installation
16.1. Scooter repair. Facings - removal and installation Partial or complete removal of the facings is necessary for most scooter maintenance and repair operations. ATTENTION! The plastic of the scooter is fragile; when removing and installing it, care must be taken
16.2. Scooter repair. Spark plug - replacement
16.2. Scooter repair. Spark plug - replacement SERVICE INTERVIEWS It is recommended to replace the spark plug after every 8-10 thousand kilometers. REMOVAL 1. Using a hex wrench, unscrew the bolt of the battery compartment cover located under the seat.
16.11. Scooter repair. Tires - replacement
16.11. Scooter repair. Tires - replacement REMOVAL 1. Remove the cap from the valve and press the spool to relieve pressure in the tire. 2. Remove the wheel (see Front wheel - removal and installation or Rear wheel - removal and installation. 3. Set the tire beads off the landing
16.19. Scooter repair. Headlight light - adjustment
16.19. Scooter repair. Headlight light - adjustment 1. The direction of the luminous flux of the headlight is changed by turning the adjusting screw. Adjustment is necessary when the road lighting in front of the scooter is poor, when the headlight beam blinds the driver of oncoming traffic, but
16.22. Scooter repair. Front fork - disassembly and assembly
16.22. Scooter repair. Front fork - disassembly and assembly DISASSEMBLY Work on dismantling the fork stays is carried out with the lining of the front part of the scooter removed. To make it easier to dismantle the fork stays, it is recommended to remove the fork assembly (see Steering column bearings -
16.27. Scooter repair. Muffler - removal and installation
16.27. Scooter repair. Muffler - removal and installation REMOVAL 1. Holding the fixing nuts with a spanner or socket wrench, use a hex wrench to unscrew the three bolts securing the muffler to the pipe. 2. Using a hex wrench, unscrew the three bolts securing the muffler to the frame and
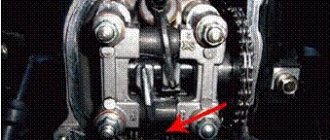
16.29. Scooter repair. Adjusting valve clearances
16.29. Scooter repair. Adjusting the valve clearances The rear facings have been removed, the saddle with seat reservoir has been removed, the cylinder head cover has been removed (see Facings - removal and installation).1. Valve clearances are adjusted on a cold engine.
16.35. Scooter repair. Starter relay - replacement
16.35. Scooter repair. Starter Relay - Replacement REMOVAL To remove the starter relay, you must first remove the rear trim of the scooter (see Trims - Removal and Installation).1. Using a hex wrench, unscrew the bolt securing the starter relay. 2. Remove from the starter relay
16.36. Scooter repair. Starter - removal and installation
16.36. Scooter repair. Starter - removal and installation REMOVAL To dismantle the electric starter parts, you must first dismantle the variator cover, remove the variator belt and drive pulley (see CVT - disassembling and assembling the drive pulley).1. Unscrew the two screws on the front
16.37. Scooter repair. Rear gearbox - disassembly and assembly
16.37. Scooter repair. Rear gearbox - disassembly and assembly The rear gearbox must be disassembled in case of obvious breakdown (noise, grinding, lack of torque transmission to the rear wheel, as well as noticeable oil leakage). DISASSEMBLY The variator cover is removed, the variator belt is removed.
16.38. Scooter repair. Variator belt - replacement
16.38. Scooter repair. CVT Belt - Replacement REMOVAL (Shown on removed power unit)1. Place the scooter on the center stand.2. Using a hex wrench, unscrew the kickstarter bolt and remove it from the axle. 3. Unscrew all the cover bolts
16.39. Scooter repair. CVT - disassembling and assembling the drive pulley
16.39. Scooter repair. CVT - disassembling and assembling the drive pulley The variator cover is removed, the variator belt does not need to be removed (see CVT belt - replacement)1. Unscrew the nut of the variator drive pulley. To do this, you need to fix the drive pulley: insert
16.41. Scooter repair. Two-stroke engine - disassembly and assembly
16.41. Scooter repair. Two-stroke engine - disassembly and assembly Using the example of an engine with a separate lubrication system, the engine-transmission unit is removed from the scooter frame (see Power unit - removal and installation), the variator cover is removed, the variator belt is removed, the drive pulley and
16.42. Scooter repair. Four-stroke engine - disassembly and assembly
16.42. Scooter repair. Four-stroke engine - disassembly and assembly DISASSEMBLYThe engine-transmission assembly is removed from the scooter frame (see Powertrain - removal and installation).1. Drain the oil from the engine (see Engine oil - replacement). (If you do not plan to disassemble the crankcase
Photo report: How to remove a scooter generator?
The generator is not such a simple thing and you will have to work a little to remove it. Well, in addition to everything, if you don’t have at least the minimum material and technical base nearby, then buy pullers for one thing. Unfortunately, there is nowhere without them. Of course, you can do without pullers, and such precedents have already been encountered in my practice, but they are not what we will be talking about today.
Our people don’t want to buy pullers and they put everything under the rotor and even try to knock it down with a hammer, and once I came across a scooter with a piece of some kind of metal welded to the rotor. They probably welded a hook and wanted to pull it off with a KAMAZ.
On the one hand, people can understand: why buy an expensive tool for a one-time job. On the other hand, I don’t understand people: why buy and personally damage a scooter with a hammer, if you can give it to a mechanic for repairs? A dilemma, whatever one may say.
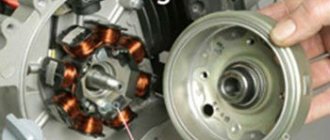
The generator consists of two main parts: the rotor and the stator. The stator is attached to the engine crankcase and can be removed very easily, literally “by hand”. But the situation with the rotor is different. The rotor is mounted on a cone and clamped with a nut, and it is clamped tightly, and in order to remove it from there, you must first secure it from turning, then unscrew the nut and only then use a puller to pull it off the cone.
How to unscrew the nut?
To fix the rotor, I sometimes use a homemade puller similar to the factory one. I made it from old unnecessary pieces of hardware, and it works no worse than the factory one.
If you don't mind the money, you can buy yourself a factory one. It is inexpensive and easier to operate than a steamed turnip: insert the pins into special holes in the rotor, rest the lever on something and calmly unscrew the nut. By the way, such clamps are sold not only in spare parts stores, but also in power tool stores.
In power tool stores, traders position this device as a universal wrench for loosening nuts on angle grinders (angle grinders). It’s called: “universal wrench for angle grinders.” It costs only 160 rubles, and the original, supposedly “correct” one costs 350 rubles.
If you buy the same one for yourself, immediately cut its pins, otherwise they are very long in stock and can damage the generator windings during operation.
Unscrew the bolts and remove the impeller from the rotor.
Let me digress a little: do not lose the bolts that secure the impeller to the rotor, but it is best to immediately remove them. I had the opportunity to repair a scooter, the owner of which lost the original bolt and tightened another one in its place, but it turned out to be a little longer and broke the windings when starting the engine.
The bolt was only a few millimeters longer than the original one.
We fix the rotor and unscrew the nut. As I already said: in my work I sometimes use homemade tools, in this case a puller.
We unscrew the nut and remove it together with the washer from the rotor. If the puck is not there, then someone has already managed to dig around there before you...
Crankshaft removal technology
Disassembling the engine to remove the crankshaft involves the following sequence of actions:
- Wrap the engine connecting rod with a rag to protect the part from accidental damage.
- Unscrew the screws securing the cover using a wrench of the appropriate size. In the case of a stud connection, instead of screws, you need to unscrew the nuts, but it is not necessary to unscrew the studs from the body.
- Remove the engine housing cover. If the cover is difficult to remove, you need to use a puller. The puller is a strip with three holes. The crankshaft axle shaft is threaded into the central hole, and the other 2 have threads into which screws are screwed, which then enter the mounting holes on the engine housing.
- Remove the bearings from the crankshaft using a special puller.
Before starting dismantling work, you need to drain the engine oil from the engine housing and wipe the contaminated parts with a rag. After removal, the dismantled crankshaft must be washed with kerosene, wiped thoroughly and dried.
Factory puller
The rotor can be removed using either a factory puller or a homemade one. The option with a factory and homemade puller has its pros and cons. I'll start with the disadvantages of the factory puller.
The main disadvantage of a factory puller is its price. A factory puller is very, very expensive. About 500-600 rubles. But price is essentially not a very important criterion for me. Versatility, reliability, ease of use and durability are much more important to me. Unfortunately, the factory puller does not have all these advantages, except perhaps ease of use.
The versatility of the factory puller is zero and, unfortunately, it is only suitable for a certain series of engines. And if you need to repair a scooter that is not widely used in our country, then you will also have to buy a new puller for it. And this will be very, very difficult to do, since tools for rare models of scooters are as rare on sale as spare parts.
The reliability of the factory puller is extremely low. I won’t say that the problem is in the design itself, rather the opposite: the design is more than perfect. And it’s much more perfect. Nut + bolt - that’s all its design.
But the quality... There is something to discuss here. The quality of factory pullers leaves much to be desired. They are enough for literally several times, and I’m talking about expensive pullers for 500-600 rubles.
Cheap ones at 220-250 rubles in terms of quality are completely out of the question. Not only are they made of some kind of plasticine, but even this seems not enough for the manufacturer of this shit. He still manages to make them thinner or even thicker than necessary.
This is what the cheapest puller looks like, or rather, what’s left of it: a bolt from it is lost somewhere. It was used only once - the thread was immediately torn off, both on the puller itself and on the rotor, although before using this guan it was good there.
And even if you imagine the situation. that I will be able to buy a good branded puller, even if it costs 1,500 rubles, but it costs about that much. Where do I put the tusks (or rather, where do I get away from them?), who kill the threads under the puller and then, with an innocent look, roll their garbage dumps to me for repairs. There is no way to correct the thread on the rotor; it is not through.
This is what a high-quality factory puller looks like. Their prices are real - from 500 rubles and above.
Cons are minuses, but the factory puller also has its advantages. One of which is ease of use. And it is really convenient and easy to use. What's inconvenient about that? Screw it into the rotor, tighten the bolt and the rotor itself jumps into your hand.
Common breakdowns
Generator faults can be electrical or mechanical. These include:
- loss of functionality of the voltage regulator;
- rectifier block failure ();
- short circuit of stator windings;
- current short circuit in the rotor winding;
- wear of bearings and brushes.
Voltage regulator
The purpose of this unit is to normalize the voltage before feeding it into the automotive electrical circuit. You can check the serviceability of the regulator by checking the voltage that it supplies to the battery terminals. This indicator depends on the model and brand of the vehicle and varies between 13.5-15.5 V. Therefore, you should find out in advance what voltage your particular type of regulator produces. This can be done by studying the manual for using the machine. For example, you can take a VAZ 2107 or 2110 car, since these vehicles have the most typical faults associated with the integral and relays.
Using a Multimeter
To check the VAZ 2110 generator with a multimeter, you need to switch the device to voltmeter mode. Then you need to connect its probes to the battery terminals. The most important thing is to observe the polarity and turn off the car engine. The voltage normally varies from 12 to 12.8 V. Next, the procedure should be repeated, but with the engine running. The voltage readings should rise to 13.5-15.5 V. Lower and higher voltage values indicate a malfunction of the generator.
Checking the generator without removing it from the car
A bridge of diodes performs the functions of a kind of alternating current converter. It contains three negative and three positive diodes.
Before checking the bridge, you need to disconnect all the wires coming from it and from the voltage regulator. You also need to remove the ground anchor from the battery in advance. First you need to check the rectifier for short circuits. We activate the ohmmeter mode on the multimeter and connect the red (positive) probe to the positive contact of the diode bridge, and the negative probe to the surface of the housing of the generator itself. If the rectifier is fully operational, then the readings of the measuring device will go to infinity. In other cases, the rectifier will be inoperative.
Testing of stator and rotor windings
A common breakdown of a car generator is a short circuit in the windings. It occurs when current surges are too intense, brushes wear out and liquid gets in.
So, you need to remove the rotor and find a pair of slip rings on its structure that will need to be ringed. Having started the ohmmeter mode on the multimeter, we connect the probes to these rings. Normal resistance is 2-6 ohms. If you get large values, then there is a loss of contact between the slip rings. If the device shows lower values, then an interturn short circuit has occurred.
Then it follows between zero and the terminals of the windings. The normal value is no less than 0.3 Ohm.
Wear of brushes and bearings
If you have already disassembled the generator, then it is advisable to check the condition of the brushes. They can wear out or break due to misalignment of the rotor shaft. If the brushes are damaged, they should be replaced with new ones.
Inside a car alternator there is a pair of bearings. One is fixed on the rotor shaft, the other is in the center of the cover. The whistling and hum of the generator when the engine is running is a clear sign of bearing wear. In this case, the generator housing can become very hot. If you notice such signs, it is better to replace the bearings immediately, otherwise you may encounter more serious problems.
You can check the bearing by removing the belt from the generator and trying to rotate its shaft with your own hand. If the part rotates freely and easily, then everything is in order. If it is difficult to rotate the rotor, then you should not delay replacing the bearings.
Homemade puller
Unfortunately, homemade, just like factory-made, is not without its drawbacks. It is moderately reliable, versatile, and cheap, but it is not so convenient to use, and if you do not know how to use it, you can easily break the threads under the bolts of the cooling impeller.
Which puller you will use is up to you to decide. I have described all the pros and cons of both options for you.
For myself, I chose the option with a homemade puller. And the price has nothing to do with it. It's all about experience. Over the years of work, I tried a lot of things and eventually came to the conclusion that there is nothing better than a homemade tool puller.
I screwed a bolt from a regular car puller into the nut, attached the washer to the cooling impeller, marked points with a pencil through the holes for the bolts, marked and drilled the holes.
If you don’t want to make a puller, buy a factory one at the store or ask your friends. Just before purchasing, just in case, remove the cooling impeller and look at the condition of the thread.
Removing the rotor
Insert the bolts into the required holes. We take the bolts from the cooling impeller - they fit there perfectly. In order not to touch the windings, we screw restrictive nuts onto the bolts - they will not allow the bolts to go deep inside the generator.
We apply the puller to the rotor and screw the bolts into the holes. In order not to break the thread, slightly tighten the central bolt and see if all the bolts are tight. If any bolt is loose, tighten it.
This way we will evenly distribute the load between the bolts. If you neglect this moment, the entire load, unnoticed by you, can rest on only one bolt or two, and then they will break out of the rotor along with the thread. We don't need this, of course.
Now the main thing: what is there, you cannot tighten the central bolt by force. In this case, excessive force will not achieve anything. Everything must be done slowly and competently. Otherwise, you will tear the puller out of the rotor along with the roots, and then your budget will become completely financially insolvent.
You only need to remove the rotor this way: Lightly tighten the central bolt of the puller with a wrench, lightly hit the end of the central bolt with a small hammer - the rotor, usually, after the first blow, flies off the cone without talking, if it doesn’t fly off, pull the bolt again and hit again.
I learned this technique back in 1996, when I had the opportunity to remove the reel drive pulley of the Kolos combine harvester from the shaft. If it weren’t for one smart person who promptly told me how to work with a puller correctly, then I would have smashed both the pulley and the puller and the sledgehammer along with the combine...
The rotor sits on a key. If you do not plan to further disassemble the engine, leave it as is. And if you plan, you better get it, otherwise you’ll lose it.
A broken key can be easily removed with small pliers; if the key fits very tightly, leave it, it won’t get away from you.
So that you don’t have to guess later how your stator was positioned, we put marks with a core or take a photo, remember it, or do something else. This is necessary in order to protect yourself from problems with a lost outline.
It happens that when installing it back, the stator is installed in reverse, and then depending on your luck: everything may go without consequences, or the spark may disappear or interruptions may appear. To avoid this, any, not just CDI-type scooter generators must be installed exactly as they were originally installed. If you follow this golden rule, you will be happy.
We remove the stator. Installation of the generator is carried out in reverse order.
Disassembly and repair of the VAZ 2107 generator
| Terminals and fastenings on the body of the VAZ 2107 generator. The numbers are marked: 10 — stud securing the generator to the tension bar, 9 — pulley, 8 — stator, 7 — front cover of the generator, 6 — rear cover of the generator, 5 — capacitor, 4 — terminal “61” "generator - common terminal of additional diodes, 3 - terminal "30" of the generator, 2 - voltage regulator, 1 - terminal "B" of the voltage regulator. |
- Unscrew the nut securing the generator pulley, remove the pulley and key.
- We unscrew the four nuts of the bolts holding the generator together and remove them.
- Remove the front cover of the generator and take out the rotor. If the generator is removed only to replace the bearings, then we complete the disassembly process.
- After washing the front cover of the generator, we remove the four bolts securing the front bearing and remove the old bearing.
- We install a new, pre-lubricated bearing, insert its mounting bolts and tighten them.
- We remove the rear bearing from the armature shaft using a puller and change it. If the generator only needed to replace the bearings, then you can begin assembling it.
- If there were any other problems, then we will disassemble the generator further.
- If there are problems with charging, remove the diode bridge located in the back cover of the generator. To do this, unscrew the nut of the bolt of the neutral wire coming out of the cover, remove the brush assembly, then from the inside of the cover we give three nuts securing the bridge and the stator winding, and then remove them.
- We check the integrity of the diodes of the bridge about the bell. As a reminder, a diode is an element that allows current to flow in only one direction. The diode bridge consists of six diodes: 3 positive and 3 negative. Looking at the bridge, you can immediately distinguish them by their layout. If during the inspection process a faulty diode is identified, then you can try to replace it or replace the diode bridge assembly.
- We also check the stator winding. All pins must communicate with each other, but not with the housing. If a fault is detected in the winding, then replace the winding.
We assemble and install the generator in the reverse order. We install the belt, tension it, connect the wires, replace the battery terminal and start the engine.
Also read other reviews
- Starter for VAZ 2112 price Review of starters for the VAZ 2112 car. You will find out what is better to repair or change the starter on this car. ...
- Bendix starter for VAZ 2110 price Review of the main problems and methods for solving them that arise with bendix on starters for VAZ 2110 cars. ...
- The VAZ 2110 starter does not work. The article discusses the main actions necessary if the starter in a VAZ 2110 car stops working. ...
How to remove a generator on a scooter, detailed tutorial with photos
In this article I will tell you and show you in detail how to remove the generator on a scooter. There is no particular difference, what kind of scooter you have, Japanese, Chinese, capacity or others, the principle of removing the generator on a scooter is the same. In either case, you will need a tool called a generator rotor puller.
The same alternator rotor puller does not fit all scooters, therefore, check the brand for the extractor. All this is indicated in online stores, so there shouldn’t be any problems. Now there are an abundance of similar pullers, and if you decide to get to the generator, don’t try to do it without it. In any case, damage the winding and you will need to change the generator, which costs even more than the tool.
And here, in fact, he is. This puller is designed for Honda scooters and Chinese scooters with a 139qmb engine:
But this puller will be useful for you to remove the generator rotor on Chinese 150cc scooters:
There are also universal 2-in-1 models on the market, where the shaft can be rearranged and screwed in from the reverse side. You can purchase such pullers in motorcycle parts stores or in online stores, for example, here: generator rotor puller. As you can see in the photo, here it is universal, both-sided.
On one side of the puller, an M24 thread is used with a pitch of 1 mm on subsequent scooters:
- Honda Tact;
- Honda Dio;
- Peugeot;
- Kymco;
- Chinese scooters with 139QMB engine;
- Other models with a similar rotor.
On the other hand, M27 threads are used with a pitch of 1 mm on Yamaha scooters, 4-stroke Chinese scooters with an engine capacity of 125-150 cc. and other models with a similar rotor.
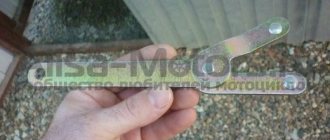
Also, to fix the rotor, we will need a special clamp, which can also be used to fix the clutch bell. This is what it looks like, I think we’ve already seen it:
Crankshaft restoration
Due to the fact that recently the vast majority of people have begun to look towards Chinese scooters, their number has increased. As you know, the quality is not at the highest level, but it is quite acceptable for trouble-free operation for 2-3 years or even more. I don’t want to write about factory scooters, because their quality is high (they keep the brand), but not all of them.
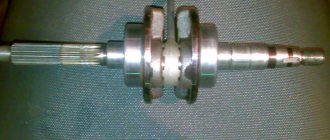
In general, this article is intended for all scooter riders without exception and does not have clear boundaries in the brand and year of manufacture of the scooter. We will consider the KShM - the crank mechanism of a 2-stroke engine.
Brief information: The crankshaft is designed to convert reciprocating energy into rotational energy. In other words, the crankshaft. This unit is not very complicated in design, but requires very precise weight distribution and proper installation. Also, certain conditions are required for normal operation.
similar for all scooters. I touched upon the Chinese because their raw material for the crankshaft does not meet any quality standards. Naturally, there are also normal ones, but, as a rule, they are installed on good Chinese scooters and fail very rarely. I had a case - they brought an AF34E engine removed from a scooter for repair. They said it is very difficult to start, pulls so-so, overheats and consumes fuel immeasurably. After a 1-2 minute diagnosis, it turned out that the radical dead were in the trash. He told me to come in 2-3 days. Imagine my surprise when I disassembled the engine... The indigenous people stood with Daelim (56-20-12), they were in a clear state. But the Chinese, self-installed knee
gave itself away immediately. The bearing seat on the crankshaft on the variator side was so broken that the crankshaft moved up and down by more than 1 mm. This is a very critical situation. The bearings had to be pressed out with a puller. And they put it on the knee so easily that no effort was needed at all. In general, the situation is bad, and I had to look for a replacement knee and resort to bearing seat analysis.