What to do if the relay regulator is broken
Sometimes a situation occurs when the relay regulator becomes faulty. In this case, there is no need to panic. It is very important to take certain measures to prevent all motorcycle systems from failing.
First, you urgently need to disconnect this device from the generator and from the battery so that they do not fail. The voltage will be supplied alternately.
The main thing is to pay attention to ensure that the generator does not fail. In this case, the voltage will be supplied from the battery, where there is a possibility that it will begin to boil away and increase in size. The result will be an explosive situation.
The motorcycle regulator relay diagram shows its structure. Thanks to this, you can figure out how to repair it and connect it.
Moto tuning
Today I will tell you how to install an additional relay in a motorcycle that turns on additional equipment when the ignition is turned on.
This material contains practical recommendations for people who are familiar with a soldering iron and are ready to independently implement an integration into the electrical circuit of a motorcycle in order to give it new capabilities (DVR, charger for phones and other gadgets, etc.). When we buy a motorcycle, most often it requires retrofitting, both mechanical and electrical. We won’t talk about mechanics now, but there is something to discuss about electrics.
If you take a closer look at all the existing additional equipment, then according to its operating logic it should be turned off along with the ignition and connected back when it is turned on. However, all fuses and power lines on most motorcycles are already rated and have precise load limits. This means that we need to create our own line with an additional relay for switching on. Tested: this option is good and reliable.
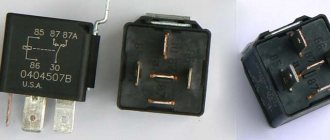
First, we need to buy an ordinary car relay with a block.
Even the weakest will do, but I prefer to set it to 20A. Use wires with a cross-section of at least 0.75mm. Then you will need to assemble the following circuit:
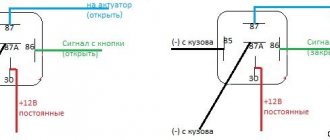
We connect the controlled relay contact (85) to the point where power appears when the ignition is turned on. We ground the second control contact (86) (that is, we screw it to a metal case or to the negative contact). Next, we connect the controlled relay contact (87) through a fuse to the positive terminal of the battery, the second terminal (30) will be connected to our load, that is, to additional equipment.
Now let's look at this scheme in detail based on Honda motorcycles. In them, the fuse box is most often located next to the battery. It also makes sense to place our additional relay there.
I prefer to take power from the ignition switch from the same fuse box. This is usually a thin green wire. Please note that in this case it is more correct to connect to this wire behind the standard fuse, and not in front of it, this will provide additional protection against a short circuit inside the relay. Then we take ordinary screw terminals for 220V and make a distribution block out of them.
Ultimately it should look something like this:
It is advisable to then close them in some small enclosure.
We hang our additional equipment on the back side of the terminals. We screw the negative wires of the additional equipment to the motorcycle frame or to the negative terminal of the battery.
After everything is assembled, carefully insulate everything with electrical tape and secure with zip ties. On such a line you can hang a navigator, heated grips, a recorder, a 5-volt converter and a cigarette lighter at once. This will allow you not to worry about unintentionally draining the battery, even if you forget to turn something off, and also relieve the internal power lines of the motorcycle itself.
Issues of selection, diagnostics and replacement of voltage relay regulators
Various malfunctions can occur in relay regulators, which in most cases are manifested by a lack of battery charging current and, on the contrary, an excessive battery charging current. The simplest check of the regulator can be carried out using a voltmeter - just start the engine and let it run for 10-15 minutes at a frequency of 2500-3000 rpm and with the headlights on. Then, without reducing the speed and without turning off the headlights, measure the voltage at the battery terminals - it should be 14.1-14.3 volts (twice as high for 24-volt ones). If the voltage is significantly lower or higher, then this is a reason to check the generator, and if it is in order, replace the regulator.
The replacement should be a relay-regulator of the same type and model that was installed previously. You especially need to pay attention to the order in which the regulator is connected to the on-board network (to which terminals of the generator and other elements), as well as to the supply voltage and currents. Replacement of the part must be carried out according to the instructions; work can only be performed with the engine stopped and the terminal removed from the battery. If all recommendations are followed and the regulator is selected correctly, it will immediately begin to work, ensuring the normal functioning of the electrical system.
Replacing a relay regulator on a motorcycle
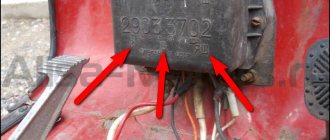
Sooner or later, almost all owners of Ural or Dnepr motorcycles are faced with a battery charge problem. The standard relay-regulator type PP 330 eventually stops working correctly and needs to be cleaned or adjusted. Not every motorbike owner can competently perform these operations. Replacing with a new one is an option, but the cost of a new PP 330 is often quite high. Getting out of the situation, however, is quite simple.
After all, you can install in the regular place of the PP 330 an electronic voltage regulator of type 121.3702 for 12V from a VAZ car, which is sold in any auto store, and its cost is several times lower than the PP 330. But for this you will have to work quite a bit with the wires.
The electronic voltage regulator is installed in the standard place of the PP 330 with virtually no modifications. During the replacement process, it is necessary to additionally drill one hole in the mounting area of the regulator relay. You also need to replace the screw terminals on the wires that go to the PP with female connectors.
We connect the wire that went to the terminal (VZ) on the PP 330 (upper terminal) to the connector (15) of the electronic relay. We connect the wire that went to terminal (Ш) (lower right terminal for PP 330) to connector (67). We screw the ground wire to the metal base of the electronic relay (31) through the screw securing the housing to the platform. Two wires remain unconnected: LC - control lamp (lower left terminal) and “change” (middle lower terminal). For “lazy” motorcyclists, the conversion process can be considered complete; you just need to insulate these two wires and leave them hanging in the air, screwing them to the frame with something so that they don’t dangle. In this case, the battery will charge, but the alternator warning lamp on your motorcycle will not light up.
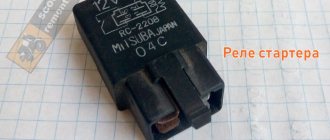
For those owners who are not satisfied with “half measures”, we continue the process. Together with the electronic relay regulator, you need to purchase a small relay of type RS 702 or (75.3777) with normally closed contacts from the auto shop. The RS 702 is remarkable in that when voltage is applied to the relay winding. the relay contacts open. This additional relay can be installed on one of the screws securing the electronic relay-regulator.
We connect the relay type RS 702 as follows. We connect the wire that went to the terminal (change) of PP 330 to connector (86). We connect the wire that went to the terminal (LC) to the connector (87). We dealt with the wires hanging in the air. We connect connector (85) to ground with a separate wire. We connect connector 30/51 to the wire that goes to connector (15) of the electronic relay, which is also positive from the ignition switch.
The conversion is complete, we start it and check it.
5.77 average rating ( 58 % points) - 22 votes
This might be interesting
- Replacing sun visors Sun visors are present in every car, providing a more comfortable ride for the driver in sunny weather...
- On bicycles through the mountains This is a report on a journey by bicycles through the Caucasus Mountains of completely unprepared people. Read this article and you...
- Car loan. Article 5. Reviews about car loans It’s up to you to decide whether to take out a car loan or not. We publish reviews from consumers and car owners who at one time...
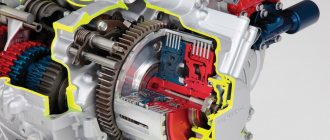
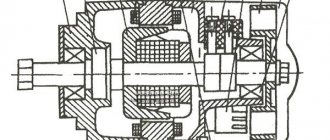
Generator G-424
To understand the principle of operation of the generator and relay regulator, a little theory.
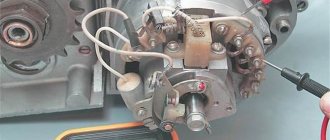
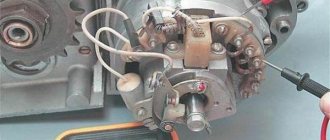
Electric generator G-424 is a three-phase machine, with electromagnetic excitation. Generates alternating current. VGB-2A rectifier converts current into direct current. For normal operation of an electric machine, a relay-regulator PP-330 . The job is to regulate the voltage of the motorcycle's on-board network so that it does not exceed 14 volts.
The G-424 generator is not able to work with a discharged battery. To start the engine and increase to 2400 rpm, the motorcycle runs on a battery. Only after this threshold is exceeded does the electric generator operate in self-excitation mode.
Generator G-424 is PROHIBITED to be turned on without load!
Generator circuit G-424: 1 - cover; 2 — oil seal; 3 - rotor; 4 - stator winding; 5 - terminal block; 6 — back cover; 7 — shield assembly; 8 - rectifier block; 9 - fan; 10 — protective casing; 11 - bearing.
Troubleshooting the generator
The method for determining the malfunction was as follows (I tried several methods, since replacing the relay regulator did not help):
Indirect determination of generator performance
This method does not allow you to accurately determine the malfunction of the generator, but it can still be used to determine whether the generator is “dead,” or there is still hope and the cause of the malfunction lies elsewhere.
Disconnect the wire from terminal “Ш” on the generator. And we apply + from the battery to this terminal, bring the wrench to the generator body, it should be magnetic, not much, but it is noticeable. If it is magnetic, then the rotor winding is working properly. Turn it off.
We connect a 12 volt lamp to the “+” terminal on the generator, and the other end of the lamp to ground. And we connect “+” from the battery to the “Ш” terminal. And we turn the engine with the kickstarter, the light should light up. If this happens, then the generator is working.
In my case, the light was on, I changed the relay-regulator, but the battery still did not charge, and when the engine was running, the red battery charge control light did not go out.
Cleaning and testing the generator G 424
- I removed the generator, unscrewed the back cover, pulled out the brushes - the wear was within normal limits, they were checked with a multimeter.
- I unscrewed the rectifier and it “ringed” like diodes, i.e. In one direction the arrow should deviate, I change the polarity, the arrow does not deviate. Those. the diodes are not “broken”, as they should be.
- I rang the stator windings - everything is normal, there is no short circuit to the housing.
Using the probes through the windows for the brushes with a multimeter, the armature rang - “it rang”, there is no short circuit to the generator housing.
Everything is in perfect order, the generator should be in good working order, so I didn’t completely disassemble it. But there is no charge. Therefore, I began to understand the operation of the relay regulator and look for the reason for it.
Old type or check 591.3702-01
This is a very old type of relay; it was installed on “penny” cars, as well as on many rear-wheel drive cars. It has also always been separately mounted on the body, but the check here is slightly different in terms of contacts.
If you take their markings, then there are only two of them - “67” and “15”. The first contact “67” is a minus, as is the relay body itself, but “15” is a plus. The principle of operation is the same, we connect our charger - we start checking, increase the voltage to 14.5V, then look at the lamp. If it turns off well, no, it’s bad, replace it.
There is another “life hack” - if you connect a light bulb, bypassing the regulator relay, to the wires that went to pins 15 and 67, then remove the wire from the positive terminal of the battery - if the engine does not stall, then the generator is “live”.
need a relay.
New member
Hi all! The situation is as follows: the second battery has already swollen: sos: most likely the regulator relay has run out. motorcycle: Monster s4 916 2001
maybe someone has it?
New member
New member
If you remember, it will be mega cool. Otherwise I don’t really want to wait until the end of September.
Hello Vasily with the plow. By the way, we are neighbors, I’m across the road where the sportsmaster is
New member
New member
Yes, people, remember.
come visit for some tea
How to check PP with a multimeter on a moped?
The relay regulator on a Chinese scooter is checked using a multimeter with a voltmeter function. For this purpose, a simple DT-830 (or equivalent) is usually used. It is better to carry out diagnostics and measurement of output voltage with the device removed.
Verification algorithm:
- You need to unscrew the fairing with the central phase and find on the frame a device with 4 wires: red, green, yellow and white.
- Then start the scooter and check the voltage at idle: measure it between the green and red wires, setting the multimeter to the maximum value of 20 V.
- If the multimeter display shows a figure of 14.6-14.8 V, this is normal. For stabilizers on Chinese mopeds, this is the operating standard voltage. If at idle the multimeter shows a value of 15-16 V, this is a high voltage indicator. This indicates a malfunction of the relay regulator.
- Then you need to check the voltage supplied to the lighting lamps. An alternating voltage is supplied to the central low beam (high beam) lamp, so the multimeter should be switched to the alternating current measurement mode with a parameter of 20 V.
- Next, we measure the voltage between the green and yellow wires (green is the general electrical network of the moped). If the multimeter shows a network voltage of up to 12 V, then the electrical appliances are operating without additional load.
- If at idle this value is 16 V or higher, and with a sharp increase in engine speed it jumps to 25 V, the device does not stabilize the voltage and, therefore, does not work. With such readings, the device must be replaced with a new one.
Using a multimeter, they check the relay regulator on a Chinese scooter
On 4T scooters, the relay regulator is checked using a tester. Typically a mechanical tester is used for these purposes, although there are also electronic models.
In order to take a measurement, you need:
- switch the device to the “KiloOhm” mode and remove the regulator;
- then place the probes on the first pair of terminals (AB). The tester should show a value of no more than 18 kOhm;
- after that, we change the position of the probes on the terminals in the opposite direction (VA) and measure the voltage again - the arrow on the device should show 0;
- then we install the probes on the next pair of terminals (SD) and measure the readings on this pair;
- swap the probes (DS) and measure the indicator again;
- the remaining measurements have no contact and are not checked. The indicator when checking them should be zero.
In this way, regulators are tested on popular Japanese models with small engine volumes from brands such as Honda (Leard, Dio, Tact), Suzuki, Yamaha.
Relay regulator from VAZ together with relay RS-702
Yes, we should. There is still a lot more to drill, saw, cook, digest. It’s funny sometimes to see how some people think that you can go to the store, buy something shiny new, screw it on the side of a motorcycle and it will immediately take off like a rocket. He won't trample. More precisely, it will trample, but you need to invest sooo much effort, time, nerves, money and generally devote half your life to this. And then in the end it turns out that, for example, Japanese or all sorts of American motorcycles are better. . It’s especially funny to see how poor urinal wankers “make” some old grandfather’s old village matatsykla, diligently polishing something there until it shines. In the garage, among the piles of rubbish and other garden and manure crap, it really looks like such a worthless clunker. Sometimes it even starts and rattles violently. But as soon as he is at a party and placed next to, for example, some simple Viraga or something else, you can immediately see what kind of shit it really is. That's why I never intended to make Khorley-Davitsan out of the Dnieper. From the Dnieper with a stroller you can only make a good Dnieper with a stroller. You never make candy out of shit. Regardless of any shiny packaging, the contents will taste the same. So if you want normal carbs, buy Bingi for 30,000 rubles. If you don’t have that kind of money, fuck with the Ketaisk shit, drill holes, drink with a file, etc. . And by the way, setting up a relatively normal motorcycle on shitty carbs is much more difficult than non-German supercarbs. This is a business for real men who do not back down from difficulties. You have the right to cry, get angry, kick your tank in a frenzy and yell “Come on, f.... it's shit!!! This is no one's business and it is your own business. But if you completed your mission to the end and achieved results, you are a man. If your motorcycle doesn't work, is pushed into a corner and is littered with junk, you're a wuss. . Why am I writing this nonsense - apparently you are a newbie. So if the motorcycle is “a bad manufacturer, I tried everything, blew spark plugs, what could be wrong?” - Congratulations. You are on a difficult path of growing up and becoming a person. But nothing, it’s only the first 10 years that are hard. Then you’ll get used to it if you don’t push scrap metal into a ditch. So new carbs not working are just the beginning. Hang in there bro. . I myself drive on the Dnieper with K-301 carbs and a sidecar. It doesn't pull anything, it doesn't move at all. This is when compared, for example, with the Honda CBR 1000 RR Fireblade. I can compare. BUT! Starts up in any frost, rushes like a tank through the mud, carries 5 shit-drunk homies, drags at night through the forest in the rain in waist-deep mud on a rope the second dead Ural, on which there are 5 more of the same drunks, carrying potatoes, manure, bricks , cement, refrigerators, televisions, boards, logs, pipes, etc. At the same time, it does not consume gasoline. No Fire can do anything even close to that. . Again, this is what it’s all about - if you have a Ural, be quiet, behave more modestly and don’t try to make a rocket out of it. And get used to hard sex with a motorcycle. Start with the carbs. Then you get a taste for it - there will be a lot of other sexy things there. . On the abyss of the Dnieper and the Urals - Dnieper
What is a voltage regulator used for?
The relay regulator stabilizes the voltage of the scooter generator at the required level, not allowing it to increase or decrease the value above or below the norm. This prevents on-board voltage surges from going beyond the established limits (depending on the boards this is 12-14 V) and ruining the work of consumers whose service life is designed to be no more than 13 V.
That is, this part takes on the impulses that arise during the operation of the scooter (turning on the headlights, the starter button) and transfers the resulting thermal shock to itself. In this case, all the heat that could settle on the contacts is generated in it and removed through the device.
In addition to stabilizing the voltage, the relay also converts alternating current into direct current, which is necessary for charging the battery.
Moped manufacturers install charging relays with different parameters on scooters and select them individually for each. Depending on the regulator circuit, the connectors also differ. Chinese models usually have 5 terminals (male), while Japanese models have 4.
I had a wonderful motorcycle Zizer 400 -98.
And one day this happened: after riding, I drove to a gas station and filled the tank full. It’s already dark outside, I go to the motorcycle, look at it, my eyes are happy, my emotions are overwhelming. I sit down, press the starter and figs - there’s some kind of crackling noise, the starter doesn’t turn. I called my friend, explained the situation, he said he would come. I'm waiting, sir, I arrived in about 10 minutes. We didn’t think long about it, it was too late to get to the garage 1-2 km away, so we decided to try to start it with a pushrod. It started up with a bang from the pushrod, but the headlight does not light up. I drove without a headlight, fortunately my comrade was driving ahead and had his headlight on.
Video for those interested. (you don't have to watch it :))
It was night outside, I didn’t bother to rack my brains, I stomped home with heavy thoughts. The morning is wiser than the evening. The next day I went to the garage to solve the problem. I started dancing from something simple. We diagnose fuses. I checked. They turned out to be all intact.
I took a photo of the fuse box in the garage.
I decided to start the horse again, and oh mystic horror... the starter spun, then silence. A neighbor in the garage came here, we don’t leave our own people in trouble