The motorcycle ignition coil is checked using a visual inspection and on a specialized stand. If any malfunctions are detected, the coil must be replaced with a working copy.
The ignition coil is an integral part of the motorcycle starting system. Failure of the coil may make it impossible to start the engine. To ensure the operation of the motorcycle starting system, the ignition coil must be regularly checked for defects.
Testing at the stand
Testing a coil on a bench includes sequentially performing the following tests:
1. Check the functionality of the primary winding of the coil. The low-voltage terminals of the coil must be connected to a resistance meter, which must correspond to the standardized value specified in the operational documentation.
2. Check the condition of the secondary winding. An ohmmeter is connected to the high and low voltage terminals of the ignition coil. If measured in p.p. 1-2 resistance does not correspond to standardized values, the coil must be replaced with a new one.
3. Check the ground resistance. To do this, you need to connect the resistance meter with one contact to the coil body, and short the other one to each of the terminals in turn. If the resistance is less than the specified value, the ignition coil must be replaced.
4. Check the coil for inductance. If the inductance indicator does not correspond to the value specified in the documentation, it is necessary to replace the coil.
Causes of ignition coil malfunction
Causes of ignition coil malfunctions
What could be the problem with a faulty ignition coil? But first of all, what signs of a coil malfunction can haunt a vehicle? You can understand this by the following signs:
- Misfire moments occur
- High coil temperature and fast heating
- Engine refuses to start
- Vehicle dashboard displays fault messages
Coil malfunction can occur for a number of reasons:
- Bad candles
- severe overheating
- Impact of the external environment
- Mechanical damage
Try to buy only high-quality spark plugs, this will get rid of problems with the ignition coil. It is also worth remembering that mechanical damage can occur due to strong vibration or oil leakage and contact with the coil, this can cause a short circuit. Strong vibrations can damage the insulation and cause breakdowns. As for temperature, the coil is initially designed to operate in high temperatures, but it is worth periodically allowing the coil, spark plugs and engine to cool down.
How to set the ignition on a Ural motorcycle
Proper adjustment of the ignition on a Ural motorcycle is the key to ensuring that the engine starts easily. Fuel consumption and, to some extent, the power of the motorcycle depend on how well the ignition is set. Most Urals are equipped with contactless ignition. On older models, electronic ignition can also be installed without much difficulty.
Installing the ignition in the Urals is not a particularly difficult task. To perform this work, the following tools are required: an indicator lamp, wrenches, a sheet of newspaper and a screwdriver.
Installing the ignition on a Ural motorcycle consists of the following steps:
- Action 1 – fix the shaft at the dead center of the first cylinder. The correctness of this action can be checked using a special mark on the crankshaft. At the same time, we adjust the contact of the rotor with the spark plug from the first cylinder.
- Step 2 – turn the microprocessor unit counterclockwise until it stops. To do this, you need to loosen its fastening.
- Action 3 – check that the mark on the flywheel matches the mark on the engine.
- Step 4 – using the indicator light, check the presence of current in the ignition system.
- Step 5 – turn the block until the indicator goes out. Tighten the mounting bolts firmly.
- Step 6 – you need to check at what point the ignition occurs. This can be done using the same indicator light as an example, by closing the contacts. If everything is done correctly, the light will light up when the shaft is turned.
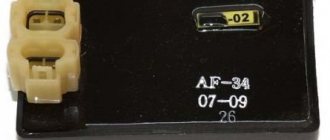
- magnetoelectric sensor,
- electronic switch,
- ignition coil
- rotor.
Installing electronic ignition in the Urals improves the main technical characteristics of the motorcycle. Non-contact ignition improves starting in cold weather, stabilizes engine operation, increases the inductive phase of the spark, which makes exhaust gases less toxic to humans.
Fuel consumption is also reduced. The labor intensity of contactless ignition installation and maintenance has been significantly reduced. Even in conditions of low battery charge, the engine will start without problems.
Electronic ignition itself consists of the following elements:
Important! Maintenance is always carried out with a cold engine.
We recommend reading:
(1 ratings, average: 4.00 out of 5)
motoholder.ru
How to set the ignition on a Ural motorcycle: checking, adjustment
06.06.2017
Quite often you can find contact ignition on a Ural motorcycle. Despite all its shortcomings, many motorcycle enthusiasts use it. The most common question from owners of this motorcycle is how to set up the ignition on a Ural motorcycle.
- Peculiarities
- Examination
- Adjustment
Peculiarities
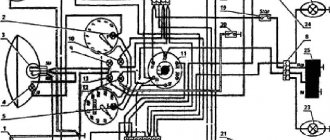
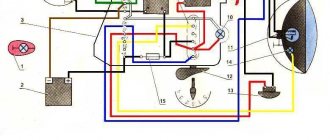
Before setting up the ignition, you should understand what elements it consists of in the Urals. This will allow you to avoid some mistakes and also configure it more accurately. If you bought the motorcycle secondhand, then the ignition may be homemade, in which case it will have to be redone.
The main source of the high-voltage pulse is the ignition coil, often called the bobbin. Can be used from Oka. It is installed separately from the main body. A chopper (cams), which is equipped with a device for advancing the ignition angle. A couple of candles. There is a set of wires for low and high voltage. This also includes power supplies, as well as their switch.
It is worth noting that, depending on the assembly, it may require 6 or 12 volts. The difference between these systems is in the coils. On twelve volt coils a B-204 coil is used, on six volt coils B-201. The connection diagram here is standard.
The breaker has a rather complex design, which consists of several elements. The housing contains a movable and fixed cam with a regulator, which operates from centrifugal force. There is also a capacitor that directly controls spark formation.
There is a piece of felt in the design; it lubricates the mechanism. Separately, it is worth mentioning the screw that secures the cam assembly; with its help, additional adjustment of the Ural ignition is made.
Examination
If there is any suspicion of problems with the ignition, you should check that it is working correctly. Diagnosis is carried out in the following order;
- We check the mechanical component of the unit. We look to see if the cam mechanism is stuck; if there are problems with mobility, then it is worth checking its performance. Be sure to measure the gap between the cams; most often it turns out to be too small, which prevents sparks from forming;
- The next step is to check for the presence of a spark. To do this, turn on the ignition and force the cams to move using a screwdriver, creating a gap. The spark should be blue and white. If it is red or orange, then you need to look for a malfunction.
- We take a multimeter and measure the resistance at the bobbin terminals. Attention! The ignition must be turned off. On the primary winding the resistance should be 6 Ohms, on the secondary winding 10 Ohms;
- The resistance between ground and terminals is checked, in optimal condition it should be 6-15 Ohms, if more, then the problem is in the wire;
- The tester is also used to ring high-voltage wires. If the resistance tends to infinity, then it is worth replacing the wire; it is better to do it as a set;
- The last step is to check the condition of the candles. Electrodes should have a sand color. It is recommended to maintain a distance of 0.6 mm between them.
Actually, this is all that should be checked. Microprocessor varieties are also checked in approximately the same way. SoveK ignition is of this type.
Adjustment
If you have identified a problem with out-of-phase phases, then you just need to find out how to set the ignition on a Ural motorcycle. This will make your life much easier in the future. Please note that the electronic ignition on the Ural motorcycle is regulated completely differently.
So, you need to adjust the ignition of the Ural motorcycle. To work, you will need wrenches, a screwdriver, and it is advisable to take a test light. Adjustments are made in the following order:
- First, set the engine to the top dead center position of the first cylinder, and this should be the compression stroke. You can check this as follows: unscrew the spark plug, plug the hole with paper and crank the engine. When the resulting plug is knocked out, you can stop, this is the desired position.
- Loosen the fastening of the breaker body, after which it is turned all the way clockwise, and a 12-volt test light is connected to the contacts;
- Turn on the ignition and turn the breaker housing until the light turns on. As soon as it lights up, you should stop and secure the lid. This completes the setting of the advance angle.
Izh Jupiter 5 ignition adjustment is done in approximately the same way. Now you know how to configure this system on your motorcycle.
motoznai.ru
Three diagnostic methods
Next, consider three proven methods for checking the ignition coil.
Visual testing method
The strength of the visual testing method (known as the “spark test”) is its ease of implementation. It does not require any equipment and can be performed even on the road. The main disadvantages are reasonably considered to be low accuracy, high labor intensity, and the risk of electric shock.
This method will require a working spark plug and pliers, and you may need a socket wrench.
It is advisable to start work no earlier than a quarter of an hour after turning off the engine, so that it has time to cool down.
First, the wire of the first spark plug is removed and the control spark plug is connected to it. Holding the spark plug by the insulator with pliers, we touch the threaded part of the skirt to the uninsulated metal section of the engine housing. When the engine is running and the coil is working properly, an intense purple spark jumps between the electrode and the housing. To minimize risks, you can not start the engine, but turn on the starter for a couple of seconds.
The conclusion that the coil is faulty is made if the spark is weak or has a pronounced yellowish tint. The absence of a spark indicates a coil failure or a complete lack of contact.
If the engine has several coils, the control procedure is performed for each of them.
If there is no spare working spark plug, a spark plug that is unscrewed from one of the engine cylinders is used as a visual indicator.
A voltage of several kilovolts is applied to the spark plugs. Taking this feature into account, when using the visual inspection method in any form of its implementation, be careful and do not touch unprotected parts of your body to uninsulated parts of the on-board electrical wiring.
Second
This method of identifying problems is similar to the “scientific poking” method. This test of the ignition coil involves disconnecting the terminals one by one while the engine is running. Although this method may seem barbaric to many, it helps to quickly identify a faulty coil.
By disconnecting the wire from the coil, the discharge will stop flowing into the fuel combustion chamber and engine operation in this cylinder will be disrupted. A failure can be easily determined by the sound and rhythm of the motor. If there is no change in engine operation when the next coil is turned off, this is a faulty part.
The third is the scientific way
To check the ignition coil, you will need a multimeter. Remove all coils and check the resistance using a tester. The resistance value is affected by corrosion on the contacts, so before checking, clean the elements from dirt, oil residues and other formations that interfere with accurately determining the characteristics of the element.
To measure the resistance on the primary winding, the probes of the device must be installed on both contacts. In this case, the multimeter must be set to 20 ohms.
Depending on the car models and the type of coil, this value can range from 0.4 to 2 ohms.
However, all four coils (assuming your internal combustion engine has 4 cylinders) should have approximately the same resistance.
To measure the secondary winding, connect the first probe of the device to one of the contacts, and the second to the spring that goes to the coil. Since the resistance value on the secondary winding can be from 6 to 10 kOhm, the multimeter flag should be set to 20 kOhm. Thus, you can easily identify the faulty coil and replace it.
It is worth noting that the resource of this element is 60-70 thousand km. According to the experience of many car enthusiasts, original spare parts installed on a car by the manufacturer can withstand more than 100 thousand, so purchase quality parts from reliable suppliers.
Video: How to identify a faulty ignition coil
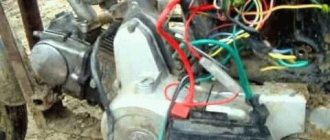
BSZ in the Urals — DRIVE2
Now I’m far from the Urals, and I can’t show you with a live example, and when I arrive, the season will end. I promise to supplement the entry with drawings and photos upon arrival. In the store we buy a travel sensor from a VAZ, a switch, an ignition coil from Oka, two armored wires for this coil with calculation of the installation location (I took it with L-shaped caps and attached it behind the generator), a wiring harness for BSZ classics.
There are no wires in the photo and no harness either.
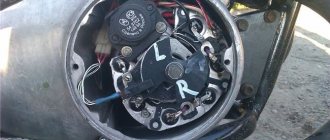
The most creative moment is to make a drawing and carve a curtain according to it. Here I found general types of finished curtains.
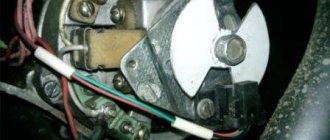
I hope you understand roughly?! And now in more detail. We find an automatic ignition advance machine like the one on the box, if there is a beep. We remove the lower part along which the contact runs; it is secured with a retaining ring. We replace the fit on the machine so that the curtain does not play on the axis of the machine, the play must be selected in two planes: radial and axial, it is better to then modify it with a file and a reamer. I don’t remember the dimensions, except for one thing, the thickness of the wing was 2 mm, then I sharpened it to 1.5 mm, I recommend 1.5 mm since there is less chance that it will interfere with the sensor. The blind is made by a turner as a round part; we make all the slots ourselves. The height of the curtain should be such that the sensor can be adjusted to fit it and does not catch the machine. After turning, we make a cut like on the sleeve that we removed from the machine, just don’t mix up the side, otherwise the curtain will turn out upside down and connect the curtain with the machine and the locking ring, we get a result approximately like in the picture. We make a mounting platform for the sensor from a 1mm sheet of iron or an old platform as in the photo.
Area
Putting everything in place.
We set the TDC, set the platform in the center and mark the sensor on the curtain on both sides. After that, we take everything back and mark the center between the two lines on the curtain, draw a continuation of this line through the center of the curtain; this will be the moment of the spark; at this moment the curtain should be interrupted, i.e. you need to make the horn more than a centimeter wide clockwise, then the design options are different, the first example is an exact copy, and the second type will be vaguely reminiscent of the detail in the photo with the second example
Example 1
Example 2
We put everything back together, connecting it according to the diagram.
And it can be adjusted using a diode lamp by connecting the plus of the lamp to the indication wire of the hall sensor, and the minus to ground when the ignition is on. I installed the switch under the tank.
www.drive2.ru
What types of ignition coils are there?
Based on their purpose:
- Having no contact.
- Contact.
If your car does not have a distributor, the spark plug coil is 100% contactless. For customized coils, only this type is provided. But if the distributor has special equipment - in the form of breaker contacts - you use a contact-type ignition system.
If the criterion is the number of spark plugs available, they are divided into:
- Are common.
- Individual.
There are also differences in winding insulation options . They are:
- Filled with oil. The housing contains metal; transformer oil is used to insulate the windings. If the housing loses its seal, this device will simply stop functioning. The leakage of such oil leads to interturn electrical breakdown of the windings (since they are absolutely not protected).
- Dry (filled with compound).
How does an ignition coil work?
It is a connection of two windings.
One consists of a small number of turns of thickened wire, the primary winding receiving low-voltage electrical impulses (12V). The secondary one is densely entwined with small-section wire, generating a high-voltage current (up to 35000V). Through high-voltage wiring, this current is supplied to the distributor, then to the spark plug electrodes. There an arc-shaped discharge is formed and a spark appears. In the first winding, the electric current is constant. In the dead position of the piston, the breaker opens the circuit in winding No. 1. A current (of high voltage) is induced in adjacent (secondary) turns and is transmitted to the spark plug electrodes.
All the time that the breaker is closed (the engine is at low speed), electricity flows through the primary coil, heating it up in vain. Therefore, a resistor is included in the coil circuit, which reduces the current (by increasing the resistance). When the breaker is in the open position (at higher speeds), the heating is very small. When the engine is first started, to increase the spark energy of the spark plugs, the resistor is blocked by a breaker (reducing the resistance, thereby increasing the current).
By the way, when you need to start the engine when the battery is dead, you just need to block the resistor with a jumper wire.