Honda Dio: How to start a scooter without a key
Losing your scooter's ignition key is an unpleasant thing. If you have a spare key, you can, of course, make a duplicate, but this option is acceptable if you are one hundred percent sure that the key you lost will not fall into the hands of criminals who could encroach on your two-wheeled friend. From a safety point of view, it is advisable to replace the old ignition switch with a new one with a full set of keys. You can also resort to making a duplicate if the ignition key is broken.
Losing a scooter's ignition key is an unpleasant but common thing.
However, in a number of cases it happens that the only key is lost or broken, the locksmith does not undertake to make a new one for the lock (and if he does, he charges a price comparable to the price of a new set of keys with a lock), you have lost the ignition key of your scooter, being in the forest or in an open field, hunting or fishing... You never know what everyday situations can happen when there is no key, but you need to start the scooter. We will tell you how to start a scooter without an ignition key.
WARNING! Do not under any circumstances use this guide to carry out unlawful encroachment on someone else’s movable property, since such acts fall at least under Articles 154 and 166 of the Criminal Code of the Russian Federation.
Video tutorial will help you start a scooter without a key
Starting a Chinese scooter with a four-pin ignition switch without a key, as a rule, is not difficult at all. In the “least vandalistic” case, you should first disconnect the connector (“male” - plug and “female” - socket) on the wiring harness leading to the ignition switch. To get to this connector, on some scooters it is enough to remove the front fender or the basket combined with it. On some models, it may be necessary to remove the front wheel. But in many cases, this connector can be felt by hand even on an assembled scooter.
After the connector is disconnected, on the “mother” we close the contacts connected to the red and black wires with each other. To do this, you need to insert a metal jumper into the sockets. Even a small piece of copper wire of suitable thickness can serve as a jumper, which must be bent in the shape of the letter “P” so that the ends of this piece fall into the desired connectors.
Starting a Chinese scooter with a four-pin ignition switch without a key is usually not difficult at all.
Let's start
The scooter engine start circuit is quite simple, understandable and universal, even in cases where the scooter starts when cold. First you need to insert the ignition key and immediately turn it. Then hold down the brake lever. Give a little gas and press the start button. It is important not to forget to remove the scooter from the side stand, since on some branded and Japanese models, due to the unremoved side stand, a special sensor may be triggered when the engine starts, which will prevent it from starting from the starter.
If the scooter is technically in full working order and it’s not very cold outside, then literally after a couple of seconds the engine should already be rattling peacefully, even if you start it when it’s cold - and you’ll be able to go about your business after just a few minutes of warming up the engine. Why is it important to wait? Because when driving when cold there is too much load, which is bad for the engine.
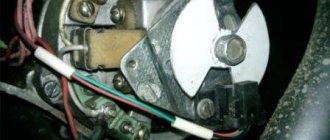
16.20. Scooter repair. Ignition switch - removal and installation
16.20. Scooter repair. Ignition switch - removal and installation
Removing the ignition switch is carried out with the facings of the front part of the scooter removed (see Facings - removal and installation).
1. Disconnect the two wire connectors going to the ignition switch.
2. Unscrew the two bolts securing the ignition switch.
3. Remove the lock assembly with the steering column locking pin from the seat.
Assembly and installation are carried out in the reverse order, having previously applied a conductive compound to the terminal blocks of the wires and coated the steering column locking pin with grease.
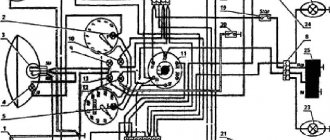
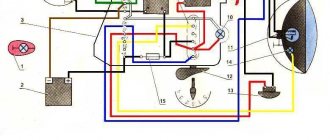
How to set the ignition on a scooter - contact system
Now we will learn how to set the ignition on a moped, walk-behind tractor or scooter. The scheme of actions depends on the type of spark creation system; it is known that there are only two of them - contact and non-contact (contact-transistor). Their main difference lies in the principle of operation. All old models of scooters, mopeds and walk-behind tractors had contact ignition. Currently, the second option is mostly used, since it is more advanced and tens of times more reliable.
Contact ignition is based on a mechanical interruption system. In the closed state, low voltage current flows through the primary circuit. When a contact in the secondary winding system opens under the influence of electromagnetic induction, a current surge occurs with a high voltage, and then the distribution block works with it. Ignition different from the norm may be early or late. It is displayed on a distributor; this device combines. Most often, this part is installed on the crankcase, but there may be other assembly specifics; you need to look at the instructions for the design and operation of the vehicle. The adjustment procedure is as follows:
- Having previously disassembled the crankcase, on the contact group we set the maximum permissible gap for a full circle of shaft rotation.
- Next, set the piston to a position whose distance from the engine dead center corresponds to the technical documentation.
- Now we loosen the stator mount and adjust it until the contact closes.
- Now we put all the details in place and admire the result.
Similar chapters from other books:
Scooter repair
16. Scooter repair 16.1. Scooter repair. Facings - removal and installation Partial or complete removal of the facings is necessary for most scooter maintenance and repair operations. ATTENTION! The plastic of the scooter is fragile; when removing and installing it, you must
16.1. Scooter repair. Facings - removal and installation
16.1. Scooter repair. Facings - removal and installation Partial or complete removal of the facings is necessary for most scooter maintenance and repair operations. ATTENTION! The plastic of the scooter is fragile; when removing and installing it, care must be taken
16.2. Scooter repair. Spark plug - replacement
16.2. Scooter repair. Spark plug - replacement SERVICE INTERVIEWS It is recommended to replace the spark plug after every 8-10 thousand kilometers. REMOVAL 1. Using a hex wrench, unscrew the bolt of the battery compartment cover located under the seat.
16.3. Scooter repair. Air filter - removal, washing and installation
16.3. Scooter repair. Air filter - removal, washing and installation SERVICE INTERVIEWS This operation is recommended to be carried out every 5-6 thousand km of the scooter. Some scooter models use replaceable paper air filters. REMOVAL
16.6. Scooter repair. Battery - removal and installation
16.6. Scooter repair. Battery - removal and installation REMOVAL 1. Using a hex wrench, unscrew the bolt securing the battery compartment cover. 2. Remove the wire from the negative terminal of the battery. 3. Remove the wire from the positive terminal
16.9. Scooter repair. Front wheel - removal and installation
16.9. Scooter repair. Front wheel - removal and installation REMOVAL 1. Place the scooter on the center stand.2. On the right side, use pliers to unscrew the splined nut of the speedometer drive. 3. Remove the drive. 4. Use two wrenches (spanner and hexagonal) to loosen
16.10. Scooter repair. Rear wheel - removal and installation
16.10. Scooter repair. Rear wheel - removal and installation REMOVAL To make it easier to remove the rear wheel, you must first remove the muffler (see p. 108 “Muffler - removal and installation”)1. Place the scooter on the center stand2. Use a socket wrench to unscrew the nut
16.17. Scooter repair. Dashboard - removal and installation
16.17. Scooter repair. Dashboard - Removal and Installation To remove the scooter's dashboard, you must first remove the front part of the trims (see Facings - Removal and Installation). REMOVAL1. Having disconnected the front part of the scooter facings from the steering wheel, unscrew the two bolts
16.21. Scooter repair. Sound signal - removal, installation and adjustment
16.21. Scooter repair. Sound signal - removal, installation and adjustment REMOVAL To carry out work on the scooter's sound signal, it is necessary to remove the front part of the cladding (see Cladding - removal and installation)1. Remove the terminals of the horn wires. 2. Holding the signal
16.26. Scooter repair. Gas tank and oil tank - removal and installation
16.26. Scooter repair. Gas tank and oil tank - removal and installation Automatic fuel valve: 1 - membrane; 2 - needle; 3 — needle seat; 4 — gas tank; 5 — fuel fitting; 6 — vacuum supply fitting; 7 - spring REMOVAL To dismantle the gas tank and oil tank, you must first
16.27. Scooter repair. Muffler - removal and installation
16.27. Scooter repair. Muffler - removal and installation REMOVAL 1. Holding the fixing nuts with a spanner or socket wrench, use a hex wrench to unscrew the three bolts securing the muffler to the pipe. 2. Using a hex wrench, unscrew the three bolts securing the muffler to the frame and
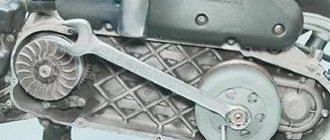
16.28. Scooter repair. Power unit - removal and installation
16.28. Scooter repair. Power unit - removal and installation REMOVAL Before starting work, we treat the fastening joints that we are going to disassemble with penetrating lubricant, since most of them are constantly exposed to water, dust and, most likely,
16.32. Scooter repair. Ignition coil - diagnostics and replacement
16.32. Scooter repair. Ignition coil - diagnostics and replacement DIAGNOSTICS Diagnostics of the primary and secondary circuits of the ignition coil is carried out with a multimeter, while measuring the resistance of the primary circuit of the coil. 1. When the wires are disconnected, the resistance is
How to check the Hall sensor
It is recommended to carry out the test using a simple device that every driver can do with his own hands. He will need a resistance of 1 kOhm and a simple LED. A resistance is soldered to its leg, two pieces of any length of flexible wire convenient for operation are soldered to it, and the device is ready. Checking the Hall sensor is preceded by determining the presence of power supply to it:
- the distributor cap is removed;
- the plug box from the distributor is disconnected;
- the tester is connected to terminals 1 and 3, then the ignition is turned on.
If the car's electrical wiring is functioning normally, the tester will show a voltage of 10 volts or higher. After this, we connect the designed device to the same terminals - the LED lights up if the polarity has been chosen correctly. Otherwise, you need to swap the ends of the wires. The subsequent verification scheme is as follows:
- We do not touch the wire connected to the 1st terminal, but we transfer the end from the 3rd to the free 2nd terminal;
- rotate (manually or with a starter) the camshaft.
If you notice that the LED blinks during this process, then the ignition sensor does not need to be replaced. It is also possible to check the Hall sensor with a multimeter. It is connected to the ignition output contact, setting the device to voltmeter mode. The device arrow should move in the range of 0.4-3 Volts (an indicator of the health of the sensor).
How to check the Hall sensor
Malfunctions of the Hall sensor manifest themselves in different ways; even experienced specialists are not able to accurately determine the failure. There are a number of symptoms, but they indicate problems with the sensor indirectly, because These signs happen for different reasons:
- the engine does not start;
- at idle speed fluctuates;
- while driving, when the speed increases, the car jerks;
- The engine stalls for no reason.
If such symptoms occur, it is necessary to also check the Hall sensor. In addition to the method indicated in the article, there are several more. For example, the simplest thing is to ask someone for a working sensor and simply replace it on your car; if the problems go away on their own, then the sensor is faulty.
If you have a multimeter at hand, checking is easier than ever. To do this, you need to set the voltage measurement game mode on the device and test the indicators at the output of the sensor; if it is working properly, the voltage will vary from 0.4 to 11 V. Another common method involves checking in the absence of sparking (if there is power in the ignition system) and consists of in sensor simulation. The block is removed from the distributor and the ignition is turned on. Next, using a piece of wire, contacts 3 and 2 on the block are closed; if a spark appears on the central channel of the ignition coil, it means that the Hall sensor is faulty and requires replacement.
It will be interesting How to adjust the microphone sensitivity with your own hands
Another way is to check the existence of resistance on the sensor. To do this, you need to build a simple device, which consists of a 1 Kom resistor, a light diode, and flexible wiring. Solder a resistance to the leg of the light diode, and to it two wires of such length that it is convenient for operation (not short). Then remove the distributor cap, disconnect the distributor and the plug box. Then we check whether the electrical circuit is working properly. Therefore, we connect the electronics multimeter to the first and third terminals, then turn on the car’s ignition.
Under good conditions, the measurement on the device’s screen should be within 10-12 V. Then also connect the made mechanism to the same terminals. If you did everything correctly, the light diode will light up. Otherwise, you need to change the wiring places. Next you need to do this: do not touch the wire that is connected to the first terminal, do not touch the tip from the third terminal, transfer it to the free second terminal, turn the camshaft (by hand or with a starter). If the diode blinks when turning the shaft, this indicates that the sensor should not be changed.
Replacing the Hall sensor.
Egnition lock
The ignition switch, as a rule, on all scooters is installed on the front panel on the right, below the handlebars. It serves to turn the engine on and off, and also plays the role of an anti-theft device, fixing the steering wheel in the turned position. In addition to the ignition switch, the luggage compartment under the saddle and the gas tank cap (or flap) are locked on scooters.
The key in the ignition switch (see photo) has the following positions: LOCK or with a padlock icon - the ignition is turned off and the steering wheel is locked in the extreme left position. The key can be removed from the ignition in this position; OFF or with the image of a crossed out circular arrow - the engine ignition system is turned off, but the steering wheel can be turned and the key can be removed from the ignition switch; ON with a circular arrow or - the ignition system is turned on. With this key position, you can start the engine and start moving (when using an electric starter, you need to squeeze the front or rear brake lever and only then press the button).
- Key positions in the ignition switch: 1. — steering wheel lock;
- — the ignition is turned off;
- — the ignition is on;
Do not turn the key to the LOCK position while driving.
When purchasing a book in PDF
1. You will be able to download the book immediately after payment.
2. The book will be downloaded in PDF format, and you can download it to any device.
1. All books are of ideal quality, since we work with publishers directly.
2. Electronic books are in no way inferior to paper books and are their complete analogue.
3. Our company has offices in Ukraine, Russia and Poland, you can always contact us at a specific address.
4. All payments on the site are maximally protected and are made using global payment systems.
Dealing with the candle
If the dio 34 does not start, then first of all we check the serviceability of the spark plug. We unscrew the candle, insert it into the candlestick and connect the ground to it using an additional wire. We pull the kickstarter leg. Let's see if there is a spark.
If it is not there, then disconnect the battery. And again we check with kickstarter for its availability.
If it does not appear, then you can determine the performance of the spark plug on another scooter or using a test gun.
In order not to waste time checking the old spark plug, it is better to immediately take a new one and continue working with it. I always take branded NGK or Denso from the catalogue, it is guaranteed to last for a year, or 5 - 6 thousand km.
When checking, with the battery disconnected, a weak spark may appear. The scooter will even start, but will not develop speed and will not move. The first impression is that the switch is faulty, but there is no need to rush to conclusions.