General principle of troubleshooting a scooter Checking the condition of the scooter's piston group Finding a fault in the scooter's power system Finding a fault in the scooter's ignition system Diagnostics of the condition of the scooter's CPG elements Diagnostics of the condition of the scooter's crankshaft Checking the condition of the scooter's clutch Checking the condition of the scooter's spark plug Repairing the scooter's gas tank
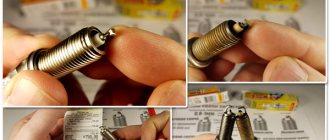
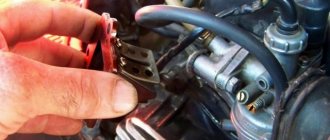
When servicing a scooter, it is necessary to unscrew the scooter's spark plug to determine whether the carburetor is set correctly.
It is important to pay attention to the brand and heat rating of the spark plug - if you install a spark plug with a different heat rating from the recommended one, it will not self-clean. If the candle is whitish, you need to enrich the mixture; if it is black, lean it. The adjustment is made on the scooter's carburetor with a special screw located under the cover covering the accelerator drive rocker arm. It is important to remember that a scooter air filter clogged with dirt, without passing the required amount of air, will cause the mixture to become richer, and before drawing conclusions about the need to adjust the scooter carburetor, it is necessary to check the condition of the air filter. A correctly selected scooter spark plug has a decisive influence on the performance of the scooter, as well as on its temperature regime. A spark plug with the heat rating recommended by the manufacturer should be installed on the engine only; only in this case will the process of self-cleaning from carbon deposits occur. The spark plug is a comprehensive source of information for deciding on the necessary repair procedures. This method is used to repair both scooters and cars, such as Ford repairs.
It must be remembered that the reason for the enrichment of the scooter mixture can be not only incorrect carburetor settings, but also a dirty scooter air filter; and the cause of a lean mixture may be the scooter’s fuel system clogged with dirt.
Soot contamination
Type of spark plug: dry soft soot of intense black color on the insulator, electrodes and spark plug body.
Consequences: poor start of the scooter engine; poor operation of a cold scooter engine; interruptions in ignition of the air-fuel mixture; bad reaction to gas.
Probable causes: excessively rich air-fuel mixture; The scooter's air filter is very clogged; The thermal range is incorrectly selected - the candle is too “cold”.
Remedy: adjust the working mixture; adjust the cold start system of the scooter engine; change the scooter air filter; clean the spark plugs or replace them with new ones - with the correct heat rating.
Honda Dio 18 scooter pours a spark plug
Repair Honda Dio 18 fills spark plug and faulty cause found!!!
Any. Carburetor -Overfills - reason, setting here.....
Why does my scooter flood on bumps?
scooter won't start
2T.Scooter - there is a spark, but it won’t start! All the reasons here are the elimination of ..Scooter
Why the scooter won't start, Honda Tact 24 mp4
How to adjust a scooter's carburetor
Signs of a faulty spark plug on a 2T engine.
Scooter carburetor setting.
The scooter smokes and rides poorly on a cold engine: the EC is to blame
Also see:
Home » Hits » Honda Dio 18 scooter fills a spark plug
servis-honda.ru
Overheat.
Plug Type: Extremely white insulator with small black flecks and premature electrode erosion.
Consequences: loss of scooter power at high speed or under load.
Probable causes: the spark plug is not screwed in enough; The scooter's engine cooling system is not working properly; ignition of the scooter too early; The thermal range is incorrectly selected - the candle is too “hot”.
Remedy: check the torque of the scooter's spark plug; operation of the scooter engine cooling system; adjust the ignition timing; select the correct spark plug heat rating.
Type of spark plug: melted and burned central and grounding electrodes (or one of the electrodes) of the scooter spark plug; bubbling insulator with metal deposits on it.
Consequences: significant loss of scooter engine power; ignition interruptions. Continued use of such spark plugs may cause serious damage to the scooter engine.
Probable causes: thermal overload; significant overheating of spark plug parts due to glow ignition - combustion begins before a proper ignition spark appears; use of low-quality fuel; burning out of the remaining air-fuel mixture in the combustion chamber due to an incorrectly adjusted fuel system of the scooter or the ignition timing of the scooter; The thermal range is incorrectly selected - the spark plug is too “hot”.
Remedy: check the scooter engine, ignition system and fuel system, as well as the quality of the working mixture and the ignition timing of the scooter. Install new spark plugs with the correct heat rating.
Spark plug NGK BP6HS (HONDA DIO)
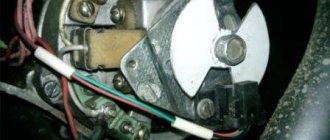
Signs of a faulty spark plug on a 2T engine. The quality of the photos is not very good, but you can still understand the main points from them. And so, we have 2 halves of the crankcase, a crankshaft, a Honda Dio spark plug, and a pair of main bearings.
Cleanliness is the key to health, so all parts, especially the crankcase, must first be thoroughly cleaned of all contaminants.
We wash the bearings from factory grease. Next, we heat the crankcase with a hair dryer. It needs to be heated well.
If you don’t have a hairdryer, you can use the oven. But in this case, you will have to change the silent blocks, and the kitchen will also be provided with an unforgettable aroma.
What are the best spark plugs for a Honda dio? Honda dio spark plugs
Bearings can be pre-frozen in the freezer. We put both bearings in their places.
If you have heated the crankcase well enough, the bearings can be put into place by hand easily and without effort. And then the fun begins. We take one half of the crankcase and the crankshaft. We insert the crankshaft into the crankcase half by hand as far as possible; there is no point in applying superhuman efforts at this stage.
Now you need to find some object to put on the crankshaft, a Honda Dio spark plug, with which you can press the crankshaft into the bearing. For example, this could be a tube of suitable length and diameter or a bunch of old bearings. We put this stuff on the crankshaft so that there is a thread left for the nut. Now, by tightening the nut, we tighten the crankshaft into the bearing.
Next, take the second half of the crankcase and apply thin to the Honda Dio spark plug! Next, we tighten the halves with bolts.
By this stage there should be no more gaps left, otherwise you risk bending the crankshaft. Honda Dio spark plug crankshaft needs to be centered.
For this you need a set of probes. And if you drive long distances, or with a heavy load, a cold spark plug with a heat rating of 7 or 8 is suitable to avoid hot ignition - after all, during intensive work the spark plug is prone to overheating. Exactly the same rule can be followed for seasonal use of a scooter. Not all scooter riders park their horse in the garage in winter.
If you continue to drive a Honda Dio spark plug in the cold, it makes sense to install a hotter spark plug.
And in the hot summer it will be correct to drive with a cold spark plug. By the type of candle you can conditionally determine whether the heat number is selected correctly. The normal color of the insulator should be light brown.
If the insulator is very light or even white, then the plug is too hot for a Honda Dio engine spark plug. I have a question, perhaps not significant, about candles.
or plays a big role. I couldn't find the answer myself. The bp6hs spark plug is not installed on any Japanese scooter. This candle is used by all the dealers selling Japanese scooters because it is very cheap to purchase and is made in China.
But the bpr6hs spark plug is installed at the factory in Japan on many scooter models. Draw your own conclusions whether the resistor plays a big role.
December 4th, in Spark plug for Honda Dio zx28 with 70cc piston engine, which spark plug to choose, it was ngk b8hs all covered in oil and misfiring. Please tell me the spark plug Honda Dio spark plugs for the Aprilia Scarabeo ie scooter. I have a Honda fullmark, please tell me which NGK spark plug is installed???
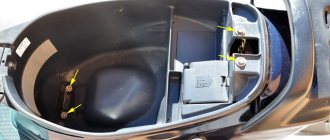
Good afternoon, tell me, I can’t find the oil pump for the Honda Lead af20 anywhere, it’s only sold on Lead. Can you please tell me what kind of spark plug is on the Honda SSH I and what key can be used to unscrew the spark plug on this scooter? E-mail is not necessarily published. Scooters Maintenance and repair All about scooters, do-it-yourself scooter repair, scooter tuning. Questions and answers Instructions and operating manuals for scooters, manuals, diagrams News in the world of scooters, new scooters, etc.
Reviews of scooters, mopeds, scooters Honda, Yamaha, Suzuki, Honda Dio spark plug, Chinese scooters, etc. European scooters Chinese scooters Taiwanese scooters Japanese scooters Scooter maintenance, oil change, spark plugs on a scooter, etc. Troubleshooting a scooter, troubleshooting a scooter Useful information for owners of scooters and mopeds Do-it-yourself scooter repair Tips for using a scooter Scooter tuning Scooter design.
Checking the voltage regulator while the scooter engine is running is the easiest way. How to choose NGK spark plugs.
Tags: dio, ignition, spark plug, Honda
- Related Posts
- Honda FTR motorcycle review - BikesWiki - encyclopedia of Japanese motorcycles
- What's the difference between Honda and Hyundai?
- What is the left-hand equivalent of the Toyota BB? There is also a Honda of this type...: ru_auto
« Previous entry
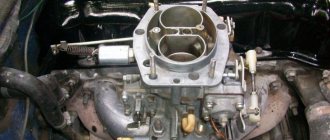
Checking and repairing the power unit using the example of Honda
1. Clean the cylinder head. a) Clean the surface of the head from gasket residues and carbon deposits. Note: Be careful not to damage the cylinder head gasket mating surface. 2. Check the cylinder head. Using a precision ruler and a flat feeler gauge, as shown in the figure, check the flatness of the working surface of the cylinder head.
Maximum permissible out-of-flatness………………..0.02 mm If the out-of-flatness value exceeds the maximum permissible, replace the cylinder head or grind it. 3. Clean the inner surface of the cylinder outlet pipe from carbon deposits. 4. Check the cylinder. a) Using a precision straight edge and a feeler gauge as shown in the figure, check for flatness of the cylinder surface.
Maximum permissible out-of-flatness………………..0.02 mm If the out-of-flatness value exceeds the maximum permissible, replace the cylinder or grind it.
b) Measure the diameter of the cylinder. Using a bore indicator, measure the diameter of the cylinder at three levels in the transverse (a) and longitudinal (b) directions, as shown in the figure. If the diameter is larger than the maximum allowable, replace it. Cylinder diameter: SKSOMj nominal………39,000-39,020 mm maximum……………….39,050 mm SK50ML, SZ50P mark “A” nominal………39,000-39,005 mm maximum……………….39,050 mm without mark nominal ………39.005-39.010 mm maximum……………….39.050 mm Maximum taper……0.05 mm
5. Clean the piston. a) Using a scraper, remove carbon deposits and other carbon deposits from the piston bottom. b) Clean the piston grooves from deposits with a piece of a broken ring.
Checking and repairing the power unit c) Use solvent and a soft hair brush to finally clean the piston. Note: Do not use a wire brush. 6. Check the piston: a) Using a micrometer, measure the diameter of the piston skirt at a distance of 4 mm from its edge and in a direction perpendicular to the axis of the piston pin, as shown in the figure.
Piston diameter: SKSOMJ nominal………38,955-38,970 mm minimum…………………38,900 mm SK50ML, SZ50P without mark nominal………38,960-38,965 mm minimum…………………38,900 mm mark “A” nominal ………38.955-38.960 mm minimum…………………38.900 mm mark “B” nominal………38.965-38.970 mm minimum…………………38.900 mm
7. Determine the gap between the cylinder and the piston by finding the difference between the measurement results of the piston diameter and the cylinder diameter. Nominal clearance……0.035-0.050 mm If the clearance is greater than the nominal, replace the piston and cylinder. 8. Check the gap in the piston ring lock. a) Insert the piston ring into the cylinder at a distance of 10 mm from the parting surface. b) Using a flat feeler gauge, measure the gap in the lock.
Nominal gap……….O.70-0.25 mm Maximum gap…………….0.40 mm If the gap in the lock is greater than the maximum, replace the piston ring. If the lock gap is greater than the maximum even with a new piston ring, replace the cylinder and piston. 9. Check the compression ring-piston groove end clearance by measuring it with a feeler gauge as shown in the figure. Nominal clearance……….0.03-0.05 mm Maximum clearance…………….0.70 mm If the clearance is greater than permissible, replace the piston.
10. Check the piston pin. a) Insert the piston pin with bearing into the connecting rod head and make sure that the pin rotates freely without noticeable play. b) Using a bore gauge, measure the inner diameter of the pin bore in the piston. Nominal diameter………………..12.002-12.008 mm Maximum diameter……12.030 mm
b) Using a micrometer, measure the diameter of the piston pin. Nominal diameter………………..11,994-12,000 mm Minimum diameter…….11,980 mm
If necessary, replace the piston and piston pin assembly. 11. Check the clutch, a) Measure the inner diameter of the clutch drum. Nominal diameter……………………107.0-107.2 mm Maximum diameter…….107.5 mm
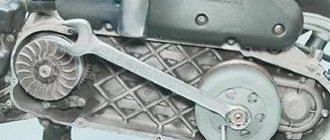
b) Measure the thickness of the friction lining. Nominal thickness……..4.0-4.1 mm Minimum thickness…………2.0 mm 12. Check the variator clutch. a) Check the surfaces of the movable and fixed cheeks. b) Measure the diameter of the bushing. Nominal thickness…………….20.035-20.085 mm Minimum thickness…….20.600 mm c) Check the roller diameter. Nominal diameter……………………15.92-16.08 mm Minimum diameter……..15.40 mm 13. Check the V-belt. a) Check the condition of the belt surface (1). b) Measure the width of the belt (2). Nominal width……………15.5 mm Minimum width…………..14.5 mm
14. Check the driven pulley. a) Check the condition of the surface of the movable and stationary pulleys. b) Check and, if necessary, replace the oil seal. c) Check the smooth rotation of the pulley. d) Check the free length of the spring. Nominal length………………98.7 mm Minimum length………………..92.8 mm
15. Check the electric starter. b) Check the condition of the flywheel and intermediate gears. 16. Checking the final drive. a) Check the condition of the input shaft drive gear, intermediate gears, and driven gear. b) Check the condition of the drive gear support bearings. 17. Check the crankshaft. a) Check the crankshaft bend. Maximum bend…………….0.04 mm
Article from the book HONDA. Scooters Dio • Tact
Publishing house
"Legion-Avtodata"
You can purchase from us. See below.
Replacing a spark plug on a scooter
The brush is affordable and easy to use, and most importantly, it easily removes carbon deposits without damaging the protective coating of the electrodes. Always carry with you a supply of spare, known-good spark plugs and a spark plug wrench.
We recommend: What is the gap on spark plugs for VAZ 2101
Quite often they can cause interruptions on the way and it will be unpleasant to carry the scooter in your hands! When screwing in a new spark plug, its thread can be slightly rubbed with a graphite pencil. This will allow you to easily unscrew it during the next maintenance.
VIDEO: Spark plug gap, what it should be, how to install
Based on the state of its electrodes, you can determine the quality of the combustible mixture, the setting of the ignition timing, and the correct choice of the brand of spark plug. The pictures below show the conditions of the candles and the “diseases” that led to this:
Using the table below, you can determine the correct choice of spark plug, fuel quality, etc. Fedorov, St. Petersburg. Any comments?
Write to me: bbird mail. Fig 1. Normal spark plug operation.
Fig 2. Velvety black soot. Figure 3. Melting of the central electrode. Spark plug condition, picture number Cause Associated symptoms Troubleshooting methods Fig. 1. The engine is operating normally. Correctly selected according to the characteristics, a well-functioning candle. Normally adjusted carburetor and ignition. High quality oil and fuel. Fuel and oil consumption is normal.
Clean the spark plug and check the gap as needed. Overrich mixture. Incorrect carburetor adjustment. The automatic thermal shutter is faulty. Increased fuel consumption. Decrease in engine power.