Just a couple of months ago, an old client asked to overhaul the engine of his Ant for the season. He is not greedy for money - he promised to buy everything needed for repairs. We agreed, the client pulled the engine off the frame and brought it for repairs. After disassembly, an unpleasant picture emerged: the piston, crankshaft, motor chain and almost all bearings were worn out.
The customer insisted on purchasing a new crankshaft. They are now in abundance in any store - I don’t want to take them, but their quality is still good... I resisted for a long time and in the end the client found a used engine from which I pulled the crankshaft. Of course, it was slightly worn out, but the bearing of the lower head of the connecting rod was intact and intact, and we didn’t need anything more.
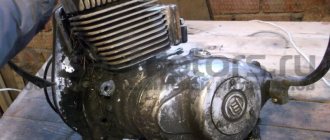
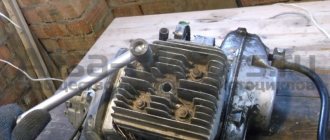
Photo report: Engine disassembly
Almost just before leaving for permanent residence on another collective farm, an old acquaintance, whom I had not seen for 15 years, turned to me and asked me to overhaul the engine of his Ant.
To be honest, I didn’t have much of a desire to get involved with this Soviet chatterbox, to say the least... But after thinking about it and playing out the situation in my head that I would have to sit in a new place for some time without my favorite job, I agreed and immediately began the repairs. I will not go into the essence of the disassembly in particular within the framework of this article - I will only outline the main points and, based on my experience, I will try to describe the most common malfunctions and errors during repairs.
The engine had the following symptoms before being repaired:
- Bad start
- Oil leak
- Weak traction
- Increased noise during operation
- The winding lever did not return to its place
- Depressurization of the crank chamber, as well as wear of the seals
- Poor quality assembly
- The piston died
- Bearing wear
- Kickstarter return spring broke
Everything else, including the gearbox and clutch, did not cause any complaints during operation. However, first things first.
Before a major overhaul, I don’t wash the engines - I just drain the oil, pull it off the frame and get to work.
Dynastarter
However, it is not only the engine that can make a motorcyclist clearly see all the components of his motorcycle. The most common problem is a problem with the dynastarter. The engineers of the Tula plant installed it in Muravya, instead of a conventional alternating current generator.
Why is it so important? If you notice a red light on the instrument panel while the moped is running, it means you are running out of charge. This happens because the generator is not producing alternating current. To begin with, in such a situation, it is necessary to check the integrity of the wires connected to the dynastarter and the relay regulator. If everything is in order, then the problem lies directly in the dynastarter. There may be three main causes of problems:
- difficulty in rotor operation (dirt getting into the collector or dust accumulation);
- freezing or wear of brushes;
- violation of the integrity of electrical equipment.
Since in most cases the operation of the dynastarter is difficult due to contamination of the collector, it is worth carrying out a simple disassembly according to the instructions described in the moped operating book. The main rules when working are neatness and cleanliness. After disassembly, be sure to thoroughly rinse all parts in gasoline and lubricate the rubbing parts, and under no circumstances throw away the parts.
Removing and checking the piston (CPG)
Remove the cylinder head (cylinder head).
The cylinder head gasket held up well, as evidenced by the absence of oil leaks.
In the upper part of the cylinder opposite the exhaust window, we feel the groove with our finger. If it feels a clearly perceptible so-called “wave”, “step”, that is, a drop, then such a cylinder is no longer subject to further use. It needs to be either bored to repair size or bought a new one.
The wear can be easily felt in the place where the piston rings do not reach the end of the cylinder. In the place where the piston rings do not work, the nominal factory size is maintained, but in the place where they work, the metal wears out. That is why a transition is formed at the boundary of these two sections, which is larger the greater the wear of the cylinder.
In my case, as expected, the wear was clearly palpable and the cylinder mirror was covered in nicks and scratches.
A bunch of hay that blocked the flow of cooling air, in my opinion, did not add efficiency to the cooling system... How can you even drive like that?
The piston turned out to be burst and, moreover, according to the good old collective farm tradition, it was treated with sandpaper. As indicated by numerous risks on its surface.
After removing the clutch cover and removing the kickstarter shaft, the reason for the freezing of the winding lever was found - the return spring had burst in half.
The motor chain turned out to be stretched, but not critically.
Photo report: Replacing the rear chain of an Alpha moped
Torque chain transmission is always a problem. But low cost, ease of maintenance, coupled with low weight, and for a motorcycle - weight is a very significant parameter - outweigh all the disadvantages and the chain drive of the rear wheel, just like many years ago, is dominant in the motorcycle industry. And we are unlikely to get away from this in the coming decades.
As already said: the chain is always a problem. The infection is spreading and nothing can be done about it. And if only it drags on, it begins to eat the teeth of the stars and if it is not replaced with a new one in time, then it will literally eat the stars in one season.
Without going into theory, let's consider a classic case: the chain has stretched and requires urgent replacement. If you look closely at the picture, you will see that the chain rollers do not fit into the sprocket teeth. As a result, the chain rollers hit the sprocket teeth and eat it up literally in one season.
Some especially gifted people manage to cut their own exclusive teeth on such sprockets using a grinder. But we won’t suffer from such garbage today, but we’ll buy a new driving star (the driven one is still alive, it’s good for a couple of seasons), a chain and do everything like a human being, and not like a collective farm.
When choosing a new chain, consider the width and number of teeth on your moped's sprockets. Chains for Alpha come in different widths and lengths: some are wide, some are narrow, some are long, some are short. We will use a wide 428 for Z13 Z41 sprockets, and which one you will use depends only on your sprockets and preferences.
We install the pin on the footrest, if you have one, of course.
We remove the casings, the drive sprocket cover, unscrew the rear wheel axle nut of the rear sprocket, and loosen the tension chains on both sides.
We look for a lock on the chain, unfasten it and remove the old chain. For tusks, the chain is always riveted tightly and in this regard I was unlucky: I had to go for the grinder B-)…
We push the wheel along the rear pendulum as far forward as possible, throw on a new chain, and fasten the lock. To prevent the lock from unfastening while moving, we place the latch so that its cut faces in the opposite direction from the direction of its movement. To avoid getting confused, do this: turn the wheel so that the lock is on top of the pendulum and fasten the latch with the cut towards the rear wheel.
We lightly tighten the nuts of the rear axle sprocket, remove the stub from the step, pump the rear suspension several times and slowly begin to tension the chain according to approximately the following principle: tighten the chain a little and immediately measure with a ruler how the wheel is.
If the distance from the wheel to the pendulum on one side is significantly less or greater than on the other, we calibrate the position of the wheel with the required tensioner. In this way, in fits and starts, we pull the chain to the desired condition.
We pull the chain until it sag by 1-1.5 cm. This will be quite enough. After everything has been done, tighten the axle nuts and make sure to adjust the rear brakes. Never forget about the brakes, otherwise you’ll end up slamming into a trash can or a similar deer.
For those who are still with us, I will tell you the old-fashioned way of how to easily and simply determine how much the chain is loose: take the chain, straighten it and hang it in a horizontal position. The looser the chain, the stronger it will describe the arc; the newer the chain, the more even it will be.
For comparison, I took two chains: one was broken, the other was just from the store: the broken one hung snot at almost an angle of 90 degrees, the new one sagged a little and that’s all. This is the way.
Removing the clutch
Unbend the lock washer, insert a tin rod or stick under the tooth of the motor transmission sprocket and unscrew the nut on the crankshaft journal (right-hand thread).
Unbend the lock washer, fix the inner clutch drum with a puller, which is a clutch disc with a welded piece of tire, and unscrew the nut (left-hand thread).
We take out the discs and drum.
Remove the basket from the shaft along with the chain and sprocket.
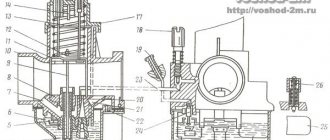
IZH Planet 5 engine diagram
| 1 - spark plug; | 2 - cylinder head; |
| 3 - cylinder: | 4 - piston; |
| 5 - piston ring; | 6 - piston pin: |
| 7 - crankcase; | 8 — channel for lubrication of the main bearing; |
| 9 — roller bearing; | 10 — left oil seal; P - left cover; |
| 12 — motor chain; | 13 - ball bearing; |
| 14 — crankshaft sprocket: | 15 — outer drum of the clutch; 16 — clutch disc; |
| 17 - inner drum: | 18 — pressure disk; |
| 19 — spring; | 20 - shaped nut; |
| 21 - pusher; | |
| 22 — ball bearing; | 23 — trigger gear; |
| 24 — gear shift lever; | 25 — trigger lever: |
| 26 — trigger shaft; | 27 — gear shift shaft; |
| 28 — trigger sector; | 29 - spring: |
| 30, 31, 32. 39, 40, 42 — gearbox gears; | 33 — gear shift fork; |
| 34 — emphasis; | 35 — gear shift shaft; |
| 36 — gearbox cover; | 37 — installation sleeve; |
| 38 — right cover; | |
| 41 - intermediate shaft; | 43 - ball bearing; |
| 44 - roller bearing: | 45 - secondary shaft; |
| 46 - input shaft: | 47 — clutch adjusting screw: |
| 48 - worm ball; | 49 — clutch worm; |
| 50 — cap of the secondary shaft nut; | 51 - oil seal; |
| 52 — asterisk; | 53 - generator; |
| 54 — right oil seal; | 55 — roller bearing; |
| 56 - gasket; | 57 - crankshaft; |
| 58 - bypass channel; | 59 — exhaust window; |
| 60 - decompressor |
Removing the dyno starter
We remove the cooling casing and then, if the engine is not converted to a magneto, remove the ignition breaker cam. Hold the dyno starter rotor by the fan and unscrew the nut. If you cannot hold the rotor in this way, fix the crankshaft with something and unscrew the nut.
We pull off the rotor with a puller. The rotor can be pulled off either with a standard puller or with a homemade one. Depending on the situation, I use both standard and homemade ones.
Analysis of previous repair errors
We remove the flange on which the stator is mounted and carefully inspect the connector plane for interference by “drop-dead handles”.
No matter how many times I repair Ants, I come across the fact that all sorts of “drop-dead little hands” seal the oil channel through which oil flows to the crankshaft main bearing and oil seal. I'm already tired, honestly - how much can you? Why cover it up?
It doesn’t matter to me, but how do you think the bearing and oil seal should work without lubrication? Admire what happens to the main bearing when it runs dry.
We unscrew the bolts and half the crankcase.
Assembly
I bought this main bearing. It seems to be our production. There are Chinese analogues in stores - they are more expensive, but I don’t know what their quality is... I try to buy something that may not be of such super-duper quality, but at least one that has been proven over the years.
The quality of production is such that there is essentially nothing to complain about. The price is quite reasonable - 350 rubles.
We press the inner race of the main bearing onto the right crankshaft journal. External - screw the stator flange of the dynostarter and press it into the crankcase until it rests against the flange.
We install the oil seal, retaining ring and main bearing into the left half of the crankcase. I'm installing a new main bearing. It is closed, but it doesn’t matter: we open it, wash out the factory grease and install it in the crankcase.
Lubricate all bearings and working edges of oil seals with clean engine oil. And very carefully, so as not to accidentally wrap the edge of the oil seal - insert the crankshaft into the left half of the crankcase, assemble the gearbox and knock out the crankcase guides by 5-6mm.
We degrease the crankcase connector, install a new gasket and install the second half of the crankcase.
We tighten the bolts and immediately, so that nothing gets into the crankcase, install the piston. I'm installing a new piston, cylinder head and reed valve body. The piston one, like everything else, is of no particular origin - most likely Rostov, but clearly not Chinese. I didn’t want to get involved with this counterfeit, but the owner didn’t want to wait until they bore the cylinder and put a liner in the cylinder head and insisted on buying it. You see the prices for spare parts - it’s up to you to decide whether to contact this new product or not.
We install the second main bearing into the crankcase and secure it with a retaining ring.
What's the result?
The crankshaft has been taken away - to say that it is worn out is to say nothing... The gearbox bearings, like the main bearings, have gone to the same place - to the crankshaft: in the trash. The gearbox, with the exception of one fork, did not cause any complaints. By the way, the clutch too.
Now the question is: what to do with all this junk? Buy a “plasticine” crankshaft from no one’s making and mold it into the engine. I was initially against this idea. In general, we found a used engine for a ruble and removed the crankshaft from it. Of course I had to tinker with him. Since the thread was clogged, I sharpened it and straightened it with a sharpening tool.
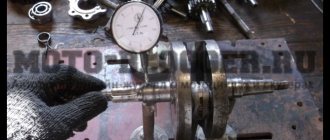
After correcting the threads, I checked the crankshaft for runout. There was no need to worry - the beating of the trunnions did not exceed one hundredth of a millimeter with a tolerance of three hundredths. By and large, it would have been necessary to replace the bushing of the upper head of the connecting rod, but time was running out and the bushing was not very worn. In all other respects, the crankshaft did not disappoint and this purchase can safely be called a success.
We decided to buy everything else: CPG, cylinder head, gaskets, seals, bearings, motor chain, etc. in the store. Although, by and large, the cylinder could have been bored out and that would be enough. But the owner did not want to wait, but in vain.
Preparation
Before installing the crankshaft, it is advisable to check it for runout. And it doesn’t matter whether the crankshaft is new or used, you need to check it otherwise, with today’s “quality” of spare parts, you can repair the engine and then suffer with it for a long time and tediously. We place the crankshaft on the prisms and check the runout, the norm is no more than 0.03 mm. If you don't have an indicator, take the crankshaft to a good turner
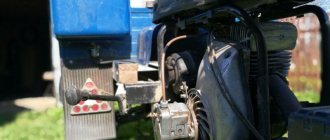
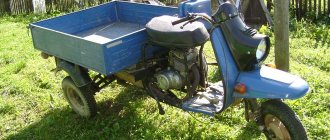
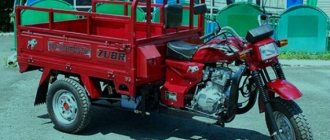
Photo report: Disassembling the engine of the Ant scooter
I recently came across a miracle of Soviet technology called an “ant scooter” for repairs. The engine of this “ant” showed no signs of life. Therefore, I didn’t even bother diagnosing it, and immediately began the overhaul, which I started with its complete disassembly. Moreover, its owner asked that everything be done at the highest level, and the highest level of repair involves a complete disassembly of the engine with subsequent troubleshooting of all components and mechanisms (in my understanding, of course).
We’ll have such a wow copy on the menu today, it’s moderately well-kept, which of course makes us happy.
Device and technical parameters
The design of the Ant scooter was quite simple and consisted of the following main parts:
- engine;
- frame;
- transmission and suspension;
- electrical equipment;
- brake system;
- body.
Such a simple design of the Ant 2M 01 scooter and its wide unification with the two-wheeled Tulitsa (Tula) model allowed the owners to carry out repairs themselves.
The TMZ Ant motor scooter had the following technical characteristics and operational parameters (data for modification of the Ant 2M motor scooter are given in parentheses):
- Drive – 3x2.
- Load capacity – 0.25 t (0.28 t).
- Engine: type – petrol two-stroke,
- ignition – electronic;
- number of cylinders – 1,
- volume – 0.20 l,
- cooling option – forced air,
- power – 11.0 l. With. (12.5 hp),
- carburetor - K-36G,
- fuel – a mixture of gasoline and oil (1/33).
- base – 1.78 m,
- type – mechanical,
- weight – 0.24 t,
Characteristics of the Ant scooter
The scooter is distinguished by high maneuverability and maneuverability, as well as small dimensions. In the garage it will take up as much space as a heavy motorcycle with a sidecar.
The Soviet scooter "Ant", which is still popular, has the following technical characteristics:
- Length – 2.68 m.
- Width – 1.25 m.
- Height – 1.07 m.
- Dry weight – 240 kg.
- Load capacity – 250 kg.
- Speed – about 30 km/h.
- Gasoline engine, two-stroke, 11 hp.
- 4-speed gearbox + reverse.
- Drum brakes with mechanical drive on each wheel.
Among the advantages of a moped it is worth noting:
- Small turning radius – 3.5 m.
- The lightness of the Ant scooter; motorcycles significantly predominate in weight.
- Low cost - only used devices are available on the market.
There are also disadvantages:
- There are a lot of used equipment on the market.
- The engine has high fuel consumption - from 8 liters. per 100 km. But more often this figure is closer to 10 - 11 liters. per 100 km. due to increased wear.
- Frequent breakdowns due to low reliability, especially of the engine.
Ant owners have the most questions about the engine. After all, I want to moderate my appetite for fuel consumption.
Device Description
The Ant is much lighter than ordinary motorcycles, so everyone dreamed of owning one. The approximate weight was only 240 kg, which is small considering that it could transport loads several times heavier than itself. Actually, it is because of this that he received the name Ant.
Another advantage of the scooter was and is that you can buy it for a small amount of money. So, you can buy an Ant scooter for only 30,000-50,000 rubles.
Engine
The Ant engine is single-cylinder. At the same time, it is quite voracious, so it’s hard to call a scooter an economical vehicle. After all, even a new Ant engine consumes about 8 liters of 80-grade gasoline per hundred, and what can we say about used equipment? After all, if the piston or gearbox is slightly worn out, then the costs increase to 10 liters per hundred. In this case, you can replace damaged spare parts, but it is not easy to buy them, since they are rarely found on sale.
You can buy an already assembled Ant engine, but such luxury is a little expensive.
Suspension
In general, the Ant scooter is a very durable piece of equipment. The front wishbone suspension is especially well executed. It can last for decades. Many scooter users even claim that it is made better than modern versions of telescopic forks.
Nowadays, most fans of the Ant scooter install rear shock absorbers from a scooter instead of front shock absorbers, because the former are currently in short supply.
The rear suspension is independent. The gearbox drives the rear wheel. This is facilitated by a roller chain running through it. At the same time, the gearbox itself is made quite well. It is located in the very center of the rear axle, making it easy to remove if necessary.
Easy to repair
Thanks to its light weight, the owner of this equipment can easily turn over the Ant scooter, which will allow him to easily carry out repair work. To change a tube, tire or even gearbox, it is absolutely not necessary to remove the wheel.
The scooter is large in size, making the equipment excellent for work in rural areas.
The scooter can reach a maximum speed of 50-60 km/h.
How to disassemble and reassemble the engine of the Ant scooter?
The motor design is simple. But even this does not protect it from breakdowns, which are often associated with age. You shouldn’t just disassemble the engine, but if the following symptoms appear, you should take up the tools:
- Startup problems.
- Oil leak.
- Lack of traction.
- Increased background noise.
- The winding lever does not return to its place.
Possible breakdowns:
- Worn seals.
- Poor quality assembly after previous repair.
- CPG failure.
- Worn bearings.
- The return spring in the kickstarter has broken.
Note! Before overhauling the power plant, it is not necessary to wash it. Just drain the oil and remove it from the frame.
Cylinder block
After unscrewing several bolts, you need to remove the cylinder head. Pay attention to the worn cylinder head gasket. Opposite the outlet window, you should probe the so-called excavation. If a characteristic wave or step is felt, then such a cylinder needs to be changed or bored.
The piston should be examined for wear. Some “Kulibins” manage to refine it with sandpaper.
Clutch
- Removing the clutch cover and kickstarter shaft. Pay attention to the return spring - it often breaks and the kickstarter does not return to its place. Also at this point you can check the timing chain tension.
- Clutch disassembly. To do this, you will need to unscrew the nuts and remove the pressure plate from the basket.
- The lock washer must be bent and a stick must be inserted under the tooth of the main gear sprocket. Please note that the threads on the crankshaft journal nut are right-handed. The nut needs to be unscrewed.
- There will be another lock washer that needs to be straightened. We take a puller and fix the clutch drum. The clutch nut has a left-hand thread.
- The disc and drum are removed, as well as the clutch basket is removed from the shaft along with the chain and drive sprocket.
Dinostarter
Remove the following elements:
- Cooling casing.
- Ignition chopper cam, but provided that the power plant was not converted to a magneto. In this case, it is necessary to fix the dyno starter rotor. This can be done using the cooling fan or by fixing the crankshaft with improvised means.
- The rotor is dismantled using a puller - standard or homemade.
As a result, the rotor was removed.
Music on the road: how to connect speakers to an amplifier in a car, and which ones are better to choose?
How to fill out the European Protocol in case of an accident, how long is the document valid? Find further information.
We recommend reading:
Repair manual
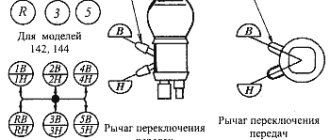
Diagram, comments, ignition installation algorithm
The gearbox of the T-200M scooter is a complex unit. And many of our readers are perplexed by the question: how to properly disassemble and reassemble it?
To know this, information only about the assembly sequence and tools is not enough; you need to familiarize yourself in detail with the box, with the operation of its parts and mechanisms. At the request of the editors, engineers V. Kamerilov and L. Boyarnikov talk about the T-200M box.
When starting to talk about the device, I would like readers to carefully read this table. Later, during assembly, it will provide you with a service.
The gearbox consists of two shafts, four pairs of gears and a gear shift mechanism.
Rice. 1. Internal arrangement of shafts and gears in the gearbox
The primary shaft 1 (Fig. 1) of the gearbox rests on two ball bearings 2 and 7, pressed into the holes of the left and right halves of the crankcase. It has a through hole through which the clutch rods pass. Gear 3 of the first gear is made integral with the shaft. Gear 4 of the second gear and gear 6 of the fourth gear rotate freely on the input shaft. These gears are engaged using the movable gear 5 of the third gear, which moves on the splines of the input shaft.
Spare parts price
Despite the fact that the production of the device stopped long ago, you can still find new spare parts for it that are produced by the industry. Some parts are imported, some come assembled. Supplied in sets:
- Clutch discs.
- Gaskets for power plant and gearbox.
- Nuts.
- Pipes.
- Levers.
The necessary parts can be found on the Internet using store catalogs. Prices for spare parts for the Ant scooter are fair. Here are some examples:
- Clutch disc – 400 rub.
- Kickstarter shaft – 1100 rub.
- Front shock absorber – 1600 rub.
- Gearbox seals – 100 RUR.
- Piston – 2500 rub.
- Gearbox – 14,000 rub.
- Wheel hub – 2000 rub.
Judging by the prices, the device is more than cheap to repair. This is an important operational property for people in rural areas.
Tuning the Ant scooter
In terms of tuning the Soviet Ant vehicle, the owners can’t think of anything. After all, these are often tech-savvy people who like to spend time in the garage. Several directions can be distinguished:
- Weight loss. To do this, you will need to remove “extra” equipment. This includes body kit in the form of wings, hood and fairings, as well as all electrical equipment. To transport goods around the village in the summer, all this is unlikely to be needed.
- Increased output from the power plant . To do this, cut off the dynostarter shaft. The operation will add power and dynamism. The recoil during starting is leveled by trimming the crankshaft.
- Installation of other wheels. Front 4.5 - 9, and rear 7 - 10. Cross-country ability and speed will increase.
- Improvement of the piston group . You can buy a piston with three rings and make an additional window in the cylinder to supply the fuel mixture.
- Magneto and increasing the efficiency of the cooling system are additional tuning.
In terms of engine tuning, some owners took radical measures and installed a Lifan engine (Lifan 188f), which has a volume of 400 cubic meters, on the Ant scooter. cm. And its power is 13 hp. A distinctive feature of this assembly is the variator and centrifugal clutch.
A centrifugal clutch is not the best option for trucks, since when driving on rough terrain on a loaded scooter at low speeds, it may slip. And this incapacitates him.
What modifications of the “Ant” scooter are there in the video:
Tell your friends! Share the article with your friends on your favorite social network using the buttons on the panel.
Damage to the transfer case and its causes
ISOFIX car seat mounting system: child safety comes first
During the union, I worked in the Department of Irrigation Systems, and I know well all the nuances of operating Ant. And in our time, craftsmen remade the scooter in order to squeeze all the power out of it, and it worked. Ant was considered to have one shortcoming - poor stability at speed. If a stone or stump got under the front wheel at speed, the scooter would overturn. Many of my friends suffered because of their recklessness. But overall Ant is a great thing.
Guys, do you think there will be enough power for a tourist if you put the 139th engine on the box from the TMZ200? The 139th c pulled normally, although it weighs 20 kg less than the assembled tourist itself
The main disadvantages of a scooter and its modernization
Motor scooter Ant and his carburetor
The Ant scooter, like any technology, in addition to its positive qualities, also had disadvantages. At the same time, the existing shortcomings could be attributed both to structural ones, originally inherent in the device, and to operational ones, arising during the operation of the equipment.
According to reviews from owners, structural defects that required rework or the most frequent repair of a particular unit include:
- an unsuccessful electrical circuit of the scooter, often leading to failure of components (din-starter, relay-regulator, ignition coil), especially in rainy weather;
- an undeveloped gearbox device often with poor-quality factory assembly led to a crash during 2nd or 3rd gear operation. To fix it, the owners had to study the structure of the box itself, as well as how to properly disassemble and then reassemble the gearbox after repair;
- a small difference in fuel levels between the tank and the carburetor chamber led, when there was little fuel in the tank, to running on a lean mixture or stopping the engine.
The most common operational deficiencies are:
- unstable ignition on the Ant requiring frequent adjustments;
- short service life of brake pads;
- loss of hydraulic fluid from shock absorbers, requiring disassembly, refilling and reassembly of shock absorbers for repairs;
- malfunction of the electrical equipment of the starter dyno under the influence of dirt, water, dust. Repairs were carried out by disassembling and reassembling, checking the electrical circuit, searching for and replacing the failed element;
- occurrence of cracks in the frame;
- oil leak in the gearbox.
Very often, the owners, having gained experience in operating the Ant scooter, carried out modernization. But before starting to implement the changes, the following issues were resolved:
- How much is it?
- What will the modified Ant look like?
- How to find and collect the necessary materials for upgrading?
- How much will the scooter weigh after the modification and how will this affect the technical characteristics?
- How long will it take to remodel?
After receiving positive answers to these questions, work on changes was carried out. Tuning the Ant scooter, which made it possible to give it additional properties, boiled down to the following basic alterations:
- Installation of a dump body for transportation of bulk cargo.
- Change of appearance design.
- Installation of a coupling device that allows you to work with various trailed and semi-trailer devices and equipment.
Versatility, cost and maintainability allowed the TMZ Ant scooter to be compared in terms of production volume and popularity with such best Soviet models of motor vehicles as the heavy M 72 Ural motorcycle and the light road motorcycle for the Minsk 125 village.
Previous entry Izh Jupiter 3 - technical characteristics, review Next entry Izh Jupiter 4 - technical characteristics, improvement