Honda af 35 zx repair, please advise.
How can you bore a cylinder without a piston?
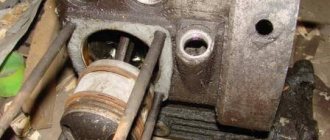
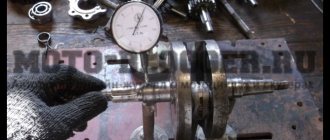
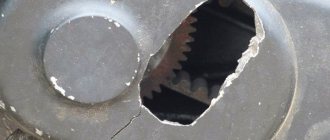
The runout must be checked at the centers of the lathe or simply at the centers; it is checked with an indicator clamped into the tool holder or mounted on an indicator stand. You need to measure where the bearings and seals fit on the crankshaft. The permissible runout on one side of the crankshaft is no more than 4 hundred parts. You also need to carefully inspect the seating for the oil seals in the crankcases and on the crankshaft so that there are no longitudinal scratches, i.e. scratches through which air can pass into the engine. If there are scratches, then we seal the seals with Victor Reins sealant.
If the bearings and crankshaft have become well, then the friction of the bearings is very small and practically does not provide any resistance - the shaft rotates like a “snot”.
What they say and write on the Internet is not always true, and even more so on YouTube, when you cannot “feel” the result yourself.
Nice Rich - it seems like nothing, I haven’t used it myself, but the reviews seem to be good. We usually either have a used Japanese crankshaft or install the cheapest Chinese one. I’ll say right away that the Chinese crankshaft has thicker bearing seats than the Japanese one and it’s very difficult to seat it. The crankshaft itself is a very delicate thing, it is very easy to bend. Immediately after purchasing a new crankshaft, you need to check it for runout in the centers, otherwise while it is coming from the factory, they throw it, throw it, etc., etc.
Regarding the bearings. Be careful, very often there are fakes that are thicker than the original ones; when installing them, the crankcase may not fit together!
You can check that the bearings have been replaced correctly after starting the engine. At first, the bearings may rustle until they find their place. This rustling noise can last no more than a couple of hours of engine operation. Then it should disappear or may not exist at all with correctly installed bearings.
Let me tell you right away that it will not be possible to do this job “beautifully” without additional devices. Now I’ll tell you briefly, I’ll write it out in the evening.
1. Take the bearings and wash the preservation from the cages with gasoline.
2. Dry.
3. We wrap the bearings and crankshaft in bags and in the freezer (the longer they stay there, the better).
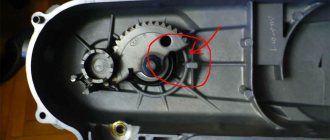
4. Take the first part of the crankcase (small) and place it more or less flat on the table with the inner part (where the bearing sits) facing up. I usually do this using birch blocks. They put it out.
5. Take a heat gun and heat the seat under the bearing. We simply check the temperature - spit a little on the landing. We heat until the saliva rolls in balls across the planting. Heated it up.
6. You need an assistant who will heat while you go to get one bearing. Take it out of the freezer and quickly coat it with motor oil a little with your hand. And take the bearing by inserting your middle finger through its central hole. Smoothly lower the bearing into the crankcase until it’s halfway (so as not to warp) and throw it. It should fall into place very easily, with the marking facing up, i.e. inside the motor. If it is warped, we will knock it out while the crankcase is hot; to do this, prepare a couple of thick rags so that you can take the hot quatret and place it upside down.
7. Installed the bearing. Remove the crankcase and let it cool down. We take the second crater (large), do the same thing as described in section 6, only when the bearing is seated, we immediately begin to heat its inner race, for about 5 minutes. While your friend warms the bearing, you go behind the crankshaft. Quickly take it out of the freezer, coat the seat on the long shaft with oil and insert it into the bearing. Eat. Let them cool down.
8. In order to succeed 100% the first time, you will need to make (or buy) a spacer from spacer cardboard (or a “Case No.” folder) in advance. Gasket in the shape of the crankcase cut, for installing it between the crankcases, thickness from 0.5 mm to 1 mm, but 0.5 is better. And it’s good to coat this gasket with grease.
9. Now the fun part - assembly. Here you need a special device to pull the crankshaft into the bearing. In the evening I will show you a photo of my device. The work must be done while sitting. We take the larger half of the crankcase and place it on our laps so that the crankshaft does not touch anything. Install the gasket. On top of the free shaft of the crankshaft (lubricated with oil) we very easily, without force at all, put on the second half (the inner race of the bearing is lubricated with oil), as if baiting it. You can’t press at all, because... You can easily bend the crankshaft by a couple of hundred! We take the tool and begin to retract the crankshaft. You need to first watch so that it doesn’t become warped. To prevent it from spinning, you need to put a nut on the installed part of the crankshaft and tighten it with a wrench, then the crankshaft will not spin while tightening the 2 crankcase halves. When the crankcases come together, you will see this by the solid oil, which will be squeezed out from the gasket and the retraction will stop.
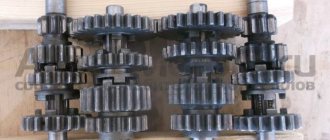
10. Pulled. The crankshaft rotates very easily, if not, then you need to disassemble it and do it all over again. Other times, even in a day, you can not pull it off, disassembling and reassembling 5 times. And all the time checking the crankshaft for runout after disassembly.
11. Clamp the crankcase with bolts.
12. Then we take the motor with our hands in the area of the gearbox and lightly but sharply hit any part of it, except the shafts, on a wooden block. The height of the engine lifting above the block before impact is 15-20 cm. You can hit it with any part of the crankcase closer to the crankshaft. During this impact, the crankshaft will become as comfortable as possible, i.e. will find its place. Attention, do not catch the block with the crankshaft! If the crankshaft begins to spin even easier, then we move on. If it starts to spin tighter, then repeat the blow, only with a different part of the crankcase and apply 2 times less force.
13. Tighten the bolts if they come loose.
14. Next, assemble the engine.
I highly recommend that before performing the operations listed above, take the crankshaft and 1000-grit sandpaper and a little water with your hands, rub the seat under the bearing on the short shaft for about 30 minutes. Rub tightly, but without force, pressing the sandpaper to the shaft. Don't be afraid nothing bad will happen.
One of these days I will change the bearings on the Lead 90. I can show you the whole procedure in pictures.
Modified October 21, 2012 by cop511
Updated Dio 34 chassis
In principle, at the time of purchasing the Dio 34, I was already clearly aware of the need for capital or a complete replacement of the chassis. The question arose: “What to choose?” The fact is that restoring, although original, “dry” fork stays with Chinese repair kits, then also fiddling around with polishing the stays and painting in order to end up with the same “dry” fork in the realities of our road conditions is such an undertaking. You could, of course, look for a hydraulic one, like on the Dio ZX, but then you would have to change the entire brake system to hydraulic, and this (taking into account the cost of the fork itself) is in no way justified on this scooter.
Apparently the original rear shock absorber could not cope with the load and was previously replaced by the previous owner with a 340 with spring preload from a 2-seater scooter. Unfortunately, storage under the fence or operation in “submarine” mode killed it too. Therefore, I decided to purchase parts in the mid-price segment. I searched for a long time, the choice was between famous Indian and Taiwanese manufacturers, I settled on the latter, because... I was given a big price for them. guarantee.
The rims and tires arrived separately. The stampings are heavy, the metal is good, but the painting is so-so, the layer is a bit thin. If I have some free time, I’ll restore the original ones, but for now there will be these. The scooter had tube tires installed, which were already pretty worn out. I decided to install tubeless. Front 4c for 125 kg load of medium profile, rear 6c for 175 kg - more “toothy”, but everything in moderation. I need such tires because... I’m going to go fishing, and the roads around the city don’t look like a Formula 1 track. The rolling resistance on these tires is moderate and will not affect consumption much.
The front and rear brakes on the Dio 34 are drum brakes, the pads are interchangeable, the size is standardized with many foreign-made scooters and mopeds. I installed pads with grooves in the friction linings. Both brake cables were jammed, the rear one was restored, and the front one was replaced.
Dio is a very low scooter and touches everything it can with its belly. After assembly, I made a comparative measurement with the same load on the shock absorbers (I did the first one before I disassembled the scooter down to the frame). The fork legs without load are 3.5 cm longer, the rear shock absorber is 340, the same as the one that was at the time of purchase. Initially, the clearance to the ground in the area of the central leg was about 11 cm, now it is about 13 cm. It seems like a small thing, but still. Let's see how the suspension settles after complete assembly and my weight...
Well, for the money:
- Hydraulic fork stays – $20
- Rear shock absorber - $10
- Rims, front bearings + nipples - $34
- Tubeless tires – $31
- Brake pads + front brake cable – $7
Total: $102
P.S. the scooter begins to take on at least some shape. I hope to be able to fully assemble it before the start of next season. Health and goodness to everyone!
Tags
- Honda
- Dio
- AF34
- AF35
- Cesta
- chassis
Maintenance of Honda Dio 34
Maintenance of Honda Dio 34 Any motorcycle requires high-quality maintenance for the longevity of its operation. Honda Dio 34 scooters require periodic inspection of all their mechanical components, as well as replacement of technical fluids. In addition, the service also includes checking the electrical system and replacing spark plugs. Depending on the quality of maintenance performed, the durability of the scooter, as well as its technical characteristics, depend. For example, untimely oil changes can increase the resistance of mechanisms, and as a result, reduce engine power and increase fuel consumption.
Changing the oil in a Honda Dio 34 scooter The main maintenance operation for a scooter is changing the oil. It must be carried out at specified intervals. The Honda Dio 34 scooter uses two types of oil: transmission oil for the gearbox, and motor oil for lubricating the engine. Recommended 2-stroke oil for Honda scooters.
Replacing the air filter To maintain the proper technical characteristics of the scooter, periodic replacement of the engine air filter is required. The frequency of filter replacement directly depends on operating conditions. If the ambient air is heavily polluted, it is recommended to replace the filter every few months. When operating in normal atmosphere, replacement is required at the same time as the oil change.
Carburetor maintenance Approximately once every 2000 km, it is necessary to clean the carburetor from accumulated dirt. This is done using compressed air or by flushing with gasoline. In addition, a special liquid is well suited for flushing the carburetor; you can purchase it at auto parts stores.
The degree of carburetor clogging will determine the smooth operation of the engine, its power, fuel consumption and ease of starting. If the blockage is severe, the engine will be difficult to start.
Replacing the gas filter The main protection of the engine and carburetor from large dirt is the gas filter. Depending on the degree of contamination of the incoming gasoline, the filter must be replaced with a new one. If the gasoline is sufficiently pure, then replacing the gas filter should occur simultaneously with changing the oil. If low-quality gasoline was filled, the filter must be replaced immediately.