Let's start with the fact that the main oil seal of the engine is the crankshaft oil seal. The crankshaft oil seal is considered an important element in the internal combustion engine. The fact is that the engine needs effective and constant lubrication. To solve the problem, power units have an oil system in which engine oil circulates under pressure and is supplied to various loaded components.
In this case, it is worth highlighting the parts that, in simple words, come out of the engine. These include the crankshaft, part of which is structurally connected to the flywheel. It turns out that when part of the crankshaft is brought out, the hole where it rotates must be sealed to prevent engine oil from leaking from the engine.
The crankshaft oil seal or the main engine oil seal acts as such a seal. Next, we will look in detail at the purpose and features of this element, and also talk about what malfunctions and breakdowns arise if problems begin with the specified oil seal.
How to change the kick starter oil seal on an alpha moped?
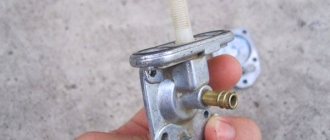
If the starter seal is worn out on your moped, then you need to change it. The kick starter leg seal can be changed without removing the clutch cover; you can easily pull it out and install a new one. It is also not necessary to drain the oil, but simply roll the moped in the opposite direction so that the oil flows onto the other side. And then you can remove the old oil seal.
To replace, you will need a regular awl or something similar, or you can take aluminum wire and sharpen the hook on the end. First of all, unscrew the kick starter leg. Next, take an awl and carefully slide it under the shaft itself and carefully pull it out in a circle, it should come out without any problems. It is advisable to check the old oil seal with the new one, put them next to each other and look for the same holes or if they have holes. Then we take a clean cloth and wipe the seat for the new oil seal so that there is no debris there.
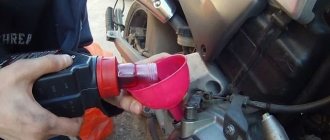
Next, take a syringe with any oil and begin to lubricate the middle of the oil seal. Then we insert the new oil seal into place, then take either a 14mm head or any tube the size of this oil seal and begin to gently press it down so that it fits well into the seat. After this, put on the kick starter leg and tighten the bolt.
Source
Replacing the drive sprocket shaft seal
The final article in the seal replacement cycle will be a description of replacing the drive sprocket seal. By the way, it, in turn, most often suffers in the same way as the fork seals, because they are the ones who do the most frequent work, and hence the wear.
But the wear of this particular oil seal is quite predictable and is not considered something out of the ordinary, just a normal operating moment.
Well, why it wears out is clear to many.
Firstly, the drive sprocket shaft is constantly rotating, and it doesn’t take a genius to understand that the friction force of the seal’s working edge on the shaft will sooner or later do its dirty work, and the seal will begin to leak oil.
The second is, of course, the quality of the original seals: now it was not very good and continues to be so.
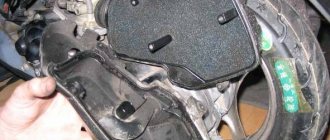
Well, the third, most deadly reason for accelerated wear is the constant dirt that accumulates under the drive sprocket! These are generally mega extreme conditions for a stuffing box, when a mixture of grass, clay, sand and mud is packed under the star. The worst thing is that it doesn’t fly away anywhere, but is only pressed and pressed, and eventually, under the influence of centrifugal force, all this mess seeps into the oil seal. Naturally, the sand, which begins to rub either on the shaft or on the oil seal, eats up the working edge, and the oil seal begins to leak. If, with all this, you also have a closed sprocket cover, which does not leave a single chance for any amount of dirt to fly out, then that’s it: you have only one way - to the store for a new oil seal.
So, if you do not ride on asphalt or on dry paths in a holiday village, then purchase or modify the generator cover yourself! We need to make it as open as possible.
Now for the replacement.
We take a new oil seal and coat the outer and inner edges of the oil seal with oil. No special oil is needed here: regular engine, transmission or fork oil... it doesn’t matter.
Apply liberally. We do this so that the oil seal fits into the seat without effort, any scuffs or snags, and, of course, so as not to damage the oil seal, otherwise why is all this needed at all?
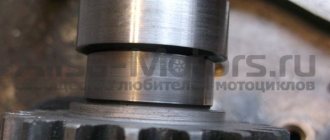
Naturally, the shaft itself also needs to be anointed, especially since it is not a smooth cylinder, like the crankshaft journal, but has a bunch of leaks: the first is for the locking washer, and, of course, longitudinal grooves, which are the mounting splines for the drive sprocket.
All these grooves give additional reason for accuracy. The groove for the locking washer can cause problems in the form of tucking of the inner working edge of the oil seal. In addition, the crimp ring of this edge may come off, which you may simply not notice, and, as a result, the oil seal will leak in the same way as the old one.
But the longitudinal ones, if they are not anointed and the oil seal is put on properly, their sharp edges can leave cuts on the working edge, and accordingly, the oil seal will leak oil again. And, of course, it is necessary to heat the seat to a temperature of 150-200 degrees so that the metal expands and the oil seal fits in without effort! No hammer or mandrels! Only with your hands!
If you hit with a hammer, then, firstly, there is a high chance of bending the metallized base of the oil seal, and secondly, it may go a little crooked, and if you feel it when seating with your hands and correct it, then with a hammer you can only bend the oil seal, and this is where it all ends: a new oil seal will be required, and the old one will turn from a circle into an ellipse from impacts.
Well, again, when planting, you don’t need to put too much pressure on the oil seal if it doesn’t fit! Calmly, slowly rotate the oil seal left and right, and it will fit on its own without brute force.
Bottom line: listen to the advice, and after proper replacement, new oil seals will serve you happily ever after, and your season will not be interrupted by downtime due to a ridiculous rubber band.
Purpose and principle of operation of the engine main oil seal
As already mentioned, lubricant is supplied to various friction pairs under pressure, and individual elements inside the engine are lubricated by splashing or gravity. One way or another, the main task is to minimize friction, remove wear products, and protect against mechanical damage and overheating.
In this case, the transmission of torque from the engine to other components is realized by removing the crankshaft from the internal combustion engine to connect to the flywheel. At the same time, there is a need to seal the hole under the shaft. For these purposes, a crankshaft oil seal is used.
This element is made of fluorine rubber or silicone, actually serving as an O-ring. The diameter of the main oil seal is equal to the diameter of the crankshaft. The oil seal material is heat-resistant and also resistant to engine oil. This avoids the risk of damage to the seal from excess heat that occurs as a result of friction.
So, the oil seal is installed in the area on the cylinder block where the crankshaft exits the engine to the outside. This location may differ on different engines. For example, on a rear-wheel drive “classic” with a longitudinally mounted engine and a timing chain drive, the main oil seal in some cases is located in the crankshaft shield in front of the support bearing.
Front-wheel drive cars, where the internal combustion engine has a transverse arrangement, and the gas distribution mechanism is often driven by a timing belt, the crankshaft oil seal is located in the BC due to the fact that shields on such power units are structurally absent. One way or another, in all cases, the purpose of the element is to prevent oil leakage from the engine cylinder block.
While the engine is running, the oil inside the crankcase is under a certain pressure. Thanks to this pressure, the seal is pressed against the parts and sealing surfaces. This allows you to reliably seal the engine against oil leakage at the installation site of the engine main oil seal.
Not an oil scraper cap. How the valve seal works and how to understand that it needs to be changed
MSK, oil seal, cap
So, from the very beginning: what is a valve stem seal?
This cap, which is correctly called an oil deflector and not an oil scraper cap, is just a valve seal. If absolutely correct, then “a sealing element of the gas distribution mechanism of an internal combustion engine with an overhead valve arrangement; a rubber cap installed on the valve guide and valve stem to allow engine oil to enter the combustion chamber.” In general, from this definition the task of the cap is clear: to prevent oil from getting through the valve stem into the combustion chamber. If, for simplicity, we neglect all sorts of rockers, pushers, hydraulic compensators and some other parts of the cylinder head, then we can say that one end of the valve rests on the camshaft cams. The other (the one that ends with the plate) goes into the combustion chamber. The end that interacts with the camshaft is constantly in the engine oil. And the cap’s job is to prevent this oil from leaking lower onto the valve plate. This is the very simple thing that I promised at the very beginning. Now let's move on to the more difficult part.
The oil seal works under very difficult conditions. Firstly, due to the very high temperature. Secondly, the valve stem is still fidgety. In just one minute of engine operation, it can run up and down more than a thousand times. Of course, it is difficult to work in such conditions. Friction, temperature and engine oil can kill anything, and a cap is no exception. You've probably heard something like “the caps have become stiff.” Indeed, being in such an aggressive environment, the caps lose their properties, primarily their elasticity. “Standard” caps cannot fit tightly to the valve stem, and therefore cannot perform their function.
I must say that now the caps last much longer than before. Owners of classic Lada cars were doomed to change these cheap (but at one time scarce) parts often. The reason is the material of the caps. Old-school car enthusiasts probably remember the products of the Kursk Rubber Products Plant (now Kurskrezinotekhnika OJSC), which produced caps for VAZ. Those caps were made from acrylate rubber compound 51-1537A-2. The heat resistance of this mixture is up to 150 degrees, and the temperature to which a working cap can heat up is 180 degrees. It is clear that such caps could not last long.
It’s interesting that the caps on early VAZ-2108 engines lasted longer than on the “classics”. The fact is that we did not have caps that would fit the “chisel” motor, so at first there were German products “Goetze” and “Elring”, and then, in the early nineties, domestic caps appeared that could work in these motors. And they were made not from a mixture of 51-1537A-2, but from a new composition at that time, IRP-1287, based on fluorine rubber SKF-26 (they were produced at NPK Reserve in Samara). Domestic caps became better, but they could still “slip” from the valve guide, after which the engine began to consume liters of oil.
By the way, why can the cap slip off the sleeve? Theoretically, some caps can do this easily, while others cannot, even if they want to. The reason is a different design option.
The main details here are more or less the same. The cap is a sleeve of variable diameter. The lower part is wider - it should fit snugly on the valve guide. The upper part of the cap is narrower; it should fit tightly around the valve stem. To do this, on the outside of the cap in this narrower part there is usually a ring made of a spiral spring, which ensures a tighter fit of the rubber of the cap to the valve stem. In the lower part, the one that covers the valve sleeve, there is also a metal element - a steel ring, thanks to which the cap must be fixed to the guide sleeve very securely.
The differences between the lip and flange caps lie precisely in this lower part of the cap. If the lip type is simply put on the valve bushing, then the flange type has a steel ring at the bottom that expands and ends just at the flange. When installing such a cap, the valve spring rests against this flange, and thus the flange cap sits in its place more securely than the lip cap. The lip seal can still fly off, but the valve spring will prevent this from happening to the flange seal.
However, lip caps are now also very reliable, and there is no problem with their mass escape from their place on the valve sleeve. But other problems on used cars occur regularly.
Everything is wrong and everything is wrong
What can go wrong, I have already said: due to aging, the cap cannot provide high-quality drainage of oil from the valve stem, and it begins to leak into the combustion chamber. In this case, the consequences are varied, but all of them are unpleasant: carbon deposits form on the valve plate, compression may drop, dynamics will become worse, and smoke will pour out of the chimney. Well, the main thing is oil consumption. In fact, they usually only remember about the caps because of the oil. And this is only because changing them is considered easier than getting into the cylinder-piston group and dealing with rings or liners. This often happens, and replacing the caps can solve the oil problem.
The main thing is to understand whether it is worth contacting them. There are quite simple ways to find out whether this is the reason or not.
The most effective method is to try sharply pressing on the gas with a warm engine. It is important to meet two conditions: first let the engine idle for at least five minutes and press the pedal sharply. The point is that at idle speed, leaking oil accumulates, and when pressed sharply, it, together with a large amount of the mixture, burns and flies out into the pipe. So someone is accelerating, and someone is looking at the exhaust. A club of blue flew out - these were caps. However, after this cloud the smoke may be normal.
To check everything again, you can try to brake with the engine. Smoke starts pouring out - these are also caps. Smoke during re-gassing is also a sign of death of the caps.
On the one hand, these methods are quite reliable. On the other hand, there are some subtleties that make such a simple diagnosis meaningless. The subtleties are that similar oil entering the combustion chamber may be due to another reason. For example, due to wear of the valve stem. It gradually becomes thinner, and in advanced cases, even the newest cap will not save the situation. The valve sleeve may also be worn out. It's rare, but it does happen. The cap is capable of working only with longitudinal movement of the valve, as was intended by the designers. The cap cannot compensate for its axial movement due to wear of the rod or guide, and the oil will still get inside the cylinder. And there may also be problems with crankcase ventilation, which give similar symptoms.
It is useless to measure compression to find bad caps. If it fell, the reason would most likely be the compression rings.
It turns out that the only 100% reliable method for diagnosing oil seals is the mandatory disassembly of the cylinder head. And everything described above should only motivate you to do this not the most exciting thing.
Help Wanted!
There were times when these caps on “kopecks” were exchanged in garages for beer with roach. It was possible there. Hypothetically, they can also be replaced on a modern car. But, of course, there will be more difficulties (at least due to a more compact layout and more stringent assembly requirements), so I don’t think anyone will want to tinker with this on their own. Anyone who wants to does not read all this, but has long since removed the valve cover and examined the camshaft. And if someone still thought that he would do such nonsense with his own hands, I can remind you of the following.
There is no point in putting new caps on valves with damaged stems - oil will still leak out in liters. It will also go away if you mix up the caps and put caps on the exhaust valves from the intake valves, and on the intake valves - from the exhaust. The valves are different, and so are their caps. The slightest loose fit - and hello, “oil-eater”. Maybe even more than it was.
In a good way, for this work it is better to completely remove the cylinder head. At the same time, you can assess the condition of the CPG (maybe the reason is not in the caps at all), check the block head (for example, by crimping), assess the condition of the mating planes (the head may fail) and the valves themselves. Of course, in some cases a completely makeshift replacement will help, but disassembling the engine twice because of your own laziness or desire to save money is very disappointing. And it is also very important not to skimp on the caps themselves: a “scorched” cap made of bad rubber will last very little, so the savings will not be worth it.
Survey
Have your valve seals failed?
Your voice
Total votes: