Theory
Once upon a time, mechanical interrupters (contacts) were used in battery ignition systems. At the right moment, they opened the circuit in the primary winding of the ignition coil - the current disappeared, the effect of magnetic induction occurred and a high voltage was induced in the secondary winding of the ignition coil, which was supplied to the spark plug. And then, in the form of a spark discharge, it jumped between the electrodes of the spark plug, forming a spark that is well known to all of you.
In modern ignition systems, such as CDI, which is what we will talk about, the principle of spark discharge formation remains almost the same. With the exception of the method of controlling the moment of sparking.
Operating principle of a membrane enricher
The membrane starting enrichment works on a different principle. When the engine is not warmed up, the valve is in the open position. Starting the engine causes a vacuum in the area of the intake manifold, which is transferred to the membrane thanks to the thermal valve. Under the influence of reduced pressure, the membrane tries to rise, opening a channel responsible for supplying additional air volume.
Further heating of the cylinder to operating temperature causes the valve to close and lower the spring-loaded valve associated with the needle. As a result, the supply of additional fuel is cut off. Such a system with a membrane functions in a clear connection with the engine temperature, which ensures a more correct dosage of fuel.
The membrane starting enrichment works on a different principle.
Sensor
Instead of mechanical contacts, an electronic sensor was introduced into the CDI ignition system, which at the right moment sends a small impulse to the switch thyristor (where it works in electronic key mode, in fact, this is something else like a breaker only electronic, and not mechanical as before) - thyristor opens and current from the commutator capacitor flows to the ignition coil. And then, almost the same thing happens as in the old contact ignition systems.
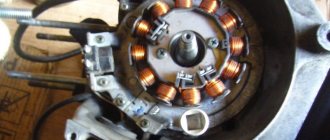
And this is a special magnet on the generator rotor, which determines the moment the spark jumps between the electrodes of the spark plug. When this magnet passes by the sensor, an impulse is induced in it
The moped has lost spark, what should I do?
Very often the reason that the engine does not start is the lack of a spark at the spark plug. This is diagnosed very simply:
- you need to unscrew the spark plug from the engine (or take a spare one),
- put a candle cap on it,
- turn on the ignition,
- press the spark plug to ground
- crank the engine with the starter, or better yet, with the kickstarter.
If a spark does not jump between the electrodes of the spark plug, the engine will not start.
But fortunately, the ignition system on Alpha mopeds is quite simple and you can find the fault on your own.
I always try to follow the principle “from simple to complex” when troubleshooting. That is, before disassembling half of the moped, you need to try to check everything that is easy and cheap to check.
First, remember what preceded the malfunction: some work may have been carried out or there may have been mechanical damage (for example, the moped fell). If something like this happened, start troubleshooting from there. There is a high probability that upon inspection you will find a broken wire, damaged insulation, a damaged connector, or something else.
Be sure to try cranking the engine with a kickstarter; it happens that the starter turns too slowly and there is no spark.
Examination
You can check the sensor without removing the generator from the engine and without even knowing where it is located. We just need to find the connector with which the sensor is connected to the scooter’s on-board network and check whether the sensor produces an impulse or not.
We go to the right side of the scooter, inspect the engine for a thick bundle of wires coming out of it, move along the wires to the connector with which it connects to the on-board network - look in the bundle for the blue and white wire coming from the engine and disconnect it from the terminal
We switch the tester to the AC measurement mode for the 2V range or, if your tester has such an option, for 200mV. We touch any metal part of the scooter or engine with one probe, and the sensor wire with the other probe. We turn the engine with the starter and look at the display:
- If the numbers are flashing on the display, then the sensor is generating a pulse and everything is fine with it
- If zeros remain on the screen, the sensor is faulty or the wire is broken
In the 2V measuring range, a working sensor should produce approximately the following values
In the range of 200mV such
If the sensor does not produce anything, check it for a break:
We switch the tester to the audio “dialing” mode - with one probe we touch the ground, with the second - the sensor wires: a working sensor in the “dialing” mode should give approximately the following values
If the display shows only zeros, it means the wire is broken or the sensor is screwed up. In any case, you need to remove the generator and look at the sensor. And there you will see: if the wire is intact, then the sensor is 100% screwed up.
Ignition coil
If everything looks intact, check the ignition coil. To do this, disconnect it (remembering how the wires are connected) and use a multimeter to check the resistance of the windings.
The primary winding is made of thicker copper wire. Its terminals are connected to two terminal connectors at the end of the coil. It has a small number of turns and therefore its resistance is low, approximately 0.5-5 Ohms. One wire of the coil is connected to ground - you need to check it, attach one multimeter probe to the nearest metal part of the moped, and the second to the coil connector. The resistance should be close to zero.
The high-voltage coil consists of several thousand turns of very thin copper wire, so its resistance should be on the order of 2-5 kOhms. The resistance must be measured between the coil contact connected to ground and the core of the high-voltage wire.
In this way, we will check the coil for a break, but without special equipment we cannot check for other coil faults, for example, an interturn short circuit, so we will leave the coil alone for now, also because a coil without visible mechanical damage is most likely working.
How to check the hall sensor on a scooter
Maybe the spark has gone missing?)
First of all, unscrew the spark plug from the head and inspect it. If the color of its spark part differs from the “café au lait” color, it needs to be replaced. The reason for the replacement may also be black longitudinal tracks on the white part of the insulator. These are breakdowns. Most often, the spark “goes” through them. We change the spark plug. Still no spark. Next you need to check the coil. We pick up a tester, preferably a good one. We connect its black wire to the scooter frame, and the red wire to the black-yellow (black with a yellow stripe) wire. Its output can be found either on the commutator or on the coil. We switch the operating mode of the tester to constant voltage measurement and pull the kick starter. If the readings on the tester fluctuate, then there is an impulse on the coil. If there is an impulse, but there is no spark, it means that the coil or the wire that goes from it to the spark plug is faulty. What if there is no impulse? Then we take the tester, switch it to the “dialing” mode (when it beeps when shorted). And we check the integrity of the black-yellow wire. We connect the black wire of the tester to a place on the switch, the red wire to a place on the coil. It is better to disconnect this wire from both the coil and the switch. The tester did not beep - change the wire. The tester beeped - let's move on. Now let's check the switch. We connect the black wire of the tester to the scooter frame, and connect the red wire to the black-red wire going from the generator to the switch. This wire powers the switch with a relatively high voltage of about 90 Volts. Be careful. Connected - we pull with a kick. The tester did not show voltage - the generator is faulty. Showed tension - move on. Now we need to check the hall sensor. It connects to the switch with a blue and white wire. And it checked automatically. If you have checked all of the above and there is still no spark, then the Hall sensor is automatically faulty. It is located inside the generator and changing it is quite difficult. Congratulations.
We haven't checked the ignition switch yet. We will check it like this: Take and pull out the black and white wire from the switch connector. If after this a spark appears, it means the ignition switch is faulty, or this wire touches the scooter frame somewhere. The fact is that this wire is used to turn off the switch. When it is shorted to ground, the switch is disabled. The ignition switch works this way.
We didn't look at the yellow and white wires coming from the generator. They work for lighting and do not participate in the ignition system.
Spark plug - screwed into the cylinder head and serves to ignite the mixture Coil - produces a high voltage pulse for the spark plug at a certain point in time Commutator - produces a low voltage pulse for the ignition coil Generator - produces operating voltage for the commutator Hall sensor - determines the position of the engine crankshaft to set the torque , when the system needs to produce a spark to ignite the mixture Wiring is the most nebulous part for a novice electrician.
DH scooter
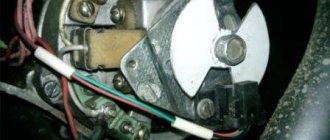
You should know that the scooter's DH is a device equipped with a magnet. By interacting with it, the DC sends an impulse to the vehicle switch, which, in turn, affects other elements of the ignition system (babin, etc.).
On 2-wheelers, the DC is just a magnet with wires going to a switch. The sensor is located here, under the cover.
The wire will be pulled through the protective channel directly to the switch.
Some people believe that in order to check the DH as accurately as possible, it needs to be removed. On the other hand, on 2-wheeled vehicles it is not at all necessary to do this, since checking with a multimeter is feasible anyway.
The easiest way to check the hall sensor is by dialing. To do this, you should arm yourself with a multimeter and set the device to ringing mode.
Here's what you need to do specifically:
- put the multimeter in ringing mode;
- Connect the ends of the device to the hall sensor wires.
If any values appear on the multimeter scale, even if they jump, the DH is working. If it is silent and nothing happens, it is faulty.
You can also set the device to resistance mode. And the check will be similar. If the values on the multimeter scale change, the DC is ok.
Checking the inductive sensor with a multimeter can be done this way: the device is placed in position 2000.
Attention. When working with resistance, it is recommended to keep the manual nearby. It may indicate which values should be shown.
For example, as for the inductive hall sensor, the manual states in black and white that its values should be equal to:
- air gap – 0.4-0.5 mm;
- resistance – 380-570 Ohms.
The air gap of the sensor is the distance from the sensor to the knob, which actually rotates.
After preparing the multimeter:
- the ends of the sensor with the plug are removed from the switch;
- The probes of the device are inserted into the plug.
If the multimeter values are within 380-570 Ohms, the hall sensor is considered working.
What is a Hall sensor?
The Hall sensor is widely used in the automotive industry to measure the angle of the camshaft and crankshaft. It notifies the driver about the moment of spark formation.
This sensor is based on the Hall effect or Hall voltage, which consists in the fact that when a conductor with direct current moves into a magnetic field, it generates a transverse potential difference.
This electromagnetic phenomenon is named after the Baltimore scientist Edwin Hall who discovered it in 1879. Hall discovered the emergence of a transverse potential difference on thin gold plates, but the application of his discovery in practice became possible only 75 years later, during the era of active development of the production of semiconductor films. The Hall effect found its application in the sensor of the same name, used in cars and scooters to capture the potential difference on the sides of the plate, that is, as a magnetic field meter.
Nowadays, there are two main types of Hall sensors:
- Digital, detecting the presence of an electromagnetic field.
- Analogue, converting field induction into voltage.
What does a Hall sensor do in a scooter?
Measuring the magnetic field strength is necessary in various motors. Typically, a Hall sensor is used when working with the ignition system in a car or scooter. The advantage of using this particular device is its non-contact effect. It can be applied to liquid level meters, current measurement, motor control, and magnetic code reading. The Hall sensor has completely replaced reed switches, which mechanically close and open the electrical circuit when the magnetic field strength changes properly;
In a scooter, the Hall sensor may be an element of the engine ignition sensor. Sometimes it serves to monitor the load current and shut down in case of excessive current supply, since the device can break down if it experiences sudden voltage surges. Due to the absence of contacts and the possibility of contamination, the Hall sensor is ideal for scooters.
Causes and diagnosis of breakdown of position sensors
The cause of failure of Hall sensors can be:
- significant overheating of the electric motor – above 150–180 °C;
- mechanical damage;
- power surges;
- water getting inside the motor housing or throttle handle.
A clear sign of a breakdown of the Hall sensors is the twitching of the MK at startup while turning the throttle. To diagnose such a malfunction, a voltmeter is sufficient. It is also convenient to use a diagnostic tester to check the functionality of the motor wheel, controller or throttle grip. It allows you to diagnose position sensors and windings, identify existing defects, check the phase angle and the correctness of phase switching.
How to replace the sensor?
A malfunction of the Hall sensor in a scooter is diagnosed using a tester. During normal operation of the sensor, the indicator should be above about.4 V.
If your meter is faulty, it must be replaced. This is done as follows:
- Remove the distributor by freeing it from the cover. Note the position of the slider before replacing. There is a pin inside that needs to be removed. Also remove coupling 22 (oil deflector) and washer.
- Remove the Hall sensor screws and its mounting. Carefully remove the device.
- Make the necessary repairs or install a new sensor by performing all the steps in reverse order.
Switch
To check the switch, we need a test lamp - this is a regular 12-volt light bulb with wires routed out for easy connection. A test light and connect one end to the ground wire, the other to the ignition coil wire. We turn the engine with the starter.
If the light comes on, the switch and its wiring are working properly. If the light does not light, then the switch or switch wiring is faulty. In order to be 100% sure that the problem is not with the switch, I recommend replacing it with a known good one. A switch for Chinese mopeds is inexpensive, if it suddenly turns out that the old switch is working, let it remain in “stock” until the next check.
How to easily check the Hall sensor yourself: tools and instructions
Good day to all! Today I’ll tell you how to check a Hall sensor, what methods exist for assessing the condition of a device, and what you should pay attention to.
Motorists and those who ride a scooter and have a contactless ignition system or electronic ignition in their vehicle design have probably heard about this sensor or controller. It is also often called the camshaft position sensor or simply the camshaft position sensor.
The device is even found on phones. But since we have an automotive website, we will talk about the Hall sensor specifically in relation to cars and vehicles.
Before touching on the topic of verification methods, it would not be amiss to understand the very essence of the device in question, its functions and operating principle.
Switch Problems - Symptoms and Signs
A switch is one of the elements of a car's electrical equipment. His task
– ensuring normal operation of the contactless ignition system. The assembly is fastened in the engine compartment.
The device is different
reliability, ability to withstand severe vibrations and shock loads. This is very important, because the switch housing contains sensitive electronics.
At the heart of the VAZ switch
– standard L 497 microcircuit, which controls an “NPN” type transistor.
>Scheme feature
– possibility of programming by the user and setting the required delay coefficient. Starting a cold engine directly depends on the correctness of this indicator.
Thanks to precise settings
, you can speed up the crankshaft rotation speed (while eliminating failures in operation) and guarantee high-quality traction of the power unit.
The main parameters of the switch device include:
Voltage range - from 6 to 16 Volts; operating voltage level - 13.5 Volts; ensuring an uninterrupted spark when the crankshaft rotates in the range from 20 to 7000 rpm;
switching current – from 7.5 to 8.5 A.
Symptoms of a Switch Problem
One of the main symptoms of a faulty switch is loss of spark.
. The engine starts hard and stalls from time to time, causing interruptions in operation.
What it is
A Hall sensor is a controller that is located in the distributor and is one of its key components. The distributor, in turn, is a breaker-distributor.
The Hall sensor (HL) is located directly near the distributor shaft, where a special magnetically conductive plate is attached. Outwardly, it resembles a crown. This plate has exactly the same number of slots as the number of cylinders in a particular power plant. Therefore, if you have a car with 6 cylinders, then there will be exactly 6 slots. A permanent magnet is installed directly inside the controller.
Now regarding the principle of operation. If you understand this issue a little, you won’t see anything complicated here.
When the shaft rotates, the metal blades pass alternately through the slots in the controller in question, that is, in the DC. As a result of rotation, a pulse voltage is generated.
This voltage, due to the presence of a switch, goes directly to the ignition system coil. This is where the conversion process to high voltage takes place. As a result, it ends up on the spark plugs. The design of the DC provides for the use of 3 different terminals at once. The first serves to connect to ground, and the second receives a plus, receiving a voltage with a nominal value of about 6 V. There is also a third terminal from which the pulse signal goes to the switch after conversion.
This is roughly how we can describe the operating principle of the sensor in question.
Symptoms of malfunctions
Symptoms of problems associated with this sensor can manifest themselves in a variety of ways. Sometimes even experienced auto repairmen cannot understand the first time why the engine is running intermittently.
VESKO-TRANS.RU
AutoNews / Reviews / Tests
How to Check the Hall Sensor on a Scooter
How to check the switch on a scooter, operating mechanism and description
Scooter is a widely used vehicle today, it does not require a lot of fuel, but at the same time it does not provide incredible speed with which you can transport your two-wheeled motorcycle brothers. This is a very specific type of transport that not everyone will choose. But all the people who love scooters are always passionate about riding them, they have a lot of fun, they also find them very comfortable. But with all this, not a single car is insured against breakdowns, including a scooter .
Malfunctions can be very diverse, but in this article we will talk about electronics, and more specifically, how to test a switch on a scooter. Naturally, if you have no idea what we are talking about, you should not immediately resort to tools. It's best to take a long, hard look at how the electronics are housed in the scooter, the difference between checking the shifter on a car versus a moped, and what you can do to check the electronics for damage and repair the vehicle. Overall, before you think about how to test a scooter shifter, you should understand what it is.
Switch and circuit diagram of the device
How to check the switch on a scooter if you don't even know what it is or where to look for it? That's why you should start small. The first thing you need to do is figure out what the switch is. It's actually quite simple because the switch is the element in the vehicle's electrical ignition circuit that generates a low voltage pulse that is sent to the ignition coil. Isolating the definition from the overall picture does not look very clear, so let’s look at the structure of the entire circuit.
Therefore, the main element here is the generator, which generates the operating voltage to operate the switch discussed in this article. As mentioned above, using a power generator, the switch generates a pulse to the ignition coil, not just a pulse, but a low voltage. The ignition coil, in turn, transmits a high voltage pulse at a certain point in time, which is transmitted to the spark plug. The spark plug is screwed into the cylinder head and, after receiving a high voltage pulse, ignites the combustible mixture, which drives the engine. Well, now you know how the circuit works in a car, which will allow you to better understand how to make a control switch on a scooter.
Malfunction
What prompted you to study the article on how to control switch on 4T scooter or any other common model? Chances are your car won't turn on, but you don't know what the problem is. The plugs may catch fire and the engine may stop. All of this may have a cause in the switch, or it may not. This is the main problem of the repair. You need to identify where the problem is in order to solve it.
If your switch is not working or working poorly, the low voltage pulse will not be transmitted to the ignition coil. Accordingly, ignition will not occur. But the problem could be in the alternator, the coil, or even the spark plug, so you need to know how to test these items. This material is specifically dedicated to derailleurs, so the focus will be on testing the derailleur on the 4T scooter and other popular models.
Power up your car and scooter
Many motorists may be surprised to learn that checking the switch on your car takes a matter of minutes. You just need to use a voltmeter, which sometimes even goes straight to the machine. You just need to know where to connect and there is no problem at all. However, in the case of a scooter, things are a little different.
If you want to learn how to test your scooter switch yourself, you need to remember that you can't make accurate measurements if your switch stays where it always is. More specifically, this will be discussed a little later, now you just need to understand that checking the switch on a car and on a scooter. These are slightly different things, so don't assume the process will be the same. Read on and you will learn how to test a shifter on a multimeter scooter, how to use a car, and what are the disadvantages of this method.
Testing the Switch Using a Tester
If you have a special device for testing, i.e. a tester, you can use it on the switch as it may give some results anyway. You can use a simple voltmeter, you can use a more versatile multimeter, but either way, remember that this part of the scooter has five terminals. grounding, sensor , power, ignition coil and off. If you only have one switch and a tester, you can only test for zero voltage. When the tester needle does not move on one of the outputs, this means that there is no voltage in it.
How to check the Concert Hall sensor?!
Hi all! I'm a multicher. I film motorcycles (video blogs with motorcycles), do reviews of equipment and various equipment. I'm coming.
Viper V125P Enduro. Hall sensor replacement
Hall sensor replacement
on the Viiper V125P enduro model. The replacement principle is the same for all motorcycles.
However, damage is not always the result of a complete loss of voltage. sometimes it may happen that one of the outputs is unstable, low, etc. And you won't be able to know unless you have the same switch that the measurements were taken with for comparison. As you can understand, this is only a partial test, so you can use this method to figure out how to check the switch on a Yamaha scooter or any other specific model. But if you want to do a full test, you will have to use more efficient methods. How to check a faulty switch on a scooter with maximum accuracy? For this you will need another working scooter.
Check out another scooter
If you are wondering how to check the switch on a Honda Dio scooter, then in this case you will not need another Honda Dio to complete the procedure. We'll discuss the interchangeability of scooter switches a little later, but now you need to understand that you can get an accurate reading if you have another scooter available in the near future. This method is the simplest and most common.
you must be disconnected switches both scooters, after which the test element must be connected to the other scooter. If everything works fine, this will mean that everything is fine with the switch, that is, the problem should be looked for in some other area. Of course, this is additional work, but the fact remains. you learned how to check the functionality of the switch on a scooter, you did the testing and got the result. If problems persist, then you have found them. you will need to repair or replace the switch, but that will be covered later.
It's time to move on to another very interesting method. imitation.
Simulation stand
If you don't have a second scooter, and you also can't access it, then you should consider buying or making a special stand for yourself that would simulate the operation of your scooter. This is a perfect check shifter Honda scooter just like any other model and if you use this vehicle all the time, it is likely that you will have to use the kickstand more than once or twice, so you should definitely invest in it.
Now it is much more convenient to buy it and install it in your garage, so you can always test any item without having to use another scooter. But you can also do it yourself. only in this case you must have very high technical skills, and it is advisable to have impressive experience working with such equipment. It should also be noted that such a stand has other advantages over a second scooter in terms of control.
Verification methods
You can use several diagnostic methods for the sensor located on the distributor.
Depending on the available means and capabilities, the motorist can check the current condition of the Hall controller with his own hands, evaluate its performance and make the appropriate decision on replacement.
As soon as you notice one or more of the symptoms presented, you should get checked. You can do it in several ways. I propose to consider them separately.
Wedge with wedge
The simplest and most effective method that does not require you to equip yourself with a tester or multimeter. But you will need a known-good similar Hall sensor.
The essence of diagnosis is outrageously simple. You remove the old controller and install a new one in its place. If after the manipulation the symptoms go away and engine operation returns to normal, then simply leave the new part in place. If you borrowed a DH from a friend or neighbor in the garage, remove the device, say thank you, and go to the auto parts store.
Voltmeter and multimeter
Using a voltmeter or a classic tester, you can easily check the condition of the device.
I think every motorist can use the tester. The task is to measure the voltage at the sensor output.
If the DC is in good condition, the tester will produce values in the range of 0.4-11 V.
A universal multimeter is used in exactly the same way. You just need to select the voltmeter mode on it.
Sensor simulation
Quite an interesting and effective method. But here you will have to do a little work with your own hands.
The principle of imitation is as follows. First, remove the block from the DH, which has 3 plugs. Next, start the ignition on the car, then connect outputs 3 and 6 to each other.
If a spark appears during such manipulation, then most likely the DC has failed.
Without testers
When testers are not available, testing can be done using a slightly different method.
Here you need to carry out step-by-step manipulations:
- the spark plug is connected to the wire terminal from the coil;
- the threaded part of the spark plug is connected to the ground;
- the carriage with the sensor is dismantled;
- connector is connected;
- the ignition is turned on;
- a metal object is held near the sensor;
- When a spark appears on the spark plug, the DH is operational.
Just be extremely careful when doing such manipulations with your own hands.
Electrics and electrical equipment of a scooter
It's not so easy to get to the spark plug itself. To dismantle it, a socket wrench is required. With its help, the candle is simply unscrewed from its seat. The starter is used to start the engine.
Information
It is located in the middle part of the scooter next to the engine. It's not easy to get to. The starter is controlled by a starting relay. The starting relay is located on the right side of the scooter frame. The starting relay receives a thick red wire from the positive terminal of the battery.
This is how the start relay is energized. Fuel gauge and indicator. Fuel level sensor 14 is built into the fuel tank.
There are three wires coming from the sensor. Green is the general minus power, and the other two sensors are connected to the fuel level indicator 11, which is installed on the dashboard of the scooter.