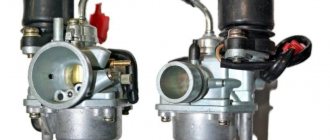
As you know, Chinese electronics are known for their simplicity and cheapness with all the ensuing consequences, namely durability and not always efficient operation. I decided to make an electronic switch for the Delta moped with adjustment. It is based on the classic CDI capacitor ignition circuit, which is used in this type of motorcycle.
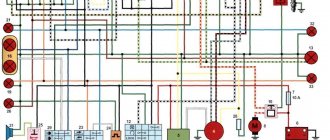
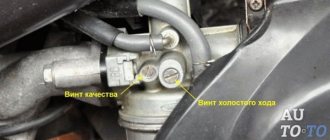
I will not go into details of the operation of the circuit, I will just note that the trimming resistor R4′ adjusts the optimal operating mode of the engine under load and at idle. In general, they need to adjust the operation of the engine so that it runs stably at idle and at maximum speed. The connection diagram in the ignition connector is shown below
The circuit is assembled on a textolite board, which is wrapped in heat shrink and sealed with cellophane on top.
What kind of spark plug is needed for an Alpha moped and other parts involved in igniting the fuel? Few owners of such vehicles know the answer to this question. But a problem can happen at any time and it’s better to be able to fix it yourself.
Ignition switch and its features
The operating principle of supplying a spark to fuel in a moped is approximately the same as in a car. The task of this system is to ignite the mixture, which is supplied by the carburetor to the engine. The candle itself produces the ignition itself, but before that, other parts also participate in the process.
It is very important that the spark is supplied at exactly the right moment, when the piston has not yet reached top dead center.
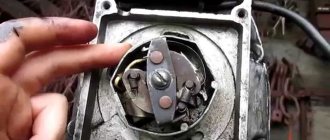
To activate the system, a so-called lock is used, from which a signal is sent to other parts. A key is required to use it on most vehicles. In the off position, the switch is shorted to ground using a special “leg”. In general, the design of the system on Alpha and other scooters and mopeds is not too different from that on cars. As mentioned above, in addition to the lock, the main role is played by the ignition coil and switch.
Device with high voltage wire
The video below demonstrates the repair of a lock (the author of the video is RECOVER PSR).
Why is there no spark on the moped?
Failure of a motorcycle ignition system can be caused by a variety of reasons, ranging from small and insignificant to serious ones requiring major repairs of the vehicle. Fortunately, bikes are technologically relatively simple (compared to cars) and you can fix the breakdown yourself. Very often, the reason for the incorrect operation of the ignition system is that there is simply no spark on the motorcycle. In this case, it is necessary to accurately identify the part or assembly that led to the breakdown.
- Spark Plug Inspection
- Checking the battery charge
- Ignition coil diagnostics
- Checking the generator and winding
- Distributor inspection
If there is no spark on a moped or motorcycle, first of all, you need to check the serviceability of the spark plug. It should not be excessively dirty and be of a natural color. If the motorcycle owner has a 100% serviceable spark plug on hand, then test the operation of the ignition system with its help.
It happens that the loss of spark on a moped or motorcycle is caused by insufficient battery charge. For a 12-volt battery, the acceptable level is at least 9 volts. If the indicator is lower, then the reason for the non-working candle has been identified.
The reason for the loss of spark on a motorcycle can also be a malfunction of the ignition coil. To check the serviceability, you need to use a low-power light bulb to make sure that the current is supplied.
Why is there no spark on a moped or motorcycle? It could be a faulty generator. First you need to make sure that the adjacent contacts are in working condition. You also need to check the correct operation of the capacitors. In addition to the above, the reason for the loss of spark on a motorcycle may be a defect in the generator winding.
Quite often, the reason for the lack of a spark at the spark plug is the distributor and the wires leading to/from it. First you need to inspect the “coal”. If the cause of the malfunction has not been identified, then you next need to check the high-voltage wires going to the distributor.
Regardless of whether the source of incorrect operation was identified or not, the problem was solved in a few minutes or hours, the owner of a motorcycle (moped) is recommended to visit qualified motorcycle mechanics as soon as possible.
The reason is that there is a high probability of overlooking a more serious defect in the operation of the bike, or even aggravating it.
We recommend reading:
Design and principle of operation of the ignition coil
The ignition coil has a simple operating principle based on electromagnetic induction. The part has a primary and secondary winding, as well as a metal core on which they are wound. The primary consists of several hundred turns, and the secondary consists of thousands.
Location in vehicle
Passing through the primary winding, the current forms a magnetic field. The current does not flow continuously and the field disappears, but voltage condenses in the secondary winding. It is this that will be supplied to the spark plug at the moment specified by the switch to ignite the fuel.
The ignition coil has a wire of a high enough cross-section so that it can withstand the voltage applied to the spark plugs. Its installation and replacement, if necessary, is quite simple, but first you need to check the functionality of the part.
Photo gallery “Main parts of the system and the timing process”
Spark plug, high-voltage wire, tip
Next on the list is the spark plug. It happens that an apparently serviceable spark plug does not work, so it is better to immediately replace the spark plug with a known serviceable one. Even if the spark plug was in good working order, it’s okay, spark plugs are “consumables”.
Be sure to take a spark plug recommended by the moped manufacturer, or its complete analogue, selected from the catalog. Do not listen to “experts” who recommend non-standard spark plugs, for example, with an increased gap or three electrodes.
If the spark plug is working but there is no spark, check the tip of the spark plug and the high-voltage wire. There should be no mechanical damage or cracks on them.
- Tester with sound “continuity” and measurement of direct current up to 20V, alternating current up to 200V.
- Lamp controller 3 W.
Let's start with testing the electrical pulse. To do this, we connect the lamp to ground (green contact) and the ignition coil (yellow-black wire). We turn over the engine.
- The lamp does not light - we proceed to checking the modules for ensuring the functionality of the switch.
- The lamp is on - a spark does not appear due to other faults (coil, ground or wires).
If everything is in order, the lamp lights up at a medium level.
Checking for mass
We install the “ringing” (picture of the speaker or diode), and on the switch chip we find the green contacts - ground (-). We attach one probe to the motor, the other to the contact.
- The mass is present - a squeak is heard.
- The mass is barely visible - the screen will indicate this with running numbers.
- Lack of mass - the tester does not respond.
- In case 2, you need to start looking for broken or soured contacts.
- In case 3, look for the break point, or close this contact directly to the motor.
- In case 1, continue testing.
Nutrition
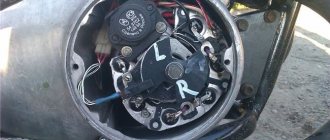
Before starting the test, you need to determine the type of device. The DC device is big – like 3 matchboxes together. The AC switch is much smaller. But it’s better to check in a more precise way:
If the generator coil is not connected, then we are dealing with a DC commutator (direct current), if it is connected to a commutator, then it is an AC commutator.
To check DC, you need to switch the tester to check DC (up to 20V). On the switch we find the power contact (black or gray). We connect one probe to ground and the other to power.
- The appearance of “0” on the screen indicates a break.
- Voltage less than 12V – contact pads are oxidized or battery charge is low.
- 12V or more - check further.
How to check the ignition coil yourself?
You can check how the ignition coil works quite simply:
- First, you need to get to it by dismantling the body of the vehicle.
- There are two contacts suitable for the part; you need to disconnect them.
- First, the resistance of the primary winding is measured. Measure it with a multimeter on the two terminals of the wires that you disconnected. Different models should have different levels of resistance; check the normal level for your ignition coil in the technical documentation.
- Now check the secondary. For it, the resistance values should be higher (and an order of magnitude greater if measurements are taken together with the core).
DC switch
Due to its ease of connection, this is one of the most common moped switches. The most basic model has only 4 contacts:
- Ignition coil
- Hall Sensor
- Plus(12V);
- Minus
Switches of this type exist in various modifications:
- with max. limiter rpm
- without limiter
- with additional contacts
- with changing ignition timing
Ignition installation instructions
It is very important to correctly set the spark moment to ignite the fuel in a vehicle - the operation of the engine depends on it.
- disassemble the crankcase and make notes of the lower and upper positions of the piston;
- unscrew the spark plug and then turn the shaft until a spark appears, make a mark on the crankcase;
- you need to set the torque so that ignition occurs 2-3 mm below the top point of the piston;
- Loosen the alternator bolts and follow your moped's instructions to adjust the commutator.
Power check
In order for a spark to jump between the spark plug electrodes, the commutator capacitor must be charged from something. And it is charged either from a battery or from a generator. Means what? Right! We check whether power is supplied to the switch.
Before you start measuring power, let’s determine what type of switch is on your scooter. Visually, switches of the DC CDI type are twice as large as AC CDI. But this is not an exact criterion. The most accurate criterion is to look at the output of the high-voltage coil of the generator:
- If it is not activated, it means that your scooter is equipped with a DC CDI type switch
- If enabled, then vice versa - your scooter is equipped with an AC CDI type switch
The output of the high-voltage coil of the generator is located in the same place as the output of the generator itself: we are looking for where the wires coming from the generator are connected to the on-board network of the scooter and if one of the two wires with round terminals is not connected, then the coil is not activated
If all the work done does not produce results, then the reason may be the alarm installed on the moped. It can block the spark. Checked by turning off the alarm. We pull out the alarm chip and check for the presence of a spark. If a spark appears, then we remove the alarm unit or check it.
If all of the above reasons do not produce results and a spark does not appear, then we check the wiring on the moped, the high-voltage cap and connecting points that could oxidize and lose contact.
If after the above reasons you do not have a spark, then the spark has gone to the wheel. Joke.
Video “Scooter 4T installation of ignition”
This video talks about setting the ignition moment of the fuel mixture on a four-stroke engine (the author of the video is Andrey Shevelev).
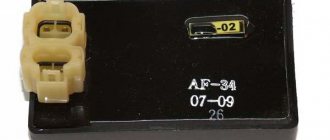
Modern mopeds and scooters are equipped with an electronic ignition system CDI (from the English Capacitor Discharge Ignition), popular with us since the 70s of the last century and called thyristor or capacitor. It is based on discharging a capacitor through the primary winding of the ignition coil and an open thyristor to produce sparking in the spark plugs. However, adjustment of the ignition angle (AF) on these mopeds is not provided. The author, through simple changes in the switch block circuit, introduced ultrasonic adjustment, which qualitatively affected the operation of the engine.
The ignition system of the Alpha moped is very simple and reliable. But still, it has one significant drawback - the lack of ignition angle adjustment. During operation, when the engine was idling and at low speeds, the ignition system sparked too early. This manifested itself in a strong kickback when starting the engine, and at idle speed it could even stop by pulling the electric starter chain in the opposite direction.
Rice. 1. Switch block diagram
The diagram of the switch block (hereinafter referred to as the switch) of the CDI AC system, installed by the manufacturer on my moped, is shown in Fig. 1. It is shown simplified, but sufficient to understand the principle of its operation as part of the system. Ignition coil T1 with spark plug FV1 is located outside the switch and is shown conditionally. In the process of analyzing the operation of the ignition system, the following feature of spark formation was revealed. When a special protrusion on the generator rotor (flywheel) passes past the induction sensor, two pulses appear at its output and enter the commutator. The first, earlier positive polarity, occurs when the protrusion approaches the sensor, and the second, later negative polarity occurs when the protrusion moves away from the sensor. Sparking (further ignition) in the spark plug occurs from the first pulse entering the switch, and the second (later negative polarity) is not used in the operation of the ignition system. The idea arose to use both impulses in the operation of the system, and so that at low engine speeds the ignition would be later, and at higher speeds it would become earlier. This required the development of both a new circuit and switch design.
Why is there no spark on the moped?
Why is there no spark on the moped?
How to check spark on a moped?
To check the spark you need to turn the key in the ignition. Next, take out the spark plug and check if there is a spark. In order to check the spark on the spark plug, you need:
- Remove the cap and unscrew the spark plug. Pay attention to the candle itself, or rather to its black soot; often, if it becomes dense, then it becomes a conductor, i.e. you don't get a spark, but it hits the insulator.
- Next, insert the unscrewed spark plug into the cap (holding only the cap) and lean it against any metal part of your moped.
- Next, we begin to crank the foot starter and carefully look at the electrodes on the spark plug to see if a spark will jump between them. If suddenly there is no spark in the spark plug, then it may be that the spark plug is broken, i.e. the spark occurs in the wrong place. How can I check this?
We take the cap, there is a metal electrode inside it, insert a screwdriver into it and bring it as close as possible to the metal part of the moped (hold only the insulated parts). And we also press the kick starter, you should hear clicks and see the action. If a spark jumped between the screwdriver and the engine, but there was no spark in the spark plug, then you just need to change the spark plug. If there is also no spark, then you need to inspect the armored wire. Are there any cracks on it? If there are cracks, then it is breaking through. This is easy to check.
- Take the foil and bring it to the crack.
- We press one part of the foil to the frame and hit the kick starter.
- If a spark occurs, you may even be able to hear it. This means the armored wire is breaking through.
The next problem may be the ignition coil. If your ignition coil is broken, naturally there will be no spark; it may be broken inside. There is only one way to check this. This is to remove the coil and install a new one or ask a friend. If nothing works anyway, then everything is fine with the coil. The switch is responsible for supplying voltage to the ignition coil. How to check the condition of the switch. If you have an acelogrof, then connect it to the output contacts of the commutator and see if there are impulses; if there are none, then the commutator does not give them. If there is no accelerator, then you need to remove the old commutator and install another one and check it. Another ignition problem lies in the generator. The rotor generator has a magnet and a coil; 4 wires come from the coil. Next, you will need a multimeter; you cannot do without it. Put the multimeter in AC voltage measurement mode, go to the wire that powers the switch (this is on the diagram of your moped). After this, crank the kick starter and see if there is voltage; if there is, then everything is in order. But if there is still no spark, then pay attention to the hall sensor, because it is this that gives the commutator an impulse. You can also check it with an acelogr to see if there are any pulses or check with a light bulb; we connect a light bulb to the output of the switch if you have power to the switch. The switch is known to be working, but the light does not blink, then there is something wrong with the hall sensor.
moped-info.ru
Homemade voltage regulator.
Greetings to all! Somehow my voltage regulator (not a relay-regulator, don’t confuse it) on a Chinese 4-stroke “fly”; I wasn’t planning on buying a new one, since the standard LV on all 4Ts is crap, so I went online to look for a diagram. I didn’t have to search for long; I found a very simple and cheap option: a shunt RN. But for proper operation, it was necessary to disassemble the generator and disconnect the wire from ground, and lead it out with a separate wire.. Well, okay, I won’t explain further, because not everyone knows about electrics. In Chinese 4t, as a rule, these are the launch vehicles: The circuit is crap, the efficiency is crap, the resource is crap
Let’s assemble this one (For a single-phase generator, in our case): For a three-phase one: We have two options for connecting a homemade LV, I won’t drag it out and tell you what and how: The first option (with alteration of the generator): 1) We disassemble the generator, remove the stator from engine and this is what we see: Important: Where it says “The mass needs to be soldered off” we solder a separate wire onto the winding and bring it out, this will be one end of the winding. The other end will be the white wire. That's it, we're done, putting the generator back together
It should turn out like this: That is, we have two wires coming from the generator (Actually, there will be three of them, but we will need two). I won’t describe the connection of the LV further, I’ll show you a better picture: Done, all that remains is to connect the yellow wire from the old LV to the “+” of the battery. With this, the first version of the alteration is completed. Now our board. the network has a constant voltage.
DC switch
Due to its ease of connection, this is one of the most common moped switches. The most basic model has only 4 contacts:
- Ignition coil
- Hall Sensor
- Plus(12V);
- Minus
Switches of this type exist in various modifications:
- with max. limiter rpm
- without limiter
- with additional contacts
- with changing ignition timing
Malfunctions
Malfunctions as such in the coil of CDI ignition systems are very, very rare, contrary to popular belief. And all of them are mainly associated with damage to the housing, combustion of the windings, or an internal break or short circuit of the wires.
In all my difficult practice, I only once came across a truly faulty coil. And this despite the fact that the owner of the scooter himself ruined it: he forgot to connect the ground to the engine and turned on the starter button... A very high starting current went straight through the coil to the starter... And where should it go. There was no mass on the engine. Naturally, the coil couldn’t withstand such abuse: it got hot and burst.