Adjusting the clutch of a Ural motorcycle
The quality of the clutch's functioning is important for a motorcycle. This will require proper adjustment of the drive mechanism. When the drive cable is tensioned sufficiently, slippage of the clutch will be observed; if it is the other way around, then the clutch is moving.
When the starting device fails to function, usually due to a break in the starting spring or its release from the bushing. In this situation, the Ural motorcycle clutch lever will not automatically return to its initial position, but you can easily resort to a mechanical method of lifting the latter up.
If the starting pawl breaks, the lever itself will slide freely and go down without rotating the engine crankshaft. A similar situation occurs if the pawl spring breaks or due to an increase in oil thickness.
During operation, noise may also occur, the main reasons for which are the wear of the working surfaces of the gear teeth. With no load adjustment of the clutch on the motorcycle, the noise simply disappears. This type of noise is not dangerous, but one cannot help but note its unpleasantness. Removing it will require removing and replacing the gear. Otherwise, the expected result will not be heard...
A worn out and failed bearing can also be a source of interference. The reasons for self-switching gears include wear of the splined connection of the coupling responsible for shifting gears. All of the above problems can be eliminated with your own efforts without additional costs, the main thing is to find the cause in time.
How to adjust the clutch on the Dnepr? Clutch adjustment in the Urals
Gearbox adjustment in the Urals
Adjusting valves on a Ural motorcycle
Spark plugs are the basis of engine operation
comments powered by HyperComments
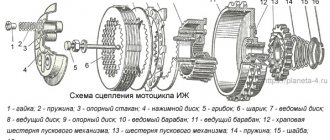
Ural motorcycles use a double-disc dry clutch. The name indicates the number of driven discs, as well as the operating conditions of the unit - the clutch operates without lubricating the discs. The design of the clutch of Ural motorcycles is quite simple and reliable, requires virtually no maintenance and, if used correctly, can last longer than the engine.
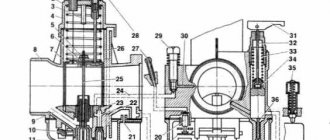
Clutch diagram: 1 — flywheel bolt; 2 — lock washer; 3 — clutch spring; 4 - flywheel; 5 - screw for fastening the thrust disk; 6 — thrust disk; 7 — intermediate drive disk; 8 — driven disks; 9 — clutch release rod; 10 — rod tip; 11 — release bearing; 12 — slider; 13 — pressure drive disk; 14 - crankshaft shank In the landing flange of the flywheel 2 there are six threaded holes for the screws securing the thrust disk 3. Six springs 14 are installed in special sockets, also located in a circle. Grooves are cut along the inner radius of the landing flange, and which include the protrusions of the leading clutch discs 4, 6. The drive pressure plate 4 is installed on the springs, followed by the driven disc 5, then the intermediate drive 4, again the driven 5 and then the thrust drive disc 3. The pressure and intermediate drive discs are secured from moving in the radial direction relative to the flywheel by protrusions , which fit into the grooves of the flywheel. Thus, the driven disks rotate with the flywheel, but they can freely move along the splines along the axis of the flywheel, so the force that the springs exert on the pressure disk is transmitted to all other disks, ensuring the transmission of torque. The thrust drive disk is rigidly attached with screws to the flywheel flange, limiting the freedom of movement of all other disks and acting as a stop. The driven discs have toothed hubs, with which they are mounted on the shank of the gearbox input shaft. That is, the driven disks always rotate with the input shaft.
Lubrication of M72 box parts
The gearbox parts are lubricated with oil poured through a hole located on the left side of the gearbox housing.
To lubricate the bronze bushings of the secondary shaft gears, there is an oil pocket in the secondary shaft bearing cover, and a blind hole is drilled along the axis of the secondary shaft. The oil that accumulates in the pocket enters the shaft hole and flows through radial drillings under the influence of centrifugal forces. To the inner surfaces of bronze bushings.
Oil leakage from the gearbox is prevented by washers and seals. All these parts must be inspected in a timely manner and replaced if there is significant wear.
Clutch. Adjusting the drive, replacing and lubricating the cable
Clutch cable maintenance involves lubricating it regularly and checking for damage. The cable is lubricated with engine oil every 10,000 km using an oil can, similar to carburetor control cables (see “Carburetor control cables. Maintenance and replacement”).
Clutch drive adjustment
It is necessary to adjust the clutch drive in the following cases: when the clutch does not completely disengage when the lever is fully depressed (drives), the clutch slips when the lever is fully released, there is “incorrect” free play on the lever. 1. Remove and move the clutch lever boot 1 down along the cable.
2. Loosen the locknuts of the two adjusting bolts. 3. Loosen the locknut 2 of the adjusting screw on the lever and fully screw in the adjusting screw 3 (see photo to step 1).
4. By turning the adjusting screws in or out, we set the free play of the end of the lever on the steering wheel within 5-8 mm. 5. Tighten the locknuts of the adjusting screws.
6. During operation, if there is a need to adjust the clutch drive within small limits (for example, to compensate for cable stretching), you can use the adjusting bolt on the clutch lever.
Replacing the cable
To replace the cable, loosen the lock nuts of the adjusting screws, completely unscrew the bolts from the release lever and bracket, and remove the cable from the lever boss on the steering wheel. Installation is carried out in reverse order. After installation, the cable must be adjusted as described above.
Adjusting the clutch of a Ural motorcycle
Adjusting the clutch of heavy motorcycles. To check the amount of free play of the clutch control lever, you need to press the free end of the lever away from the steering wheel and note its position on a scale ruler attached to the handlebar of the motorcycle. After this, move the end of the lever to the steering wheel (select free play) and again notice the new position on the ruler. The difference in the marked numbers will indicate the amount of free play of the control lever, the normal value of which is 5-8 mm.
The clutch is adjusted using special adjusting screws. The main role of which is to change the length of the cable and set the required free play clearance of the clutch control lever. Some Urals have one adjusting screw, which is located on the clutch release lever. The lever is installed on the gearbox.
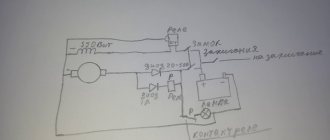
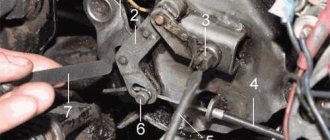
1 — adjusting screws 2 — nuts, locking screws 3 — cable sheath 4 — cable. And in M-61 and M-62, clutch adjustment must be done with two screws. One screw is installed in the clutch release lever, and the second is in the stop of the cable sheath (on the bracket).
How to adjust the clutch on a Ural motorcycle
Adjusting the control mechanisms of the Ural motorcycle
IMZ-8.103-10
Control mechanisms are controlled by increasing or decreasing the length of the drive of each mechanism. The adjustment principle is as follows.
With the control levers (handles) released:
a) for the clutch - its full engagement, which is controlled by the free play of the end of the clutch control lever. The free play should be 5-8 mm.
Normal free play of the lever ensures full engagement and disengagement of the clutch.
If the free play of the lever is less than normal, then the clutch will slip, and with greater free play, incomplete disengagement will occur - the clutch “drives”.
The free play is adjusted by two adjusting screws fixed to the clutch cable, by screwing them in or out in the clutch release lever or in a bracket mounted on the box mounting stud;
b) for brakes - the presence of free play at the end of the front brake control lever is 5-8 mm and free play of the foot brake drive pedal is about 1/4 of the full pedal travel (25-30 mm).
The front wheel brake is adjusted with an adjusting screw on the drum cover, the foot brake is adjusted with an adjusting nut at the rear end of the brake rods (with the wheels hanging).
c) for carburetors - free movement of the cables (no more than 2-3 mm), simultaneous start of their movement and lowering of the throttles to the same height at any position of the control knob. The free play of the handle and the timing of the rise of the throttles are adjusted by screwing or unscrewing the stops installed in the throttle and carburetor covers.
With the control levers (handles) fully depressed:
a) for the clutch - complete disconnection of the driven parts of the clutch from the driving parts. A sign of good adjustment of the clutch control drive is silent gear shifting; .
b) for brakes - effective braking of a motorcycle with hand and foot brakes.
Adjusting the foot brake begins with the rear wheel, having first loosened the nut of the stroller wheel brake rod. Then, by tightening the rod nut, the brake of the stroller wheel is adjusted. After adjusting the foot brake, it is necessary to loosen the nut of the brake rod of the sidecar wheel by 2-3 turns to prevent the motorcycle from pulling to the side when braking. Brake adjustment is considered satisfactory if the braking distance of the motorcycle at a speed of 30 km/h does not exceed 6 m without skidding on a dry asphalt road, while the deviation of the motorcycle from straight-line motion is no more than 1.5 m of its width;
c) for carburetors - raising the throttles to the maximum and the same height.
Messages [19]
1↑ Topic from Student 04/22/2013 15:00:14
- Student
- Assistant
- Inactive
- Name: Ivan
- From: Engels
- Registered: 11-04-2013
- Messages: 267
- Reputation: 3
- Motorcycle: Dnepr MT 10, Dnepr MT 11
Topic: How to properly tension the clutch cable.
I searched the forum, but didn’t find or didn’t notice similar questions. A question has appeared. How to properly tension the clutch cable so as not to overtighten it or become too weak. Who exhibits what?
2↑ Reply from Ural*4uK 04/22/2013 15:32:06
- Ural*4uK
- Elder
- Inactive
- Name: Igor
- From: Russia, Bryansk region, Mglin
- Registered: 03-03-2012
- Messages: 1 451
- Reputation: 39
- Motorcycle: Ural IMZ 8103 with sidecar
Re: How to properly tension the clutch cable.
at the end of the cable, above the box, there are adjusting nuts - you will understand how and where to turn. and on the steering wheel (on the clutch lever) you make a free play of 2-3 mm and that’s it
3↑ Reply from Student 04/22/2013 15:42:49
- Student
- Assistant
- Inactive
- Name: Ivan
- From: Engels
- Registered: 11-04-2013
- Messages: 267
- Reputation: 3
- Motorcycle: Dnepr MT 10, Dnepr MT 11
Re: How to properly tension the clutch cable.
What are the signs that the cable is too tight? Or do I need to tighten it a turn?
Adjusting the clutch release rod
Can you tell me how to properly adjust the clutch release rod? When starting off, when I press the clutch all the way, when I engage first gear, the engine jerks a little. I would like there to be no such jerks, but also that the clutch bearing does not suffer.
There is no way to adjust the rod, only the bolts on the cable. In general, this is normal, the main thing is not to drive.
Jazz_Man, well, these are the bolts I’m talking about. There should probably be some clear indications of the working stroke of the rod or something similar.
Yes, twist it so that it doesn’t jerk too much and doesn’t skid and that’s it. I do this: I tighten the bolt next to the engine so that the cable is not too tight, but slightly loosened and on the steering release lever so that there is no free play.
Preparing for disassembly
In order to access the clutch, you need to remove the rear wheel, reverse gear and disconnect the gearbox from the engine. To do this, you need to unscrew the three nuts holding them together and one bolt, the head of which is located on the front of the flywheel housing under the right carburetor.
To disassemble, you need to unscrew the six screws holding the thrust disc to the flywheel pins. It should be remembered that the screws are tightened very tightly and their heads are locked. When removing screws, use a large screwdriver to avoid damaging the slots on the heads.
Disassembly procedure: - use a screwdriver and hammer to knock out the protrusions from the screw slots; — unscrew the two bolts located opposite each other, and in their place screw in two auxiliary bolts 1 (picture), this will release the thrust disc from the spring pressure and make further disassembly easier; — unscrew the remaining four screws; — unscrew the auxiliary bolts; - Remove all discs and springs.