Three advantages:
Thanks to many years of successful cooperation with manufacturing plants, we are able to provide you with the most favorable and low prices for spare parts
Our price list contains more than 6 thousand items . We offer our customers everything from specific bolts and small fasteners to complete units and large body parts
Our organization has created an optimal and stable system for delivering spare parts to any region of the country. Timely delivery is carried out both by rail and by road through transport companies.
Source
"Sores"
“Planet” was good in its time, except for the ill-conceived launch mechanism. For those who have “Planet”, I think there is no need to explain what “return” means. Personally, once it gave so much that it tore the kickstarter shaft in half, bent the gearshift shaft and tore the ratchet on the clutch basket. Those whose slippers fly into the sky are lucky compared to my version...
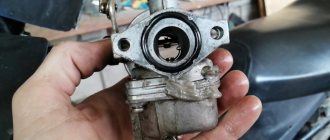
Checking the clutch drum
The first step is to check the foot start ratchet mechanism. This is where the main load falls. Turn the clutch basket over with the ratchet facing you, remove the retaining ring and disassemble the ratchet.
We inspect the teeth of the ratchet: they should be sharp without chips or other damage. If the teeth are wrinkled or broken, the winding foot will slip 100%. Many suffer from this problem due to thick oil or a weak spring - in fact, the reason for the foot slipping lies in the ratchet.
If the teeth on the basket are not worn out, it is advisable to rivet the ratchet: buy a new one in the store or remove it from another basket and rivet it. I riveted several baskets and they went without any problems until the “victory”...
An example of ideal ratchet teeth.
Often and thickly, the rivets on the ratchet weaken and if you don’t notice this in time, they are cut off. To prevent this trouble from happening to you, move the ratchet with your fingers. If it wobbles, drill out the old rivets and rivet them again. Pulling old rivets usually does nothing.
If you are making a clutch “for yourself” and for a long time, be sure to check the condition of the teeth for the motor chain.
If the teeth have already begun to turn back, then such a basket should be immediately thrown into the trash. It will no longer be of any use: the operating noise will increase, it will 100% eat up the motor chain, and there’s never an hour when one “fine” day it will lick your teeth and you will then be forced to push your jalopy for a long time and tediously...
IZH Planet clutch malfunction
Possible malfunctions that may occur during operation of the IZH motorcycle. Let's start with clutch slippage. This error indicates that the drives are slightly pressed together.
There may be several reasons:
- Incorrect setting
- The springs have lost their former elasticity
- The discs are worn out and become thinner
- Wear of drive parts
Clutch wires. This is when the lever is pushed all the way and the clutch is not completely disengaged. The discs are not evenly weakened in places that are in close contact with each other.
The main reason is the springs that compress the discs.
I mounted the clutch and installed cork discs.
I decided to experiment, if I don’t like it, I’ll return the standard ones. To adjust, I used an electronic caliper, 4mm from the nut head to the bolt.
There are now fewer metal disks. I was still thinking about the chain guide, but I didn’t bother yet and assembled it without it. I think next year. Well, the visibility of the clutch has become many times easier. Previously, more effort had to be made, but now it’s almost like foreign cars.
I like I like 2
Other entries in this logbook
Again a rarity. Ignition switch, tray in the glove compartment.
Time passes, and I still slowly continue to equip the motorcycle with original spare parts. This time they were found in the vastness of Avito. Read more
Air filter mount.
As always, I am a hunter for rare parts) While going to the market, I accidentally noticed a motor from Izh Jupiter 2, and that’s what I saw on it. Read more
I assembled the motor.
After finishing the bolt and minor modifications, the assembly of the motor began. The gaskets were cut out independently. Armor is stuffed under the cylinder. Read more
Comments
Only authorized users can leave comments
won't it slip?
- Answer
- November 16, 2021 at 05:36
__vorbik__
IZH Jupiter 5 “MRAZOTA”
My parents bought this motorcycle with wedding money in 1988. and in 1994 they put it in the garage because the family got a car. In 2007 I got it, and our relationship began. There’s no other way to call it) he and I are like cats and dogs, we love to test our nerves to the limit. 2007 Pulled it out of the barn next to the chicken coop. I washed it off the shit, started it, and drove around with minor repairs. 2009 The engine died and there were no funds for repairs. 2010 Complete disassembly, painting, engine overhaul with replacement of shafts, bearings, seals, gaskets, piston. A month later, the piston burned out (because at that time I was not yet a nanomechanic and had not heard anything about the thermal gap). As a result, I bought a piston kit with new cylinders assembled in short. 2011 April. 13 km from the house, the chain lock opened and gutted the rear casing of the star (in common parlance, a guitar) and that was the last straw. After that, the motorcycle was kicked into the barn with the words: GET OUT OF THE SOVIET MOTOR INDUSTRY! And a new YBR125 was purchased. 2015 My soul yearned for my friend, old grievances were forgotten, and my friend was transported from my grandmother to my garage. 2021 Attempts to revive this barn were ongoing. The day of dancing with a tambourine at the contact ignition was exhausting. We bought an optical ignition and it STARTED! and it didn’t just start, it FLYED. 2021 I decided to modify the engine and not touch the frame. But then, as always, I decided to go all out. Again a complete disassembly and then Ostap suffered!
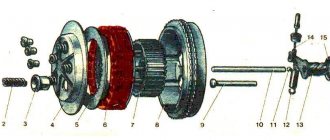
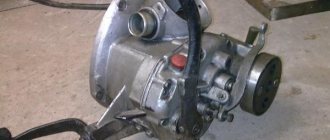
Checking the clutch basket inner drum
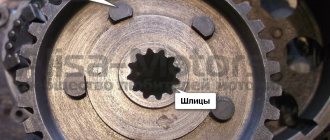
The inner drum is eternal by definition. The only problem that arises with it is that it breaks and sometimes cuts off the splines and the fit of the bolts under the pressure springs becomes loose.
Place the drum on the shaft and swing it:
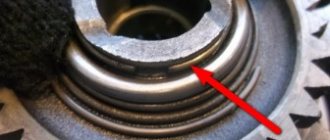
- If the drum dangles too much on the shaft, inspect the splines and if they are broken, replace the drum with a new one.
Loosen the bolts under the compression spring one by one:
- If the bolts wobble, knock them out of the drum, anchor the seats and hammer them back into the drum.
Checking clutch discs
The main clutch problems occur due to the fault of the discs. If the discs are crooked or worn out, then no amount of even a super couture adjustment will correct the poor performance of the clutch.
Wear is determined visually and only on plastic discs: we inspect the disc and if we find a crack or a broken hook on it, with which it enters the outer drum, or we see that the round protrusions on the working surface have long been worn out, we throw such a disc in the trash.
The curvature of the disks is determined as follows: place all the disks on the glass one by one and try to swing them
- If the disk wobbles, it means it is 100% crooked and should be in the trash.
- If the disk lies flat, leave it.
Adjusting the alignment of the motor transmission teeth
We put an adjusting washer on the input shaft of the gearbox, then we put the spacer sleeve of the outer clutch drum there. We put a spring washer on the crankshaft journal. We install the outer drum and the drive sprocket of the motor transmission on the engine, tighten the bolt on the sprocket. We apply a ruler to the sprockets and look at the alignment of the teeth under the motor transmission.
- If the teeth do not converge, we adjust their convergence by placing or removing adjusting washers under the clutch basket
In my case, the teeth of the basket and drive sprocket are aligned.
After adjusting the alignment of the teeth, remove the drum and sprocket from the engine and leave the adjusting washers and spacer sleeve.
We put the thrust washer of the kickstarter return spring on the gearshift shaft.
We put the kickstarter shaft on the shaft of the gear shift mechanism and insert the return spring hook into a special groove.
To avoid injury to your hand, tension the kickstarter spring only with the crank!
We put the claw on the shaft, tighten the bolt and, depending on personal preference, tension the spring. Personally, I tensioned the spring two turns. It turned out a little tight, but the paw didn’t dangle like snot and always returned to its place.
We install a basket with a sprocket and a motor chain on the shafts. We place a tin rod or stick under the chain and tighten the bolt on the sprocket with the maximum possible force.
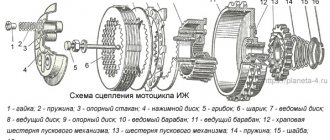
Purpose of the clutch IZ Planet and IZ Jupiter
Clutch - the name speaks volumes about the job it does. In our case, the crankshaft engages the gearbox of the IZH Planet and IZH Jupiter engines. The connection should occur smoothly without jerking, this is necessary to start moving and smoothly change gears. In case of heavy loads, it protects engine parts from damage.
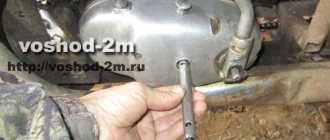
The clutch is located in the left half of the crankcase, under the left engine cover.
To get to the clutch, you need to drain the oil and remove the cover with the gasket, first remove the levers and unscrew the mounting bolts.
The basket is constantly in working condition, the discs are tightly compressed by springs.
The motor transmission consists of two sprockets. The small drive is located on the crankshaft. A large star driven on a drum. The connection is made by a motor chain.
The engine gear ratio is 2.17 for all single-cylinder IZh models. For IZ Jupiter, the gear ratio is 2.57.
When assembling the motor transmission, the planar arrangement of the stars is controlled. No more than 0.4 millimeters are allowed.
Switching off occurs using a special device. The shutdown mechanism is installed in the right engine cover. This mechanism is used to make adjustments.
Clutch device of the IZH Planet 5 motorcycle
For those who are not good at technology, it is worth recalling that the clutch acts as a connecting element between the crankshaft and the gearbox. The large clutch gear is connected to the small crankshaft sprocket by a chain transmission, which is how torque is transmitted. In the normal state, the system ensures constant communication between the gearbox and the crankshaft and only when the clutch lever is pressed, the drive mechanisms increase the gaps between the elements in the multi-disc clutch system, thereby disconnecting the box from the crankshaft.
Owners of the IZH Planet 5 motorcycle are lucky; their clutch release system is simpler in comparison with the similar 5th Jupiter, which means it is unpretentious and easier to set up with your own hands. It looks like this:
- Shaped nuts;
- Springs;
- Cups;
- Pressure disk;
- Driven (steel) disk;
- Drive (plastic) disk;
- Driven drum;
- Large drum with large gear motor transmission;
- Clutch release pusher;
- Kernel;
- Ball;
- Spring;
- Worm;
- Cable;
- Washer;
- Screw;
- Screw.
Clutch adjustment IZH Planet
To adjust the clutch control mechanism of motorcycles IZH Planet 5, IZH Planet 4, IZH-56, IZH-49, use adjusting screw 1 and locknut 2. By loosening the locknut by turning the screw clockwise, reduce the free play of the control lever. When turning the screw counterclockwise, the free play increases. After completing the adjustment, tighten the locknut. The normal free play value is determined by the free movement of the end of the clutch lever by 5..10 mm.
The normal amount of free play is determined by the free movement of the end of the clutch lever by 5..10 mm.
Malfunctions and clutch adjustment of Izh motorcycles
There are two possible types of clutch malfunction: incomplete disengagement of the discs and slipping. If the motorcycle is slipping, it will not develop speed as the crankshaft speed increases. The reasons for this malfunction may include: wear of the discs, insufficient spring pressure due to loss of elasticity or loose adjusting nuts, incorrect adjustment of the clutch mechanism. When the clutch is not fully disengaged, the motorcycle wheel continues to rotate while the control lever is fully pressed. This may also be due to incorrect adjustment, or this malfunction may occur when thick oil is used, especially in cold weather. First of all, if you discover one of the clutch malfunctions, try to eliminate it by correct adjustment. First, you need to adjust the gap in the shutdown mechanism; this is done using the adjusting screw located on the right engine cover. To do this you will need a screwdriver and a 13 mm wrench. Using a wrench, loosen the locknut and use a screwdriver to tighten the screw until it stops, and then turn it in the opposite direction half a turn - one turn. Tighten the locknut with a wrench. Secondly, after this, adjust the free play of the lever using the cable adjusting screw on the left handlebar handle. It should be within 5-10 millimeters. The correct clutch adjustment can be checked in this way: place the motorcycle on a stand, engage first gear and try to manually turn the rear wheel with force. If the adjustment is correct, you will not be able to do this. Now you need to perform one more check: to completely disengage the clutch. To do this, in the same position (motorcycle on a stand, rear wheel not touching the ground), start the engine and engage first gear. Then fully depress the clutch control lever and apply the rear brake, the wheel should stop. Release the brake, the clutch is depressed, and the wheel should remain stationary if adjusted correctly. If it starts to rotate when the lever is pressed, you need to loosen the adjusting bolt on the right side of the engine.
To check the ease of movement of the clutch cable in the sheath, press the lever and release sharply. The lever should spring back to its original position. It may be worth lubricating the cable with a few drops of liquid oil, such as Autol.
Adjusting the clutch springs
Adjusting the springs is not difficult, the main thing is to get it right. We start by placing the motorcycle on the center stand. Then remove the lid, draining the oil in advance. We squeeze the lever on the steering wheel to the limit and make sure to fix it. Next we turn on the speed, preferably the first one. We take the wheel and begin to rotate. We try to determine by touch how much effort we are applying. We look at the coupling as it rotates and determine which springs are loosely tightened. We mark them with chalk, then tighten them. We begin to rotate the wheel again and if you feel that the wheel has become easier to spin, then everything has been done correctly. The process must be repeated to achieve a better result. After this, we check the result obtained while moving. If, as the load increases, the clutch begins to slip. All springs must be tightened using nuts. In this case, all nuts must be turned the same number of turns.
Adjusting the Voskhod motorcycle clutch
The engine was completely disassembled for a major overhaul. During which the worn coupling parts were replaced. In our case, slave and master disks.
The springs that compress the discs were replaced if they were stretched out or damaged. The clutch drum has been replaced. The thread on a bolt or nut is broken; the purpose of these parts is adjustment.
If the speedometer gearbox with the clutch release mechanism has been replaced or repaired.
In the photo: 1 – adjusting screw; 2 – fixing nut.
In the opposite case, we squeeze the lever, we want to disengage the clutch and stop, but this does not happen. The motorcycle does not obey and continues to move. Clutch leads
All you need is a minimal adjustment tool
One simple screwdriver and a special 10mm tubular socket wrench.
One important condition: the screwdriver must fit freely inside the key and be a little longer
Clutch adjustment
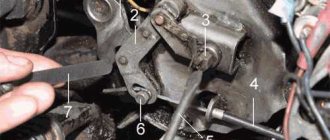
Clutch adjustment parts are not located on any Soviet motorcycle, as they are on Voskhod. We unscrew the special plug in the center of the left crankcase cover. Inside we see an adjusting screw 1 with a locking nut 2. We insert a key onto the nut and loosen it.
An important condition is to hold the nut with a wrench, only then insert a screwdriver into the bolt inside the wrench and start rotating. If this condition is not met, it is not possible to adjust correctly
note
Because if you don’t hold the nut or bolt and rotate one, they still rotate together, which leads to misadjustment.
We tighten the adjusting screw inward until we feel the stop against the fungus. Then use a screwdriver to unscrew the screw a quarter or half a turn back. So that the screw does not touch the fungus, we hold the screw in this position with a screwdriver. And only then we lock the screw and tighten the nut tightly to secure it.
All the main work is completed, all that remains is to install the recommended free gap of 5 - 10 mm on the control lever. This is done using a special bolt on the lever itself.
The long-awaited exciting moment. We start the motorcycle, warm it up and check our work. We move off smoothly. We sharply increase the engine speed. We give a load to the engine. Switching speeds. We brake and stop. If you don’t like something, you can repeat the adjustment and achieve the optimal clearance.
It’s impossible to do everything perfectly the first time, unless you’re lucky.
Clutch faults
Possible malfunctions that may appear during operation of IZ motorcycles.
The clutch of IZH Jupiter IZH Planet is slipping reasons
The malfunction is noticeable during sudden acceleration. We increase the speed, but the motorcycle does not accelerate. The same thing happens when driving on a steep hill as the load increases. The motorcycle cannot overcome the obstacle and stops, although the crankshaft speed does not drop. The discs get very hot and wear out quickly. It is impossible to operate the equipment in this condition; the cause must be found and eliminated.
This malfunction indicates that the disks are poorly pressed against each other.
There may be several reasons:
- The adjustment was not carried out correctly
- The springs have lost their former elasticity
- The discs have worn out and become thinner.
- Wear of drive parts
A serious problem could be a jammed control cable. The reason is damage to the shell and the resulting rust underneath. Gentle cleaning and lubrication, better replacement.
Check and wash the adjustment mechanism itself located in the right engine cover. Small particles of road sand that get into the mechanism with water can slow down the operation. After squeezing the lever, the parts do not return to their original position.
Features of clutch settings
It is possible to check the correctness of the clutch settings by pressing the pedal in any direction. Moving the first end of the lever 3-5 mm from the neutral position should not affect the pressure plate, that is, it should not move. After completing this procedure, it is possible to adjust the manual squeeze using a specialized screw to make the adjustment. After this, the IZ Jupiter 5 clutch is assembled, during which it is necessary to strictly adhere to the sequence of all necessary actions.