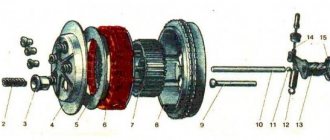
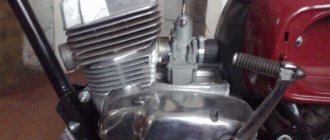
Clutch device of the IZH Planet 5 motorcycle
For those who are not good at technology, it is worth recalling that the clutch acts as a connecting element between the crankshaft and the gearbox. The large clutch gear is connected to the small crankshaft sprocket by a chain transmission, which is how torque is transmitted. In the normal state, the system ensures constant communication between the gearbox and the crankshaft and only when the clutch lever is pressed, the drive mechanisms increase the gaps between the elements in the multi-disc clutch system, thereby disconnecting the box from the crankshaft.
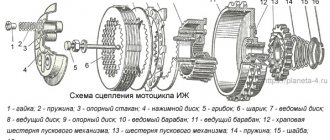
Owners of the IZH Planet 5 motorcycle are lucky; their clutch release system is simpler in comparison with the similar 5th Jupiter, which means it is unpretentious and easier to set up with your own hands. It looks like this:
- Shaped nuts;
- Springs;
- Cups;
- Pressure disk;
- Driven (steel) disk;
- Drive (plastic) disk;
- Driven drum;
- Large drum with large gear motor transmission;
- Clutch release pusher;
- Kernel;
- Ball;
- Spring;
- Worm;
- Cable;
- Washer;
- Screw;
- Screw.
How to replace a motorcycle clutch
June 02
The motorcycle clutch is one of the most important elements that propel the vehicle. Correct adjustment and proper operation make the clutch service life quite long. For careful drivers, it can travel about 40 thousand km or more. However, in any case, there comes a time when the motorcycle clutch requires replacement.
This article will discuss when to do this and how to properly replace a motorcycle clutch.
Some “symptoms” indicate the need to replace the motorcycle clutch. These include:
- Noise in the crater.
- Tight squeeze of the lever.
- Vibration.
- Clutch slipping. It is one of the most serious symptoms. This is characterized by the absence of a rigid connection between the engine and the wheels.
- Unpleasant burning smell. It should also be noted that a burnt clutch does not always have a characteristic smell; there are cases when there is no smell.
There are times when the clutch “leads”, i.e. the motorcycle attempts to move forward with the lever pressed all the way. In this case, it is difficult to change gears, and it is almost impossible to catch neutral.
However, even if the indicated symptoms were noticed, this does not mean a clear replacement of the motorcycle element, because you can try to adjust the clutch.
Adjusting the clutch on a motorcycle
The clutch is regulated by changing the force of pressing the discs against each other, which, in turn, is regulated by preloading the springs.
To do this, special “fungi” are put on the springs, which can be accessed after removing the cover on the left engine cover (oil hole).
It is worth saying that in this way you can not get close to all the “fungi”, but only to some of them. All “fungi” can be adjusted by rotating the crankshaft using the starter.
Advice
It is worth noting that absolutely all springs must be equally tensioned, i.e. Each “mushroom” is twisted the same number of half turns.
Thus, if the clutch is slipping, there are only two steps to follow:
- Make sure there is free movement of the handle. If it is not there, the clutch will be constantly depressed.
- Open the left cover, without draining any liquids, and tighten all the “fungi” evenly. After this, you should check the operation of the clutch. If slippage continues, it is worth repeating the procedure.
During adjustment, you should be careful and pay attention to various details, for example, the oil level in the engine, the condition of the teeth on the discs, etc.
It is worth noting that the malfunction of this element of the motorcycle should not be neglected, because if at the beginning of the day the clutch begins to slip, then after just a few hours of intensive motorcycle riding, it can completely die, thereby causing harm to the vehicle as a whole. After all, small particles of burnt clutch discs get into the oil, along with which they are sent to the precision joints of the liners, connecting rods and pistons, thereby damaging the engine. Therefore, if the time has come to replace the clutch, it should be done immediately.
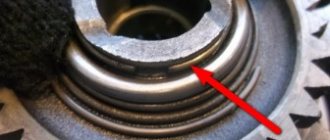
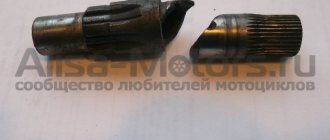
With constant use of the motorcycle and long mileage, the basket itself wears out along with the clutch - wear appears on the edges of its longitudinal slots.
Its appearance in these places makes it very difficult for the clutch discs to move.
A shallow hole can be corrected using a regular file, however, this is a completely extreme case; still, if it appears, it is better to install a new basket.
So, there are different types of motorcycle clutch, however, the most common type is the multi-plate clutch in an oil bath. This is what is most often installed on motorcycles. Therefore, we will consider replacing the clutch using the example of a multi-disc clutch.
To install a new clutch on your motorcycle, follow these steps:
- The first step is to remove the clutch cover, first getting rid of the plastic and the cage, if present.
- Then you need to unscrew the clutch cable bracket and remove the cover.
- The next step is to carefully remove the gasket. It is worth saying that if the gasket remains intact, then its reuse is acceptable.
- Unscrew the spring bolts.
- Next you need to remove the discs.
However, before this process, it is necessary to carefully inspect the clutch basket for cracked discs and other damage. If there are any, you need to be extremely careful when removing them so as not to drop a single piece. Otherwise you will have to lift the tray to get it out. - Removing disks. This should be done one at a time and folded in the order in which they are removed. Please note that friction discs alternate with steel ones.
- The clutch should be checked for wear.
This is done by measuring the length of the springs and the deformation of the steel discs. All values that are acceptable for a working clutch are listed in the motorcycle's instruction manual. - Next, you need to install all the clutch discs in place in the required order, while replacing the old discs with new ones, and tighten the spring bolts.
It should be noted that before reassembling the clutch, it is useful to flush the assembly. An all-purpose cleaner is suitable for this. After washing, be sure to wipe everything dry. Wet friction discs must be soaked in oil before installation. - Reinstall the cover.
However, with this process there is a possibility of problems with the precise installation of the pusher. To install it accurately, you need to move the pusher to the “squeezed” state (counterclockwise). - Screw on the lid. But before doing this, you should definitely make sure that the new clutch is working correctly. This can be done by pressing a few bolts, as well as installing the cable bracket and squeezing the lever.
- A weak thread sealant should be applied to the threads of the pressure disk screws and cover fastenings before installation.
- Tighten the bolts.
This process is carried out in such a way that each subsequent bolt is opposite to the previous one. First you need to tighten all the bolts and only then tighten them. Otherwise, there is a 99% chance that the lid will leak. A 12 Nm torque wrench is suitable for tightening the bolts. - The last step in replacing a motorcycle clutch is to install the plastic, cage, slider, in a word, everything that was removed in the first place.
Replacing clutch discs on a motorcycle
Thus, after completely replacing the clutch, you need to change the oil, start the motorcycle and do a running test of the clutch. However, the oil does not need to be drained when replacing discs, since the clutch basket is located significantly above the oil level. But, if the discs are burned out, then changing the oil is a necessary process, because it is filled with a large amount of chips and dust.
If all steps were done correctly, then there should be no problems.
Source: https://www.motoking.ru/clauses/kak_zamenit_sceplenie_motocikla
When does the clutch need adjustment?
Clutch adjustment of IZH Planet 5 is required in two cases:
- Clutch "slipping". In this case, the clutch discs are not tightly connected to each other, which causes slippage of the drive discs and incomplete transmission of torque. You can notice this in the lag in actual engine speed and motorcycle acceleration. Especially noticeable during sudden acceleration or driving uphill. This situation can occur if the springs do not create enough force or there is no free play in the drive mechanism. Less commonly, slippage may indicate wear on the disc pack. Most often, the problem is solved by a simple adjustment; in other cases, disassembly, replacement of the package and assembly of the IZH Planet 5 clutch are carried out.
- The clutch "drives" . The opposite story is where the disks are partially connected all the time. This is expressed in kicks when engaging first gear, the motorcycle trying to leave with the lever depressed, or turning the rear wheel hanging out in gear. The reason may be a misaligned position of the pressure disk, as well as an increased gap on the engagement mechanism or clutch lever.
Note! If the IZH Planet 5 clutch basket has been disassembled/assembled, then adjustment of the mechanism is mandatory.
Often, clutch slipping and kicks during shifts do not appear due to a simpler and more common problem - cable wear. Before proceeding with full or partial adjustment of the mechanism itself, make sure that the drive cable is in satisfactory condition, it is securely fastened on both sides and moves easily inside the braid. After all, if it is stretched or rusted, it can become sour and then the clutch begins to slip.
Clutch setting
Adjusting the springs usually does not take much time and is not considered a complicated procedure. To carry out these actions, the motorcycle is placed on the stand, the oil is drained, and then the installed cover can be removed. After this, the special lever will need to be squeezed to the maximum and securely fixed. Then it is recommended to turn on the first or second speed, take the wheel and start rotating. Based on the load, we determine which springs are more tense and which are looser.
Then, when we have figured out which springs need to be tightened, we rotate the wheel to check the result. It is necessary to pay special attention to such a fairly important point that when the load increases, the clutch will not slip. After all of the above steps are completed, the IZH Jupiter 5 clutch basket is assembled. Adjusting the IZH Jupiter 5 clutch is important for stable and safe riding on this popular motor vehicle. Therefore, when you feel that it is necessary to carry out these actions, then you should not delay it.
Clutch adjustment IZH Planet 5:
- Remove the gearshift foot and kickstarter. Next, unscrew all the bolts on the left crankcase cover and carefully remove it.
- We temporarily put on the gear shift leg and engage first, or better yet, 4th gear. We rotate the rear wheel in the direction of travel, observing the alignment of the pressure disk (4).
- With chalk we mark the bolts (1) that correspond to the side that protrudes the most during rotation. We tighten the bolt that is closest to the protrusion, and then check the tension of those located nearby. (If the disk is not distorted, then immediately proceed to the next step)
- Now you need to check how much the bolts (1) protrude. The operating manual indicates the optimal protrusion length is 4.5 - 5 mm. However, this data corresponds to a new disk package. The package will obviously require replacement when the protrusion of the bolts is 2 mm or less.
- We have dealt with the disk package, now we need to configure the shutdown mechanism, or rather its free movement. To do this, go to the right cover. There is an adjusting nut (16) and a screw (17) on it.
- We tighten the nut until it stops, so that the clutch does not disengage. Then we unscrew it a quarter or half a turn, securing it with a screw.
- All that remains is to set the free play of the lever on the steering wheel. To do this, use the adjusting screw and set the gap to 5 mm.
This completes the adjustment of the IZH Planet 5 clutch. All that remains is to assemble the left cover and pour oil into the mechanism.
Advice. To avoid oil leaks, replace the gasket and also check the tightness of the screw connections on the crankcase cover.
Basic clutch malfunctions
One of the most common problems that occurs with the IZH Jupiter 5 motorcycle is clutch slipping. Almost all owners who use this model for quite a long time face this problem. This kind of malfunction indicates that the discs are not pressed together well enough and the IZ Jupiter 5 clutch needs to be adjusted.
The main reasons why this can happen:
- The IZ Jupiter 5 clutch was adjusted incorrectly.
- The installed springs have lost the required elasticity.
- The discs have lost their thickness due to significant wear.
- The drive elements are significantly worn.
Sometimes it feels like the clutch is dragging . A similar problem usually occurs when the lever is clamped to the maximum, but the clutch is not disengaged. In this case, the installed disks in some places touch slightly, and in others they fit tightly to each other. Adjustment of the clutch basket on IZ Jupiter 5 must be carried out in full compliance with the specified recommendations.