Sooner or later, every moped driver wonders how to remove a wheel on a scooter . There can be many reasons for removing a wheel, the most common of them (there are interesting articles on the links, I recommend reading):
- If you have a flat tire on your scooter
- The brake mechanism requires servicing (read the article Servicing the drum brake on a scooter)
- Sometimes to adjust drum brakes
- Disassembling the gearbox
- Replacing brake pads
- To balance a scooter wheel (I recommend reading Balancing a scooter wheel with your own hands)
- And of course to change the wheel
Removing the rear wheel on a moped is not as difficult as it seems, but, frankly speaking, it is not easy either. This process is very different from a similar operation with a car due to the fact that many other structural elements of the scooter, such as the exhaust pipe, shock absorber and other parts, prevent the removal of the rear ramp with the disc in the scooter. Although the scooter wheel itself is fixed with only one nut.
Reasons for removing the rear wheel
A scooter, like any other vehicle, is subject to the laws of physics. Parts wear out and require repair. Vehicle wheels are no exception. At first glance, removing the rear wheel from a moped is easy. And it is held on by just one nut. But this is a misleading impression. In order to get to the rear wheel rim, the owner will have to work hard, removing most of the plastic and parts.
The reasons for removing the rear wheel of a scooter can be very diverse. Most often this is a flat tire, because few motorcyclists have not at least once run their wheel into a sharp object. But in the back of the scooter, in addition, there are many important parts, to access which you will need to disassemble half of the vehicle. What else could be the reason for repairs involving dismantling the rear wheel? Let's list:
- Faulty brake pads. Brakes are the most important part of a motorcycle. If they do not work well, you need to fix the problem as quickly as possible.
- Replacing the old wheel with a new one.
- Wheel balancing.
- Replacement of the gearbox shaft.
- Disc painting.
- Drum brake adjustment.
- Replacing a worn or punctured wheel.
Procedure
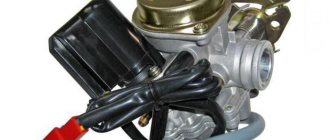
- First you need to remove the muffler.
Place the scooter on the stand so that the wheels dangle in the air. Remove the seat, the lower plastic skirt, and then slightly unscrew the bolts that secure the muffler to the frame (there may be 2 or 3 of them). Please note that they cannot be unscrewed completely.
Using a socket wrench, unscrew the nuts securing the muffler to the cylinder, and then completely remove the bolts.
When removing the muffler itself, hold it with your other hand. Do not lose the rubber gasket that is located between the muffler and the cylinder.
If you find that carbon deposits have formed in the muffler, you should clean it off by heating the outer surface with a blowtorch and walking inside with a wire brush. After removing the muffler, the cylinder outlet should be covered with a piece of clean cloth.
You can change the wheel on your scooter as soon as you apply the rear brake and unscrew the nut.
Usually it is easy to remove, but if you have difficulty, you should block the wheel by inserting a wooden block into the disc. To prevent the wheel from spinning, open the variator cover to hold the clutch washer.
After this, you need to remove the wheel from the spline and begin the actual repair.
Once you have finished replacing or repairing the rear wheel, reassemble the dismantled parts of the moped in reverse order. Before assembling the scooter, do not forget to treat the splines with grease.
If, after removing the wheel from the scooter, you find serious defects, it is better to take the spare part to a tire shop, where they will repair it efficiently or advise you to replace it.
Rear wheel removal instructions
How to remove the rear wheel from a scooter? The quickest step-by-step instructions below will help you figure this out:
- Position the scooter so that the rear wheel spins in the air.
- Remove the muffler. To do this, remove the seat and plastic, and then unscrew the nuts that hold the muffler. It is important not to remove them completely, but only to loosen them.
- Using a socket wrench, unscrew the nuts securing the muffler to the cylinder. Remove it from the scooter. In this case, the paranite gasket may be lost, so be careful.
- If the muffler is dirty, it can be cleaned of carbon deposits and dirt. To do this, heat the outside with a blowtorch, and go inside with a stiff metal brush. After all the manipulations, it is better to cover the exhaust hole of the muffler with a clean cloth so that foreign particles do not get into it.
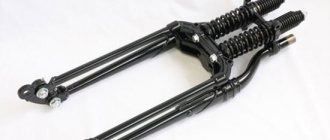
- Most mopeds have a monoshock absorber. If your model has two of them, and they are located in the rear, you need to unscrew the nuts and remove them.
- If you have a rear disc brake, you need to do the same steps: carefully unscrew the brake caliper and move it to the side.
- And now you can proceed directly to removing the wheel. Unscrew the carrier nut using an impact wrench. If you don't have one at hand, a regular screwdriver will do. But in this case, it is recommended to fix the wheel with a wooden beam.
- Remove the wheel from the spline.
To install the wheel, perform all the above steps in reverse order.
Sequence and features of work execution
Before removing the rear wheel from a moped or scooter, you need to have all the necessary tools. If you have a special case with keys in your garage or home, you can immediately start doing the work. The procedure is not complicated, somewhat reminiscent of a similar operation with a car. The only difference is that there are a large number of other structural parts inside that prevent quick disassembly. Although the part itself is fixed with only one nut.
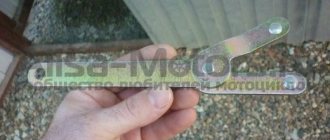
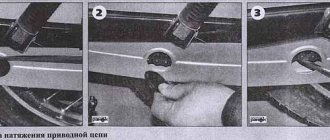
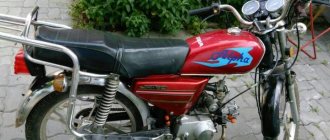
Work should begin by placing the vehicle on the step. It is important to choose a flat, stable surface so that when dismantling the scooter does not fall on its side. If you have performed this procedure a long time ago, we strongly recommend treating all threaded connections with WD-40 spray. If there is rust, you will have trouble unscrewing it. Therefore, the use of this spray will greatly facilitate the procedure, since all the bolts and nuts will be easy to unscrew. To prevent the wheel from spinning when dismantling, press the brake pads by securing the brake handle with a regular belt, as in the photo:
The design of most models requires preliminary removal of the muffler along with the exhaust pipe. If you do not do this and immediately unscrew the nut securing the wheel, it will not come off, since the muffler will rub against the tire. To remove the clamps, you need to loosen the fixing bolts and then unscrew the two nuts located under the power unit. Having done this, carefully remove the muffler and leave it in a convenient place.
For example, in some cases, Chinese scooters do not require preliminary removal of the exhaust pipe (for example, on the Viper 150 model with a drum brake system). Much depends not only on the design, but also on the width of the tire/air pressure inside it. On the other hand, having removed the exhaust after all, removing the wheel rim will be significantly simplified.
Note! A paronite gasket is installed between the exhaust elbow and the cylinder. Don't forget to put it aside so you can put it back in its original place later. Otherwise, the exhaust sound will deteriorate. In addition, the absence of a paronite gasket increases the risk of getting a leg burn from exhaust gases that have a high temperature.
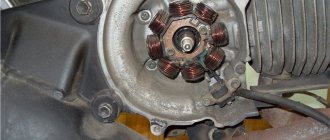
After removal, unscrew the bolt holding the shock absorber at the bottom. Move the stand to the side. Some scooter models have only one shock absorber, located where the CVT is. There is no need to unscrew the latter (only if you plan to further remove it and overhaul/replace it). If your scooter has a rear disc brake, be sure to unscrew the caliper and move it to the side.
Unscrewing the wheel
Having removed all the unnecessary parts, let's figure out how to properly remove the wheel from the scooter. An impact wrench may be needed for this. If there is none, secure the wheel with a block of wood (the brake lever will not be able to guarantee that the disc is held in place). Before placing the block, it is recommended to rest it not on the variator cover, but on the bracket itself. The CVT guard is usually made of a low-strength material, so you may damage it when removing it.
Honda scooter repair
The Japanese Honda scooter has long been one of the top three best-selling vehicles with an engine capacity of up to 150 cm³. Modern design, thoughtful and comfortable seat, maneuverable chassis, engine with economical fuel consumption make Honda a favorite of many.
The undoubted advantages of the scooter include a liquid cooling system, a V-shaped transmission, and a 4-stroke engine with one cylinder. Honda mopeds consume approximately 2.5 liters per 100 km, and can reach speeds of up to 100 km/h.
When driving off-road, moped owners often run into sharp objects that can damage their tires. But removing the rear wheel on a Honda scooter can be difficult because of the burnt residue stuck to the splines, which glues the parts together and complicates the dismantling process. In this case, experienced scooter riders advise spraying with WD-40 and then carefully tapping the wheel closer to the center through a piece of wood.
Wheel trim
In what cases is tire replacement required:
- Product wear and non-compliance with tread height standards. Typically the standard is 0.8 mm.
- Tires have defects: cracks due to aging or mechanical damage and punctures.
- Presence of tubercles. Blisters appear when driving under high pressure or during an impact. The normal value is 2 atm.
How to install new tires:
- One bead of the tire is placed on the rim. If a camera is used, then sprinkle it with talcum powder and place it inside. The hole must be completely blocked by the valve without displacement. Now you can bead the tire using mounting crowbars. Next, inflate the tires with a regular pump to the standard recommended by the factory for the specific scooter model. These pressures should not be increased.
- If the tire is without a tube, a special compressor is required. To carry out the procedure, you need to deliver a large amount of air in a short period of time.
On a note!
In winter, when there is ice, you should reduce the tire pressure.
A compression pump is required to inflate tubeless tires
Troubleshooting the Racer scooter
The Racer company entered the world market quite recently. Nevertheless, its products have already attracted the attention of motorists. A distinctive feature of this scooter is the kick starter, which allows you to start it even when the battery is dead. Fuel consumption per 100 km ranges from 2 to 5 liters. The 4-stroke engine has an electronic injection system and can reach speeds of up to 80 km/h.
When repairing wheels, two drum brakes installed at the rear and front make it difficult to remove them. Therefore, the question of how to remove the rear wheel on a Racer scooter is very relevant. To do this, you need to follow the steps described in the “Instructions” chapter, but with one amendment. Before removing the wheel itself, you need to loosen the brake cable, which “sits” on the pads. After this, the procedure should go without much difficulty.
How to remove the rear wheel on an Irbis scooter
Another brand of scooters with an engine capacity of up to 150 cm³ is Irbis. The products of this brand are distinguished by their brutal design, two powerful headlights at the front and bright colors. When you see such a scooter on the road, you won’t confuse it with anything else. The largest cubic meter models can reach speeds of up to 90 km/h. Disc brakes bring it to a quick stop under extreme braking. Oil cooling prevents the engine from overheating.
A reinforced suspension with two shock absorbers can cause a lot of problems when removing the rear wheel. To access the tire you will have to first unscrew the muffler mounts and then the rear brake. Irbis scooters are equipped with a monoshock absorber, so there should be no problems in this part.
Recommendations from mechanics
You can find many recommendations and discussions on how to remove the rear wheel on a scooter. To make repairs easier, experienced motorists recommend using penetrating lubricant WD-40 (or gasoline in extreme cases), and thoroughly clean the parts from dirt and degrease before installing them. It is also strongly recommended to lubricate the splines with grease. After installing the nut, it is recommended to tighten it firmly, jerkily, but without striking. To hold the wheel in place, instead of a beam, you can use a CVT cover, which will prevent it from turning.
As a last resort, if you are unable to dismantle the wheel yourself, experts recommend contacting the nearest trusted service center. The same should be done if, after removing the parts, you find serious damage to one of them.
Necessary tool
Replacing a wheel on a Honda Dio is not difficult to do. Even an inexperienced beginner can slowly complete the task in 20 to 40 minutes.
To do this you need a modest set of tools:
- hex heads for 24, 12, 10
- a wrench and a small extension for the wrench.
If you need tire mounting and you want to repair it yourself, you will also need the following tools:
- a metal cap for unscrewing the nipple (spool valve),
- a vice for squeezing the tire and removing it from the wheel rim seats,
- 2 - 3 motorcycle mounts for tire removal,
- a compressor for inflating a tubeless tire, and if the tire has a tube, then a regular pump is sufficient.
Results
Every scooter needs repairs from time to time. Malfunctioning of a vehicle not only interferes with a comfortable ride, but also endangers the life of its driver. Repairing a scooter with your own hands is quite simple, if you sit down first and properly understand the details. Sometimes the process may stall at some element, then it is recommended to carefully follow the entire sequence of steps from the very beginning - perhaps a mistake was made somewhere. When replacing a rear wheel, you need to take your time and be careful, and then you will succeed.
Good luck with the repair and good luck on the roads!