Operating a scooter and enjoying its ownership brings a lot of positive emotions to the owner. In general, a scooter is a truly unique motor scooter, which is an almost universal transport. The scooter is great for driving around the city and for traveling outside of it. And everything would be fine, but sooner or later the moment comes when it has to be repaired and maintained, something that motorcyclists like to do much less of. Also, you often have to adjust and set the ignition, which few people know how to do correctly. It’s exactly how to set the ignition on a scooter that will be discussed in today’s article.
Difficulties
Our people don’t want to buy pullers and they put everything under the rotor and even try to knock it down with a hammer, and once I came across a scooter with a piece of some kind of metal welded to the rotor. They probably welded a hook and wanted to pull it off with a KAMAZ.
On the one hand, you can understand people: why buy an expensive tool for a one-time job?.. On the other hand, I don’t understand people: why buy and personally damage a scooter with a hammer, if you can give it to a mechanic for repairs? A dilemma, whatever one may say.
Replacing generator brushes
A car generator is designed to convert the mechanical energy of rotation of the engine crankshaft into electrical energy. It performs two main functions: recharging the battery and powering the vehicle's power supply systems with generated electricity. Along with the rotor and stator, the housing of the alternator also contains a brush assembly, a voltage regulator and a rectifier unit.
Brushes are the most vulnerable element of the generator. At the moment of their contact with the slip rings, the rotation speed of the generator shaft reaches 12-14 thousand rpm, which causes accelerated wear of the contacting surfaces. Timely replacement of generator brushes helps prevent damage to the brush assembly and ensure uninterrupted power supply to the vehicle while driving.
Theory
The generator consists of two main parts: the rotor and the stator. The stator is attached to the engine crankcase and can be removed very easily, literally “by hand”. But the situation with the rotor is different. The rotor is mounted on a cone and clamped with a nut, and it is clamped tightly, and in order to remove it from there, you must first secure it from turning, then unscrew the nut and only then use a puller to pull it off the cone.
Checking the serviceability of the scooter generator
If a scooter generator requires repairs and its device does not allow you to assess the breakdown with the naked eye, a control device - a multimeter - can help. It is the tester that will show real surges in voltage amplitude and identify the direction for troubleshooting.
Diagnostics is carried out in several stages.
Stage 1. Checking the generator output voltage.
1. Connect the tester to the disconnected connectors;
2. With the engine turned on at minimum speed, evaluate the result. Satisfactory performance is within 5 V.
Stage 2. Checking the output voltage of the switch using a tester with a voltage amplitude reading.
1. Connect the switch wires to the generator stator wiring;
2. Disconnect the block from the terminal of the primary ignition coil;
3. We close one terminal to the main wire of the ignition coil, the second to the engine ground.
4. When starting the engine, we check the output voltage using a tester in the “constant current” mode;
5. We return the switch wire leading to the coil to its place and check the average output voltage.
6. The required indicator is about 200V.
Stage 3. Checking the battery condition.
This is the simplest operation when diagnosing and repairing a generator on a scooter :
How to unscrew the nut?
To fix the rotor, I sometimes use a homemade puller similar to the factory one. I made it from old unnecessary pieces of hardware, and it works no worse than the factory one.
If you don't mind the money, you can buy yourself a factory one. It is inexpensive and easier to operate than a steamed turnip: insert the pins into special holes in the rotor, rest the lever on something and calmly unscrew the nut. By the way, such clamps are sold not only in spare parts stores, but also in power tool stores.
In power tool stores, traders position this device as a universal wrench for loosening nuts on angle grinders (angle grinders). It’s called: “universal wrench for angle grinders.” It costs only 160 rubles, and the original, supposedly “correct” one costs 350 rubles.
If you buy the same one for yourself, immediately cut its pins, otherwise they are very long in stock and can damage the generator windings during operation.
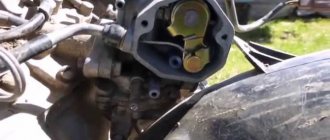
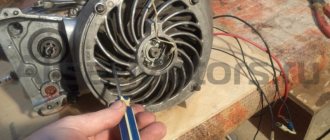
We examine the scooter from all sides to see if there is a generator on it, remove the casing and cooling impeller from it.
Unscrew the bolts and remove the impeller from the rotor.
Let me digress a little: do not lose the bolts that secure the impeller to the rotor, but it is best to immediately remove them. I had the opportunity to repair a scooter, the owner of which lost the original bolt and tightened another one in its place, but it turned out to be a little longer and broke the windings when starting the engine.
The bolt was only a few millimeters longer than the original one.
We fix the rotor and unscrew the nut. As I already said: in my work I sometimes use homemade tools, in this case a puller.
We unscrew the nut and remove it together with the washer from the rotor. If the puck is not there, then someone has already managed to dig around there before you...
The principle of operation of ignition in a 4-stroke scooter engine
Modern scooters are equipped with contactless systems. They are considered the most reliable and easy to use, do not require complex connections, and provide a constant good spark on time. However, the setting is still important; even the presence of a spark does not always allow the fuel mixture to ignite, since its power also plays a role.
The main reasons for the operation of the ignition system are quite simple: its task is to create a spark to detonate the fuel mixture. If this does not happen, you need to carefully examine each node and find out why the spark disappeared.
Broken ignition is the cause of engine failure
An incorrectly configured or faulty ignition often causes engine failure. It would be wrong to immediately climb into the cylinder and examine the insides of the scooter, especially since this will not solve the problem. Before touching the ignition system, you need to check for other reasons why the scooter may not work.
Factory puller
The rotor can be removed using either a factory puller or a homemade one. The option with a factory and homemade puller has its pros and cons. I'll start with the disadvantages of the factory puller.
The main disadvantage of a factory puller is its price. A factory puller is very, very expensive. About 500-600 rubles. But price is essentially not a very important criterion for me. Versatility, reliability, ease of use and durability are much more important to me. Unfortunately, the factory puller does not have all these advantages, except perhaps ease of use.
The versatility of the factory puller is zero and, unfortunately, it is only suitable for a certain series of engines. And if you need to repair a scooter that is not widely used in our country, then you will also have to buy a new puller for it. And this will be very, very difficult to do, since tools for rare models of scooters are as rare on sale as spare parts.
The reliability of the factory puller is extremely low. I won’t say that the problem is in the design itself, rather the opposite: the design is more than perfect. Where else could it be more perfect?.. Nut + bolt - that’s its entire design.
But the quality... There is something to discuss here. The quality of factory pullers leaves much to be desired. They are enough for literally several times, and I’m talking about expensive pullers for 500-600 rubles.
Cheap ones at 220-250 rubles in terms of quality are completely out of the question. Not only are they made of some kind of plasticine, but even this seems not enough for the manufacturer of this shit. He still manages to make them thinner or even thicker than necessary.
This is what the cheapest puller looks like, or rather, what’s left of it: a bolt from it is lost somewhere. It was used only once - the thread was immediately torn off, both on the puller itself and on the rotor, although before using this guan it was good there.
And even if you imagine the situation. that I will be able to buy a good branded puller, even if it costs 1,500 rubles, but it costs about that much. So where do I put the tusks (or rather, where can I get away from them???), who kill the threads under the puller and then, with an innocent look, roll their garbage dumps to me for repairs?
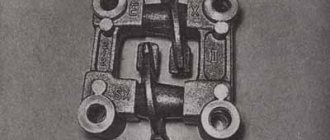
This is what a high-quality factory puller looks like. Their prices are real - from 500 rubles and above.
Cons are minuses, but the factory puller also has its advantages. One of which is ease of use. And it is really convenient and easy to use. What's inconvenient about that?.. Screw it into the rotor, tighten the bolt and the rotor itself jumps into your hand.
Conclusion
Don't be afraid of the ignition system. It’s easy to set up, the main thing is to check the entire circuit; much more often it fails, there is no gasoline or the spark plug needs to be replaced. Only after making sure that there are no physical malfunctions should you start setting up the ignition. If it is set correctly, you will hear and notice, as the engine will start easily and run smoothly.
Typically, new scooters have proximity ignition systems. If there is a spark, this does not indicate that the system is working, because there may not be enough power to ignite the mixture of electric charge.
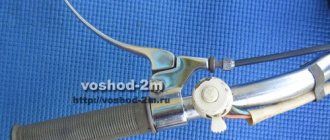
To check the spark, unscrew the spark plug and, without removing it from the cap, lean it against the metal part of the scooter and start turning the starter. At this moment you need to hold on to the cap, because if you hold on to the candle itself, you may receive an electric shock; the voltage can reach up to 40 thousand volts. To find the problem and adjust the ignition system, use a new spark plug and a multimeter. Install a new (working) spark plug and use a multimeter to check that there is electrical contact between the engine and the frame.
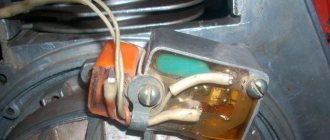
The generator is an important element of the ignition system. Disconnect the wiring from the generator with the following resistance measurement between ground and wire. (black wire with a red stripe), this is necessary to measure the resistance of the ignition coil supply circuit. Resistance can be called normal if it reaches 80-150 Ohms. And if there is no resistance or the resistance is below normal, this means that the generator is not working properly. 1 more way. First, you need to disassemble the generator and connect a multimeter to the coil terminals, because one of them is soldered to the magnetic core. This will help you pinpoint the problem. If the resistance measurement shows a normal result, then the fault must be looked for in the wiring or at the connection point with the coil.
Also, if the generator is correct, check the integrity of the wiring. To do this, you need to connect the multimeter to 2 points (to the terminal blocks: 1. switch; 2. ignition coil and to the block connected to the generator). After you have checked the integrity of the wires, they need to be shorted. If the entire circuit from the generator to the wiring terminals and to the ignition unit is intact, then the ignition unit may have become unusable.
Homemade puller
Unfortunately, homemade, just like factory-made, is not without its drawbacks. It is moderately reliable, versatile, and cheap, but it is not so convenient to use, and if you do not know how to use it, you can easily break the threads under the bolts of the cooling impeller.
Which puller you will use is up to you to decide. I have described all the pros and cons of both options for you.
For myself, I chose the option with a homemade puller. And the price has nothing to do with it. It's all about experience. Over the years of work, I tried a lot of things and eventually came to the conclusion that there is nothing better than a homemade tool puller.
I made my puller in literally an hour, if not less. I bought the largest washer that was available in the store, welded a smaller washer into its center, and welded a regular nut into the center of the small washer.
I screwed a bolt from a regular car puller into the nut, attached the washer to the cooling impeller, marked points with a pencil through the holes for the bolts, marked and drilled the holes.
If you don’t want to make a puller, buy a factory one at the store or ask your friends. Just before purchasing, just in case, remove the cooling impeller and look at the condition of the thread.
Generator brushes: what function do they perform?
When in contact with the slip rings located on the rotating rotor shaft, the generator brushes transmit current from the battery to the rotor field windings. This is how an electromagnetic field is created.
Under the influence of the alternating magnetic field of the rotating rotor, an electromotive force is induced in the coils of the stator windings and an alternating electric current is created. The current passing through the diode bridge (rectifier block of the generator) is converted into direct current. This is exactly what is needed to recharge the battery and ensure the functionality of the car’s electrical equipment.
Removing the rotor
Insert the bolts into the required holes. We take the bolts from the cooling impeller - they fit there perfectly. In order not to touch the windings, we screw restrictive nuts onto the bolts - they will not allow the bolts to go deep inside the generator.
We apply the puller to the rotor and screw the bolts into the holes. In order not to break the thread, slightly tighten the central bolt and see if all the bolts are tight. If any bolt is loose, tighten it.
This way we will evenly distribute the load between the bolts. If you neglect this moment, the entire load, unnoticed by you, can rest on only one bolt or two, and then they will break out of the rotor along with the thread. We don't need this, of course.
Now the main thing: what is there, you cannot tighten the central bolt by force. In this case, excessive force will not achieve anything. Everything must be done slowly and competently. Otherwise, you will tear the puller out of the rotor along with the roots, and then your budget will become completely financially insolvent.
You only need to remove the rotor this way: Lightly tighten the central bolt of the puller with a wrench, lightly hit the end of the central bolt with a small hammer - the rotor, usually, after the first blow, flies off the cone without talking, if it doesn’t fly off, pull the bolt again and hit again.
I learned this technique back in 1996, when I had the opportunity to remove the reel drive pulley of the Kolos combine harvester from the shaft. If it weren’t for one smart person who promptly told me how to work with a puller correctly, then I would have smashed both the pulley and the puller and the sledgehammer along with the combine...
The rotor sits on a key. If you do not plan to further disassemble the engine, leave it as is. And if you plan, you better get it, otherwise you’ll lose it.
A broken key can be easily removed with small pliers; if the key fits very tightly, leave it, it won’t get away from you.
So that you don’t have to guess later how your stator was positioned, we put marks with a core or take a photo, remember it, or do something else. This is necessary in order to protect yourself from problems with a lost outline.
We adjust the contactless ignition system
The contactless system operates through a sensor, switch, primary and secondary ignition windings. When the rotor with magnet closes the sensor, it sends a signal to the commutator, which, in turn, begins to accumulate current from the generator and transmit it to the primary winding. At this moment, high voltage appears in the secondary ignition winding. Its purpose is to ignite the spark. If there are any malfunctions listed above, adjustment is carried out by simply aligning the crankcase and ignition marks; to do this, remove the valve cover. The next steps are:
- We disassemble the crankcase in accordance with the technical description for your car.
- A mark is made on the rotor and crankcase at the dead center position of the engine in a place convenient for viewing.
- By rotating the crankshaft, we achieve a spark, make a mark on the crankcase relative to the mark made on it in the MTD. The difference between these marks on the crankcase is the ignition timing.
- Unclench the stator mounting bolts and set the advance angle corresponding to the technical documentation.
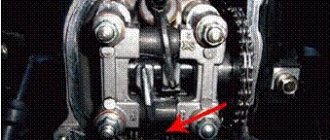
It is important to ensure that two of the three holes in the gear for the chain are at the level of the cylinder, and the remaining one is above the plane in which the cylinder and the mentioned holes are located.
How to set the ignition on a scooter and find out if it is functioning correctly? What to do if you decide to adjust it? The answers to these and many other questions related to the ignition of scooters, walk-behind tractors, and mopeds can be found out by reading the following article.
Outline
It happens that when installing it back, the stator is installed in reverse, and then depending on your luck: everything may go without consequences, or the spark may disappear or interruptions may appear. To avoid this, any, not just CDI-type scooter generators must be installed exactly as they were originally installed. If you follow this golden rule, you will be happy.
We unscrew the bolts.
We remove the stator. Installation of the generator is carried out in reverse order.
Replacing scooter generator brushes
If the scooter has problems with a poor battery charge, a weak spark, or there is a breakdown in the electrical system, then it is highly likely that the vehicle's generator will have to be repaired.
There may be several reasons for the failure:
1. Short circuit;
2. Violation of the integrity of the wire;
3. A sharp drop in the magnetization of the generator rotor.
The decrease in rotor magnetization is due to objective factors, typical of which are:
* The scooter enters a high magnetic field area.
Under these impacts, a significant drop in the output current of the generator often occurs, which leads to the impossibility of further operation of the scooter. But a more objective picture emerges only when a competent diagnosis is carried out.
Is it possible to restore brushes?
In emergency situations, when you can’t count on help, you can use the advice of experts on emergency restoration of the brush assembly. However, reliable operation of the brush assembly can only be fully ensured by using high-quality spare parts recommended by manufacturers. Recovery is always a temporary solution; As soon as the opportunity arises, you need to go to the service center.
The procedure for replacing brushes, despite its apparent simplicity, requires certain skills and special knowledge. Therefore, it is better to go to a car service center, where diagnostics and maintenance of your car’s electrical equipment will be performed quickly and with a quality guarantee.
Source