Your iron horse may need repairs to your motorcycle fuel tank at the most inopportune moment. It may not be suitable due to the situation, if the motorcycle stopped working in the middle of the road, or it may not be suitable due to the financial component.
Service services can cause a lot of damage to the budget, and therefore many people ask the question: is it possible to repair a motorcycle gas tank with your own hands? The answer is yes, it is possible to repair a motorcycle tank yourself. But in order to get started, you need to determine what the cause of the breakdown is and how it needs to be eliminated. The following options are possible:
- use of welding (suitable if the damage was caused by a mechanical shock);
- cleaning the gas tank (unfortunately, blockages often cause breakdowns);
- cutting new threads into working holes.
How to repair a dent on a tank?
If the cause of the breakdown is mechanical damage, which may occur due to a fall from a motorcycle or an accident, you will encounter a dent on the tank. This nuisance is not uncommon, because, as you know, those who do not drive do not fall. Repairs at a service center can cost quite a large sum, but there is an opportunity to avoid expenses by repairing the motorcycle tank yourself. First of all, you need to assess the damage. Determine the surface that we will subject to deformation and clean it of paint. There is a special tool for straightening dents - a reverse hammer. However, if you don’t own it, don’t want to buy it, and can’t borrow it from anyone, that’s okay. There is an alternative way. To implement it, let's start with the fact that we need a braided steel cable. You need to unravel about five centimeters and tinning. The dent also needs to be tinned. Afterwards, part of the unbraided cable needs to be soldered to the part of the tank that we need to straighten. And then it’s all a matter of brute force, the main thing is to act carefully: pull the rope. This can be done either evenly or in jerks.
After repairing the damage, all that remains is to get rid of the solder.
Now, you need to prepare the motorcycle for painting. To do this, you must clean the surface of the tank, level it, prime it, and actually paint it. In some cases, welding cannot be avoided to repair a motorcycle tank. If you make them yourself, never forget about safety!
Even if the gas tank is now empty, gasoline vapors may still accumulate in it. Therefore, before using welding, be sure to rinse the container and dry it.
Simple trick
Rice. 4. This is how the pads are installed
Motorcyclists have a lot of difficulties installing brake pad springs. To facilitate the installation of the pads, we recommend using this technique. First, insert the bent ends of the springs into their holes, then rest the ends of the pads against the disc pin and the release cam and press them with both hands onto the brake disc, as shown in Fig. 4.
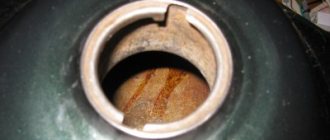
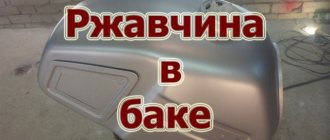
Rust: why does it occur and how to get rid of it?
Another cause of failure may be rust or blockage. The main reason for blockages in the tank is low quality gasoline. Corrosion is often the result of improper operation. You can get rid of it using epoxy resin. This method is the simplest and most effective, and therefore the most common. In order for this method to be fully effective, you need to perform all the steps correctly. First, you need to remove the tank and remove any remaining gasoline from it. Remove all parts from it. Next, we need to get rid of gasoline vapors. Why do you need to blow out the tank with compressed air? Now, leaving the filler neck, we need to plug the remaining holes.
Rinse the gas tank with solvent and leave until dry. While it's drying, we can prepare the epoxy resin. As soon as the tank is dry, pour it into the gas tank. Using rotational movements, within two to three minutes we distribute the resin over the entire inner surface of the tank, after which we pour out its remains.
Now, you need to let the tank dry. On average, this will take about two hours, however, this is an individual process, and it can take up to a day.
After drying, all that remains is to assemble the tank.
But what to do if the insides of the tank are already covered with rust? And why is this happening? Let's start with the reason. The main source of corrosion results is sitting the motorcycle without riding with a half-empty tank. This danger arises due to the fact that it is not possible to ride a motorcycle all year round. It is used for only a few months a year, the rest of the time it sits idle. In the case of a long period of inactivity with a half-empty tank, most of it does not interact with gasoline, and in the intervals between winter and summer, temperature changes are by no means a rare phenomenon. As a result, water vapor forms on the walls. Therefore, if you want to protect your motorcycle from rust, knowing that your iron horse will have a long downtime, fill the tank full.
The cause is clear, but how to deal with the consequences? This depends primarily on the amount of rust covering the walls. If there is a lot of it, then you can resort to the following method. For it we need some nuts. If you don’t have them, you can replace them with other parts, the main thing is that they are not pointed. So, pour the parts inside the gas tank. Now you need to fill them with gasoline. Then, after closing the tank, shake it thoroughly for five to ten minutes. Then pour out the resulting mixture. It wouldn’t hurt to do another wash, but this time just with gasoline. This method will not clean the tank completely, it will only remove large parts of the rust. If the rust deposit is small, it can be removed using a specialized product.
This type of rust control has one drawback - these substances penetrate quite deeply into the tank, which can affect the tank's painting. There are also non-standard ways to get rid of rust. For example, there is quite a lot of talk now about cleaning with Coca-Cola. This is possible due to the content of orthophosphoric acid in it.
When saving your tank from rust, do not forget about your own safety. Rust converters contain acids that affect our skin, so never ignore rubber gloves while working. There is another popular method for cleaning the tank. It is based on electrolysis.
First, let's prepare a solution of water and soda; for two hundred grams of salt we will need twenty liters of water. Pour the resulting mixture into the tank. Now, you need a 12 V battery. The wire from the positive anode must be placed in the tank. It should not touch its walls. We connect the negative anode to the gas tank body. Ready. Now you need to leave the tank. In a few days it will be free of rust.
Candle “tap”
Rice. 1. Tap candle
A tap is used to calibrate damaged threads in the hole of the spark plug head or to remove carbon deposits. But, since the thread is special (14X1.25), it is not easy to find a suitable tap. In these cases, it can be successfully replaced by an old candle with a long threaded end. The insulator is removed from it, and the threaded section is sawed into four parts with a hacksaw (Fig. 1). The tops of the first threads of the thread are filed down a little - and the “tap” is ready. After lubricating the thread with liquid oil, screw it into the head using a spark plug wrench.
Of course, this can only be done with the head removed, so that chips and carbon deposits do not get into the cylinder.
Five random articles about motorcycles:
Return conditions and procedure
All purchased goods presented in our store are subject to the manufacturer’s warranty, subject to the Buyer’s compliance with the operating instructions. When receiving motorcycle spare parts, you need to check the product for visible defects, otherwise complaints about the appearance of the product that are discovered later will not be accepted. When returning or exchanging goods, the Buyer must have with him a receipt of payment confirming the fact of purchase of the goods. The product must retain its presentation, original packaging and consumer properties. The buyer must notify the seller by email or telephone of his intention to exchange or return the product. Auto parts without boxes and without fasteners (bolts or nuts, centering rings) if included, depending on the configuration, are not accepted for return. Guaranteed obligations.
Java Energy Supply
Hub repair on Dnepr motorcycles
Repairing the hub Motorcycles from the Kyiv plant use cast aluminum alloy wheel hubs. They are light and comfortable, but the holes for the spokes become elliptical over time, and then you have to tighten the spokes very often so that they do not tear. Motorcyclists who ride a lot on bad roads sometimes even replace all the spokes with a solid disc. This, of course, is not the best solution. I offer owners of Kyiv motorcycles a relatively simple, practice-tested method of hub repair. First, we remove four to six spokes, the sockets for which are subject to repair. Using an 8mm drill (or better yet, a finger end mill), we drill out the damaged holes. We cut a copper tube with an outer diameter of 8 mm and an inner diameter of 6 mm into pieces 12 - 14 mm long. We flare one end of the segments using a mandrel made from at least a beard or center punch. We place the resulting bushings in the holes of the hub and flare their second end, as shown in the figure.
Minsk MMVZ-3.112.1 and MMVZ-3.112.11 (Universal and Enduro)
Station wagon and Enduro The scope of motorcycles has recently shifted from highways, from the streets of large cities and is increasingly gravitating towards rural areas, small towns and villages. “Behind the Wheel” has addressed this problem more than once (1985, No. 7; 1986, No. 4 and No. and addressed it to the motorcycle industry. For our part, we, the workers of the Minsk Motorcycle and Bicycle Plant, based on the responses of consumers living in rural areas, felt that the time had come to develop a special modification for them, called enduro. Universal motorcycle MMVZ-3.112.1. Now our plant, along with the basic universal-purpose model (MMVZ-3.112.1), has also begun to produce its “rural” modification (MMVZ-3.112 .11).Both of them have retained the traditional advantages of the brand - simplicity of design and maintenance, unpretentiousness in operation and are largely similar in design. The two-stroke engine runs on a low-temperature mixture.
Motorcycle compatibility Voskhod 2 and Voskhod 2M
From “Two M” to “Two” When a year and a half ago the Kovrov plant named after V. A. Degtyarev began producing the Voskhod-2M motorcycle (“Behind the wheel”, 1978, No. 1), many owners of the “Voskhod” of previous models showed lively interest in replacing components of their cars with more advanced ones. Letters with questions about the interchangeability of the engine, electrical equipment, and front forks began to arrive both to the editorial office of the magazine “Behind the Wheel” and to the motorcycle manufacturing plant. The vast majority of them concerned Voskhod-2. The engine of the Voskhod-2M motorcycle can be mounted on all previous models of our plant, however, making certain replacements and alterations in the electrical equipment (more on this a little later). As for Voskhod-2, released after April 1976 (from that time on they were already equipped with an electronic ignition system), then replacing the engine does not entail any upkeep at all.
Source
Preparing for downsizing
Since you have assessed and also inspected your tank and also have a good understanding of the procedure ahead, the next step to figure out how to clean a rustic gas tank is the preparatory work.
◾Removal
You will need to remove your tank from the bike and drain any remaining petrol before you begin cleaning. If your bike has gas valves attached to the tank, you'll want to remove those as well. Disconnect all shutoffs, sensors, and lines from the tank, as well as the screws that hold it in place.
◾Connect holes
Next, you need to secure the fuel valve outlets and filler caps with silicone plugs or vacuum cleaner caps before inserting the diesel and spherical bearings. This is an important step that is also quite simple, so don't avoid it.
◾Check chemical volatility
Before pouring the mixing compound directly into the tank, you should test the chemical volatility or reaction of the chemical cleaner as well as the offending product. To do this, go outside and put a chemical agent, as well as an abrasive, in the dishes so that the acid does not damage.
There are very few opportunities for this, but it is still better to play it safe than to be sorry. You may spoil something or damage the inside of the container. You may also consume toxic substances. Remember that vinegar reduces the risk of a reaction, which is why it is often used.
◾Find a safe zone
Find fresh air as well as a well-ventilated area. When working with gas, chemicals and other products, it is important to work in an area with good air circulation.
As long as you're working with a mild acid like vinegar, the smell may not be that bad, but the fumes can cause nausea or vomiting, migraines, and potentially more serious health risks, so open your garage door if you don't. Have a well-ventilated space for this, go outside.
Safety Gear: Fodsports Bluetooth Motorcycle Communicator
High voltage indicator
Sometimes when tuning or repairing an engine, you need to know whether high voltage is being applied to the center electrode of the spark plug. For this purpose, either use various indicators, or, having disconnected the high voltage wire from the spark plug, bring it closer to the ground to make sure whether a spark jumps between the end of the wire and the ground. This check can be made easier. Cut the high voltage wire 5-6 centimeters from the spark plug, strip the ends and insert them into a glass tube 30-35 mm long so that there is a gap of 0.5 to 1.0 mm between them (Fig. 5). To observe the spark, paint the glass tube black, leaving a light strip 2-3 mm wide, through which the spark will be clearly visible. Wrap the connection points between the wire and the tube with insulating tape - this way the ends of the wire will be more securely fixed in the tube.
Tips for choosing and applying putty correctly
Motorcyclists for the most part very often choose those types of putties that they can afford. There is a wide variety of them on the modern market.
When choosing, it is very important to pay attention to the following:
Under no circumstances should putty be applied by hand. It is better to use a special tool for this purpose. With its help, the putty surface will be even and smooth. It will be possible to apply a layer of paint on it evenly.
Do-it-yourself motorcycle gas tank repair
Many motorcyclists experience dents appearing on various parts of their bikes. It is also not uncommon for a new coat of paint to be applied. This spectacle cannot be called pleasant. Immediately the appearance of the motorcycle becomes less attractive.
The gas tank very often suffers from mechanical damage. All sorts of dents and chips often appear on it, which are very difficult to correct. Moreover, to eliminate them you need to spend a lot of money, which not every motorcyclist has. Today, every owner of his own bike has a wide choice of means to bring his motorcycle’s gas tank into proper condition.
Very often putty is used for this purpose. You must be careful when using it. After all, it is very important to do everything in such a way that others do not even suspect that the dent on the tank was hidden with putty.
How to Use Putty to Level the Surface of a Motorcycle Gas Tank
Not many modern motorcyclists know how to properly putty a motorcycle tank. For many, this is a rather difficult process. Many people don’t even take up this task because they are afraid of cracks appearing on the surface of the motorcycle’s gas tank.
During work, you need to use putty correctly. Its main purpose is very often to be used for applying paint. It is used to level the surface. In order to hide all the irregularities or small dents, it can be applied in several layers. This must be done carefully using special tools for applying it.