During the operation of the scooter, various breakdowns occur. It doesn’t matter at all who the manufacturer is (Japan or China). The difference is that one vehicle breaks down earlier, while the other breaks down over time. Problems can occur with the wiring, engine, or chassis. But, as a rule, almost everyone is faced with replacing the CPG. This abbreviation implies the term “cylinder-piston group” or, as people say, “piston group”. Looking ahead, it must be said that replacing the piston, piston and rings separately is not as difficult a task as it might seem at first glance. It is also worth knowing that the process of removing and replacing the CPG is almost the same on all scooters. Therefore, the article will discuss the main points. Looking ahead, let us remind you that the power of the CPG can vary. It is recommended to install a piston engine with the same power as a standard CPG.
Preparatory moments
Before replacing the piston or rings (CPG in total), you need to get to the cylinder. For beginners who have no idea where this element is located, we will tell you. The muffler is just bolted to the cylinder. If you have no idea how to correctly install the piston on a 4t or 2t scooter, then first you need to remove the old CPG. The upcoming repairs can be divided into the following stages:
- Removing the scooter trim (plastic);
- Disconnecting electrical wires;
- Disconnect the oil hose;
- Engine dismantling;
- Removing the old piston, rings (CPG in total);
- Installation of new parts;
- Engine installation, wire connections and hose;
- Plastic fastener.
The plastic is folded to the side so as not to be crushed if careless. All bolts and screws are placed in a pile and, if necessary, sorted separately. After making sure that all hoses with gasoline and oil are disconnected, remove the engine. It is necessary to understand that engine removal differs depending on the design features of the scooter model. Once the engine is removed, you can begin to remove the plastic casing, which protects the CPG from external factors. Then remove the cylinder head. It is secured with 4 bolts. In order not to break the thread, all bolts are unscrewed crosswise.
We remove the cylinder and immediately inspect it. If there is no damage, then it can continue to be used. While the piston most likely cannot be used back.
Factory puller
The rotor can be removed using either a factory puller or a homemade one. The option with a factory and homemade puller has its pros and cons. I'll start with the disadvantages of the factory puller.
The main disadvantage of a factory puller is its price. A factory puller is very, very expensive. About 500-600 rubles. But price is essentially not a very important criterion for me. Versatility, reliability, ease of use and durability are much more important to me. Unfortunately, the factory puller does not have all these advantages, except perhaps ease of use.
The versatility of the factory puller is zero and, unfortunately, it is only suitable for a certain series of engines. And if you need to repair a scooter that is not widely used in our country, then you will also have to buy a new puller for it. And this will be very, very difficult to do, since tools for rare models of scooters are as rare on sale as spare parts.
How to properly install a piston on a scooter
The new piston is equipped with a pin, two retaining rings and additional rings. If the scooter is 2-stroke, then the number of additional rings is 2. In 4-stroke engines, 3 rings are almost always installed, one of which is an oil scraper ring. Let's look at installing a piston and rings using the example of a 2-stroke scooter. First, two compression rings are placed on the piston in special grooves. Next, we use the so-called “finger” to connect the piston and crankshaft; the fastener is considered complete after installing 2 retaining rings on both sides of the finger. The rings should fit tightly in the intended holes. Remember: the arrow on the piston should point downward, towards the floor. The “processes” described above are not complicated if you look at them. It is best to watch a training video or read the scooter maintenance instructions. Then, for sure, questions like “How to install rings on a scooter piston” will not arise.
Cylinder installation
This is the final stage and must be approached with caution. After all, if the fastening is incorrect, the slightest gap will not provide the necessary compression. As a result, the scooter will not start. Install a gasket between the engine and the cylinder, and between the cylinder and its head. The head is clamped with bolted connections crosswise. It is easy to check the correctness of the work performed. To do this, you need to start the engine. If the motor runs smoothly, everything is done correctly. You can also make a few efforts with the kick starter to feel the compression.
As you have already killed yourself, there is nothing complicated. Installing rings on a scooter piston and replacing the CPG in total do not require any special knowledge. All you need are details, time and desire.
Help
Need help finding spare parts?
We will help and advise!
+7-927-653-31-57
Gradually the time comes and your two-wheeled four-stroke friend needs to change the piston. There may be 2 reasons for this: wear or installation of a more powerful piston. In this article we will tell you how to replace the piston (CPG) on a 4-stroke scooter with a 139QMB engine.
If you have a different engine model, for example 152QMI or 157QMJ (150 cc scooter), then this article will also suit you to replace the CPG, since there are no fundamental differences. For 2-stroke scooters, we recommend reading the article “Replacing the piston on a 2-stroke scooter”
Read also: Nissan skyline gt r kpgc10
We will describe the process gradually step by step. First of all, we need to remove the plastic that prevents us from getting to the engine.
The next step is to unscrew and remove the carburetor (In this case, it is not necessary to disconnect all the hoses from the carburetor, but simply move it to the side).
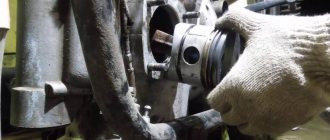
We unscrew the muffler at the place where it is attached to the cylinder head and at the place where it is attached to the engine crankcase (2 long bolts). Now remove the muffler.
The next step is to unscrew the plastic cylinder head cover. (2 halves connected by two screws) After this, remove the cylinder head cover by unscrewing the 4 bolts. We unscrew the chain tension regulator, which is located near the carburetor.
Next, you need to unscrew the 4 cylinder head nuts, after which we can remove the cylinder head. When we removed the chain tension regulator, we freed the chain and can easily remove it (after we removed the chain from the camshaft, it is necessary to secure it, for example with a wire, so that it does not fall into the engine crankcase)
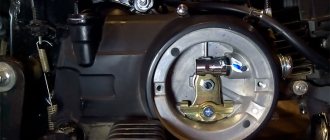
In this photo the head has not yet been removed, but only the camshaft has been removed and the chain is fixed. The next step is to remove the cylinder from the studs. If problems arise with this, you can lightly tap with the wooden part of the hammer on all sides of the cylinder.
We put the piston in the top dead center position (the highest position of the piston, we are guided by the marks on the generator rotor.) It is necessary to ensure that the chain does not fly off the drive sprocket, so as not to mess with installing it in the reverse position. Take a clean rag and cover the hole in the engine crankcase to prevent any debris from getting into it. Remove the retaining rings from the piston and thereby free the pin (here you can use round-nose pliers or small pliers.) Remove the pin using a small wooden block (while trying not to create a load on the crankshaft connecting rod). This completes the process of removing the old cpg.
We take a new piston kit for 72 or 80 cubic meters (piston diameter 47mm or 50mm, respectively). You can, of course, use a standard new 50 cc CPG. The kit includes: cylinder, piston, piston rings, pin, retaining rings, as well as head and cylinder gaskets. You can buy a 72 cc cpg at a low price in our online store.
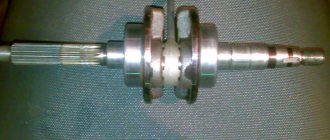
Installation is carried out in the reverse order, having previously lubricated the cylinder, piston and rings with a small amount of oil. We first install a thin ring on the piston in the lower groove, then an oil scraper ring and again a thin ring (the wavy ring - the oil scraper ring will thus be between the two thin ones in the lower groove). Next, install 2 compression rings (which are thicker). The cuts of all rings should not be located on top of each other. After installing the rings, place the piston on the crankshaft connecting rod, fix its position with a finger and locking rings. We take the connecting sleeves from the old cylinder and insert them into the new one.
We put a gasket under the cylinder on the studs. Carefully place the cylinder on the piston with rings so as not to damage the cylinder. We push the chain into the groove for the chain. Then install the chain bar on the cylinder head. Now we can put the chain on the camshaft sprocket (the position of the sprocket should be as follows: a large hole at the top, and two small ones on the sides, parallel to the edge of the cylinder head). We fix the position of the cylinder head with the gasket by screwing it on. Then we install the plastic cylinder head cover, chain tensioner, carburetor and muffler. The installation is now complete!
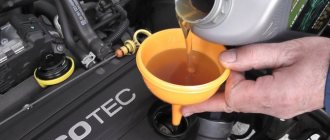
If you haven’t changed the oil for a long time, you need to change it before starting with a new piston. Before putting a full load on the scooter engine, it is necessary to run-in, i.e. drive 300-500 kilometers at a speed of no more than 40-45 km per hour.
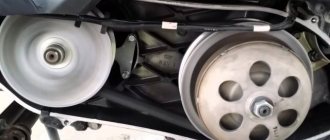
Along with an increase in the power of the scooter with the installation of a tuning cpg, the load on the variator with the gears of the gearbox also increases. Remember this and if possible, replace the variator with gears with tuned ones (more reinforced.)
Comments • 37
Buy 2 scooters 50 and 150 cc. And make one of them.