The cylinder-piston group (CPG) of a scooter engine is the same replaceable part of the vehicle as any other. Metal fatigue under natural operating conditions, road accidents and other unfavorable situations lead to the need to replace pistons. The ability to move stably directly depends on the serviceability of the element:
- the presence of pistons in good condition allows you to start the engine without sudden heating;
- the optimal level of pressure in the internal combustion engine allows fuel to be consumed in normal quantities;
- The amount of emissions into the atmosphere through the exhaust pipe also depends on the serviceability of the pistons.
Changing your scooter's CPG reduces oil costs and increases the overall life of the vehicle's engine. It is especially important to watch for signs of needing repairs during particularly active trips and temperature changes.
To fix a broken piston group, you will need to open the scooter, which is carried out in a standard sequence for almost all brands and models with minor differences in design. Many users carry out repairs without taking into account small parts, which is why piston rings and valves quickly become unusable. The following instructions will help you carry out all work safely and efficiently.
How to properly install a piston on a scooter?
During the operation of the scooter, various breakdowns occur.
It does not matter who the manufacturer is (Japan or China). The difference is that one vehicle breaks down earlier, while the other breaks down over time.
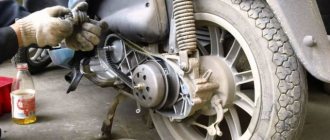
Problems can occur with the wiring, engine, or chassis. But, as a rule, almost everyone is faced with replacing the CPG. This abbreviation implies the term “cylinder-piston group” or, as people say, “piston group”. Looking ahead, it must be said that replacing the piston, piston and rings separately is not as difficult a task as it might seem at first glance. It is also worth knowing that the process of removing and replacing the CPG is almost the same on all scooters. Therefore, the article will discuss the main points. Looking ahead, let us remind you that the power of the CPG can vary. It is recommended to install a piston engine with the same power as a standard CPG.
Installing the timing chain tensioner
If you have a 157QMJ series engine, do the following: unscrew the plug on the tensioner body; We insert a thin flat screwdriver into it and begin to tighten the bolt until the tensioner rod goes inside the body.
Without releasing the screwdriver while simultaneously holding the tensioner body, with your free fingers, insert the tensioner into the cylinder, screw it in with bolts, and only then release the screwdriver and screw the plug into place.
If you have a 139QMB series engine, then do this: unscrew the plug from the tensioner housing and remove the spring; push the rod inside the body; install the tensioner in the cylinder; insert the spring into the housing and screw in the plug.
After installing the piston, do not forget to adjust the thermal clearances of the valves and break in the engine.
Downloading a book
After successfully completing the payment (by any method) and returning to the KrutilVertel store from the payment system website, you will be taken to the successful payment page:
The book you purchased will be in your personal account, from where you can always download it.
Please note that after making the payment, you need to return back from the payment system website to the KrutilVertel website. If for some reason you did not return back to the site and closed the payment system tab with a message about the successful completion of the payment, please let us know - we will send you a letter indicating access to download the book
If for some reason you did not return back to the site and closed the payment system tab with a message about the successful completion of the payment, please let us know - we will send you a letter indicating access to download the book.
How to install a piston on a scooter: remove the old one, install a new one
Getting to the piston cylinder will be easy if you follow the instructions. You need to start by removing the plastic lining of the scooter, and then disconnect the wires. The oil hose is disconnected, and the motor itself is removed by unscrewing the fasteners
The plastic cover should be set aside so as not to crush it due to careless movement.
To get to the piston, you ultimately need to remove the cylinder head, and then the cylinder itself.
Dismantling the piston itself is carried out in the following sequence:
- remove the CPG mounting bolts along with the head and gasket. Each bolt must be unscrewed in a criss-cross manner (diagonally) to avoid damaging the threads - installing the piston back requires using the same method. This will also prevent unwinding without the participation of the owner;
- directly dismantling the cylinder using upward movements - if you can’t pull it out, it is recommended to knock with a light wooden object. The product may become stuck due to the deposits listed above;
- turning the crankshaft for maximum piston lift. Be sure to cover the crankcase hole with a rag to prevent dirt from getting inside;
- you need to remove the retaining ring in order to remove the piston pin;
- In case of jamming, you need to use liquid to remove carbon deposits. An alternative is carburetor cleaner. As a result, after soaking, all plaque is easily removed, similarly with rings;
- cleaning ring grooves.
Step-by-step video on how to remove the piston from a scooter:
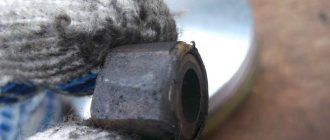
You will need to inspect the needle bearing for signs of burning, indicating wear of the part. If they are, a change is required immediately. Installation of a new CPG will not be effective for long in the absence of proper care.
Needle bearing
You should also pay attention to the following factors:
- if there is displacement of the needles inside the cage, the product as a whole is unusable;
- violation of geometry also indicates the need for replacement;
- There should not be much play when moving in the upper head of the connecting rod. In normal condition, the bearing simply moves freely.
As a result of changing the needle bearing, you can install a new piston for the scooter. Installation is carried out in reverse order. Several features of the procedure must be taken into account:
- Each new piston is supplemented with two rings (retaining rings), which allow the structure to be securely fixed. For four-stroke engines, the number of rings is already three due to the presence of an oil scraper ring;
- everything must be placed so that the rings and cylinder converge in the groove for reliable operation under any load;
- You should not put the plastic back before checking the functionality of the scooter;
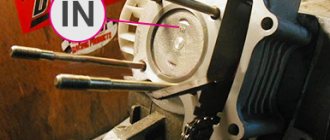
- the upper part of the cylinder is indicated by the word “IN” on the cover - this way you won’t be able to confuse the direction;
- The inscription “EX” (exhaust) on the cover should be directed towards the exhaust port. Another option is to draw an arrow (it means the same thing). This factor depends on the specific scooter manufacturer.
Repairs can be carried out using a special kit containing all the necessary tools:
- piston ring remover (pliers);
- piston groove cleaning device;
- L-shaped screwdriver.
All this can be found separately. The main thing is to follow the dimensions that will suit a specific scooter model.
Step by step video on how to install a new piston on a scooter:
Cylinder installation
This is the final stage and must be approached with caution. After all, if the fastening is incorrect, the slightest gap will not provide the necessary compression. As a result, the scooter will not start. Install a gasket between the engine and the cylinder, and between the cylinder and its head. The head is clamped with bolted connections crosswise. It is easy to check the correctness of the work performed. To do this, you need to start the engine. If the motor runs smoothly, everything is done correctly. You can also make a few efforts with the kick starter to feel the compression.
As you have already killed yourself, there is nothing complicated. Installing rings on a scooter piston and replacing the CPG in total do not require any special knowledge. All you need are details, time and desire.
Installing piston rings
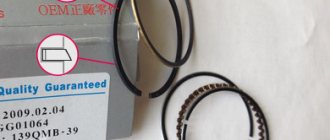
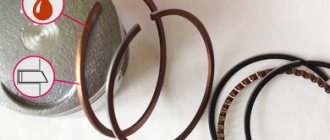
Remove the set of piston rings from the box. A piston ring set for a Chinese four-stroke scooter usually consists of five items. Three of which are a single assembled oil scraper ring, the other two: upper and lower compression.
A typical set of piston rings looks something like this
Or so
Carefully unpack the kit with perfectly clean hands.
In the kit you will find two of the thinnest rings and one thick corrugated ring (expander) - this will be an assembled oil scraper ring that needs to be installed on the piston first.
We place an expander in the lowest groove of the piston
We place thin oil scraper rings in the same groove - one under the expander, the second on top of the expander
We find the lower and upper compression rings in the kit and install them, respectively, in the middle and upper grooves of the piston - with marks on the side surface to the cylinder head (cylinder head). The lower compression ring differs from the upper one in color (not always) and the shape of the working edge (always). In most kits, the lower compression ring is painted black, and its working edge has a slight bevel.
Tags
The top compression ring in the vast majority of piston ring sets is a uniform light color. But this is in most cases, but in practice it happens that the kit comes with upper compression rings that are black or even red
By and large, the color is not particularly important to us, something else is important to us: the working edge of the upper compression ring has small roundings (chamfers) on the sides, and the working surface of the edge of the upper compression ring is covered with a shiny protective coating
For example, in this kit both compression rings are black. But the working surface of the upper compression ring is covered with a layer of protective coating, and small chamfers are removed on the edges of the working surface.
The lower compression ring has a matte working surface, and the working edge is beveled at a slight angle. All these moments are clearly visible in the photo.
The compression rings in this kit are red and black. As in the first case, the upper compression ring has chamfers on the working edge and a protective coating, and the lower one has a matte working edge beveled at an angle.
On classic piston ring sets, the upper compression ring has a light color and a rounded working edge. The bottom is dark in color and the working edge is beveled at a slight angle.
When installing the piston rings, do not forget about the marks. The marks on the rings after installation on the piston should be oriented towards the cylinder head (cylinder head).
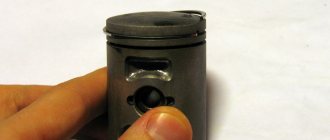
How to remove a piston from a scooter engine
Like it or not, after several thousand mileage (sometimes after several kilometers), the piston piston of a scooter wears out and requires replacement. By the way, on the scooter whose engine you see in the photo, the piston engine “traveled” only 700 kilometers and “quacked.” This happened due to improper engine break-in; the basic rules for engine break-in are described in detail in the article: Proper engine break-in of a scooter
You can, of course, remove the piston without “rolling out” the engine from the frame, but this is not entirely convenient, it is easier to work with the engine when it is lying on the table, especially since the time spent on “rolling out” the engine from the frame can be more than compensated for by convenience and therefore speed - quality of repair.
The engine has been removed and is completely ready for use.
We remove the muffler, carburetor together with the intake manifold, and also remove the cooling casings and valve covers. Unscrew the chain tensioner
Pay attention to traces of oil leakage between the head and the cylinder (marked with an arrow), this is due to the deformation of the plane of the head, a little more and the gasket would have burned out, how to fix this problem is written in the article: Modification of the cylinder head of a scooter engine
Unscrew the four nuts on the camshaft bed
Unscrew the two bolts on the head
We remove the camshaft bed, do not lose the guide bushings; there are two of them.
Remove the chain from the camshaft sprocket and remove the camshaft from the bed
We remove the head without losing the valve bed guide bushings (marked with arrows)
The valves on this head “ask” to grind them in, as it is written in the article: How to grind the cylinder head valves of a scooter engine
The cylinder also has four guide bushings: two on the bottom, two on top - don’t lose them
We remove the cylinder and cover the holes in the crankcase with a rag, try to position the rag so that the chain rests on it, and not on the dirty engine crankcase.
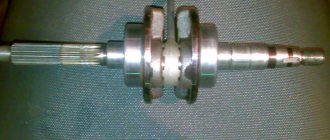
Using round-nose pliers, remove the retaining ring in the piston boss, push out the piston pin and remove the piston.
In custody
Tuning lovers should reveal a little secret: the 157QMJ engine can be equipped with a larger displacement piston 170 CC, such tuning will undoubtedly increase the power and dynamics of your scooter - proven!!! How to do such tuning is written in the article: Installing a piston 170CC instead of the standard 150CC on a scooter
scooter-mania.ru
How to extend the life cycle of CPG
It is not recommended to drive the scooter at maximum speed for long periods of time (especially in hot weather). This can lead to thermal seizure, which leads to deformation of individual parts of the CPG. As a result, the highest speed of the vehicle will be unattainable due to the loss of pressure inside. When disassembling the structure, the sticking is easily determined by the presence of burnt parts in the form of tongues. Carburetor adjustments will be required to prevent deposits from forming in the muffler and combustion chamber and overall loss of power.
It is necessary to fill in high-quality motor oil that gives a positive effect:
- no noise from the engine;
- no overheating of the motor during prolonged operation;
- relatively clean exhaust and a pipe for the exit of gases.
The best option is synthetic oil, which has the advantage of efficiency, the absence of carbon deposits in bearings, deposits on the piston crown and other unpleasant consequences. Similarly, it is necessary to take a responsible approach to choosing fuel for a scooter. It is worth buying gasoline of the 95 type, which does not lead to detonation inside the combustion chamber, increasing the engine temperature.
After replacing the piston on the scooter, you can begin other types of work such as painting or changing other internals. Be sure to drive several hundred meters to ensure the reliability of the work done.
Preparation for the procedure
You need to start by cleaning the exterior of the scooter from dirt, sand, and dust. The work itself must be carried out indoors, where there is no risk of debris getting inside the mechanisms from the outside. Operations may be carried out outdoors, but subject to the following conditions:
- the air temperature should be 18-25 degrees;
- little or no wind;
- the presence of a flat, hard surface for repairs - concrete or asphalt are best suited;
- It is not recommended to open the inside of the scooter for at least two hours after turning off the engine for safety reasons.
For fastening, you will need to prepare a box with cells for each type, so as not to lose or mix up the varieties. The work may take about an hour depending on your skill level. If you lack experience, it is better to call another person for help and carefully record what was removed (and in what sequence) in order to reassemble the vehicle correctly after everything.
What will be needed for replacement?
For such a procedure, it is worth preparing a set of wrenches, a ratchet with socket heads, a torque wrench, a piston ring puller and the set of rings itself.
You may be interested in: Mishlene tires: brand history, popular models
The tool for mounting/dismounting piston rings has a simple design and affordable price. Without this device, the replacement process can turn into an almost impossible task. Of course, in the past, car enthusiasts made do with a couple of screwdrivers. But it is better to have such a tool, otherwise without it you can damage the rings or the piston surface. Moreover, it is always available in auto stores.
Replacing the piston
Note
:
The need to replace the CPG, as a rule, arises after it wears out due to long-term use or the use of low-quality fuels and lubricants, as well as due to the operation of a moped with an air filter that is not impregnated with special oil, or without it at all. Therefore, when replacing the CPG, it is imperative to diagnose the condition of the crankshaft and main bearings, since they may also need to be replaced. It is recommended to change the CPG as a whole, i.e. Along with the piston group, change the cylinder as well. During operation, the rings and cylinder wear out not evenly in a circle, but in an ellipse, due to the fact that the rings are pressed against the walls of the cylinder with unequal force. Therefore, it is not recommended to replace only the piston and rings if the need to replace them is due to wear, since an elliptical cylinder will not allow for normal compression with new (round) rings.
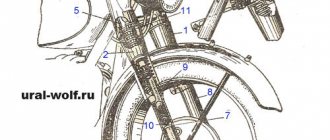
1. Remove the motor. Disconnect the battery ground wire. Remove the necessary body parts. Disconnect the power cable connecting the motor to the scooter's electrical system. Disconnect the high voltage wire and high voltage coil. Disconnect the automatic enrichment connector. Disconnect the generator wiring connector. Disconnect the fuel hose and vacuum hoses. Disconnect the accelerator cable. Remove the air filter housing. Remove the rear brake cable. Remove the rear shock absorber. After unscrewing the bolt securing the engine, remove it, see Figure 10. Carefully lift the scooter by the frame, see Figure 11.
Attention:
Check the condition of the silent blocks on the engine mounting brackets.
Rice. 10 Fig 11
2. Remove the air filter, muffler, generator and cylinder casings. Using a brush and a compressor, remove all dust from the cylinder; if necessary, wash the cylinder. Everything must be perfectly clean.
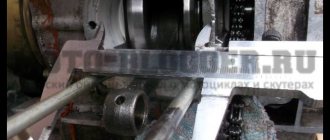
3. Unscrew the spark plug and unscrew the nuts (bolts) securing the cylinder head, see photo 12.
Photo 12
4. Remove the head and cylinder (if it doesn’t fit, you can carefully pick it up with a pry bar), see photo 13.
Photo 13
5. Be sure to place a clean cloth between the connecting rod and the crankcase walls to prevent foreign objects from getting into the crankcase, which can lead to damage to the crankshaft and piston group, see photo 14.
Photo 14
6.Remove the piston pin stopper and squeeze out the pin. It is not pressed in, it is simply installed a little “pull”, see photo 15
How to assemble a 4t piston system on a Suzuki Sepia moped
You need to arm yourself with a small syringe (preferably a medical one, its price is very low) and oil. The piston is installed on the scooter in stages.
The bearing is mounted, pre-lubricated with oil.
The cylinder, piston pin, rings and new piston must be washed with gasoline and blown with air from the compressor. Only after this should you begin installing them.
Installation of the rings must be done with great care, since the rings are very fragile and can be damaged. It is better to have several spare rings, since the price of one ring is low.
The motor is being mounted.
The piston itself is put on the connecting rod and the piston pin is inserted, after which the final stopper is installed. After installation, you need to check that the arrow on the piston points towards the muffler.
The cylinder, or rather its inner walls, are lubricated with oil, and a new gasket is put on. The stoppers are carefully matched to the ring locks. Now you need to squeeze the rings and put on the cylinder. The cylinder should fit tightly with some resistance; do not press on it with force; the rings may break. If this does not work, then you need to check the installation of the rings.
The cylinder head is installed and tightened through the gasket. The nuts are tightened crosswise by hand.
The following are installed on the scooter one by one:
- filters;
- motor;
- muffler;
- candles;
- casings.
All hoses and cables are carefully connected.
Before installing the air filter, it must be dried.
Now you need to start the engine and run in the 4t piston on the scooter. You should not do it at high speeds; this can lead to unpleasant consequences; the moped will have to be repaired again. Since the price of work in a workshop is quite decent, independent replacement of such a part as a piston on a scooter is relevant.
Replacing a piston (CPG) on a 4t scooter
Need help finding spare parts?
We will help and advise!
+7-927-653-31-57
Gradually the time comes and your two-wheeled four-stroke friend needs to change the piston. There may be 2 reasons for this: wear or installation of a more powerful piston. In this article we will tell you how to replace the piston (CPG) on a 4-stroke scooter with a 139QMB engine.
If you have a different engine model, for example 152QMI or 157QMJ (150 cc scooter), then this article will also suit you to replace the CPG, since there are no fundamental differences. For 2-stroke scooters, we recommend reading the article “Replacing the piston on a 2-stroke scooter”
Setting the valve timing ch2 (in collective farm style - ignition)
Without knocking the piston off from TDC, we orient the camshaft so that the large hole and marks on its sprocket become as shown in the photo and, while putting on the chain, install the camshaft in bed.
Ideally, the marks on the sprocket should be strictly parallel to the plane of the valve cover connector. In practice, unfortunately, such accuracy is difficult to achieve. And this is mainly due to the stretching of the timing chain. And there’s nothing you can do about it - either change the timing chain to a new one or catch the phase by switching the teeth, but this method of setting the valve timing is not acceptable to me personally.
Problems when paying with bank cards
Sometimes difficulties may arise when paying with Visa/MasterCard bank cards. The most common of them:
- There is a restriction on the card for paying for online purchases
- A plastic card is not intended for making payments online.
- The plastic card is not activated for making payments online.
- There are not enough funds on the plastic card.
In order to solve these problems, you need to call or write to the technical support of the bank where you are served. Bank specialists will help you resolve them and make payments.
That's basically it. The entire process of paying for a book in PDF format on car repair on our website takes 1-2 minutes.
If you still have any questions, you can ask them using the feedback form, or write us an email at [email protected]
How to correctly insert a piston into a cylinder. How to insert correctly. KakPravilno-Sdelat.ru
» How to insert correctly
DIY caliper repair
Anyway, yesterday I tried to tighten the cylinder onto the piston with new rings. I couldn’t find the sheet metal for the clamp recommended in the book - I tried to fit it in like that. Got laid and went home. Does everyone use tightening clamps made of tin, or has anyone else found a way out of the situation? And also, there is a large gap in the valve guides. If you change it, you have to hot press it in and then, due to misalignment, rip the seats, etc. Then the repairs threaten to drag on until the end of the season. Is it possible to give up and ride for a year or does this threaten something terrible?
You can install it without a clamp - the piston is slightly askew, use a screwdriver to press the ring into the groove from one edge of the ring to the other gradually, and so that there is constant pressure between the piston and the cylinder. We have to struggle.
To follow up: you must immediately put the rings (one at a time) into the cylinder without a piston, use the piston to align them in the cylinder and check the gap in the lock. If there is no gap in the lock, then you can’t even use a hammer.
And carbon deposits from the piston grooves must be removed. There's a lot of it there. New rings may not sink completely because of this. It is convenient to remove it with a piece of the old ring. You can't say anything about the guides; you need to know the gap. If it is less than 0.3 mm, it will knock a little and burn up the oil, but this is not critical, you can roll off the season. If more, then everything is possible, from killing the valve seat and guide to pressing the guide out of the head. Well, it will eat oil, the candles can give off oak. Anything can happen.
Thanks. Perhaps the carbon deposits remained - I just tried to dissolve it with some kind of cleaning agent. I did not measure the gap in the guides, but it feels like the valve in them can be shaken and this will be felt. In principle, I traveled last year - I’ll try again.
I would recommend installing the piston rings without anything at all. With just your fingers, yes + a hammer handle. And this is how it is done. A hammer handle is placed under the piston skirt to prevent the piston from running away, which means inside the crankcase when pushing the cylinder onto the piston. Then the lowest oil scraper ring is put on the piston. Using your thumbs, you need to push the ends of the rings slightly apart so that the side of the rings is located. Place the opposite ends obliquely onto the piston. THEN pushing the ring apart to the size of the piston beyond the ends, but certainly obliquely. forward with the whole side to catch up to the desired groove. Do the same with everyone else. Of course, the rings must be pre-selected, for a normal piston - normal, and for a repair piston - appropriate. The ring grooves must be free of carbon deposits. When installing the piston into the cylinder, the rings, as they are put on, must be pressed one by one as much as possible with your fingers and put on the cylinder on them in a circular rotation. This procedure took me 1-2 minutes for each cylinder. Having put on the piston, remove the hammer handle and place the cylinder on the mounts.
Piston rings are a child's task - there are no problems with that. But the problem with circular rotations is that I immediately place the cylinder on the studs. I'll try to clean the grooves again, and if that doesn't help, I'll have to turn out the studs to get circular rotations. Phoenix everyone.
You need to be careful with the broken ring when cleaning the grooves. If the ring is worn, then the edges are VERY sharp. The ring somehow went almost to the bone in my finger. And so, I always installed the cylinders alone, without any mandrels, screwdrivers, or hammers. I set the pistons to TDC, engaged the gear, pressed the ring into the groove with my fingers, and tightened the cylinder. I drowned the next ring and pressed it with a cylinder. And so that’s it. For convenience, the piston is slightly warped. There is a wonderful cone on the cylinder, it helps a lot in the process. On the M-72 and K-750 the process is more complicated, where the cylinders weigh awesome.
Installing a piston engine (CPG) on a 4t scooter
We take a new piston kit for 72 or 80 cubic meters (piston diameter 47mm or 50mm, respectively). You can, of course, use a standard new 50 cc CPG. The kit includes: cylinder, piston, piston rings, pin, retaining rings, as well as head and cylinder gaskets. You can buy a 72 cc cpg at a low price in our online store.
Installation is carried out in the reverse order, having previously lubricated the cylinder, piston and rings with a small amount of oil. We first install a thin ring on the piston in the lower groove, then an oil scraper ring and again a thin ring (the wavy ring - the oil scraper ring will thus be between the two thin ones in the lower groove). Next, install 2 compression rings (which are thicker). The cuts of all rings should not be located on top of each other. After installing the rings, place the piston on the crankshaft connecting rod, fix its position with a finger and locking rings. We take the connecting sleeves from the old cylinder and insert them into the new one.
We put a gasket under the cylinder on the studs
Carefully place the cylinder on the piston with rings so as not to damage the cylinder. We push the chain into the groove for the chain
Then install the chain bar on the cylinder head. Now we can put the chain on the camshaft sprocket (the position of the sprocket should be as follows: a large hole at the top, and two small ones on the sides, parallel to the edge of the cylinder head). We fix the position of the cylinder head with the gasket by screwing it on. Then we install the plastic cylinder head cover, chain tensioner, carburetor and muffler. The installation is now complete!
If you haven’t changed the oil for a long time, you need to change it before starting with a new piston. Before putting a full load on the scooter engine, it is necessary to run-in, i.e. drive 300-500 kilometers at a speed of no more than 40-45 km per hour.
Along with an increase in the power of the scooter with the installation of a tuning cpg, the load on the variator with the gears of the gearbox also increases. Remember this and if possible, replace the variator with gears with tuned ones (more reinforced.)
Our production
In our online store you can find and purchase new piston groups at low prices. A complete list of piston engines can be found at this link
Installing a piston with a larger volume than stock is perhaps the simplest, most affordable, affordable and effective way to significantly increase the maximum speed and power of a scooter. There are, of course, even more effective ways to increase maximum speed and power, but these methods, or rather the hardware, cost simply unrealistic money...
If you charge the engine of the same 139QMB to the maximum, then such tuning before the “increase” cost the client about 35,000 rubles and this does not include work.
Read also: Motor oil total quartz 9000 5w40 reviews
It is clear that not everyone can afford such amounts. Yes, even if it’s affordable, what’s the point? It’s easier to buy an old branded scooter and ride it than to charge the “Chinese” and then throw it in the trash after a season. But that's what I think.