Determining the main characteristics of the trolley
Many village residents have a walk-behind tractor at their disposal.
This is an excellent assistant when performing a variety of field and garden tasks. It allows you to significantly reduce the time and effort spent on working on the ground, making it possible to process more space. But, a trolley for a walk-behind tractor further expands its functions. Now each owner will be able to transport vegetables, soil, apples, or bags of other crops on their own unit. In addition, it is easy to do it yourself if you have a minimum set of necessary tools.
Homemade carts have a number of advantages over commercially available ones, which include:
- There is not always a trailer on sale that will suit you both in size and characteristics. But when making it with your own hands, you can take into account the desired size, height, and functionality.
- The quality of most products leaves much to be desired. But by making a trailer with your own hands, you will be sure that it will last a long time.
- The price of a homemade device is significantly lower than that of a purchased model.
- It is much more pleasant to use those made by yourself.
Before you design your own cart, be sure to think about what goals you set for it and what you will use it for. Based on these facts, it will become clear which parts of the cart will need to be given maximum attention.
Before you start work, you need to draw up a project that you will adhere to during construction. If you find it difficult to do this yourself, or you are not confident in your own abilities, it makes sense to seek help from a competent mechanic.
The diagrams try to show the cart as accurately as possible in different positions and angles. At this stage, all the parameters of the device are planned, the joints and seams will be drawn especially clearly. The essence of this stage is not only to draw a rough diagram of the work, but also to think through all the little things and important nuances that will arise during the work.
You need to think about:
- How non-separable units and parts will be connected to each other. This can be regular welding, riveting or screwing together.
- How the moving units will be connected, using hinges, axles or bearings.
- What will the nodes be like and how will they work?
- What type of seat will it be: simple or swivel?
- If you plan to make the body self-dumping, then additional parts will be needed, such as a mechanical body tipper.
- Legs that will act as a support
- Various additional nodes that depend on exactly how you see the final result.
Once everything is ready, you can start assembling the structure using:
- Holder (bracket) for mounted trolley parts
- Console
- Carrier
- A footrest that is best made from a board
- Driver's seat, made of the same board as the footrest
- Frame
- Wooden board body s20
- Three support beams made of 50x50 timber
- Bolt M8
- Thrust ring made from metal pipe
- A wheel from a motorcycle or an old Moskvich
If you use such a clear drawing, then you will get an excellent cart for a walk-behind tractor.
Engine
As noted above, the main driving force of homemade mini-trucks is motors from mopeds (Soviet magazines recommended using the IZH-56 engine), and low-power boxer engines.
It is sometimes easier to get diesel and gasoline engines from stations than to recover scrap, but power units from passenger cars are also found in homemade designs.
More on the topic: Peculiarities of transporting goods in small shipments
It is difficult to imagine that a homemade truck will require good dynamics and acceleration. Torque is critical when choosing, but some high-speed engines can be used in conjunction with a reduction gearbox.
The durability of these engines, equipped with a good, by the standards of our reality, atmospheric cooling system, is worthy of special mention.
Tractor engines from T-16, T-25, etc. have proven themselves quite well. Motors like the D-21A1 can be easily adapted for domestic needs: power - 25 hp, maximum rpm - 1800. However, the standard starter from these engines may not work Russian cold weather, so the original starter is often replaced with a starter from the T-40.
Additionally, the motor can be improved by adding a cardboard filter to it, and given its dimensions, it is better to place it behind the cabin. Engines from the T-16 can be connected to the GAZ-51 gearbox using the original clutch, although in this case you will need to use a sheet metal adapter with holes for the mount and shaft.
Connection of the GAZ-53 rear axle with the Mazda 2.0 l engine.
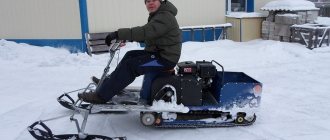
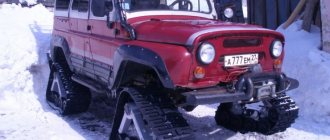
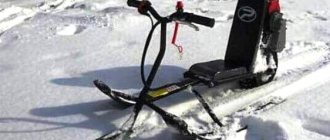
In the regions of the far north, the simplest design of motorized sleds has proven itself well, which is an engine from a Druzhba-5 saw or similar (Scheme 1, Scheme 2, Scheme 3), connected to a tracked chassis.
The principle of use is to make the saw rotate not the chain, but the tracks. In this case, the motor itself is located in front, on skis attached to a bicycle fork, and the driver, along with the load, is located above the tracks. Power 4 hp
enough to accelerate an 80-kilogram sled through the snow to 60 km/h.
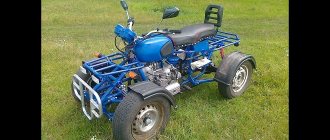
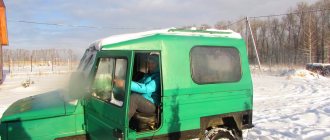
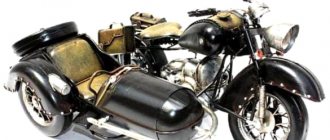
Ural Hercules - factory Ural tricycle
The Irbit Motorcycle Plant has released a three-wheeled modification in its model range for transporting cargo up to 500 kg. The model is called “Hercules” and moves well both on city roads and off-road. The sides of the tricycle are also removable and this allows it not to be limited in the size of the cargo it transports. Hercules is a truck that does not require a category “C” license.
Technical characteristics of the Hercules tricycle:
- Dimensions: 335x150x115 cm
- Ground clearance: 185 mm
- Weight: 500 kg
- Fuel tank capacity: 19 l
- Maximum speed: 70 km/h
- Engine capacity: 750 cc
- Power: 45 hp
- Engine type: opposed 4-stroke with two cylinders
- Generator: 500 W
- Electrical: 12 V
- Transmission: 4-speed, with reverse gear
- Tires: 6.45 and 13 inches
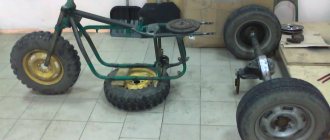
Parts for self-propelled vehicle
You can build a self-propelled cart with a practically indestructible transmission with your own hands from a domestic chainsaw such as “Druzhba” or “Ural”. It is clear that domestic equipment is chosen primarily because of the successful layout of the engine design and the relatively low price of the device.
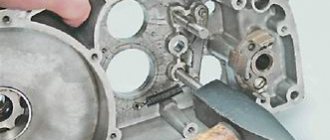
As in the case of a scooter, we do not touch the chainsaw engine; only the clutch assembly and the cutting chain drive sprocket need to be slightly altered. First of all, you will need to completely remove the clutch from the engine. The silumin engine crankcase is cut so that a window 30 mm wide and 70 mm long is obtained in the lower part.
The transmission of a self-propelled trolley is made in the form of a chain drive. You can use a single-row chain from a light motorcycle or a double-row from a car engine. It all depends on what spare parts the master has at his disposal and what load is planned on the self-propelled cart.
To choose the right chain drive, you need to compare the speed of a motorcycle engine in first gear and the average speed of a chainsaw. Only in this case can you count on obtaining an acceptable speed of the self-propelled trolley. The speed in first gear is 5-9 km/h, but since the chainsaw engine speed is significantly higher, the cart can reach speeds of up to 20 km/h and higher.
In the design of the chainsaw, there is no shaft or boss on the clutch housing on which the driven sprocket can be installed. You have to disassemble the assembly and weld a finished shaft, taken from a motorcycle engine or made independently.
This is the most difficult part of the work, since you will need to turn the seating shoulder onto the disk on a lathe. Any attempts to weld the shaft to the disc “on the knee” can damage the entire engine; the more accurately the shaft is welded, the less vibration there will be on the frame of the self-propelled cart when the chainsaw motor is running.
Scooter and tricycle made from a chainsaw
Chainsaws, as mentioned above, are very popular among home craftsmen. They are distinguished by their light weight and dimensions, and in terms of power they are what you need. Today on the Internet you can watch many video tutorials on how to make a tricycle, scooter or moped from a chainsaw . More often mopeds and scooters are made from the Druzhba chainsaw. An old bicycle is also taken, onto which all the parts are installed, including a forward flow muffler.
An example of a homemade tricycle scooter
It is the forward flow muffler that becomes almost the main feature of making a homemade scooter, because you need to know some of the secrets of its installation. The forward flow muffler was originally invented for sports cars. A forward flow muffler in itself already increases the power of a scooter engine.
Air filter
An air filter for a homemade moped or tricycle is also made by hand. First of all, the filter must be reliable. It is recommended to use an oil filter from Moskvich, a washbasin siphon, a metal pin, silicone and a self-adhesive micro-pork to make such an element.
- The filter is clamped between the neck of the siphon and the rest of it;
- The whole thing is held together with a metal pin, the length of which is selected on the spot;
- Place the plug on the metal pin;
- We collect everything and treat the cracks with silicone;
- We glue a micropork onto the flange of the siphon neck.
How to make a cart for a walk-behind tractor with your own hands, practical recommendations
After you have calculated the dimensions (for walk-behind tractors with a power of up to 5 l/s, the optimal body dimensions are 1 m * 1.5 m), we proceed to cutting the corrugated pipe for the frame.
The structure should be assembled on a flat surface using electric arc welding. For profile sizes of 40-50mm, reinforcing gussets at the corners are not needed. The design has sufficient rigidity. The main thing is to achieve a high-quality, uniform seam along the entire perimeter of the joints.
Of course, the seams are sanded using a grinder.
Then we weld the frame of the body sides. A profile of 20-30mm is sufficient for this. It is very important to ensure that the dimensions of the frame and side parts match, otherwise it will be difficult to assemble the body.
The sheathing in this structure is made of 1.5mm sheet iron. Screw connections, with threads in a professional pipe.
Before assembly, the metal must be cleaned of corrosion and treated with a rust converter with priming properties.
The sides of the body are smooth on the inside for easy transportation of bulk cargo. Let's try the design on the frame.
Before final assembly, carefully paint the frame element. You can use regular oil paint on metal. On a primed surface, adhesion will be sufficient. If funds allow, use special coloring compositions with a polymer filler.
This surface is more resistant to abrasion. Or at the end of the season, the surface of the body must be tinted.
- We install the body flooring, having previously painted it.
- After tightening the fasteners, we paint over the heads of the bolts and places where the coating was damaged during installation.
Popular: Russian walk-behind tractors are the right choice
We make a coupling device (drawbar) from the thickest professional pipe.
The design includes a dump truck body. Therefore, we install the axles for the folding mechanism strictly in the middle. Here it is important to maintain precise orientation and alignment, otherwise the mechanism will jam when lifting the body.
The axle bushings are mounted through a 5 mm thick reinforcing plate. The same amplifiers are welded onto the coupling device, which acts as the main frame.
After final welding, we check the free movement of the mechanism. The design of the dump truck is non-separable, so it is important to install the axles correctly the first time so that you do not have to overdo it.
The wheels and hubs were taken from old agricultural machinery. The adapter bushings are turned by hand on a lathe. The bearings on the hubs were replaced - they were simply selected according to the diameters.
- The finished structure is welded to a pipe that acts as an axis.
There is no suspension system in the classical sense. The axle is mounted rigidly on the frame. High-profile tires act as shock absorbers.
The hinged tailgate is mounted on powerful hinges for iron gates. The sash folds down, with latches installed on the top - side clamps.
There is no lifting mechanism provided. The balancing is designed in such a way that the empty body leans back under its own weight. For fixation, bushings are welded onto the frame and the front part of the body. A steel pin secured with a cotter pin is used as a lock.
The manufacture of the steering joint should be approached with special responsibility.
The structure is machined from a steel circle with a diameter of 50 mm. Hardened steel studs are used. There is no need for a bearing connection here; the intensity of movement of the hinge is low. Regular lubrication is sufficient.
We install the structure on the hitch of the walk-behind tractor. The vertical joint (steering) is installed on a standard tow pin. The horizontal hinge bushing is removable and is bolted to the drawbar.
We looked at how to make a cart for a walk-behind tractor and a trailer for a tractor in one product. Therefore, instead of a steering joint, a standard ball hitch can be installed. And the cart is used as a trailer.
The load capacity as a trailer is rated at 400-500 kg. When working with a walk-behind tractor, excluding the driver’s weight, you can transport up to 300 kg. The seat is equipped in the front part of the body, made of a corner and a wide board. Although here the possibilities for creativity are limited only by your imagination.
A do-it-yourself walk-behind tractor trolley is a very real project. If you have basic metalworking skills and high-quality materials, the result is no worse than a factory one. And the cost is several times less.
Watch the video on how to make your own cart from what you can find at a scrap metal yard.
If you have any questions, please write. We will definitely answer.
Recommendations
The joints of the frame parts must be reinforced with gussets made of sheet steel. To make the design more correctly, it is advisable not to limit yourself to simple drawings, but to use large-scale models. It is immediately necessary to provide attachment points:
- engine;
- shock absorber;
- seats;
- fuel tanks;
- pendants
It is advisable to install the engine so that there is a free flow of air around it. This rule is important even when water cooling is used.
You should definitely take care of the appearance of the vehicle. An elegant, attractive appearance is often created through chrome surfaces and individual parts. To make using a tricycle more comfortable, it can be equipped with fog lights, speaker systems, and so on.
The front part is often made on the basis of silent blocks. The rear main rail is equipped with fasteners that support the body. It is advisable to use tractor generators as a source of energy in electric tricycles. The gearbox and axle shafts can be bored to size on a good lathe. The installation of an electric motor capable of pumping additional air will help prevent overheating of cylinders made of aluminum.
How to make a tricycle with your own hands, see below.
Motorcycle dog and caracat
Anyone who has had the chance to ride an imported motorized towing vehicle will probably see in its design a lot of similarities with a conventional walk-behind tractor. Almost the same front traction unit with the engine, a similar method of transmitting torque, similar controls on the steering wheel. The only thing missing is rubber tracks, with the help of which the motorized dog will pull the sled and rider across the snowy field.
When realizing their dream of a motorized towing vehicle, avid fishermen and hunters can go in two ways: buy a ready-made snowmobile attachment or make it yourself.
Today, tracked attachments for almost all types of walk-behind tractors (Neva, Salyut, Agat, Favorit, Cascade, Forza, etc.) are produced on an industrial scale. The price of this unit is quite high (about 30 thousand rubles).
Speaking about what can be made from a walk-behind tractor, it is worth mentioning such an interesting homemade product as a karakat. The strength of this car is in its huge wheels, which are ordinary inner tubes, tightened with strong belts.
Sometimes truck tires are used to make ultra-low pressure tires. They are lightened by carefully cutting out part of the surface with an electric jigsaw, leaving only part of the bead and lug tread pattern.
Homemade rims are installed on the karakat from a walk-behind tractor, modifying and expanding standard car rims. You can also put a very original wheel on a lightweight walk-behind tractor. To do this, two aluminum basins are welded along the contour, the bottom is cut out to fit the size of the hub, and they are equipped with stiffening ribs and side stops for fixing the camera.
Despite its external clumsiness, the carakat based on a walk-behind tractor is surprisingly passable and stable. It not only easily overcomes swampy lowlands, but is also capable of carrying quite a significant load (up to 100 kg).
Anyone who plans to assemble an ATV using a walk-behind tractor as a base must be prepared for the fact that he will not reach super-high speed on it. But in terms of maneuverability and maneuverability, such a device is in no way inferior to a more expensive one.
The seating position in a home-made SUV remains traditional “motoblock”, and not motorcycle-like as in a “quad”. There is no need to make rims for this ATV yourself. You can use standard ones from any passenger car, designed to install wide-profile “mud” tires.
Advantages and disadvantages
Let's start with the advantages that a homemade trike from a Ural motorcycle has: - excellent cross-country ability, especially in mud; - comfort and less fatigue; — simplicity, low cost and reliability of the design; — minimal risk of engine overheating.
The trunk allows you to secure everything you need
And now about the disadvantages: - difficult control (due to a blocked bridge); — lack of reverse gear, which would be very useful (to be solved); — the intake manifold is strongly cooled until condensation appears (possibly having a negative effect on the combustible mixture); — a large load on the front axle (the front wheel sinks in mud, which significantly worsens cross-country ability); — high speed in 1st gear.
If there was a reverse gear, there would be no need for a shovel
In general, these shortcomings can be considered insignificant, especially considering the significant improvement in cross-country ability. In addition, many of them can be eliminated.
Trike from the Urals
We decide on the dimensions and prepare homemade drawings
A cart for a walk-behind tractor is a serious matter, so you should start with the drawings. It is clear that each homemaker chooses his own solutions, but the dimensions of existing products will clearly help.
These drawings can be used to build a medium-sized trailer with a rigid suspension. In this case, a body made of boards is assumed.
These drawings can be used to build a medium-sized trailer with a rigid suspension. In this case, a body made of boards is assumed.
This drawing will help you make the trailer frame shown above. Typically, a profile pipe with a cross section of 25x25 mm or 20x40 mm is used for these purposes.
This diagram illustrates the parameters of a trailer with a lift. A telescopic stop can be easily made from two pipes of different diameters inserted into each other. There is a protrusion on the frame that secures the front part of the body from lateral movements while driving. The support under the drawbar ensures horizontal fixation of the trailer.
This drawing will help you make a simple structure with a flat loading platform. A lightweight trailer can be made from a profile pipe with a cross-section of 20x20 mm or a corner 45x45 mm.
It is convenient to use a trailer suspension from the Ant scooter or make one yourself. Two independent levers on silent blocks plus shock absorbers with springs will ensure a highly smooth ride.
Another drawing of a trailer with soft suspension. In this case, it is assumed that a torsion bar suspension from a motorized stroller or “Zaporozhets” will be used. Let me note that, regardless of what design you choose, you need to prepare at least a simple sketch of the frame with dimensions. This will help avoid mistakes, material damage and wasted time.
From tractor to boat
The most common modifications from a conventional walk-behind tractor are all kinds of complex equipment and vehicles. True, the latter can be more called homemade products based on the engine and transmission of the device.
Potato planters. If there is a large area for planting potatoes, a device based on a walk-behind tractor would be ideal. It includes several elements at once. First of all, the potato planter is equipped with a small hopper for tubers.
In front of it is a plow that makes a ditch, and behind it is a hiller that fills and forms a bed. All devices must be adjustable in accordance with the planting depth and size of the beds.
Mini tractor. Most often, craftsmen construct all kinds of mini-tractors. In this case, the shift in the center of gravity of the equipment should be taken into account, since the engine is installed in the rear. Therefore, care should be taken to expand the wheelbase of the rear axle.
Currently, you can find on sale all kinds of components and assemblies for creating a tractor based on a walk-behind tractor, such as front axles, brake system, all kinds of rods and levers, pedals. But if you wish, you can make all this yourself, using suitable parts from old cars.
Boat motor. The engine from a walk-behind tractor can also be an ideal replacement for a conventional outboard motor. To do this, the necessary fastening should be made on the boat hull, and the standard engine cutter should be replaced with blades. In the right hands, a walk-behind tractor can also become the basis for creating a small buggy-type car.
True, it will not be possible to drive in urban conditions - this is due to the official registration of the vehicle with the state traffic inspectorate. But it can be an excellent help in rural areas for fishing trips or hunting for mushrooms. Also, such an “SUV” is ideal for mastering driving skills for beginners.
Most often, the front axle from a “disabled” vehicle is used as the chassis for such a homemade vehicle, the rear axle is a drive axle, it can be installed from an old Zhiguli or from an Ant scooter. By the way, the size of the wheels used will depend on this.
Tools and materials
A good option would be to make a vehicle from an Alpha moped. Instead of standard propellers, it is recommended to use wheels from an Izh motorcycle. But you can get a good device from Dnepr. Even models from very old series are suitable, including those in extremely worn condition.
For the rear part, use car wheels. The ideal donor for wheels and axles will be VAZ cars of any model.
Sometimes a tricycle is also obtained from the Voskhod motorcycle. The basic mechanism has excellent speed characteristics, which increases the significance of this option. The gearbox is taken from any cargo scooter. The body is made by hand. It is advisable to install forced cooling and change the gear ratio.
When they say that a three-wheeled vehicle is made from a chainsaw, they mean that the engine was taken from there. Of course, you can use motors only from the most powerful saws as a basis. The remaining components are:
- frame made of ordinary VGP;
- wheels and axles removed from garden carts;
- a driven sprocket and chain taken from a bicycle;
- small leading star with D-6;
- handcrafted wings.
If you decide to make a three-wheeler from an “ant,” then additional components are usually taken from Izh motorcycles. The engine and variator can be anything, even made somewhere in Asia in semi-underground conditions. The frame, gearbox, hubs and shock-absorbing unit are removed from the “ant”. The axle shafts are borrowed from VAZ.
Hydraulic components and brakes can be collected from the Minsk motorcycle. But experienced experimenters sometimes even make them themselves.
One original and quite convenient variation is a three-wheeled vehicle made from a pit bike. Despite the “childish” purpose of the original vehicle, it can turn out to be a real all-terrain vehicle that can overcome off-road conditions perfectly. On the ATV, part of the stationary axle is cut out, leaving the factory brake and main sprocket. You can add a differential, but then you will have to deal with scrupulous alignment. FYI: An excellent trimmer tricycle can be created based on the Champion.
It is appropriate to complete the analysis of possible options using the example of three-wheeled transport from OKI. It is rarely used in its pure form; it is much more correct to create “hybrids” with motorcycles such as “Ural”. For the work itself you will need:
- welding machine (an inverter is possible, although not necessary);
- electrodes of a suitable type;
- grinder (for cutting and grinding metal, removing burrs);
- spanners;
- screwdrivers;
- electric drill;
- other tools and components - at personal discretion.
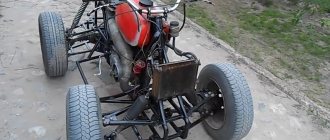
Homemade tricycle with a walk-behind tractor engine (20 photos)
The simplest homemade tricycle with a walk-behind tractor engine.
Greetings to visitors to the site Myself a Builder! I would like to show a homemade product by craftsman Dmitry, who made for his son a simple tricycle with a walk-behind tractor engine.
The design is simple and reliable. The frame is welded from profile pipes 2*4 cm, 1.5 mm. 1.5*1.5 cm and a round pipe 2.5 cm. The steering column is taken from a bicycle.
To begin with, a LIFAN 168F-2 D20 6.5 hp engine was purchased. with automatic clutch.
Next, drive and driven sprockets were purchased from an Ant scooter for the Izhevsk chain.
I couldn't buy a factory sprocket. They are not on sale in the Kurgan region.
Guided star.
The sprockets were turned in a lathe and two races with an internal diameter of 20 (motor shaft) and 25 (axle) were turned out.
I welded the sprockets to the cages and cut grooves in them for the key.
Leading star.
The wheels were taken from a garden wheelbarrow. The quality of the wheels is simply disgusting. And the price tag is cosmic. It would be cheaper to use hubs and wheels from the VAZ 1111 Oka.
Rear axle with a diameter of 25 mm. Ordinary rolled metal. On one side, the wheel is rigidly fixed to the axle, and on the other side, the axle is machined to the diameter of the bearing in the wheel hub. After that, a hole was drilled and a thread was cut for the bolt. For fixing the wheel on the axle. I couldn't buy support bearings. Therefore, I took the ones that were suitable for the inner diameter and selected a suitable pipe for the outer size. I welded a metal plate with drilled holes for bolts for fastening to the frame. To prevent the axle from moving in the bearings, on one side I welded a washer the size of the bearing and on the other side I made clamps from a pipe (you can see everything in the photo).
I also used a grinder to cut a groove in the axle for a key to fix the driven star.
The drive sprocket is mounted on the engine and the chain tensioner can be seen below.
The frame, as I already wrote, was assembled from what was lying around in the yard. Profile and round pipe and frame from a bicycle. Everything is visible in the photographs, so I won’t write much. I will describe it in general terms. I got the idea for the frame from my head and the Internet. But mostly he improvised on the fly. The bottom of the frame is a corrugated pipe 2*4 and 1.5*1.5 cm.
Next I installed the bicycle handlebars. Everything is in standard mounts. Friendship chainsaw gas trigger was welded to it.
I cut out the wings from the door of a VAZ 2107. For rigidity, I rolled them on a special machine. The fastening for screwing the front fender was mounted on rivets.
I welded the front wheel fork as follows. I cut off the stays from the bicycle, welded a 40*40 corner, welded new stays in the form of inch tubes to it, and plates for the wheel axle with a hole were welded at the ends of the pipes.
The seat was made of plywood. I put foam rubber from an ancient sofa on it and covered it with leatherette. I also inserted and glued 6 mm bolts in advance to secure the seat to the frame. I secured the upholstery with a stapler and everything was ready.
The triangle at the front of the frame was sewn with iron. This is necessary to prevent dirt from flying onto the engine and driver.
Chinese components make their presence felt. On the first ride the wheel broke. Which was simply a support and not a drive. Having driven 300 meters on a flat tire, it turned into a pile of threads and rubber (if you can call it that).
And as the most attentive noticed, this device does not have a brake. He will probably appear soon. It turned out to be an interesting drink. You need to drive it mainly on asphalt because... It does not have off-road qualities. My son is simply delighted with it.
TOTAL: 17010 rub.
This estimate does not include all materials because... I had some of them. An expensive toy for sure. But there was a goal to do it. Goal achieved, let's move on. Good luck to everyone in your endeavors.
Tricycle test video:
Homemade author: Dmitry. promotobloki.ru
Industrial self-propelled trolleys
If you set a goal and find a suitable self-propelled vehicle, you will be offered either a hydraulic self-propelled trolley - loader, or a Chinese version of a mini-dumper on caterpillar tracks. For work in the field or at the construction site of a large facility, such a mini-tractor with a lifting capacity of 300 kg may be suitable, but there are few people willing to pay 2 thousand dollars for the opportunity to transfer cargo at a snail’s pace.
Self-propelled vehicles from Honda will be very interesting for households. Its mini-dumpers can hardly be called a self-propelled trolley; they are more construction equipment, but in a private home a small device would be very useful.
For example, the ANTBY800 model is equipped with a 13 hp gasoline engine. Essentially, this is a hydraulic self-propelled cart, since it is based on a hydraulic drive that distributes torque to orbital engines. The trolley is capable of moving up to 800 kg of cargo in the cargo compartment, lifting up to 300 kg to a height of 1.4 m and transporting a trailer weighing up to 2 tons.
The hydraulic circuit made it possible to equip the minitractor with a working shovel-blade like a bulldozer. But, like the Lunokhod, Honda’s miracle does not have a cabin or even a place for the operator, which is not entirely convenient, especially if you have to work on the trolley for quite a long time. The cost of a self-propelled cart is almost 700 thousand rubles.
Lighter self-propelled carts, as in the video
They are an order of magnitude cheaper, but in terms of their capabilities they are of little use for housework. As a rule, self-propelled designs have a high center of gravity, a weak engine and a short wheelbase. It is convenient to transport loads up to 50 kg over relatively short distances. For construction work or transportation of materials, the engine is clearly not enough.
All that remains is to make a self-propelled vehicle with your own hands:
- Adapt existing transport equipment with an engine, for example, a snow blower, walk-behind tractor or walk-behind mower, to a self-propelled cart;
- Assemble an original self-propelled structure based on a chainsaw engine and a homemade welded frame;
- Modify an old scooter, use the engine and transmission;
- Assemble an electric self-propelled cart.
All of the listed options have long been tried by craftsmen in practice, and many of the assembled homemade carts have shown good results. The main advantage of making a self-propelled cart with your own hands is the ability to customize the design to your needs. In addition, building a self-propelled carrier from spare parts and components will cost much less than a purchased cart.