Some may consider security features for small mopeds to be overkill. Practice shows that it is small dimensions and light weight that attract the attention of thieves. The compact vehicle is very easy to steal and transport.
Choosing a suitable alarm
Modern security systems, even for small-sized equipment, allow you to use such practical bonuses as a remote control, starting the engine from a distance and some other advantages.
Security systems for mopeds and scooters are almost as diverse as those for cars. Installing an alarm on a scooter traditionally begins with selecting a suitable model. You can choose a security guard based on different criteria:
- manufacturer;
- price;
- degree of protection;
- set of functions.
Retail chains offer security systems from the most primitive and inexpensive made in China to expensive ones that have decent functionality and are also protected from outside interference.
In order not to make a mistake in your choice, evaluate your financial capabilities and recommendations of manufacturers, and also communicate on specialized forums. The best criterion for selection is reviews from owners who have been using alarms for some time. Advice from sellers and service center specialists will also not be superfluous.
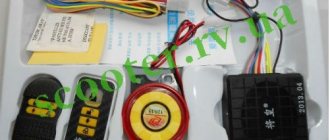
When purchasing, you must check the completeness. The average alarm kit consists of:
- central block;
- sound siren;
- vibration sensor (set of sensors);
- key fobs for remote control;
- set of connecting wires with terminal blocks.
Particular attention should be paid to the installation instructions and wiring diagram, because... in their absence, connecting the alarm to the scooter will be quite problematic. Although the principle of operation and the procedure for installing the system into the design of a moped of different models are not fundamentally different, it is better to use the factory instructions and manufacturer’s recommendations.
How to install an alarm on a scooter - step-by-step instructions
Step No. 1: choosing an installation location.
For scooters with a classic layout, the most suitable place for mounting a central unit with a sensor and speaker is a niche under the front plastic covering. Firstly, there is enough free space here. The installed equipment will not interfere with controls and other components. Secondly, this is where the main wiring harness runs, which you need to connect to. Another installation option is in a niche under the seat. It will be more difficult for a burglar to get to this place, but to connect you will have to increase the number of wires.
Step No. 2: installing an alarm on the moped.
Manufacturers of security devices always offer their own method of mounting the unit and sensors. As a rule, double-sided adhesive elements are used for fastening. An option is available using clamps and brackets. The method of fastening depends on the specific alarm model.
Step #3: connection.
How to install an alarm on a scooter without making a mistake in the wiring order?
To ensure the operation of the security system, two prerequisites are required:
- continuous supply of power to the central unit from the battery;
- correct connection to the ignition system.
Before starting work, to avoid short circuits, the ignition is turned off and the battery is disconnected.
- Take the connection diagram and strictly observe the color of the wires;
- To connect the alarm wiring to the moped's electrical network in the places indicated in the diagram, expose the insulation and connect the ends of the alarm connector wires;
- After checking the correct connection, the connection points are soldered and well insulated.
The most important advice for installing security guards
In solving the problem of how to install an alarm on a moped, owners forget about the biggest drawback of these vehicles. Many models, especially Japanese scooters, allow you to get to the battery without much difficulty. This allows the thief to quickly turn off the power and de-energize the alarm.
Installing an alarm on a motorcycle
A motorcycle is not only a means of transportation, but also a faithful friend and an indispensable assistant.
Often the loss of an iron horse is associated with the death of a living person. Even breaking a motorbike yourself is not as offensive as giving it into the hands of scammers.
In order to avoid theft of a motorcycle, you can use various protection methods.
The most popular methods are all kinds of alarms and blocking devices.
What is the difference between such installations and car security systems? The main difference is compactness. Because the installation space for motorcycles is much less than for a car.
The next difference is that the integrated tilt sensor is usually with adjustable sensitivity, and is carried out using a remote control.
Finally, protecting your bike is no easy task and will require a combination of mechanical locks and electronic devices to achieve.
Thus, the alarm cannot 100% guarantee the security of your iron friend.
A good addition to it would be the use of a special cable, which will block the rear wheel and become an obstacle to theft.
In addition, it is advisable to purchase a pager that can notify the owner in advance of an attempted theft, even if the thief tries to disable the siren.
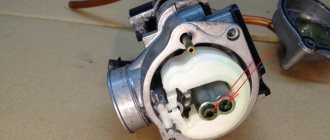
The alarm is presented in the form of a block with a speaker, from which 4 wires come . One of the wires goes to the “plus”, the second to the “minus”, the third to the antenna, and the fourth to the engine start/stop button.
The alarm is supplied with a key fob, thanks to which the system is controlled. The alarm operates from a 12V battery
The security design system is as follows. Mechanical protection, which is used as a lock on the front brake rim, or a massive chain. A motorcycle alarm must block the engine, have a sensor for impact, tilt or movement, a pager, as well as a siren and other additions.
Contact sensors for lowering the seats and unscrewing the glove compartments are extremely important. They can be replaced with reed switch devices removed from apartment alarm systems.
Since ordinary limit switches require fastening with metal brackets, unfortunately, doing this in the “engine engine compartment” is not always possible.
Reed switches are purchased taking into account that when the sensor is activated, all contacts close. The option of conventional reed switches is not excluded, but then you will need a 20 kOhm resistor and an isolation diode per reed switch.
Compare the main features of Jawa 350 in the detailed table.
Izh Planet Sport 650 Rotax, a motorcycle that never made it into mass production.
Motorcycle alarm with feedback
Principle of operation
The usual set consists of an alarm, sensors that are sensitive to shock and key selection, and a key fob that receives sound alerts.
Existing chains and locks are not always reliable against theft of your iron friend. Therefore, in order to no longer have to worry about your motorcycle on the street, installing a feedback system would be an excellent solution.
Advantages
A closed-loop alarm system protects your motorbike more reliably than non-feedback models that only respond to mechanical factors.
That is, if the robber gets into working condition, namely, where the sensor is installed, then the remote control receives waves from the sensor and transmits them to the owner in the form of a sound signal.
Varieties
The Starline motorcycle alarm is the latest security system with a dialogue code, designed to protect motorcycles, scooters, and quads.
To protect the code, a state-of-the-art encryption algorithm with 128-bit personal encryption key commands and an innovative frequency hopping method are used.
When sending commands, the transceiver converts frequencies according to a unique program during each sending.
This technology is used for the first time in an alarm system and makes hacking as difficult as possible. Resistant to all popular code grabbers.
Motorcycle alarm with auto start - this system with auto start remotely turns on the engine, after which the side lights on the vehicle come on or the hazard lights start flashing.
Alarms have some differences in models, but it is safe to say that this type of alarm contains more advantages than disadvantages.
Bike locks with alarms come in the following types:
- Lock "shackle" with fastening to the front brake disc.
- Safety chains with lock.
- Garage anti-theft “anchors” and anti-theft docks.
- Reinforced anti-theft cables.
- U-shaped anti-theft locks
- Clamp-lock for mounting on the front brake.
- Locks with adapters that are attached to the transmission rod.
Alarm and scooter - compatibility and connection
Connecting an alarm system to a scooter is sometimes more difficult than installing a security system in a car. The scooter alarm is connected according to one of two standard schemes, and the choice of scheme depends on the type of ignition switch. It would seem that there is nothing complicated here, but the electrical wiring of scooters may have “nuances” that are usually not taken into account during installation. It is impossible to list these nuances, but you can give examples of connection. This is what is done in the text, as well as in the video, which is given at the end.
Standard connection and circuit selection
Let’s say this is the first time an alarm system will be installed on a moped or scooter. Find out right away how many wires go to the ignition switch - 2 or 4. If there are more than 3 contacts in the terminal block, then the second option is probably used. This is 100% true for Chinese scooters, including Racer Dragon, etc. There usually only 4-pin ignition is used.
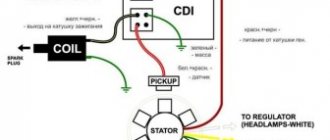
Signatures here indicate the signaling wiring.
The figure lists the wires and contacts:
- Blue (blue). The wire is used for remote starting. “12 Volts” appears on it when you need to close the starter relay. You don’t have to connect it (isolate it).
- Red and Black (red and black). Signal power supply. It is highly recommended to install a 5-7 A pre-flask.
- Orange (orange). Here the signaling system “observes” the voltage value: there is “+12 Volts” - the ignition is on. Ring out the appropriate cord in the terminal block.
- Pink and Gray (pink and gray). The cables are included in the break of the cord going to the switch (its insulation can be white-black, etc.). This cord receives ground potential when the engine is stopped.
A common mistake is the following. The “gray” wire is connected to the lock terminal, while the “pink” wire goes to the switch. If you do this, nothing will burn, but the system will work with errors.
Now, let's look at the second version of the scheme:
As you can see, the same alarm system for a scooter can be used, but it must be connected differently. The point is to correctly determine the type of ignition. The starter wire, by the way, in the second option can be broken “to the button”.
There may be a power cord in the terminal block that does not have a certain potential when the ignition is turned off. This cord, usually “light green”, is not at all the same cable that is cut according to “Scheme 1”.
Nuances concerning both schemes
If you connect the security system as discussed above, you can get a workable option, perhaps without remote start. In general, an alarm system on a scooter can be installed in different ways. For example, if you don't need engine lock, just don't cut the wire and connect the "gray" and "pink" cords. You don’t have to connect the siren or the scooter’s turn signals (at the owner’s choice). Further, all the schemes that have been considered will only become more complicated.
We will equip the motor with remote start
The “blue” wire coming from the signaling connector can supply voltage to the relay that turns on the starter. Let's figure out what to connect it to.
Starter button
There may be several wires coming from the “2” button module, if it is present at all. One of them is connected to a standard relay, and when pressed, the following may appear:
- + 12 Volt. Then, connect the cord itself to the “blue” signal wire (T-shaped connection);
- "Mass" potential. If you need autostart, you will have to buy a relay, the normally open contacts of which are connected between ground and the found cord.
When installing an additional relay, turn on the winding between the “blue” wire and ground. In this case, the signaling electronics must be protected with a diode.
Additional relay wiring diagram
“Chapter 1” looked at how to install an alarm on a scooter with a 4-pin and 2-pin ignition. In the second case, for example, remote start is easier to implement:
Autostart, two-pin ignition
The numbers here indicate the relay connection points:
- Contact 30;
- Contact 87;
- Pin 85 (diode cathode);
- Pin 86 (diode anode).
As you can see, no new connection points will be added. The only thing is that you have to stretch the cord from ground to pin 86.
The last paragraph does not apply to any equipment produced in China. Simply, Nexus, Racer, Tachilla and many other scooters use a 4-pin ignition.
Subtleties of connecting to the switch
Let us immediately note: this chapter only talks about the first circuit, that is, the 4-pin ignition. As you remember, to connect the signaling you need to break one wire going to the switch:
Electrical diagram of the ignition system
The cord in question is marked with an arrow. Finding it in most cases is not difficult:
Ignition switch module
Here there are 6 cords connected to the switch, and their markings are clear.
Sometimes, at the same time, the switch module is a miniature unit, and it can be difficult to even find its location. Which is true for most Racer models and many others.
Electrical equipment of the "Racer Dragon" scooter
It’s hard to guess, but the switch module here is the part numbered “5”. And sometimes, in difficult cases, a digital switch is used, to which a connector with dozens of cords is connected. We have seen such an example in the video. Good luck.
Installing an alarm system on a scooter with your own hands
An alarm is one of the most effective ways to scare away a thief who is trying to steal your scooter, moped or parts thereof. But even despite this precaution, scooters and mopeds are subject to theft quite often. Previously, very little had been heard about alarms on scooters, and even less people used them. Most likely this was due to the high cost of the kit, if we compare the total cost of motor vehicles. In other words, previously it was completely pointless to install an alarm system on your device, because it could cost the owner almost half the cost of his vehicle.
It is for this reason that many Japanese used scooters and mopeds do not have alarms, like European ones in particular. Today on the market you can buy a budget, but fairly well-made alarm system for motor vehicles - motorcycles, scooters, mopeds. These inexpensive alarm devices can be afforded by almost any segment of the population.
A little about the Chinese alarm kit
According to statistics, scooters and mopeds are stolen much less often if they are equipped with an alarm. However, it should be clear that you cannot be 100% sure that equipment cannot be stolen with an alarm system. But still, if your scooter or moped is located in an unguarded parking space or in the open air, then most likely an alarm will not hurt in such cases. Some find a way out and use a special lock on the disc brake, while others use a simple chain with a lock.
to install alarm systems on scooters and mopeds, both Japanese and Chinese, but when choosing, you need to be careful to understand which option is right for you. Will a particular option be suitable for your transport? Today, many alarm systems are sold in online stores and prices are more affordable than market ones. These are mainly kits made in China, which are intended for the installation of motorcycles, scooters and mopeds.
Installing an alarm system on a scooter, moped
An alarm is one of the most effective ways to scare off a thief. Who is trying to steal your scooter, moped or parts thereof.
But even despite this precaution, scooters and mopeds are subject to theft quite often. Previously, very little had been heard about alarms on scooters, and even less people used them.
Most likely this was due to the high cost of the kit, if we compare the total cost of motor vehicles.
In other words, previously it was completely pointless to install an alarm on your device. After all, it could cost the owner almost half the cost of his vehicle.
It is for this reason that many Japanese used scooters and mopeds do not have alarms, like European ones in particular.
Today on the market you can buy a budget, but fairly well-made alarm system for motor vehicles - motorcycles, scooters, mopeds.
These inexpensive alarm devices can be afforded by almost any segment of the population.
A little about the Chinese alarm kit
According to statistics, scooters and mopeds are stolen much less often if they are equipped with an alarm. However, it should be clear that you cannot be 100% sure that equipment cannot be stolen with an alarm system.
But still, if your scooter or moped is located in an unguarded parking space or in the open air, then most likely an alarm will not hurt in such cases.
Some find a way out and use a special lock on the disc brake, while others use a simple chain with a lock.
to install alarm systems on scooters and mopeds, both Japanese and Chinese. But when choosing, you need to be careful to understand which option is right for you.
Will a particular option be suitable for your transport? Today, many alarm systems are sold in online stores and prices are more affordable than market ones. These are mainly kits made in China, which are intended for the installation of motorcycles, scooters and mopeds.
Often the kit contains standard parts. — Central unit, siren, key fobs, wiring harness and contact block.
An instruction manual should also be an integral part.
Below is the diagram for Chinese scooters:
Preparing a place for a scooter alarm
To properly install the alarm on your scooter, you need to dismantle the front plastic. This is done in order to get to the connectors and contacts we need. How close or far away the battery is installed does not matter.
Well, the plastic is removed by unscrewing the bolts and screws that secure it to the central plastic. It all depends on your model.
There is practically no difference in installing alarms on Chinese-made scooters Today we will delve into the installation process specifically for these units.
If the kit contains instructions, then you need to mark the locations in the wiring.
Where your alarm wiring will be connected. The first thing you need to do is disconnect the chip from the ignition switch, thereby securing the installation process.
How to install an alarm on a Honda scooter
In order to set the alarm, we need an 8-10 key, preferably a socket one, a shaped screwdriver, scissors and electrical tape. So, let's remove the front plastic. Here it is on 10 bolts, but, in some cases, it can be used with a figured screwdriver. To remove the front plastic, we need to unscrew three bolts from the front, put everything on the floor, it won’t get lost there. In general, installing an alarm takes 15 minutes. There is nothing difficult about it, and I think everyone can handle it. Therefore, you can save yourself on ice cream. Unscrewed three bolts from the front.
Oh, yes - you can select alarms in the ALARMS section
Here there are four screws, unscrew the four screws and also throw them on the floor. One, two on this side, and one, two on this side. Return to the previous position.
Also, attention! There are latches, two latches. They are located here below, under the beak.
These are plastic hooks that can be pulled out. Now I’ll pull it out for you and just show you how they work. You can either unscrew it a little and pull it with a screwdriver, and it will narrow and pull out. There are two of them. One stands on one side.
The other one is on the other side. Now we'll take out the second one. Here you go, the second one. That's it, we unscrewed the front trim, it is only on the latches. Again, be careful not to overdo it so as not to break it. Here we have the front plastic removed.
So, what is a car alarm for a Honda scooter? Open the box.
Here you can choose an alarm for your motorcycle
Now we begin to put all this on the moped. So, let's start. Remove the wires from the clamp. We remove, or rather, pull out the speedometer cable and unclip the lock chip. This is in case we don't get short-circuited. Click. Here we have the castle feature. We'll take it up here for now, because we'll need it now.
Next, we unwind a little electrical tape here. You can use a knife, or you can unwind it by hand. That is, to install an alarm we do not need to place it near the battery or anywhere else. Everything is done under the front trim. So. You can cut the tourniquet a little. For this we will use either a knife or scissors.
Further. Next, I will use this wire stripper, i.e. I'll show you now how it works. What do we need here? Here we need a blue wire, an orange wire and a yellow and red wire. Look. Wire stripping works this way.
That is, the wire is stripped. I don't cut it or anything.
But, I can assume that you don’t have such a thing, so you can use a lighter. Almost the same effect.
They set it on fire, it caught fire, and, as it were... almost, on one side it was cleared, as if there it was, working with a lighter like this.
Well, of course, it all looks neater with a cleaner, but you can do it with this thing. This is to avoid cutting the wires. In this case, we will work as a stripper. So we clean up orange, blue and yellow with red.
Next is the ignition switch. We need a permanent plus - this is the red wire, we also clean it.
We disconnected it, so we don't have to worry about something shorting out. Then it’s just a black wire. There is also a black and white wire here, but now we just need the black one. Again, we don’t cut it, we just clean it.
But we cut the black and white wire. Here we take scissors or wire cutters, whoever has what. And we cut it.
Again, it can be cleaned in this way. A lighter... the insulation was heated and removed by hand. Also the second edge. The insulation was heated and removed by hand.
Here we have them cleared. That's it, we've prepared everything here.
Next we take the wiring harness from the alarm. Our alarm system will be on this side.
Here they will not interfere, the cables when turning, well, and how it will still be pressed with this bracket. Accordingly, we don’t need long wires. Why do we need this bunch of wires here? We need fairly short wires. So. Let's assume that we have a chip here, and so that the wires can reach...
Those. once and twice. Those. This length of wires is enough for us. We leave the long one only black.
Black is a bulk wire; it will cling to us a little lower.
There is such a ring here; some alarm systems don’t have it. Therefore, this piece of wire will be enough for us. We take scissors and cut mercilessly. Again, we clean all the wires. I will use a special device, but as I showed you, you can use a lighter. We clean them out a centimeter... well, about three, probably. This stripper is quite useful at home, on the farm, and it is inexpensive, probably costs about 2 dollars now, just. We only strip the pink and gray wires a little less. About a centimeter.
So let's begin. We connect the red wire from the alarm to the red wire on the ignition switch. We have enough length to wrap tightly around our cut. Those. many may say that it is better to solder there or something else. But this is optional. I want to tell you, from personal experience, I have probably installed about 1000 pieces already. They are all holding on and working. They do not oxidize or fall off.
Then we take electrical tape. It will be inconvenient to wind with a whole skein, so we cut off a piece, it will be enough for us. And we wrap the already screwed wire with this piece of electrical tape. It is better to take soft electrical tape, it sticks well and is quite convenient to use. Next on the ignition switch we have a black wire, we screw the orange one to it. We fasten the orange wire from the alarm. In exactly the same way. Like this, we also lower it down here, again we take electrical tape. Or you can use heat shrink.
You can immediately cut several of these pieces and stick them together to make it more convenient for you, without constantly wasting time on this matter. You can also, having learned how to do this on your moped, set an alarm in your city for your friends, acquaintances, and just strangers on mopeds. You can make good money from this. Well, not bad – relatively speaking, enough for ice cream. Let's just say there were days when I set 8-9 alarms a day.
Further. The pink and gray wire from the alarm is connected to the lock, connected to the black and white wire. Please note that the pink wire is connected to the top, i.e. closer to the lock, so we screw it on. Of course, there are all kinds of hooks that hold the wires together, but again, this works great
And we screw it here. Further. Again, we wrap it with electrical tape and fasten it all together. Remember, right? The gray wire is down, the pink wire is up, closer to the lock. So, we got something like this. Here we will carefully wrap it all up with electrical tape into a wiring harness.
Further. Let's move on to this bunch. Here, in the moped, we have orange, blue and yellow with red. We connect the yellow wire from the alarm to the orange one. This is the exit for the turns. So that at the moment the alarm sounds, when someone is trying to steal our moped, or, perhaps, a cat has jumped on it to do its dirty deed, it will squeak and blink. Screwed it on.
Next, again, a piece of electrical tape downwards. Next is the blue wire, followed by the yellow wire from the alarm.
We wrap all this up, again, with electrical tape. And we have the last wire left, this is the yellow, red and blue wire from the alarm. This is the last wire we have stripped on the moped.
We wrap all this up, again, with electrical tape. And we have the last wire left, this is the yellow, red and blue wire from the alarm. This is the last wire we have stripped on the moped.
We still have a black wire left from the alarm system - this is a minus. We take a 10 key and unscrew the resistor, which relieves excess voltage on the frame. Many people believe that by turning it off, the headlight starts to burn brighter, but you should not turn it off, because the battery may be overcharged. We screw it under this bolt.
Further. We lower the black wire along with these wires so that we have everything nice and neat and here we begin to wrap the whole thing with electrical tape.
Here, we cut the harness, the braid of the harness, cut for convenience, we connect it and also carefully wrap the whole thing. Next, we wrap the wires that go to the alarm. To ensure that everything was beautiful, there were no extra pieces or wires sticking out.
And they immediately followed the wires to the castle. We tear off the electrical tape and begin to carefully wrap it up so that the appearance is not lost. Because you are not going to ride a moped all your life, and having sold it to someone, the person will be pleased when he takes it apart, but here everything is neat. And you yourself will be pleased to see that your moped is all intact, there is nothing superfluous in it. That's it, this is how it looks for us.
Further. We move the chip here, under the latch, and stick it in the place where it was.
So here it is. That's it, here we have it. We return the speedometer torso, we'll put it here for now. Here we wipe everything down so that we have a clean place, so that the alarm sticks to the double-sided tape.
We take the alarm unit, double-sided tape is glued here. We don't have it at the moment, so... That is. you glued the tape, moved the cable clamp, put the alarm here and glued it here. This is where you will have your sensitivity setting. This is where you pull the chip through the top, and this is where you hook it.
Further. We also have wires coming out of the alarm for the bell, you connect them too.
And glue the bell on this side. I would also like to note that the double-sided tape may come off somewhere due to the heat, and so on, so run the wires through this top thing.
Those. If it comes off, your alarm will not fall out, it will hang on the wires. That is, the bell is already clinging here. It will also not interfere with the cables.
I won’t glue it now, well, I just showed you where. Here it all comes back here, and this is how it stands.
The alarm is quite sensitive. This button here, the unlocked lock means removal. A closed lock means arming.
This button turns off all functions altogether. Those. It also turns off the remote start. And even if your moped runs from the ignition switch, now we can start it, by pressing this button you turn it off. Further. A button with a bell is just a beep from a distance. Again, everything is turned off with the lock open. Press this button twice, usually there is a lightning bolt on it, this is a remote engine start. And it turns off, again, with the lock open.
Next we have to assemble the plastic. Well, and, as they say, everything is in reverse order.