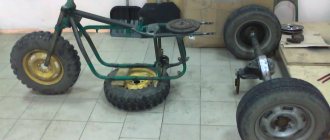
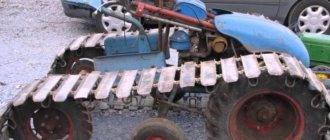
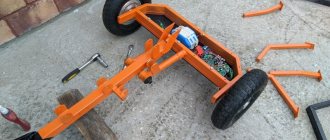
In this video, watch a brief description and test drive of a 200 cc tricycle. At the bottom of the article it is indicated where you can find many videos that tell you how to make such a tricycle with your own hands. The beginning of the story with the assembly of this cargo bike can be seen on our website here. This vehicle is equipped with a 200 cc engine with 6 and a half horsepower. The penny's four-speed gearbox is connected to the engine via a centrifugal clutch. The gearbox contributes to the best distribution of forces that are necessary for the operation of the tricycle. Since it was assembled in makeshift conditions, most of the spare parts were either used or new from a metal warehouse. Therefore, in the front part of the frame, the wheels are taken from Soviet mopeds.
The big advantage of this vehicle is its virtually independent suspension. It is made from a rear shock absorber from an Izh motorcycle. The front part is made of silent blocks. There are two fasteners on the rear main rail with which the body is secured. The main source of electricity in this tricycle is the generator from the Belarus tractor.
The entire history of the tricycle’s assembly can be viewed on YouTube, the SEREGA channel. TV.
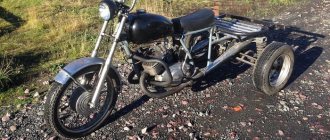
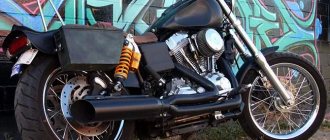
Homemade tricycle IZH Jupiter-5
The motorcycle remains practically unchanged, only the rear wheel is sent for replacement, instead of which a gearbox with axle shafts from the Ant cargo scooter is installed. But in this case, the author took a rather unconventional path and made homemade axle shafts from scrap, ordering splines to be bored to the standard size from a familiar turner .
The rear wheels and hubs are from the domestic VAZ car; in the winter and snowy seasons, for better traction with the road surface, the author puts chains on the wheels, thus the cross-country ability of the tricycle increases many times over.
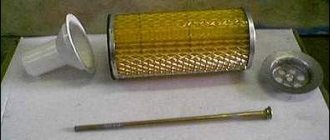
It is advisable to install forced air cooling, because the load on the engine with two rear wheels is slightly higher than in the standard configuration. The problem of overheating of aluminum cylinders of a motorcycle engine is solved by installing an electric motor with the ability to pump air (a motor from a car heater) is connected to the on-board network of the tricycle and air is supplied to the cylinder heads through corrugated bells.
And so let's look at the design features of a homemade tricycle assembled on the basis of the Soviet motorcycle Jupiter-5
The tricycle is stable and you can easily ride it off-road. Putting chains on the rear wheels increases cross-country ability.
Having settled the motorcycle in the spring snow along the very axle shafts, the movement still continues, but the main thing here is not to overheat the internal combustion engine until forced cooling is installed.
He doesn't care about the spring thaw.
This is how the author installed the rear homemade axle shafts and wheels of the VAZ.
Torque is transmitted by a chain transmission.
This wonderful tricycle based on the domestic motorcycle IZH “Jupiter-5” was assembled by the “Golden Hands” master Vitaly Borovsky. Let's all support the author's technical creativity and give us a thumbs up!
How to convert a regular bicycle into a three-wheeled model with your own hands
Cycling is popular among all segments of the population, including older people and athletes. It allows you to maintain physical fitness, and if you make a tricycle with your own hands, the model will be able to carry additional loads. This technique is characterized by increased stability and can be used as a kind of simulator. Before you start making your own model, you need to study the assembly instructions, drawings and other nuances of the process.
- Features and device
- Preparatory stage
- Required materials and tools
- Manufacturing instructions
- The nuances of installing the brake system
- Video
Suspension
It doesn’t matter whether you make a tricycle with your own hands from an Izh or any other motorcycle. You will have to remodel the front wheel suspension anyway. After all, the distribution of forces in a tricycle is very different from that observed in a regular motorcycle. To do this, you will need two pairs of consoles, as well as two powerful springs - if possible, try to get helicopter or airplane springs, but springs from passenger cars can also be used if necessary. The consoles need to be connected to each other by levers, through which the axle of your front wheel will pass. Naturally, this is not the only way - there are a large number of ways to make a tricycle with your own hands. Drawings are available on the Internet (one of them is in our article), but this method is one of the most effective.
Features and device
The three-wheeled bike differs from its usual counterpart in a different frame configuration and the presence of an additional rim. If the model is intended for city or park walks, it is better to make a simple option, without frills or reinforcing elements. Products for driving over rough terrain and transporting goods are equipped with a reinforced frame, transmission, reliable braking system, and their speed modes are also changed.
If the tricycle will be used by one person, the design is adjusted according to anthropometric parameters. For mass use, the most universal modification is chosen.
Advantages of DIY tricycles:
- suitable for use by people of different age categories;
- characterized by increased stability and load-carrying capacity;
- making homemade options does not require significant costs or special skills;
- facilitated landing of the owner due to stable balance;
- possibility of commercial use.
Preparatory stage
To create a tricycle with your own hands, you need to purchase a standard analogue with a pair of rims. This may be a foreign or domestic modification. Taking into account the chosen configuration, the aesthetic part of the future transport will be designed. It is necessary to take into account the quality of parts and the possibility of transforming the unit.
Initially, all design diagrams and drawings should be completed. Particular attention is paid to:
- Stability, which requires correctly calculating the placement of the rear wheels.
- Height of the steering column and seat. The parameter is calculated taking into account the characteristics of a particular person.
- Purchase of a rear axle with differential. The element is responsible for comfortable movement and safe driving.
- Adjusting the steering unit. A homemade tricycle should not fall over when turning.
- High-quality brake block, signal horn.
- Smooth movement of the steering wheel and wheels. There should be no creaks or other extraneous sounds.
In the drawings of a tricycle, the most crucial moment is modifying the frame configuration. It will be necessary to strengthen the metal profile using stiffeners. As an option, it is possible to use a design from Ural. The rear axle is cut down and an updated frame made of duralumin pipes is installed. The second part is installed in the lower section, it is used for transporting goods. Wheels are placed on both sides of the axle, and a sprocket is fitted in the center.
How the suspension works
If you are not making a trike out of a scooter with your own hands and are counting on a powerful and impressive model rather than a children's tricycle with a motor, then you need to seriously think about the action of your front wheel suspension. What are helicopter or airplane reasons for? The fact is that the movement of the wheel along the vertical axis will occur with much greater force than on a motorcycle, so you need to install stiff and durable springs - at least in the lower part of the suspension, which compensates for movement along the vertical axis. To compensate for movement along the horizontal axis, you can use softer springs - for example, from the Izh motorcycle. As you can see, assembling a tricycle with your own hands is quite difficult, but if you follow all the instructions, have a clear drawing and all the necessary materials, you should be able to cope.
Required materials and tools
To make a three-wheeled trike from a bicycle, you should stock up on the following equipment:
- a pair of chains;
- cables for the brake and speed switching units;
- standard bicycle;
- stainless steel clamps;
- wheels;
- wings;
- brake block;
- basket for transporting cargo;
- steel frame;
- paint and varnish composition.
To create a tricycle with your own hands, you will need a hammer, an angle grinder, a welding inverter, a drill, and a set of keys. After sketching all the drawings and diagrams, you should prepare the specified materials and tools in advance. If you plan to build a spacious luggage compartment, additionally prepare sheets of plywood and a hacksaw. If desired, the unit is equipped with an alarm bell or horn. Comfortable seating is ensured by installing a new seat or installing a special cover.
Some craftsmen place a compact basket at the front of the structure for transporting bags and packages. At the same time, your hands are completely free while riding.
Battery
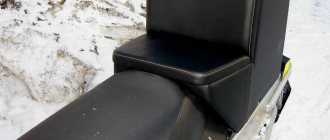
The battery for your tricycle must be installed under the driver's seat - for this purpose a special frame is created, located above the engine. This way, everything important about your vehicle is in one place. You should also consider making the passenger seat behind the driver's seat. Not only does it allow more people to ride at the same time, it can be attached with saddlebags that will completely enclose the engine and battery, making your trike complete.
Manufacturing instructions
Master class on how to make a tricycle step by step:
- The donor model is placed on the platform with the steering wheel down.
- Remove the wheels, remove rust and other defects in visible places.
- Saw off the rear part of the unit with a grinder.
- The differential is fixed using metal clamps.
- The bridge is installed at 90 degrees using the above method.
- The remaining auxiliary elements are secured by welding.
- The wings are mounted, between which a basket of suitable size is welded.
- Install two rear rims in parallel.
- The fasteners of the clamps are tightened.
- One is made from two circuits and then installed.
- Equip the brake unit using disc parts and a switch on the steering wheel.
- They check the build quality and paint the model.
Homemade tricycles may vary in size depending on the user's creative ideas. A proven, fast and reliable method in terms of technology is the use of a UK-65 type rear differential axle. When creating a drawing of a homemade tricycle, you should take into account the costs of consumables.
When creating the modification in question, you will need to take into account the costs of purchasing the necessary parts yourself. In addition to the bridge, you will need a chain, a speed switch, wheels, and a set of sprockets. Also, we must not forget about lubricating and painting sanded and welded surfaces.
The nuances of installing the brake system
After carrying out the above manipulations, the assembly of the equipment can be considered complete. Special attention should be paid to the brake assembly and axle. Only a disc system is suitable for an adult tricycle; a rim analogue cannot be installed correctly. The unit will require additional financial investments to ensure that further operation of the product is safe for the cyclist and others. The kit includes discs, hubs, calipers, and a manual control lever.
No particular difficulties are expected during the installation of the bridge. The unit aggregates with most classic frames. First, all the standard parts of the rear part are dismantled (chain, wheel with fender, trunk, hand brake). A type of UK category bridge is mounted on the rim mounting compartment. The stops are inserted behind the lower pipe of the rear frame part, the axle is threaded through special eyes. The elements are securely tightened, the mating parts are fixed using clamps. At the next stage, an extended chain is installed, made from two standard analogues by removing excess links. For this purpose, the method of grinding off a rivet or installing a new lock is used. Then the speed switch is adjusted.
The future owner of a tricycle, assembled independently, can build the device without significant financial costs, decorating the equipment according to his preferences with an original design. As a result, the user will receive not only a personal exclusive bicycle machine, but also an assistant for transporting food and other items. Experts recommend regularly lubricating rubbing parts, as well as monitoring other structural elements.
Do-it-yourself tricycle assembly from the Urals
Before starting work, it is necessary to think through the design of the future tricycle and the location of all elements. Ideally, make a drawing of the future vehicle.
Important design points:
- All joints must be reinforced.
- Car cups are welded to the top beam. It also serves as a support for shock absorbers.
- Frames are welded to the central beam, which serve as footrests for passengers and also support the suspension bump stops.
- The base for the pedal weights is the lower transverse tube, which is attached to the frame.
- A support for the gearbox is also made on the transverse frame.
The main difference between a tricycle and a motorcycle is that the engine is located at the rear and therefore the center of gravity of the vehicle is shifted back. When accelerating, such a tricycle rears up a little. Below you can see a diagram of how to convert a Ural motorcycle into a tricycle.
Location of tricycle parts
As we have already said, the engine of a Ural tricycle is not located on the main axis, like in motorcycles. It is placed between the rear wheels, because of this, when accelerating quickly, the tricycle easily rears up. But this is a much safer event than on a motorcycle and adds adrenaline and entertainment to the trip.
Engine
As a motor, you can use a native motor from the Urals or take a car engine. The main parameter of choice is its capacity between the rear wheels. Be sure to securely fasten it in at least three places. Most often, if the power unit is in good condition, then you don’t even need to do anything to it. And if the engine is old, then you can replace the radiator or some other elements.
Depending on the engine you choose, you will also have to change the exhaust system by installing one muffler for each cylinder.
When converting a motorcycle from the Urals into a tricycle with your own hands, the gearbox is usually installed on the left side, because you usually need to hold the steering wheel firmly with your right hand. You'll have to think a little about how to connect it to the engine, because now the gearbox will be located at a much greater distance from it.
Suspension
The standard motorcycle suspension will have to be redone due to the fact that the load on the wheels in the Ural moto tricycle is distributed differently.
This is done using two consoles and two large springs (aircraft springs are ideal, but car springs will also work). The consoles are connected by levers through which the front axle passes.
Tricycle layout
The first thing you need to think about if you are going to make your own trike is its layout. The fact is that the power unit, which is usually located directly on the axle of motorcycles, thereby improving the balance and reliability of the vehicle on the road, can no longer be there. Accordingly, you need to carry it by the axle, between the two rear wheels. Naturally, this affects the stability and controllability of the tricycle - and not in the best way. But if you are an experienced driver, you will be able to adapt quite quickly. Moreover, this opens up some interesting prospects - for example, the ability to rear up your vehicle without any problems when developing at high speed. It looks extremely impressive and, unlike motorcycles, in this case you do not risk anything - this is an absolutely safe action (of course, if you do not pull the car too much, but on a motorcycle such a trick is much more difficult in any case). Accordingly, you will be able to impress everyone around not only with the appearance of your vehicle, but also with its spectacular capabilities. This alone is enough to convince yourself to make a tricycle with your own hands.
Tricycle from the Urals and VAZ-2101
When creating a cargo tricycle with your own hands from the Urals and parts of a VAZ-2101 car, the easiest thing will be to install a regular bridge and make a car suspension with shock absorbers from the Urals.
The bridge from the VAZ-2101 is turned over, after welding the differential. This is reflected in the handling - the steering wheel is quite difficult to turn, however, the trike's cross-country ability increases.
The driveshaft is shortened and welded to the fork on the final drive and connected to the axle through a rubber coupling. It is better to take the original Uralov clutch, in this case the transmission will be softer.
To avoid bending the cardan drive, you can move the engine to the left by 7-9 cm, or move the axle to the right or increase the wheelbase.
It is better to leave the engine as a whole unchanged, but instead of two carburetors, make one Chinese one. And for forced cooling, use an air filter from Izh.
Additionally, to cool the engine when operating in difficult conditions, you can install two fans and run them separately if necessary.
Pros and cons of the design
+ Simple and cheap transport;
- Can only go forward;
— Too much load on the axle with the front wheel;
Power unit
Naturally, when you think about making a tricycle with your own hands, you will need to choose a suitable engine. In this case, you do not have to take a power unit from another motorcycle - an engine from a car will also work. The main thing is that it fits properly between the rear wheels. This way you can improve the performance of your vehicle. In some cases, you won’t even have to make any changes or improvements; in others, you won’t even have to replace the radiator or some other part. It is also recommended to install other mufflers, and increase their number by installing one on each cylinder. Naturally, there are other options - it all depends on which power unit you decide to choose. For example, if you make a tricycle from the Ural with your own hands, then it is better to replace the engine completely.
How to make a tricycle from a Ural and ZAZ-968 motorcycle
The front fork works like in the Urals, a lever system is used and the front axle is located between the transverse arms.
When creating a trike from the Urals and a ZAZ-968 car, the rear part remains practically unchanged, like a car. Only a muffler, oil cooler and air filter are added there. The gearbox and engine are also original to ZAZ. The engine is mounted as before, and the gearbox is placed on the left.
In general, there is not much to change.
DIY assembly steps
- At the very beginning, the rear axle is removed from the car.
- A beam is attached to the cut.
- Mufflers, an air filter, an oil cooler and pipes are installed on the rear wheel axle. If you use engines from the 90s, then all these elements will already be installed.
- A frame is being made that will be the basis of the tricycle, so it is necessary to make it strong and reliable.
- An extended front fork is manufactured by welding with shock absorbers attached to it. Lengthening occurs by replacing the fork rods with longer ones or by welding more tubes to the Ural fork.
- Welds the frame and rear axle of the car, forming a solid structure.
- The fork is connected to the frame by welding, just like with the rear axle of the ZAZ.
- After this, the seats, gas tank and other elements are attached.
- Finally, the new tricycle is painted and chromed.
Gear box
When you make a tricycle from the Ural with your own hands, you definitely need to take into account where exactly the gearbox will be located. You already understand that the engine itself will be off the axle, behind the seat, between the two rear wheels. At the same time, make sure that it is attached as securely as possible in at least three places - especially if you plan to perform various tricks, as described above. As for the gearbox, it is better to install it on the left side of the steering wheel, since your right hand will be occupied most of the time. It is unlikely that if you take the engine and gearbox from a car, you will be able to make a design that is convenient enough to change gears without stopping driving. Also don't forget that you need to take care of connecting the box to the motor, which is a bit more difficult considering that it is now located a little further from the box than it should have been in the original. But if you're trying to figure out how to make a tricycle with your own hands, you always need to be prepared for these kinds of surprises and difficulties.
Ural Hercules - factory Ural tricycle
The Irbit Motorcycle Plant has released a three-wheeled modification in its model range for transporting cargo up to 500 kg. The model is called “Hercules” and moves well both on city roads and off-road. The sides of the tricycle are also removable and this allows it not to be limited in the size of the cargo it transports. Hercules is a truck that does not require a category “C” license.
Technical characteristics of the Hercules tricycle:
- Dimensions: 335x150x115 cm
- Ground clearance: 185 mm
- Weight: 500 kg
- Fuel tank capacity: 19 l
- Maximum speed: 70 km/h
- Engine capacity: 750 cc
- Power: 45 hp
- Engine type: opposed 4-stroke with two cylinders
- Generator: 500 W
- Electrical: 12 V
- Transmission: 4-speed, with reverse gear
- Tires: 6.45 and 13 inches