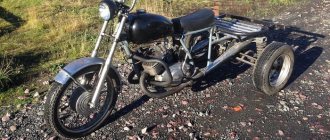
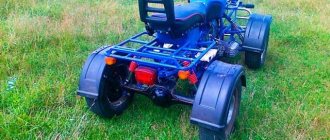
Does everyone remember this miracle? So, those who wish will find further drawings for this ATV so that they can assemble it with their own hands!
The universal motorized vehicle that I developed is designed to travel on any roads and forest paths; In addition, it can tow a trailer weighing up to 250 kg. The car has been in use for three years now, but I have had no comments on the design, handling or reliability.
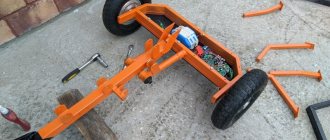
In winter, it is easy to convert it by replacing the rear wheels with pneumatic ones and installing a steering ski in front; the car thus turns into a snowmobile, and the transformation takes less than an hour. The use of available materials in the manufacture of an all-terrain vehicle and the simplicity of the design may well ensure the repeatability of the machine even in a home workshop.
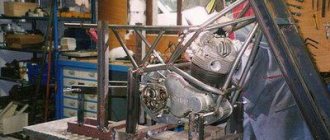
The MTS frame is made of round pipes, square profiles and angles. Its feature is detachable connections that allow you to remove the steering column assembly when installing the engine, as well as the front axle beam. Each of the connectors consists of a conventional “plumbing” coupling, a drive and a lock nut.
To tension the chain connecting the engine to the gearbox, the motor frame (part of the frame of the Minsk motorcycle) moves; the axle of the rear wheels with bearings also has the ability to move in the longitudinal direction, which allows you to adjust the tension of the second chain connecting the gearbox to the rear axle. The front and rear fenders are removable (they are absent in the snowmobile version). The joining of frame elements was carried out by electric welding.
The engine of the motor vehicle is from a Minsk motorcycle; I have no comments on its operation. It is, of course, possible to install more powerful engines - from the Voskhod motorcycle or the Tula scooter; you just need to adjust the frame dimensions for them. The choice of the “Minsk” engine was due to its efficiency and low weight. Its power turned out to be quite sufficient for traveling on a snowmobile with a passenger; it is also possible to tow a skier or sled. The starting properties of the engine are quite satisfactory both in summer and winter.
The directional control of the summer version of the motor vehicle is provided by turning the front wheels using two rods; for the winter version there is a lever and a rod connecting it to the ski fork. The latter is borrowed from a moped. The front axle is from the SZD motorized stroller, although somewhat reduced: sections of its beams are cut out and the central parts (with the torsion bar mounting bolt) are welded to the peripheral ones (with the bushings of the suspension arms). In the winter version, the levers, steering knuckles, rods and torsion bars are dismantled.
The steering wheel is from a Tourist scooter; it fits perfectly with the steering shaft with an M10 bolt. The controls are standard, motorcycle ones. The brake lever is connected by a cable to brake pads mounted on the gearbox.
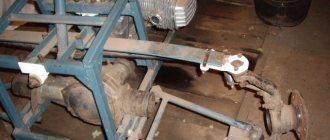
Gearbox. Its basis was the rear wheel hub of the Tula-200 scooter, to which a sprocket was welded on the brake drum side. The rear axle is driven by a chain with a pitch of 19 mm. The transmission brake allows you to significantly simplify the design of the rear axle. The sprocket is fixed on the axle with an M14 bolt; the hubs of the running wheels are fastened in the same way, as shown in the drawings. As the base of the gearbox, you can use not only the wheel hub of the “Tourist”, but also other motor vehicles.
The axle of the drive wheels is a rod with a diameter of 30 mm; its ends are machined to Ø25 mm, and turned hubs are put on these places. The wheels are used from a motorized stroller measuring 5.00X10.0. Winter wheels are of the usual design for pneumatic tires on low-pressure tires: with plywood disks, aluminum supports and inner tube fastening with belts. The axle bearings are double-row; they have conical inserts with nuts that secure the axle well and do not require high precision machining.
Optional equipment. This includes front and rear trunks, headlights, turn signals and brake lights; their attachment points are shown in the figures.
The design of the all-terrain vehicle is simple; it can be made in literally a few days in a fairly primitive workshop - of course, if all the component parts are available. And the possibilities for using such a machine are the widest: as a winch when plowing a garden, to drive a circular saw, like a simple garden tractor (excellent cross-country ability on arable land, so cultivation, hilling, etc. is possible). In addition, you can increase cross-country ability by installing twin rear wheels. You can also mount a reverse gearbox from a SZA motorized stroller, in which the differential is replaced by a shaft, and then the all-terrain vehicle will receive reverse gear. There is no wear of the tires due to the lack of a differential, and this does not affect handling.
An ATV is an excellent off-road solution. It is popular among fans of extreme recreation, fishermen, hunters and anyone who needs to get into places where a car cannot pass. This type of transport is easy to operate, has excellent maneuverability and is quite stable while driving.
Factory-made ATVs are quite expensive, so craftsmen choose the economical option: they make such machines themselves. Of course, this solution is not for everyone: you must not only have golden hands and the tools necessary for the job, but also have a good understanding of the structure of a car, motorcycle and the ATV itself.
If you have a persistent desire to make this miracle of technology yourself, you should start with planning. It is necessary to decide on the models on the basis of which the transport will be assembled, and draw up drawings for them. Be sure to think about what tools will be needed during the work process and make sure that they are in good condition. No matter how boring this activity may seem, nothing will come of it without prior preparation. If for some reason it is not possible to make a drawing yourself, you should find a ready-made version.
Next you will need the sources. From a technical point of view, an ATV is a cross between a car and a motorcycle. Accordingly, to make it you will need a motorcycle and a car. It is optimal to select domestic models on the secondary market; it will be inexpensive, but the quality is quite satisfactory for the construction of an ATV. It is better to use a small car like an Oka or Niva. Among motorcycles, the Ural is very popular for such purposes; you can take the IZH.
Technology
When the drawings are ready, the sources have been purchased, and the tools are waiting in the garage, you can begin making a homemade ATV. Ultimately, people’s lives and health depend on the quality of work, so we must take our time and do everything consistently.
First you need to select the engine and cooling system. Typically a motorcycle engine is used because it uses less gas and takes up less space, but a car engine can also be used. Since it can overheat in summer, it is better to take a model with air cooling, optimally forced (using a cooler).
The frame must be assembled so that the engine can be fixed on it. It will be located in front or behind - it doesn’t matter, the main thing is that it is securely fastened. There are two options here:
- Making a new frame from scratch from pipes. In this case, you must have equipment that allows you to bend the material.
- Take a motorcycle frame as a basis, remove the unnecessary and add the necessary.
Before making the final frame, it is advisable to do spot welding and consult the drawings.
Further assembly
Side steps are welded to the frame, a front axle is installed, a cardan from the gearbox is connected to the front axle, and front shock absorbers are installed. Front axle shafts are connected to the hubs and axle
The brake system is installed separately for the rear wheels
Steering and braking system for front wheels installed
Off-road tires purchased (in this case the most suitable option)
The stage of creating the ATV matrix has arrived. Polyurethane foam, cardboard, resin, fiberglass, reinforcement, etc. came in handy.
The technology of using materials when creating a matrix is a very complex process that requires deep and detailed study
Light reinforcement and cardboard form the frame of the wings, as well as the front and rear parts of the cladding. Foam was poured in excess into the places where convex shapes were supposed to be made.
The dried foam was processed with a file, jackhammer, knife and other tools
An oil cooler from a helicopter was installed and the first layer of fiberglass was applied
The front suspension is completely assembled. Original ball VAZ 2109 from below. On top is a steering tip from a UAZ
Treated surface. Side view
The hubs were adjusted to the NIVA wheels using special adapters
Side view of the hub
The matrix is almost ready. Additional frame parts have been prepared for use as a trunk and a bumper at the same time.
The seat is homemade. The steering wheel is borrowed from the Minsk motorcycle. Control elements were connected to it.
How to make an ATV with your own hands based on a finished frame?
It is necessary to remove everything unnecessary from it, leaving only the frame itself. The rear part is removed, and pipes are extended at the front, and the bridge is welded.
Next, spare parts from the car and additional metal pipes are taken; the best option would be water pipes. To make a frame for the body you will need a 70x40 pipe. Its length should be equal to or greater than the length of the spring, and its width should be the same as that of the bridge.
The cardan must be connected to the box using a rubber coupling, and to the bridge using flanges. The drive is easy to do with your own hands using a chain from IZH.
If you plan to install springs on shock absorbers, it is advisable to leave the rear pendulum with silent blocks.
After making the frame, you need to mount the engine on it. You can use a homemade muffler.
Selection and production of elements
You will either have to make this component yourself or restore it after use - in both cases, the engine must be bolted as securely as possible. It is placed in both the front and rear of the vehicle. To prevent backlash, the drive and transmission must also be connected very tightly. For the manufacture of the frame, water and gas pipes are used, the size of the metal layer in which does not exceed 3 mm. For the spar, take a pipe with a cross-section of 25 mm, and for a cross member or strut it should be 5 mm smaller.
Transmission
It must be installed efficiently so that there is no play. The engine and drive can be removed from the motorcycle, and the wheels can be used from the car. The trunk is easily made from pipes with thin walls. There are two possible control options:
- Using the steering wheel (in this case, the base from the car is taken).
- Using a motorcycle handlebar. The fuel tank comes with the steering wheel. For a homemade steering shaft, a 20 mm pipe with 2.8 walls is suitable. There should be a limiter at the bottom.
The suspension can be made either front or rear. There are two options for making the rear:
- The rear axle of the car is used. It will need to be shortened. The design will be heavy, but there will be a differential, which will be useful on the highways.
- A gear-shaft design is used. A gearbox is mounted on the rear axle, and wheels are mounted on the disks. This is a lighter version of the suspension for a homemade ATV. It lacks a differential, but this is not critical.
The front suspension is used from a motorcycle. It is possible to make an all-wheel drive model, but this is much more labor-intensive work, and also requires certain skills in turning.
The pendulum arms are installed so that when turning the ATV wheels do not catch the engine. If you are using a Ural frame, you should move the wheels further out. Two bipods are welded to the steering column: on the left and right wheels. The front pillar should be inclined.
Parts selection
ATV frame
Depending on the “donor” and the design of the quad, you either have to make the frame yourself, or you can reconstruct a finished, used one.
The most important thing is that the engine is securely bolted to the bottom along the frame, which can be located either front or rear. The transmission and drive should also be firmly attached to the frame to avoid play.
Homemade frame
The material used is ordinary water and gas pipes with a wall thickness of no more than 3 mm:
- for spars - 25 mm;
- for crossbars and struts - 20 mm.
The pipes are connected using spot welding, followed by solid welding. Ears for attaching shock absorbers and levers are welded to the frame immediately. Brackets - during installation of units and components.
Reconstruction of an existing frame
To reconstruct a finished frame, you should remove everything, leaving the frame, dismantle the back part and build up the front. Then weld elements for fastening a complete set of components and assemblies of the ATV. When reconstructing a motorcycle frame, the seatposts should be moved back by 40 - 45 cm.
The front and rear luggage racks are cut out of a metal sheet and welded to the frame. Finally, the finished frame is painted; there is no need to varnish it.
Additionally, we recommend reading our expert’s article on how to choose a roof rack for your car.
We also recommend reading our specialist’s article, from which you will learn how to select and install a box on the roof of a car.
Engine
The engine is suitable for a car, motorcycle or scooter. Some “Lefties” even construct an ATV from a walk-behind tractor with their own hands, since newer models are equipped with four-stroke engines, the power of which in heavy devices reaches 15 “horses” - versus 11 hp. "Ant."
The engine of a scooter has the advantage of low fuel consumption; in addition, the scooter-based quad is the lightest, which makes it easy to pull it out when stuck in mud and sand. But a quad to transport cargo and/or drive off-road requires a more powerful engine.
The engine power of the Izh-1, Izh-2 and Izh Jupiter is 24 hp, the old Ural is 32 or 36 hp, the two-cylinder engine of the old Oka is 35 hp. , a three-cylinder car of a later release - 53.
Suspension
The suspension can be used both rear and front. The easiest way is to take the front one from a motorcycle.
2 rear suspension options:
- The rear axle of the car, shortened to fit the dimensions of a quad. The advantage is the presence of a differential. Disadvantage - the design will be heavier.
- Cardan-gear design - with a gearbox mounted on the rear axle.
Please note: the quad all-terrain vehicle requires an independent suspension with high ground clearance.
The suspension arms are bolted to the frame through rubber-metal hinges - silent blocks.
The shock absorbers are suitable from Izha, but if the budget allows you to purchase gas-oil shock absorbers with pumping, the driver will be able to adjust the suspension according to road conditions.
Steering and chassis
The steering system of an ATV can be based on a car - with a steering wheel, or with a motorcycle steering wheel. Some craftsmen combine both types: motorcycle handlebars, levers and shafts at the top, car tie rods at the bottom. It is advisable to take the fuel tank along with the motorcycle handlebars.
ATV with four-wheel drive
To make it, you will need a steering system from a car, a drive from a manual transmission, suspension and differentials. The suspension, like the steering, can be removed from the car. In such cases, the frame is cooked completely from scratch, based on the size of the engine of the future ATV. On the front suspension, you should take into account the space for the drive gearbox.
Using automotive products purchased on the secondary market, you can relatively inexpensively assemble vehicles for difficult roads and rural areas. One of the budget options for the source is the Ural motorcycle, since it is inexpensive, has rear-wheel drive and a four-stroke engine. Due to its positive aspects, it is popular.
A self-made ATV is not only a convenient and practical vehicle, it is a reason for pride and an opportunity to demonstrate your skills. Outwardly, it may be inferior to factory designs, but in terms of its technical characteristics, home-made ATVs are no worse.
Perhaps the only negative (apart from the time spent, since doing what you love is never a burden) is the need to involve auto experts in order to obtain documents and be able to register the ATV.
An ATV is a four-wheeled hybrid of a motorcycle and a tractor, a vehicle that is equally successfully used in both agriculture and recreation. Just a few years ago, Russian people considered the ATV a foreign curiosity. And today he is able to independently design and manufacture it. In addition, today a much more common occurrence in Russia are home-made ATVs, rather than factory ones. Next, we will try to figure out why it happens this way and not otherwise.
Final stage and finishing work
The final step in creating a homemade ATV is installing the seats and headlights. In this case, anti-theft headlights would be the ideal choice, because the ATV must be suitable for use in any weather. Particular attention should be paid to the number of seats on the ATV and decide whether it will be a driver-only seat or a driver-and-passenger seat.
Finishing work when creating an ATV consists of covering the resulting structure with metal and painting.
ATVs designed on the basis of Oka
For 20 years (from 1988 to 2008) in the vast expanses of our vast homeland, one of the most common cars was the domestic Oka (VAZ-1111, SeAZ-11116). Today, “Oka” is one of the most popular options for vehicles, on the basis of which home-made ATVs are created. In the manufacture of ATVs, the engine, gearbox, wheels and other auxiliary parts of the vehicle are usually used. Direct installation and construction of the ATV based on the Oka car is carried out in accordance with the drawings created by experienced designers. The defining moment when creating an ATV is to formulate the purpose of its use. Based on this, the future owner of the ATV opts for one of the two existing Oka engine options (35 hp and 53 hp).
ATVs designed on the basis of the Ural motorcycle
At the moment, several decades ago, the popular domestic Urals in Russia have been replaced by much more nimble and economical foreign models. In this regard, many people have their recent best “friend” standing idle and rotting in their garages. But not a single Russian person is able to allow good things to go to waste. Therefore, “Urals” are increasingly used to create a type of transport that is relatively new for Russian people. This motorcycle is unanimously recognized by folk craftsmen as the optimal basis for creating an ATV. Homemade ATVs made from it are an order of magnitude more economical and have greater draft power than their factory-made counterparts.
The creation of an ATV based on the Ural consists of two stages: designing the rear part and the front. The use of the Ural gearbox when creating the rear part of the ATV will ensure the design not only strength, lightness, but also simplicity. In the end, the finished product will not be equipped with a differential, which, in essence, can be sacrificed in the name of reducing the time spent on its creation. As for the design of the front part of the future vehicle, it will take much more effort and time than the previous stage. Most of the work is finishing up the front arms of the ATV. This is due to the fact that they should be less rigid than a car, but more powerful than a motorcycle.
ATVs built from scooters
A motor scooter (scooter) - a lightweight motorcycle with an engine located under the seat - is an ideal option on the basis of which you can create a homemade ATV. A vehicle created by craftsmen on the basis of a scooter is an excellent alternative to the best factory copies.
It is extremely economical in fuel consumption and at the same time has the qualities necessary for an ATV, such as mobility, light weight and relatively considerable load capacity. The peculiarities of creating an ATV from a scooter are that the frame, engine, power supply and ignition system must necessarily be transferred from the same device. But the fuel tank of the future vehicle should be a motorcycle tank, not a scooter, since it has a significantly larger capacity. The design of the rear and front axle will most likely be borrowed from a cargo scooter, the suspension from the shock absorber of a large motorcycle, and the control from the Oka or any domestic motorcycle.
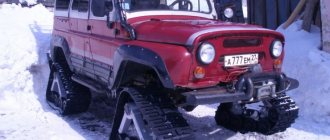
LUAZ: Category “B” ATV
From the editor: it is customary to say about this car that everything in it is given for the sake of phenomenal cross-country ability. Indeed, on paved roads, the driving comfort in it is noticeably less than in a UAZ, and besides, the forty-horsepower engine is barely enough to accelerate this, no joke, miracle of the domestic automobile industry to 80 km/h on straight sections. But if you treat this unique all-terrain vehicle not as a car in the usual sense, then perhaps there are no equals to it and none are expected.
I can say that I am a hereditary LUAZ driver. Now I have a car made in 1986 with a hard top; early modifications only had a soft top. LUAZ is, of course, a unique car not only in its design and off-road qualities. I believe that LUAZ is good exactly the way it is: any modifications, such as replacing the engine with another, gearboxes, even wheels, inevitably entail a whole chain of inevitable modifications to the units.
Take the wheels, for example. The original ones have 13" wheels and a fairly narrow track. With the help of adapter plates, it is not a problem to install 16" Niva wheels with a wider track. In this case, there is no need to redo the arches, the ground clearance increases immediately by 5 cm (from 40 - already unthinkable ground clearance for a civilian car, up to 45 cm), but... the loads on the wheel gearboxes also increase (one of the main “know-how” of LUAZ is independent wheel suspension on longitudinal torsion bars, each driven through its own gearbox). If you do not change the gears in the gearboxes (to reduce the gear ratio), they will quickly fail due to overload. This, in turn, changes the operating mode of the box... and so on. LUAZ is what it is because it was designed comprehensively, all units are designed taking into account teamwork.
For me, LUAZ is a means of transportation directly to the hunting site, i.e., the same as ATVs or specialized all-terrain vehicles. A payload of 250 kg just allows you to “take on board” 2-3 hunters with all the equipment for a 1-2-day hunt. The main property of the LUAZ as an SUV is that it can drive almost everywhere where you can, in principle, go with your feet (and in some places where you can’t). Virtually no overhangs, crazy ground clearance, short wheelbase, all-wheel drive with inter-axle and rear inter-axle differential locks, the weight of an “empty” car is 950 kg, but at the same time the presence of a full-fledged frame allows you to overcome a very wide range of obstacles, including ditches with wall angles of almost 70º and half-dug out by beavers, meter-long drainage pipes: the two of them move over the rocking body.
It is, of course, possible to plant a LUAZ (especially on its original narrow tires and if you are not “friendly with your head”), but pulling it out due to its low weight is also usually not a problem - a manually adjustable winch is quite suitable for this. You can, of course, install stationary ones, but this requires replacing the bumpers, and this is already a “design change” with all that it implies. What else can be said about the cargo capabilities of the car? To understand: pulling the same elk to the road or camp is not a problem; in low gear, the 40-horsepower native engine from Zaporozhets copes with this task normally.
The second thing that makes LUAZ even more similar to quads is its seasonality. No, in winter it also starts normally, with the blinds closed, it warms up and goes where “it glances,” even in deep snow. But there is a big “but” - this is the stove. Let me remind you that the MeMZ-969A engine is air-cooled with a blower fan (the car is also equipped with an oil cooler and crankcase heat-dissipating fins for additional cooling), so the stove in the LUAZ is a separate unit, and it is gasoline. Even after modernization, which reduces the fire hazard and constant smell of gasoline in the cabin to an acceptable level, the cabin is still not designed for long-term driving at significant sub-zero temperatures. Although in late autumn, when it’s already cold in the tent (or there’s simply nowhere to put it), the stove makes it possible to spend the night in the car relatively comfortably. To do this, the side seat is removed, the rear seats are folded, and the folding bed can easily fit into the car. So, I repeat: for me, the LUAZ is a hunting support vehicle in the spring/autumn off-season, which makes it possible to transport not only a boat to a reservoir, but also all the equipment for goose hunting - across wet arable land directly to the landing site.
The disadvantages of the car include the small power reserve (the standard tank has a volume of only 30 liters), especially with the original carburetor, the consumption of which is close to 15 liters per 100 km. This can be “treated” by installing a Solex carburetor (as on carburetor VAZ-2108/09): with it, consumption does not exceed 9 liters per 100 km. A serious drawback is the design of the fuel tank itself: it is not protected by anything and, due to the virtual absence of a rear overhang, when moving backwards, it is the first to “collect” all stumps, stones and other obstacles. Usually LUAZ drivers install the crankcase protection from the “eight” or similar cars in reverse - it turns out to be a kind of “ski” that not only protects the tank, but also in certain cases adds to the vehicle’s cross-country ability.
The “weakest link” is the steering rack: it is structurally flawed, has a weak gearbox mount, and therefore requires regular maintenance (injection) and careful treatment. Now it is not a problem to purchase kits to replace it with slats from Sobol and others. In general, it is worth saying that at one time there were certain problems with LUAZ spare parts, but now supplies from Ukraine have been established, as well as the production of analogues “at home”. For example, the same axle axle boots are now made of silicone.
The traditional weak point of all LUAZs was the engine gaskets - valve cover, cylinder head and oil pan. But the seals, especially the boxes, on the contrary, were excellent for a car of this class. At least, the common UAZ truth that “if oil does not flow from the units, it means it has simply run out there” does not apply to LUAZ. In general, in terms of service life, if you do not make thoughtless upgrades and do not try to squeeze more out of the car than what it is designed for, then all components and assemblies honestly last a service life that is quite acceptable for a vehicle of this class. At the same time, the main one - the sleeved air-cooled engine - if not overheated, it is generally difficult to kill. The maintainability of the LUAZ is also a huge plus: everything can be done in the garage, or even in the field (even removing and installing the engine with gearbox), without special tools, and all the main spare parts (half shafts, gearbox parts and gearboxes, etc.) are available and inexpensive.
Now about the main thing, i.e. why I consider the LUAZ to be a “quad bike with a roof.” The fact is that on it (as well as on a quad) it is not at all necessary to drive from home to the hunting spot. On the contrary, don’t do this! You buy a rigid hitch - a “tie” - attach the LUAZ to it, and voila. This car behaves great when towing like this; driving with it is no more difficult than driving with a loaded trailer. You just need to remember that the towing speed should not exceed 100 km/h. At a speed of 110–120 km/h, the wheel gears will heat up noticeably and quickly fail. Of course, there is a way out - you can disconnect the axle shafts - but this is already “special preparation of the car”, which requires time and, preferably, a clean and dry place. And so, if you “hit it and go,” the time of readiness for use (as well as for departure) is noticeably shorter even than that of an ATV, which still needs to be lowered from the trailer, and then driven onto the trailer and lashed down. The convenience and possibilities of such use of the LUAZ - as a towed “quad bike with a roof” - are difficult to overestimate. After all, there is no need to even get a category “A” license, like for a quad. Probably, in this version there is simply no alternative to this unique machine.
Russian hunting magazine, October 2021
2758
ATVs designed on the basis of the Ant scooter
For 36 years, the Soviets organized the production of Ant motor scooters. In total, over the years, 8 models have been produced, differing in gas tank volume and engine power. Today, the Ant scooter is an ideal base for creating an ATV with your own hands. In order to convert the “Ant” into an ATV, you should perform some fairly simple steps: slightly redesign the frame, work on reinstalling the seatposts, and so on. Installing the steering wheel and brakes of the future ATV will require special attention, continuous effort and time. When constructing homemade ATVs, it is strictly not recommended to use a brake system that has previously been used. It would be much safer to buy a new one. At the same time, the steering system can be used from an old Ant scooter or an Oka car. The final stage of creating an ATV from an Ant scooter is installing turn signals, headlights and stops.
Engine and transmission
Engines from Soviet-made motorcycles such as the Ural or Dnepr are suitable as a power unit for a homemade all-terrain vehicle. For lighter and more maneuverable equipment, you can use units from Java or IZH motorcycles, which were equipped with single-cylinder two-stroke engines.
To simplify the design of the future ATV, it is better to use the same transmission and drive together with the engine that they were originally equipped with. To design a car with all-wheel drive, you will need to install an additional gearbox. This is used extremely rarely in home-made devices, since it will be difficult to implement an additional unit without dramatically adding weight at home.
Engine
The power plant for an ATV made at home is taken from motorcycles, cars or scooters. Sometimes they even use a motor from a latest-generation walk-behind tractor, with a power of up to 15 hp, as the basis. With. However, the use of engines removed from scooters also has its benefits, since they save fuel. An ATV made this way is very light. It will not be difficult to pull it out once it gets stuck; These advantages are considerably overshadowed, however, by the low carrying capacity of the device.
Using drive trains from old motorcycles is also a good idea. The problem is that they were not designed for cooling. This automatically puts an end to long summer trips. However, the cooling system is sometimes taken ready-made from a VAZ and installed additionally. Although it’s easier to take a modern Lifan engine.
Suspension
ATVs are equipped with both rear and front suspensions. Many experts consider the simplest option to use a front suspension from a motorcycle. But since this is not always possible, sometimes they use the rear ones from different vehicles. The rear axle is shortened according to the dimensions; This solution allows you to use a differential. However, the structure becomes significantly heavier.
Steering and chassis
The steering system of an ATV can be constructed according to a motorcycle or automobile design. Sometimes both solutions are even combined.
Instead of a gear pair, it is more correct to install a chain drive. This step will simplify maintenance and make it cheaper. It is advisable to install a manual gearbox for greater maneuverability. Moreover, the rear, low and high gears on the ATV will still have to be changed manually. The input shafts from the gearbox are directed clearly to the rear and front axles; They try to take the wheels from small cars, with the appropriate type of tires on them.
Important: if you use a steering wheel from a motorcycle, then you should also take the tank from it. The steering shaft can be made from a pipe with a cross-section of 2 cm, the walls of which are no thicker than 0.3 cm. In this case, it is necessary to install a lower travel lock.
Four-wheel drive
All-wheel drive ATVs can have very decent cross-country ability, but only when they are equipped with a reliable, powerful engine and studded tires. All-wheel drive requires the use of steering mechanisms from the car. Additionally, a manual transmission and differentials will be needed. A standard frame is not suitable; a new one must be made, taking into account the engine size.
The suspension and steering system are taken from the car. A platform for mounting the gearbox must be installed on the front suspension.
Important: working with a four-wheel drive ATV is difficult, and buying a ready-made unit costs money. However, in both cases, the consolation will be increased transportation capacity and cross-country ability.
Frame
Special attention should be paid to creating the body of an ATV. This is one of the most difficult stages. Fans of homemade vehicles usually make such a component from fiberglass or fiberglass. Fiberglass is used even more actively, especially for body kits. First of all, prepare a “blank” of the body, which is obtained from strong foam. They are connected using polyurethane foam or special glue.
The next step is to apply several layers of fiberglass. Each one in turn is coated with epoxy resin. To make the body of the all-terrain vehicle stronger, metal fasteners are inserted between the layers of fiberglass. The finished product needs to be thoroughly dried, and then sanded and painted.
Having familiarized yourself with the main stages of work, you can consider the process of creating an ATV based on various equipment in more detail and depth.
This is what good-quality drawings of vehicles made from Ural look like. The ground clearance of the device is 0.28 m. The distance between the centers of the wheel rims is 1.25 m. The total length (the distance between the extreme front and extreme rear points) is 1.85 m.
Craftsmen can also make a homemade device from Niva or Oka. The engine, cooling system, and transmission are taken from the “donor” car. The same goes for most parts. But the frame, alas, will need to be modified. Round pipes are taken and the base for the front and rear cargo boxes is welded from them.
Additionally, eyelets are installed where the levers and shock-absorbing devices will be attached. The brackets, as already mentioned, will have to be mounted directly while working with specific components. The power plant, gearbox and clutch basket are slightly shifted relative to the longitudinal axis of symmetry (to the left). Otherwise, the horizontal angles of the longitudinal shafts on the transmission will be very large.
Frame and suspension
The frame for a homemade device is usually made independently from scratch. You can use blanks from an old motorcycle as material for the frame. The pipes from which they are made are lightweight and have the necessary strength and flexibility. As a last resort, you can choose the material yourself. The main parameter here will be weight. Excessively thick tubes or profile will make the ATV very heavy and difficult to ride quickly and maneuverably.
For suspension, you can use shock absorbers with springs from the same motorcycles. The suspension itself is shaped like the letter “A” and is movably mounted on the frame. Shock absorbers and springs should be selected in such a way that they can withstand the weight of the future car and ensure a smooth ride with good control over bumps and holes.
Steering and wheels
The steering can be partially used for a motorcycle, with the addition of two-wheel drive. The drive is carried out by adding levers and ball joints to the design, which can be borrowed from a car. The main task of the steering is accurate and comfortable steering.
Wheels for an all-terrain vehicle are best used from a car, as they are wider and will improve the vehicle’s maneuverability. The diameter of the wheels must be calculated in such a way that the homemade ATV can develop sufficient speed and also have a harmonious appearance.
Body and electronics
To install attachments, a gasoline tank and controls, you can use a motorcycle frame, which is structurally connected to the ATV frame. Particular attention should be paid to the stability of the all-terrain vehicle, its appearance and the comfort of the driver’s seat.
Don’t forget about installing all the necessary lighting and external alarm devices on your homemade ATV. The headlights, taillights and turn signals can easily be used from the same bike that everything else came from.
Look at this homemade ATV in action!
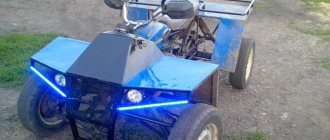
A battery-powered ATV for a child will, without a doubt, be a great gift, and at the same time safe for the environment
A battery-powered ATV for a child will, without a doubt, be a great gift that is environmentally friendly, easy to operate and does not require constant maintenance. If you want to please your child with such a gift, you have two options. The first is to buy a ready-made ATV. The second option is more complex, but will bring a lot of pleasure to those who are “friendly” with technology. As you probably understand, we mean self-assembly of a children's ATV. We will talk about how to make an ATV for a child with your own hands in this material.
If you are a creative person, then you will probably have your own ideas for creating an original model of a children's ATV. If this is a problem, you can borrow non-standard ideas from the Internet. The main thing is that you will enjoy the process and save on buying an expensive toy, because a DIY electric ATV will cost you much less than a ready-made one.
New steering
He who does nothing makes no mistakes
Preamble As planned, I decided to try to fight with our steering. It is tolerable when you drive on asphalt with clamped shock absorbers. However, when you drive on an uneven road, some serious blows fly through the steering wheel into your hands. This is called bump steering aka bump steering. And our ATV has it because whoever designed it did not at least read Dem Khammil’s book “Suspension and Brakes - How to Build a Sports Car.”
For those who are not in the know, watch the video from my last bortovik.
Actually, we need our suspension to meet these requirements
For myself, I defined the task of modifying the steering wheel as follows: 1/ If something doesn’t work out, you need to be able to return to the original version of the steering 2/ It is advisable not to cut the frame 3/ Use a minimum of inexpensive parts 4/ Refuse the steering damper if possible
Actually, because of these requirements, many options were eliminated (there was even an option to convert the front suspension to MacPherson strut - but it’s a waste of money to buy struts and knuckles from Oka for testing)
I bought rotary levers from Niva (you can also use classic ones) and started trying them out to find the kinematic diagram.
It became roughly clear where to move - but I had to sit down with AutoCAD and draw a kinematic diagram in it for an accurate calculation. One interesting thing was that I tried moving the wheel up and down and the toe-in remained virtually unchanged. One thing has become clear: the process of restructuring will not be quick.
As a side note, I’m getting the ATV back to normal for the next season. Valves, brakes and so on little things - it turned out that the Bendix does not always engage with the flywheel - the teeth on the flywheel crown were worn out. I had to turn the ring gear over - it turned out to be not very difficult, it can be removed with light blows of a hammer - and to put it in place, just heat it to 200-250 degrees and then it easily sits back in place.
Day of theoretical research Steering is not something in which you can do something at random. Or rather, you can - but you can get the result at random. Therefore, I took the geometric dimensions as accurately as I could and in AutoCAD - in order to accurately reproduce the approximate kinematics as it is now. Otherwise, there is a chance of getting either extremely sharp control - when turning the steering wheel at a small angle will cause a large turn of the wheels or vice versa, or even turning the CV joints at a supercritical angle. This is definitely not gud. In general, in AutoCAD I drew a model of the kinematics of our helmsman and began to select the location of the nodes. It turned out that, in principle, the problem can be solved - just position the lever correctly and move the attachment point of the rod closer to the center of the steering column. I am posting a video with a simulation of kinematics - there the kinematics as they are now are highlighted in green, and how they will be in purple. Any comments from smart people on kinematics are absolutely welcome! Akhtung, it is better to watch the video in maximum resolution on the entire screen and in max. quality if you want to see the details
Day 2, boring
The swing arm bipod has me stumped. The holes in them are conical and the diameter is much larger than the original tips. In general, I drilled holes to d18mm, inserted a bushing into them, welded the bushing to the bipod and drilled the internal hole to d12mm for our tip. Now I’m sitting and scratching my head - what are these bipods made of, I really want to hope that it’s not cast iron - then it’s sad and we need to invent new levers.
Day 3, hopeless It was evening, there was nothing to do. Or rather, but judging by the reviews, the levers are made of cast iron. I was thinking about ordering levers separately from steel from a milling machine; now there are a lot of CNC milling services in Moscow and they take AutoCAD files. I drew a model in AutoCAD - now I’m thinking of ordering it.
In the meantime, it became clear that the frame would have to be cut and strengthened. The problem arose due to the fact that the travel in the steering tips limits the geometry in this way - I had to remove a piece of the frame - I plan to strengthen it later.
I also modified the steering column by drilling holes according to the kinematics calculations. At the same time, it turned out that the steering column bearing had also died. I bought another 6203 2RS and matched it with an oil seal from a washing machine 22x40x8 with 2 edges - I’ll try to install it, with great hope that it will greatly help lengthen the life of the bearing.
Day 4, angry
Of course I'm not sitting in the garage for the 3rd day in a row with that damn Kazuma. This is just a storytelling device to mark stages, so to speak. And in general, today at this stage, with great effort, I overcame the desire to pour gasoline on this misunderstanding like an ATV and burn it. And I would really, really like to look into the eyes of the designer, the technologist and the deer who assembled my quad.
And everything is simple - I noticed that the steering bearing was crunching again. Well, I think, now I’ll install SKF + oil seal and everything will be fine. Naive. Pressing out was surprisingly easy, but this surprise was by no means pleasant.
The outer race of the bearing has fallen apart!!! Your division - and last time, as a money changer, I was surprised that the steering column fit into it so poorly. I put the actual SKF bearing in place and... I couldn’t insert the steering column into it, although when the bearing was not installed, it easily fit into the seat on the column. Adnaka, the boss's ass... I had to fucking cut off the top mount and then I was able to insert the column. An interesting picture emerged - the axis of the steering column was, to put it mildly, not at all close to the upper mount. See the picture for where the upper part of the steering column mount is attached.
And then... The further into the forest, the thicker the partisans. The alignment of the steering column also turned out to be very, very bad. Everything is clearly visible in the video.
In short, I freaked out, now I still have to buy a new speaker. I'll look for an even one.
Day N-1,N, N+1
I haven’t written a report in a while, are you bored? Actually, I was waiting more for the order of the levers, which were made in St. Petersburg according to my drawings. The levers arrived and were machined and painted.
Then the fitting began, checking the kinematics, I will only say that if you put the gear levers in the original holes on the ears of the steering column, the steering wheel turned out to be as sharp as diarrhea - you turned a little and the wheels turned at a larger angle. As a result, I found the correct location of the speaker on the ears (after amplifying and scalding everything). Then I spent a very long time welding the fastenings of the arm bearings - it turned out to be a very dreary task - in the end I found somewhere to mess up early - now I’m thinking - saw off with a grinder and weld it again or it will do. Actually, the result of the assembly is in the photo
It was the Xth day... Soon the fairy tale will be told, but the deed will not be done soon. However, it is being done, the process has smoothly moved from the disassembly direction to the assembly stage.
I welded the frame, strengthening the cut out places and painted everything.
I painted all the levers, adjusted all the lengths - it was a tedious process, it was necessary to find the swing points of the levers, so that the rolling plane of the levers coincided with the rolling plane A of the forks. I set everything square.
He put the square on the wheels and shook his hands. There is contact! When the square rolled, the wheels practically stopped changing toe. The square no longer flaps its wheels when rocking like an elephant with its ears)) Also, adjusting the toe-in will no longer be a gimorous procedure (no need to load your face with bags anymore).
Now I’ll slowly finish the electrics, now that I’ve disassembled the face, install a snorkel, etc. and so on. Already during the remodeling process, a lot of planned things were done - including the wheel bearings were changed again (installed by SKF - we'll see how long they last), the brake pads were replaced.
Day H - preliminary results I collected everything, snorkel, pendant, light, etc. Quad, ready for the season
I inflated the wheels to a working pressure of 7 PSI = 0.5 ATM and drove specifically over potholes! BEAUTY! The shocks to the steering wheel went away like a class, there is no parasitic steering, everything is very, very soft. At the same time, I did not specifically install a steering damper - it is no longer needed. As a result, the steering wheel became “light” and the control of the square became just like on the brands. I am mega pleased. True, now there are resource tests ahead - then it will be possible to put an end to this issue. Let's see how it will work in difficult conditions. In the meantime, I made a video comparing the operation of the front suspension in the old and new versions. Enjoy
Resource Test Day
Chief, everything is gone, chief!
We started a “tough” raid over bumps, ravines and other gullies. The modification of the suspension showed the thrill of the modification itself - the ride was very comfortable. However, after a powerful rubilov, it became clear that something was wrong with the helmsman - an inspection showed that the levers were bent - the life tests failed. Apparently ST20 steel is too soft for such harsh loads, it’s good that it didn’t fall apart along the way. When dismantling the house, it also turned out that the bearings in the arm swing device had also swallowed dirt (even though they were closed) and “crunched.” Pichalka, we need to think further. Replace the bearings with 2 RS ones with a rubber seal, but I don’t know what to do with the levers yet, I’ll try to install the original ones from Niva - if they fail too, then I’ll have to think again.
Episode 4 - A New Hope
In a galaxy far, far away...
In general, I figured out why the levers were bent - it turned out that the ST20 steel was very soft, and the lever arm turned out to be large. I came up with a couple more ways to remake the levers by shortening the shoulder. However, I decided to install the original levers, which I drilled out and welded in bushings and decided to try it - and lo and behold, they didn’t bend, although today they cut down a hard raid of 90 km, with jumping over logs, etc. In addition, I made the steering a little more “sharp” and turned at a larger angle than stock (but did not reach the critical angles of the CV joints) - it became harder to steer, but in the forest it’s just a thrill to maneuver between the trees. If it doesn’t break in a couple of rides, it will be just super, because there are no impacts in the steering wheel with the new steering wheel, which of course is great
Undo Still, welding a steel bushing into malleable cast iron was a so-so idea, but it still broke. I don’t want to bother with levers again, I need to roll. I decided to dismantle the structure (in the winter I might tinker with a new one again - it’s too comfortable with a new steering wheel) and put back the simple rods + damper back. But he didn’t take the original ones again, but decided to follow in the footsteps of installing rods and steering ends from the car. At first I wanted to install the tip and rods from 2110 - but it’s too cumbersome to cut the rod, make threads, etc. People criticized the rods from the MB-190 for being flimsy and for the fact that they dangle. As a result, our solution is in the form of rods from BMW E28-E34 (part code FEBI 08851). From observations - the shank of the finger is D10mm (someone's flimsy) - the finger itself is on a cone from 12 to 14 mm (taper like 1:10). Actually, you need to make cones in the fist and steering column and then it will sit rigidly and will not break. The angle of rotation of the fingers is even greater than that of relatives and definitely greater than that of the 2110 tip - this is buzzing - which means you don’t have to be afraid of breaking your finger out of the tip. The adjustment range seems to be more than enough and in general the design does not seem to be flimsy - the thread of which is screwed into the rod is generally 14mm - this is more than the original ones. In general, we will try to implement it.
I hope there won’t be a continuation...
How to make a children's ATV with your own hands?
Decide on the appearance and design of your brainchild. In principle, you can assemble a children's electric ATV of any size and any complexity - everything will depend on your abilities and technical skills. You can stretch out the process over months, but if you want to please your child quickly, choose a simpler design; it can be modified as the child grows up.
You can take a donor model as the basis for a future ATV - for example, an old ATV or a children's car, or you can make the frame yourself. If you choose the second option, an accurate drawing is required. When making it, take into account the possibility of upgrading the ATV in the future - the frame should have a strong suspension. You can draw a drawing of the frame of a children's ATV yourself or take an idea from the Internet. When making your own ATV frame, pay special attention to the quality of the welding seams. The material for the frame is a square profile of 25x25 mm (or another size), as well as a ¾-inch pipe.
Preparation for work, tools and equipment
First of all, you need to carefully consider when, where and for what purposes the future ATV will be used - hunting and fishing, motorcycling in nature, transporting goods, etc. It is on this basis that you need to make a choice of a “donor” vehicle, deciding how powerful the engine is needed, what kind of suspension is suitable, what kind of trunk, etc.
You can take ready-made drawings from the Internet, create them from scratch yourself, or combine both options and ready to remake them at your own discretion.
List of required tools:
- welding machine;
- Bulgarian;
- drill;
- a set of keys;
- various small tools - calipers, hammer, knife, screwdrivers, pliers, etc.
To make your own frame, you will also need equipment for bending pipes. If you don’t have one, you can rent it or outsource the necessary work to another craftsman. Only with remarkable skill can you bend the pipes manually by heating the bend with a gas cutter or torch.
- engine;
- frame;
- rear and front suspension;
- steering;
- brake system;
- cooling system;
- muffler;
- electrical equipment - battery, headlights;
- body, body kit
Wheels
It’s better not to skimp on wheels and buy new ones right away - go-kart wheels or a set of wheels for a large garden wheelbarrow will do. For an older child, it is better to take wheels with a wide tread - they are perfect for off-road use. Don't spare money on stamped discs - at least on the simplest ones.
An excellent solution for a children's ATV is rear wheel drive from an electric motor through a ready-made or homemade gearbox. Consider also the steering system - this will allow the child to easily handle the ATV and increase its safety.
Motor and battery
These components are selected taking into account the capabilities and wishes of the young rider. There is no limit to imagination here - from the screwdriver motor to infinity. It is important that the installed electric motor makes it possible to develop the required speed - for children 5-8 km/h is enough, for older children it is interesting, naturally, the speed will be needed more. When choosing a battery, consider its capabilities. It should be installed in such a way that it would not be necessary to disassemble the ATV for recharging. You can use a battery from a donor scooter, uninterruptible power supply, or another suitable one.
When all the components are installed, take care of the aesthetic component - after all, for a child, the appearance of his vehicle is primarily important. You can use body kit elements from an old ATV or develop your own - it all depends on desire, financial capabilities and availability of free time.
A children's electric ATV with their own hands is a pleasure for adults and a joy for a child from owning a unique personal transport. published