Complete disassembly of the engine is necessary if serious damage to the connecting rod, crankshaft and its bearings is noticeable. This happens, for example, when the engine jams, or general severe wear of parts (rumble, hum during operation). The engine has to be completely disassembled ("halved") also in case of wear of the left crankshaft oil seal (drop in power, difficult starting, increased smoking due to oil leaking into the crank chamber from the gearbox).
1. Remove the cylinder and piston from the engine.
2. Drain the oil and remove the power unit from the motorcycle.
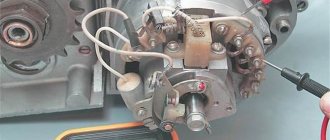
3. Having removed the left crankcase cover, remove the motor transmission, clutch and trigger mechanism.
4. Remove the right crankcase cover. Here you should remove the generator along with the right crankshaft oil seal.
5. Remove the drive sprocket of the main gear.
6. We disassemble, as far as possible, the gearbox.
7. On the right side, use a screwdriver to unscrew the screws connecting the crankcase halves and unscrew the nuts of the two bolts.
8. Using a punch, we knock out two installation sleeves to half their length.
9. Apply light blows with a mallet to the plane of the connector of the crankcase halves and, using a mounting spatula, (putting it into the grooves of the front and rear of the engine), separate the halves.
Do not push the crankcase halves apart with a screwdriver inserted into the connector. This will lead to damage to the joint planes and leakage of the crankcase.
10. Using a screwdriver, unscrew the screws securing the locking plate of the gearbox bearings.
11. Remove the plate.
12. Remove the adjusting rings-washers, writing down their number and location.
13. Remove the left half of the crankcase from the crankshaft, tapping it with a mallet if necessary.
Be careful, the aluminum alloy of the crankcase is quite fragile.
14. Using light blows on the outer ring, knock out both ball bearings of the gearbox shafts.
15. We knock out the rolling pins that guide the gearshift forks from the crankcase.
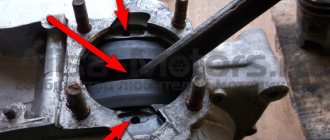
16. Using pliers or pliers, remove the outer retaining ring of the crankshaft ball bearing.
17. Remove the adjusting washer(s).
18. Use a soft metal drift from the side of the crank chamber (through the oil seal hole) to knock out the ball bearing.
19. Use pliers to remove the inner retaining ring.
20. Take out the split spacer ring.
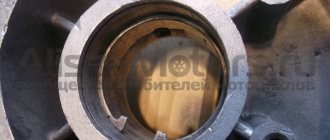
21. Select suitable mandrels for pressing out the left crankshaft oil seal.
22. Through them, with light blows, knock out the oil seal along with the figured washer and the main bearing ring towards the crank chamber. We remember which side of the oil seal was facing the crank chamber.
Similarly, we press out the outer race of the right main bearing.
23. If the crankshaft main bearings need to be replaced, remove them with careful blows of a chisel or a suitable puller.
1. We wash all parts in kerosene or white spirit and inspect them.
There should be no cracks on the housing parts, no signs of scuffing in the bearing seats or broken threads.
The right and left halves of the crankcase can only be replaced as a set.
2. Clean the mating surfaces of the crankcase from any remaining sealant and gaskets.
3. Polish the gearshift forks to a mirror finish.
4. Using a scraper and sandpaper, remove burrs and other production roughness from the crankcase halves. After this, we additionally wash the body parts with water and detergent.
Repair of the crankshaft is possible only in a specialized workshop.
5. Fill the left oil seal with grease and install it together with the bearing ring, split spacer ring and shaped washer in the left half of the crankcase.
6. Install the internal retaining ring.
7. Liberally coat the main bearing rollers with grease so that they do not protrude from the cage.
8. Having cut it out of a plastic bottle, roll it up and install the mandrel for the left oil seal.
9. Place the crankshaft with the left end up on the supports.
Rocking slightly, carefully place the left half of the crankcase onto the crankshaft. The crankcase connector should be in the plane of symmetry of the connecting rod.
10. Take out the mandrel.
11. Install the lubricated ball bearing on the shaft.
19 mm tool head
press it in until it stops.
12. Install spacers and retaining ring.
13. Lubricate the connecting rod bearing with 4-6 drops of engine oil.
14. Check the ease of rotation of the crankshaft.
15. Further assembly of the engine is carried out in the reverse order of disassembly. At the same time, we apply a heat-resistant (not lower than 200°C) sealant to the grease-free planes of the crankcase connector and the threads of the bolts. However, first we assemble the engine without sealant to make sure that the crankshaft and other parts rotate freely. All bearings, their seats and gears must be lubricated.
The sealant should be applied in a thin bead without breaks.
16. When connecting the crankcase halves, carefully tap the parts with a mallet.
It is enough to cover the paronite gaskets with a layer of grease.
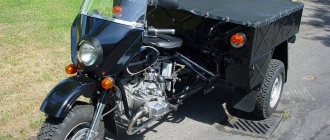
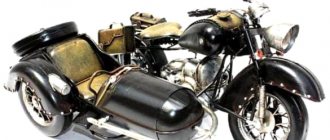
The IZH Planet 5 motorcycle, created in 1987 by the Izhevsk plant, is still popular among motorcyclists. This is a very high-quality and reliable bike, characterized by durability, simplicity and affordability. Disassembling the IZH Planet 5 engine is quite simple even for amateurs. The design of the motorcycle itself does not contain complex elements.
Planet 5 is unpretentious to weather conditions. If you want to start the engine in a cold winter, it will surprise you, even if it is -30 degrees outside the window. Moreover, the motorcycle was designed to ride on various types of roads, which makes it very passable and an excellent assistant in agricultural work.
Like its counterpart, Jupiter 5, IZH Planet 5, whose engine performance is not much inferior to its “brother,” has a strict classic style. However, it has a number of advantages over Jupiter, the main of which are:
- single cylinder engine;
- disassembly and repair of the gearbox without removing the engine;
- presence of one muffler.
However, there is also a big disadvantage . The Planet's crankshaft is much more massive, so it operates at lower speeds, which makes it less powerful. Although the design of the IZH Planet 5 engine is practically no different from the Jupiter one. True, breakdowns occur no less frequently, so if you switched from one motorcycle to another, there should not be any special problems with operation and maintenance.
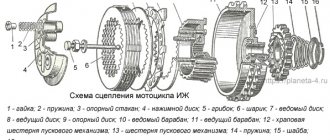
IZH Planet 5 engine diagram
| 1 - spark plug; | 2 - cylinder head; |
| 3 - cylinder: | 4 - piston; |
| 5 - piston ring; | 6 - piston pin: |
| 7 - crankcase; | 8 — channel for lubrication of the main bearing; |
| 9 — roller bearing; | 10 — left oil seal; P - left cover; |
| 12 — motor chain; | 13 - ball bearing; |
| 14 — crankshaft sprocket: | 15 — outer drum of the clutch; 16 — clutch disc; |
| 17 - inner drum: | 18 — pressure disk; |
| 19 — spring; | 20 - shaped nut; |
| 21 - pusher; | |
| 22 — ball bearing; | 23 — trigger gear; |
| 24 — gear shift lever; | 25 — trigger lever: |
| 26 — trigger shaft; | 27 — gear shift shaft; |
| 28 — trigger sector; | 29 - spring: |
| 30, 31, 32. 39, 40, 42 — gearbox gears; | 33 — gear shift fork; |
| 34 — emphasis; | 35 — gear shift shaft; |
| 36 — gearbox cover; | 37 — installation sleeve; |
| 38 — right cover; | |
| 41 - intermediate shaft; | 43 - ball bearing; |
| 44 - roller bearing: | 45 - secondary shaft; |
| 46 - input shaft: | 47 — clutch adjusting screw: |
| 48 - worm ball; | 49 — clutch worm; |
| 50 — cap of the secondary shaft nut; | 51 - oil seal; |
| 52 — asterisk; | 53 - generator; |
| 54 — right oil seal; | 55 — roller bearing; |
| 56 - gasket; | 57 - crankshaft; |
| 58 - bypass channel; | 59 — exhaust window; |
| 60 - decompressor |
Specifications.
The serial Planet 5 had the following main characteristics:
- base – 1.45 m;
- frame – welded, tubular;
- dimensions;
- Length – 2.20 m,
- Width – 0.81 m,
- Height – 1.20 m,
- weight – 160 kg;
- maximum load – 175 kg;
- engine – two-stroke single-cylinder;
- cooling option – air;
- cylinder diameter – 72 mm;
- working volume – 345 cubic meters. cm
- engine power> – 22.0, hp;
- maximum speed – 120 km/h;
- fuel consumption – 5.0 l (90 km/h)
- mixture ratio of oil and gasoline (A 76) – 1/30;
- battery voltage – 12 volts;
- clutch - multi-disc;
- The gearbox is four-speed.
These parameters and engine performance provided the motorcycle with high traction characteristics at low speeds, which allowed for confident movement, especially on rural roads.
Assembly and disassembly
Before you think about power, you need to understand motorcycle maintenance. Often, chasing speed and appearance, owners forget about the basic rules for operating their pet. Due to negligence, and not only, various types of breakdowns occur. You can troubleshoot problems yourself. Considering that disassembling and assembling the IZH Planet 5 engine is very simple, they can be done at home. However, it is recommended that you consult the factory-produced motorcycle operation and maintenance book.
There are cases when the maintenance book was lost long ago, or was not received at all upon purchase. In this case, here is a simple procedure for disassembling the engine:
It should be noted that the cleaner your workplace is, the better the repair will be done, since dirt that gets inside the engine can make it difficult to operate and even cause another breakdown. Don't be too lazy to wash the engine well before work .
Write down or mark the progress of your actions. This will help with assembly. Group the parts in the order they are disassembled and assemble them by location. The more organized the disassembly process is, the faster you will assemble the IZH Planet 5 engine, the technical characteristics of which will once again delight you.
- So, the first thing you need to do is remove the exhaust tube. It will be most convenient not to unscrew it completely, but only from the engine side and tie it to a stable part.
- Now proceed to remove the cylinder cover, which is secured to four bolts and the cylinders themselves, being careful not to damage the gaskets. Damage to the gaskets will lead to loss of engine pressure and compression.
- Remove the tube from the chain boot.
- Knock out the front pin strengthening the engine. Knock it out carefully; the bent part will not fit back in.
- Now proceed to the engine mounts. Remove all nuts and bolts from the rear of the engine.
- When the engine is not secured, move it to the side on a stable surface. There are seven bolts on the pallet that need to be unscrewed. Then carefully remove the tray. Remove the outboard flywheel plate and gasket and secure the engine. It is better to fix the engine on a workbench; if you don’t have one, then a massive table will do.
- Let's move on to the take-out flywheel. To loosen the bolt holding the flywheel in place, you will need a socket wrench and a long, sturdy pry bar. The carving on the cap is quite soft; if you overdo it, you can tear it off.
- Then we separate the halves of the pallet. They will still be needed, so we don’t put them away in the “far corner”.
- Now we move on to the take-out flywheel and veneer. They are easy to remove and do not require any special skills.
- Having remembered the locations of the adjusting washers, remove the front, rear and follower shafts in sequence.
- Let's move on to the crank chamber covers. After unscrewing the pins, carefully remove the covers and rings.
- Then you need to return to the pallet again. Remove the crankshafts from its halves.
- Next, remove the bearings of the crankcase halves. Unscrew the race and screws with the crankshaft oil seal.
- And the last step. Remove the installation rings and knock out the seals. Assembly is carried out in the reverse order, but it is necessary to tighten the bolts and studs with certain efforts. Otherwise, there should be no questions about how to assemble the IZH Planet 5 engine.
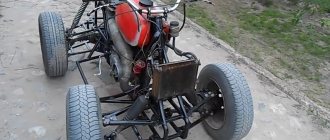
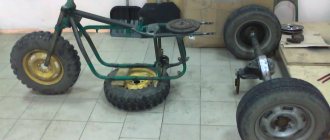
Frame from scratch
The frame chosen for the project was quite interesting. Visually complete stock. I'm sorry, there is no photo of the frame in its original form...
Frame from the Sh-53 motorcycle (motorcycle for road racing based on the planet). I got the frame with a pendulum. I think the pendulum should be given special attention.
The pendulum is on two roller bearings, 50 mm longer than the standard one. And no collective farm! There are no “bunch of washers”, welding seams a la “Uncle Vasya’s neighbor welded for a bottle.” Everything is done on bushings, the extension is done quite competently, the pendulum is reinforced with additional gussets. It is likely that the pendulum is factory-made. It's very neatly executed. The rear engine is mounted on the same axis as the pendulum. 3 mm thick plates with holes (and not on the frame and with slots, as in the factory version. How to install the engine assembled with the gearbox, you ask? But more on that later...)
Well, the rest is completely stock.
The overcooking of the frame was planned to be global, so the frame was cut and welded on a slipway so that there would be no distortion and violation of the basic geometry. It was immediately decided to switch to mono suspension. For these purposes, the pendulum was welded, a thrust frame and a mount for the lower end of the shock absorber were welded. The front end of the shock absorber is mounted in the lower part of the upper frame tube. The rear part of the frame has been shortened and reconfigured; glove compartments are not in the plans. Let me make a reservation right away: the angle of the seat tubes has not been changed. No raised tail!
All unnecessary fastenings were removed from the frame (under the side trailer, fastening the central step, rear fender, fastening the pump and the second ignition coil, etc.). All factory seams, upon closer inspection, turned out to be of good quality, but without proper processing, which I did without thinking. Double-seam welding of the frame, thorough cleaning...
I cook and clean it myself. After all, I have my own blacksmith shop and a decent set of professional tools and required professional skills. Yeah, I'm a blacksmith. The most real one. I'll tell you separately sometime)))
I clean the frame with a grinder (yes, you know, there is a compressor with a capacity of 520 l/min, there is a sandblaster, but I still can’t finish the working part with ceramic nozzles. Eh, laziness... I’ll have to warm up with a grinder and a drill).
The frame wasn't cleaned up a bit today, but that's not the point. The general concept is visible.
Soon I’ll tell you “how to assemble a monoshock absorber with a double spring.” Well, this is my version of course.
Good luck to all!
Tags
- Frame
- custom
- alteration
We recommend reading:
Tips, instructions, important features of the process
Hello reader, before you start reading this, I recommend stocking up on more than one cup of tea and a lot of cookies, because the article, in my opinion, is included in the “dull” group because there is a lot to write, and I would like not to miss anything in order in the future, the person who read this did not make the mistakes that I made. So, let's begin. I didn’t write about all this in the description, because there’s a lot to write, and there’s no point, it doesn’t fit into the description, but it’s in a separate article, and so, as was written earlier, the motorcycle was “revived” after a long 5 -year-long downtime, as I remember now, the weather was bad, it was raining, in general it was early spring, my friend and I remembered it, and something became interesting, is it true that our motorcycle industry is as bad as they say, that motorcycles are not reliable, they say, as long as you ride, you lie under it. However, closer to the point, the motorcycle started up almost immediately, it was necessary to do basic things, pour fresh gasoline, blow out the spark plug, check the ignition and electrics in general, because the downtime was not short, and anything could happen, and he got up to this downtime not just like that, I knew about it too. But strangely enough, the motorcycle started up immediately, without problems or complaints, it worked smoothly, and it smelled, truly smelled like our two-stroke engine smell, I think everyone who lived in a village or region knows what our Planet or Jupiter smells like when passing by , this is a smell that takes you somewhere to childhood or something, but let’s return to the topic. They started the motorcycle, I rode literally 2 kilometers and it stopped, the coil got hot and eventually burned out, I had to roll it, I struggled with it for about a week or two, took it to mechanics and just knowledgeable people, but no one could understand what was wrong, but there was a person who could still do it. The problem was in the wires on the generator, they were mixed up in phases, anyone who knows the structure of the generator on the Sovki will understand what I mean. Because of this, the ignition coils (popularly called "women") burned, and often also the spark plugs. Then the season went on, the whole season without a single breakdown or a single complaint, the motorcycle surprised me more and more every day, and completely
Change in appearance.
Despite the fact that the design of the fifth Planet model was probably the most interesting among all domestic motorcycles, tuning the IZH Planet - 5 motorcycle most often began with the appearance. The main reason for this was that work to change the external image can be classified as the simplest, not requiring deep technical knowledge and skills.
For this purpose, the following main work was carried out:
- double-sided arches and knee guards were installed;
- the windshield was replaced;
- higher wings were mounted;
- direction indicators were replaced;
- the muffler pipe was replaced;
- enlarged side mirrors were installed.
Complete or partial tuning operations to change the appearance immediately made the motorcycle recognizable and different from its serial counterpart.