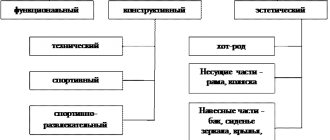
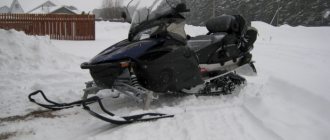
On caterpillar tracks
Track supports are used more often than others, simultaneously performing the function of propulsion. The reason is high efficiency and reliability. This design allows you to reach high speeds while maintaining stability and maneuverability. There are several options for how to make tracks for a snowmobile with your own hands:
Read also: How to make a histogram in Microsoft Excel
- from a conveyor belt;
- from truck tires;
- from driving V-belts.
The advantages of a snowmobile that is designed by yourself:
- Price. Making a homemade snowmobile will cost much less money than buying factory-made equipment.
- The opportunity to make the snowmobile of your child’s dreams (the desired design, power, etc.).
- High reliability. Every parent wants only the best for their child, so the snowmobile will be developed with high quality. In turn, not every manufacturer pays attention to the level of safety in pursuit of increasing cash flow.
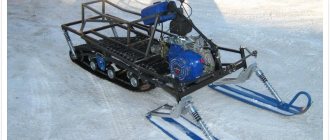
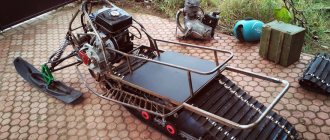
The main parts that are needed to develop a homemade snowmobile are: power unit (engine), fuel tank, frame, tracks, track, control and seat. In addition, there must be a drawing according to which all the parts will be assembled into one whole. First, the frame is welded from pipes and angles, then it is connected to the steering mechanism. Next comes the installation of the engine. The location of the carburetor should not be far from the fuel tank. After installing the engine, tank and mounting the fuel system, we proceed to installing the track. You can buy the caterpillar separately or make it yourself by first watching the instructional video. The driven axle is installed at the rear of the frame, the drive axle is installed in the middle of the vehicle. The final stage includes connecting the gas and brake cables.
What it is?
Technologically, certain very important points can also be highlighted here:
- the presence of a height-adjustable steering wheel;
- simplicity, safety and functionality of management;
- soft and smooth operation of the brake mechanism;
- limited engine power, which prevents strong acceleration;
- high stability associated with the location of the center of gravity in models at a low altitude from ground level.
A snowmobile for a child is generally similar to another popular winter device - a snow scooter. Only instead of a mechanical driving force, an electric or gasoline motor is used here. In addition, such models actively use various control options and more reliable brakes that can easily provide a quick stop.
The snowmobile itself is a vehicle designed to travel on snow. It is equipped with special runners that provide stability when moving on snowy roads.
Children's models of snowmobile equipment that go on sale are usually supplemented with an external controller - a control panel - capable of stopping the equipment in an emergency. Such parental control is very useful in the initial stages, when the child is just learning new equipment.
Adjustment of the steering wheel in children's models is provided on an individual basis, which greatly facilitates the use of riding equipment for children of different ages.
General rules of constructions
Homemade products for driving on snow are varied in appearance, size, layout, power, and even the principle of movement. But in each variety there are components that provide the properties necessary for snowmobiles, namely:
- Don't fall into the snow.
- Move along the surface with minimal friction and in the desired direction.
Obviously, the probability of sinking into the snow and the friction force depend on the weight of the unit, the contact area, and the shape of the surface of contact with the snow. Of course, the condition of the snow has its influence, but this must be taken into account.
To fulfill its main purpose, the following components are always present in the design of a snowmobile:
- supports in the form of runners, wheels or tracks to support the weight of the structure with passengers on the snow surface,
- engine with gearbox, transmission device and fuel tank,
- propellers pushing the structure along the snow surface,
- steering device that changes the vector of interaction with snow to turn,
- frame on which all components are mounted.
Making homemade products is simplified by the availability of parts from specialized equipment. Often spare parts are taken from Buran snowmobiles or any tools and vehicles with motors: scooters, motorcycles, walk-behind tractors. The scope for creativity when creating each node is huge. There are many varied and proven solutions for every detail.
READ How to Change Line on a Huter Electric Trimmer
Kinds
All existing versions of snowmobiles produced for children can be divided into several categories, according to their technical characteristics and design features.
- Children's snowmobiles with electric drive
. They are equipped with a rechargeable battery that can maintain the operation of the equipment for a long time. They are environmentally friendly, low noise, and safe for children of all ages. When stored at home, such equipment does not emit harmful substances into the atmosphere. The battery is easy to replace after use. Such models practically do not require complex or expensive maintenance.
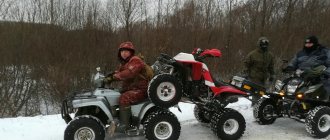
- ATVs and all-terrain vehicles
are a universal solution for any age. Recommended for year-round use. Hybrid solutions are equipped with a single chassis with replaceable modules. For example, the package may include wheels for summer driving. Rear tracks exist for use as an all-terrain vehicle. There are special skis required when operating in snowmobile mode. Hybrids are produced mainly in gasoline versions.
- On gasoline
. They are equipped with modern and reliable gasoline engines, are energy independent, but cannot be called environmentally friendly. Such models are recommended for use by teenagers and are equipped with quite powerful motor options.
But you can also find the simplest options that are safe even for younger students.
Let's look at some features of battery and gasoline models in more detail. Electric, environmentally friendly models are most often developed independently or presented as a concept. Can be produced in limited editions. The batteries they use are usually powerful, similar to those installed in a car.
.
Maintenance-free solutions used in such an energy carrier minimize losses associated with electrolyte evaporation, which also contributes to a significant improvement in the overall environmental friendliness and safety of the equipment.
Gasoline children's snowmobiles are widely represented on the market in versions from well-known companies specializing in the production of motorcycle equipment. Such models are equipped with two-stroke or four-stroke engines and warm up easily and quickly even in the cold. The equipment's maintainability and ease of maintenance make them a good choice for winter skiing.
.
Gasoline snowmobiles for children typically use one of two types of cooling systems: air and water type. In the second case, the environment acts as a source of cold supply, namely fallen snow.
When choosing fuel, you should give preference to unleaded options, which can significantly extend the life of the engine.
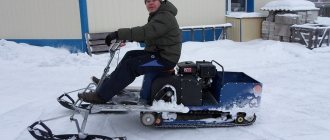
How to make a snowmobile from a chainsaw?
Snowmobiles are compact but quite passable units that have long been actively used by residents of regions with large volumes of precipitation. However, not everyone can afford to purchase this unit. Because of this, engineering enthusiasts are forced to design their own snowmobiles, which is not that difficult to do. The main thing is to carefully prepare for assembly and strictly adhere to the correct procedure.
READ How much oil to fill in gasoline for trimmer
What skills are needed?
You don’t need any special skills to assemble a homemade snowmobile, but it is advisable to know how to work with welding and have a welding machine. To use the diagrams and drawings provided, it is advisable to be able to understand them.
Read also: What words are written with a capital letter?
Rack
Steering ski: 1 – runner (nylon, sheet s20, from a children's snow scooter); 2 – spring (normally stretched, from the rear shock absorber of the moped); 3 – spring support; 4 – undercut (duralumin corner 20x20); 5 – spring cover (angle 35x35); 6 – fastening the spring to the cover (M8 bolt with washer); 7 – support lever (pipe 30x30); 8 – spring for fastening the rack-fork to the ski lever (steel, sheet s2); 9 – spring for attaching the support lever to the ski (steel, sheet s2); 10 – axles (M8 bolt, 2 pcs.); 11 – steering knuckle stand (bicycle steering stand with crown and part of the fork); 12 – steering bipod (steel, sheet s4); 13 – fastening of the steering bipod (type M16); 14 – fastening the spring bearing and the lever spring to the ski (M5 bolt with a countersunk head, 7 pcs.); 15 – lever bushing (steel pipe with a diameter of 30 mm); 16 – plain bearing (nylon bushing, 2 pcs.); 17 – stand bushing (steel pipe with a diameter of 30 mm). In the top view, parts 11, 12, 13 of the steering knuckle are not shown.
For the rack, take several 3x3 cm corners and connect them to each other using metal fasteners. To create a platform, you need to attach a sheet of metal to the connected racks. This will be the place to install the gearbox and chain drive shaft.
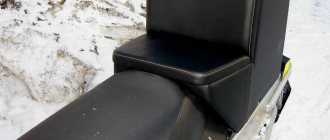
Don't forget about the seat support. To do this, you need to take a steel module and weld it to the main frame. The module does not have to be large.
Using a beam, connect the front of the frame and the front axle. For these purposes, you can adapt a standard water pipe, which has a radius of at least 1.5 cm. It is clear that this should not be a metal-plastic pipe, but a metal one. Weld the steering wheel bushing at the end, and attach the stand in the middle. This stand will play the role of a subframe for the engine.
Be sure to attach small stiffening ribs in the form of gussets in the places where the racks are attached. This is necessary to strengthen the structure and provide it with a longer service life.
Inflatable wheels
In terms of time consumption, the second most attractive design after snow scooters and sleds is a homemade snowmobile made from a chainsaw on wide inflatable bladders from the wheels of a truck or tractor. For strength, a uniform layer of liquid rubber is applied to their surface or another flexible and waterproof material is glued. Chains are placed around the circumference at equal distances from each other across the chamber or crossbars are firmly attached to increase traction. Wheel rims can be used for bicycles , motorcycles, or made yourself.
If the inflatable structure does not have runners, then it will be able to ride on the ground even without snow. Frames can be installed on such all-terrain vehicles along with engines from Izh, Ural or Dnepr motorcycles. The disadvantages of the design are dimensions, weight and a high degree of vulnerability of the wheels, but this does not affect the popularity of high-speed homemade pneumatics.
The design and principle of operation of a homemade snow scooter
A snowmobile consists of several elements:
The operating principle of the device is as follows. A power unit mounted at the rear or under the operator's seat (the engine from a chainsaw, trimmer, or other device) causes one or a pair of wheels to rotate.
They push the structure forward, and it glides over the snow thanks to a pair of skis, which reduces friction and evenly distributes the load on the snow mass. The operator sits on the seat and selects the direction of movement using the steering wheel, which also ends with a single ski.
The basis of a snow scooter with a motor is a power plant - an engine from a trimmer
Accessories
To periodically replace worn-out skis, you may need other accessories. For example, a set of skis may not include a special kit (kit) for installing new ones.
Another equally important attribute is ski pads. They expand the surface of the sliding support, and their width, depending on the model, starts from 250 mm, length from 1200 mm. With them, your snowmobile will go even faster due to its high structural strength and protection from damage.
True, as a rule, this has a bad effect on the maneuverability of the car, but without them there is a risk of damaging more expensive suspension parts on stones, stumps or windbreaks hidden under loose snow.
They are very easy to attach using a clamp with a screw and an undercut. You just need to clamp the pad between the skate and the factory ski, aligning all the same holes, and then insert the skate studs and tighten the nuts.
Finally, level the trim with a hammer and tighten all the nuts. In the bow, the ski with the pad is tightened with an M8 bolt through a drilled hole. Installation on foreign models of snowmobiles may differ, so all technical information about the product must first be clarified with manufacturers or dealers.
Brush and roller
The nozzle is indispensable for quickly collecting debris on the lawn. It sweeps it away without damaging the surface. Thanks to the high rotation speed of the working tool, cleaning efficiency increases. The nozzle is suitable for removing fallen leaves from the lawn, and special bristles can sweep away even small twigs and small debris.
Simple children's snowmobiles
The easiest way to make a support is to install wide skis under the frame. The option of creating a motor sleigh is especially attractive because it is assembled using a children's snow scooter and a tool with a low-power motor, such as a screwdriver, a hand-held lawn mower-trimmer, or a 2-horsepower chainsaw.
A children's snowmobile is assembled from a chainsaw without strengthening its frame, but to transport adults in winter clothes, it is worth adding strength to the structure.
Homemade snowmobile: video
There are many ways to diversify your child's winter activities, making them more varied and exciting. But one of the most favorite ways to spend time remains the use of various “vehicles” to conquer the snowy expanses.
Even the simplest ice cubes can delight children and schoolchildren. And if a children’s snowmobile is introduced into the game: a gasoline-powered ATV snowmobile, made by caring parents with their own hands or bought in a store, there will definitely be no end to the delight. Of course, the speed limit for such a device and its technical characteristics are very different from those that are relevant for adult equipment.
Popular homemade models for children look quite stylish and attractive if you put some effort into their creation. And among the purchased options you can find solutions that are attractive for both kids and teenagers. It would seem that choosing the best option would not be difficult. But in practice, finding the best solution can be quite difficult.
Ice screw
An ice drill made from a trimmer is a low-power unit for winter fishing enthusiasts, characterized by its low weight and easy transportation. In order to save money on the purchase of new equipment and the effort required when manually drilling ice, fishermen make them from old trimmers. For this you need:
- petrol mower;
- factory or homemade drill;
- improvised materials.
It is difficult to make an ice screw at home. The parts to pay attention to are the screws and the blade base.
To create augers you need:
- Calculate the sizes of product segments.
- Prepare metal blanks, mark, cut out a sector, weld the segments together. The result is a steel spring welded on one side.
- Stretch the spring by a given step on a special machine in order to weld the segments on the other side.
- Grab the flange and weld it to the pipe.
- Boil the screw connections and paint.
- When choosing auger rotation, take into account the direction of rotation of the gas-powered tool.
Converting a trimmer into a gas auger is suitable for units with a folding boom. The connection adapter is the easiest to prepare.
If it is necessary to increase the rigidity and stability of the mechanism, a durable frame is made to mount the gearbox and motor.
Motorized drills are units for making holes for installing wooden piles, laying foundations, and drilling wells. The operating principle and manufacturing method are similar.
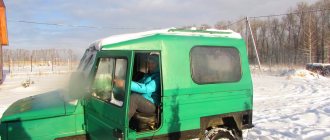
Snowmobile made from a walk-behind tractor and simple wheels
A wheeled model of a snowmobile will require a trailer. It is connected rigidly to the walk-behind tractor frame. You also need winter wheels and a little ingenuity.
A channel is used for a rigid trailer coupling. A blank about 50 cm long is rigidly attached parallel to the axis of the future snowmobile. First, holes are drilled at the ends of the channel and clamps are installed. A crosspiece is welded to the axis of the snowmobile, the workpiece is secured with a bolted connection, and locknuts are installed. The unit will act as a stopper, preventing the trailer from moving to the side.
Important! A stiff clutch reduces maneuverability. However, the snowmobile's stability improves.
Do-it-yourself snowmobile: tips on... Do-it-yourself snowmobile: tips on... How to make a snowmobile yourself at home... Making a snowmobile with your own hands is easier... How to make a snowmobile with your own hands...
The trailer will be a homemade sled on skis made of stainless steel sheets.
The trailer is placed on skis and the driver's seat is equipped. The original wheels are removed from the walk-behind tractor. Winter tires are installed instead. Sometimes they are made independently in the form of ring attachments with tracks on the original wheels of the walk-behind tractor.
Snowmobile from a motorcycle: a guide for masters
Making a snowmobile from a motorcycle is not so easy. If the assembly of previous products did not cause any difficulties, then with this design you will have to suffer. The work will require not only tools, materials and equipment, but also skills in working with a welding machine and other equipment.
Important! Motorcycles "Ural", "Izh" and "Dnepr" are the most suitable models for making a snowmobile with your own hands.
Snowmobile design technology
- A suitable frame is made from metal pipes of different diameters and steel corners. Its base is made in the form of a rectangle (its dimensions are 150 x 43.2 cm).
- The steering beam is constructed from metal corners (its dimensions are 50 x 50 x 5 mm), its parts are sheathed with dense metal overlays. The finished structure is installed in a horizontal position on a drilling machine.
Motorcycle Izh
- The frame and the finished beam are processed at the joints, special grooves are prepared for reliable fixation of the elements.
- The front crossbar of the frame is equipped with a strong corner.
- The seat is attached to the frame of the structure.
- Make holes in the side members.
- A channel is welded between the steering and middle sections.
- Select a suitable track sprocket and rubber band for further installation (suitable dimensions - 2200 x 300 mm, thickness - no more than 10 mm).
- The caterpillar itself is carefully sheathed with nylon so that the material does not delaminate during use.
Snowmobile from motorcycle
- A transmission is installed, which consists of a front and rear axle. The front one is the drive one, it consists of a tubular shaft, a track sprocket and rollers (the sprockets themselves are fixed with through bolts). The rear axle structure consists of a track drum and a tubular shaft.
- The skis are welded to the structure of the snowmobile (sheets of steel and metal corners are used for their manufacture).
The control system of a homemade snowmobile from a motorcycle is quite complex to design. It consists of:
- longitudinal traction;
- lateral thrust.
From the information presented we can conclude: a homemade snowmobile from elements of a walk-behind tractor, chainsaw or motorcycle is a reality. Any craftsman can make it. For productive work you will only need certain skills, equipment, tools and materials.
How to make a snow scooter with a chainsaw engine with your own hands
To make a children's gas snowmobile with your own hands, you can take the motor from a chainsaw. For example, common options:
- “Friendship” is simple, the device will be without unnecessary details. At the same time, the weight is 12 kg, and the power is small - 1 kW. Another disadvantage is that there are no safety covers, which is especially important for children.
- “Ural” - the weight is approximately the same (almost 12 kg), while the power is much greater - 3.6 kW. The engine is two-stroke and works even in cold weather.
- “Shtil” is a saw of medium power, but it is not so noisy. It does not produce strong emissions, which is also important for children.
Required materials and tools
To make a snow scooter with a motor with your own hands, you will need ready-made structures and installations: a gasoline engine, steering wheel, windshield, seat, chassis, shock absorbers. You can take a ready-made backrest for a snow scooter or make it yourself.
For work you need to prepare the following materials and tools:
- Welding machine with electrodes.
- Duralumin pipe D16.
- Bearings: 2 pcs. 16 mm each, 1 pc. – 10 mm.
- Plugs for plastic pipes – 2 pcs.
- Star element.
- Tracks 5 cm.
- Plywood, plastic or fiberglass (sheathing).
- Steel shafts.
- Pipe for frame with a diameter of 25 mm.
- Aluminum profile (letter “P”).
- Profile steel pipe with a cross section of 20*20 mm.
- Fastening elements (nuts, bolts).
Drawings and assembly diagram of a snow scooter
The easiest option is to take a ready-made children's snow scooter and mount the motor yourself. If you wish and have the necessary elements, you can assemble the structure yourself by taking the engine, steering wheel, making the chassis and other parts. You can take a ready-made drawing as a basis.
When assembling products with your own hands, you must follow safety regulations.
Step-by-step instructions for assembling a snow scooter with a motor consists of the following steps:
- First you need to make a frame. Using spot welding, a steel sheet 2 mm thick is connected in the middle of the entire structure. The chain drive shaft will be mounted here, as well as the gearbox.
- A seat is located in the middle of the frame. You can do this yourself - then you can save money on assembling a snow scooter with a motor yourself.
- The support base is fastened with a beam to the front axle crossbars. A water pipe with a diameter of 15 mm or more can be used as a connecting element. Bushings for the steering wheel are welded at the ends, and a stand is mounted in the middle.
- The next stage of assembling a snow scooter with a motor with your own hands is the stand. For installation, use steel corners with sides of 30*30 mm. They are connected by steel crossbars - 2 mm gussets are suitable for this. The motor will be mounted on this rack.
- The caterpillar is taken ready-made, for example, from the Buran snowmobile. The workpiece needs to be shortened by 50 cm. The caterpillar is secured with transport tape. And the gears are made from cardboard sheets 15 mm thick.
- The drive shaft is made of 14 mm thick pipe. The gears are fixed with the upper flange, and trunnions (tips) are welded behind the drive shaft.
- Now you need to attach the scooter motor. You can also do this with your own hands at home. To do this, take a working unit, weld it and mount it to the rear.
- To make sprockets, you need to take two tips, and the right one should be longer than the left one (to make a keyway that will fix the chain drive sprocket). The sprocket is secured with a pre-threaded nut.
- You can also make the snow scooter's steering wheel yourself. To do this, take a ready-made device from a bicycle or scooter. For proper installation, it is necessary to place it on the central axis so that the traction force controls the skis well.
- At the last stage, you can install a windshield, as well as headlights for illumination at night. It is not necessary to install the brakes yourself for a children's snow scooter with an electric motor or a gasoline engine, since the vehicle does not gain high speed. If necessary, you can always brake with your foot or release the gas.
A finished snow scooter with a motor, assembled with your own hands, is in no way inferior to the factory design
Upgrading homemade snowmobiles
After riding a simple snowmobile assembled with your own hands, it is impossible to resist thinking about improving transport. First of all, you can reduce the influence of frosty wind. For this, ready-made fairings and windshields are usually used - for example, like the popular Buran:
On short winter days, the light from a motorcycle or car headlight will come in handy more than once. To make the lamp shine, you need a generator. For mini-structures, it is enough to install a bicycle generator driven by a motor gearbox. High-speed devices will require more powerful lighting.
There is no limit to perfection. Once assembled, the snowmobile can be endlessly equipped with new devices for performance, comfort and reliability. Many forums on this topic exist online, allowing you to share your own experience and take into account others’ experience in designing winter transport.
Attention, TODAY only!
What is the difference between snowmobiles for adults and for children? The main differences include the size of the equipment and power, which is significantly lower on children's models. In addition, the operating principle and design of children's snowmobiles are much simpler. When developing children's snowmobiles, much attention is paid to safety measures. These include the ability to turn off the engine remotely, and often install a speed limiter. That is, the child will not be able to develop a speed higher than the same parents want, having previously set a limit. As a rule, on most models the maximum speed does not exceed 13 km/h. Also, to ensure that the child is as protected as possible, manufacturers install a “safety lanyard”. It is needed so that a child can stop the engine when falling from a snowmobile. The front track on children's snowmobiles is wide to prevent the equipment from falling over and resulting in injury.
At the moment, there are two types of children's snowmobiles: electric and gasoline. In this article we will talk about gasoline ones, as they are the most popular. Only a gasoline snowmobile will allow a child to feel that drive and adrenaline rush from riding a real adult vehicle, but only in a smaller size.
Gasoline engines are 4-stroke and 2-stroke. The former are characterized as very reliable units with a large reserve of engine life. During operation of a 4-stroke engine, a minimum of noise is generated. Also, gasoline consumption is significantly lower. In turn, two-stroke performance elements have a small weight and dimensions, very compact. There are no difficulties when carrying out maintenance or repair work. Two-stroke engines do not need to be prepared for operation (warm up).
The cooling system can be of two types: air and liquid. They both have their advantages and disadvantages. The air system is characterized as very simple, but sometimes the engine can overheat due to improper handling. Water cooling is more reliable, engine overheating is minimized. Since cooling in this case occurs due to snow, overheating occurs due to the lack of loose snow.
About the fuel system. There is an injector and carburetor system. The so-called injector uses less gasoline, works more reliably, and produces less exhaust gas emissions. But if any problems arise with the injector, it is quite difficult to make repairs in the field.
Models of chainsaws for conversion
We choose a model for remodeling - Ural, Druzhba, Husqvarna, Shtil. You can use an old tool with a worn saw blade.
The most popular option is the Druzhba saw, which has a simple device with a minimum number of components and components. The disadvantages include the heavy weight of the unit (12 kg) and the low level of safety. In addition, this technique is low-power 1 kW and is far from meeting the requirements of today - it is morally outdated even for creating a snowmobile from a chainsaw.
If we consider the Ural, then this is a more suitable modification, since it was originally developed as a powerful machine for felling forests. Therefore, in terms of technical parameters, the Ural is fully consistent with the expected loads on the snowmobile. With almost the same weight as Druzhba, the Ural saw is much more powerful - 3.7 kW.
A homemade snowmobile from a chainsaw, Shtil, Husqvarna, are very suitable options, given the sufficient power of 1.5 -3.0 kW with a low weight of 4 kg and the modern design of the tools.
Manufacturers
Among all the available brands, models from a number of large and well-known manufacturers are considered relevant. Let's take a closer look at some models.
Yamaha
This Japanese manufacturer specializes in creating sports and road motorcycles, but is also quite successful in producing reliable snowmobiles.
The most popular model is the Yamaha SRX 120
with a gasoline engine. The snowmobile is equipped with a single-cylinder engine with a power of 3.5 horsepower and has excellent performance characteristics. An emergency shutdown module is included in the package. The equipment weighs 76 kg, fits easily into a car trailer, is reliable and maneuverable.
Snow Fox
A miniature solution and a budget price make this four-horsepower unit a good choice for a child’s first snowmobile trails. The design of the equipment is standard - with two stable front skis and a rear crawler conveyor.
The light weight of the snowmobile - only 37 kg - makes this choice optimal for family walks
. The budget price provides all the opportunities to purchase a fashionable device for a child.
Arctic Cat F120
A model renowned for its ease of use. Among the options here are heated steering wheel grips and an emergency braking system.
The model is quite massive and stable. It has a weight of 75 kg, a comfortable fit, and a body protected from external influences. The engine is single-cylinder, with a power of 3.8 horsepower.
Taiga RM Lynx
The children's snowmobile Taiga RM Lynx, produced by a Russian manufacturer, has all the advantages of modern motorized technology. It is compact and easy to use. The speed limit is set at 13 km/h
. In addition, he completely copies a similar adult model in appearance. This feature is a very compelling argument for boys who want to be like their parents in everything. The package includes a single-cylinder engine with 6.5 horsepower.
It is up to the parents themselves to decide which type of snowmobile to choose for their child. Almost all serious and modern equipment, regardless of the country of origin, today costs more than 1 thousand dollars. Cheaper models are significantly inferior to their expensive counterparts in class, reliability, and degree of security.